
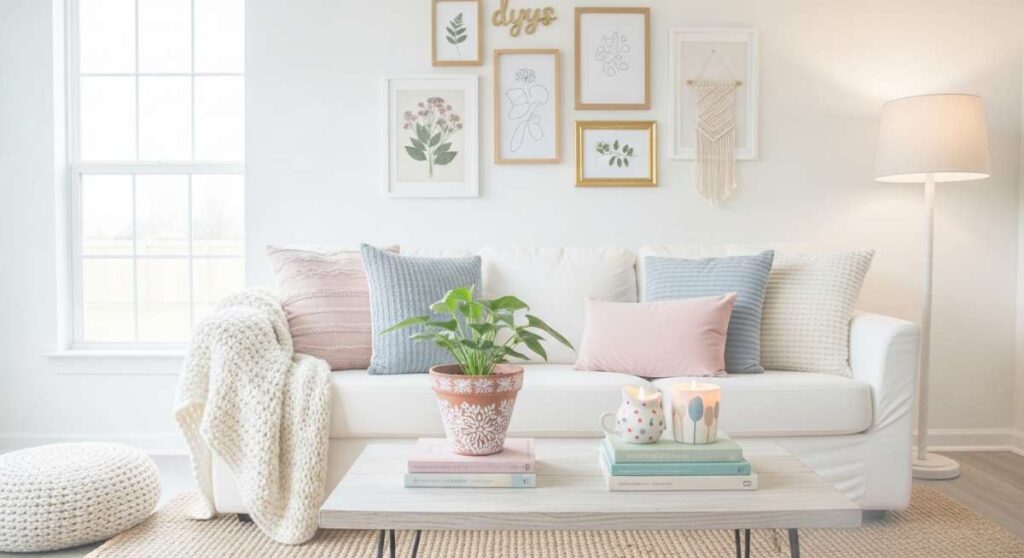
How to Create a Dreamy Home on a Budget: DIY Decor Tips That Went Viral
Have you ever spent hours scrolling through your feed, sighing at those perfectly curated homes that seem to exist only in the realm of high-end magazines? I’ve been there—clutching a lukewarm coffee, looking at my beige walls and wondering how on earth I could ever bridge the gap between my bank account and my aesthetic aspirations. We often feel that beauty requires a fortune, but I’m here to tell you that the most viral, soul-stirring homes aren’t built with a credit card; they are crafted with a bit of dirt under the fingernails and a lot of heart.
Transformation doesn’t happen overnight, but it starts the moment you decide your space is worth the effort. From the way the light hits a hand-stenciled patio to the nostalgic comfort of a Y2K-inspired bedroom, these DIY projects have captured the internet’s imagination because they are real, achievable, and utterly magical. Let’s dive into these viral tips that will help you cultivate a sanctuary that feels expensive without the price tag.
How to Grow Vibrant Front Yard Gardens for Maximum Curb Appeal
Why we love this
There is something profoundly welcoming about a home that greets you with a riot of colors and the gentle hum of pollinators. We love this approach because it transforms a sterile lawn into a living tapestry of velvety petals, spicy floral aromas, and lush green textures that shift with the seasons. It’s about the sensory experience of walking up your driveway and feeling the temperature drop slightly as the plants breathe, creating an immediate sense of peace and pride before you even reach the front door.
Essential Elements:
- Perennial flowering plants (Lavender, Coneflowers, Salvia)
- Nutrient-rich organic compost and mulch
- Defined garden edging (stone, brick, or metal)
- Drought-resistant ground covers
- Architectural focal points like a birdbath or decorative trellis
How to make it
- Assess your sunlight exposure for at least 6 hours to determine if you need full-sun or shade-loving varieties; this prevents plant burnout.
- Clear the existing sod and till the soil to a depth of 12 inches, mixing in a generous 3-inch layer of organic compost to provide a nutrient-dense foundation.
- Lay out your plants while they are still in their pots to visualize the heights, placing taller species in the back and shorter ones at the front for a layered, tiered effect.
- Dig holes twice as wide as the root ball and just as deep, gently teasing the roots before placing them in the ground to encourage outward growth.
- Apply a 2-inch layer of cedar mulch around the base of the plants, keeping it away from the stems to prevent rot while ensuring moisture retention and weed suppression.
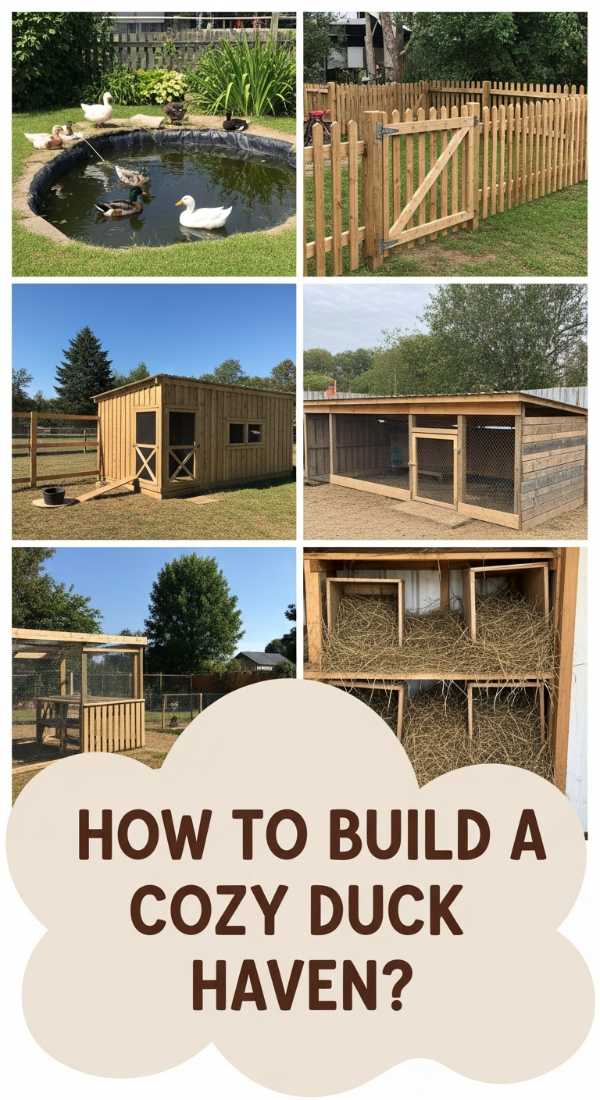
How to Build a Cozy Duck Haven for Happy Backyard Poultry
Why we love this
Watching ducks waddle through a custom-built haven brings a unique, whimsical joy to any backyard. We adore this project because it combines rustic charm with the soothing sounds of splashing water and soft quacks, creating a tranquil farmstead vibe even in a suburban setting. The sight of clean, white feathers against a backdrop of cedar wood and the earthy scent of fresh straw provides a grounding connection to nature that is both therapeutic and incredibly photogenic for your lifestyle feed.
Essential Elements:
- Elevated wooden coop with predator-proof locks
- Low-entry ramp for easy access
- Filtered pond or large recessed basin
- Nesting boxes filled with pine shavings
- Secure hardware cloth fencing
How to make it
- Construct a timber frame for the coop, ensuring the floor is elevated at least 12 inches off the ground to prevent dampness and deter burrowing predators.
- Install a heavy-duty hardware cloth (not chicken wire) around the perimeter, burying it 6 inches deep to create a secure, dig-proof barrier for the run area.
- Design a low-gradient ramp with cross-slats for traction, as ducks are less agile than chickens and require a steady path into their sleeping quarters.
- Incorporate a drainage system for the pond area using a gravel leach field beneath the basin, allowing for easy weekly flushing and cleaning of the water.
- Layer the interior with high-quality straw or pine shavings, checking for dryness daily to ensure a hygienic environment that keeps the ducks’ feathers pristine and healthy.
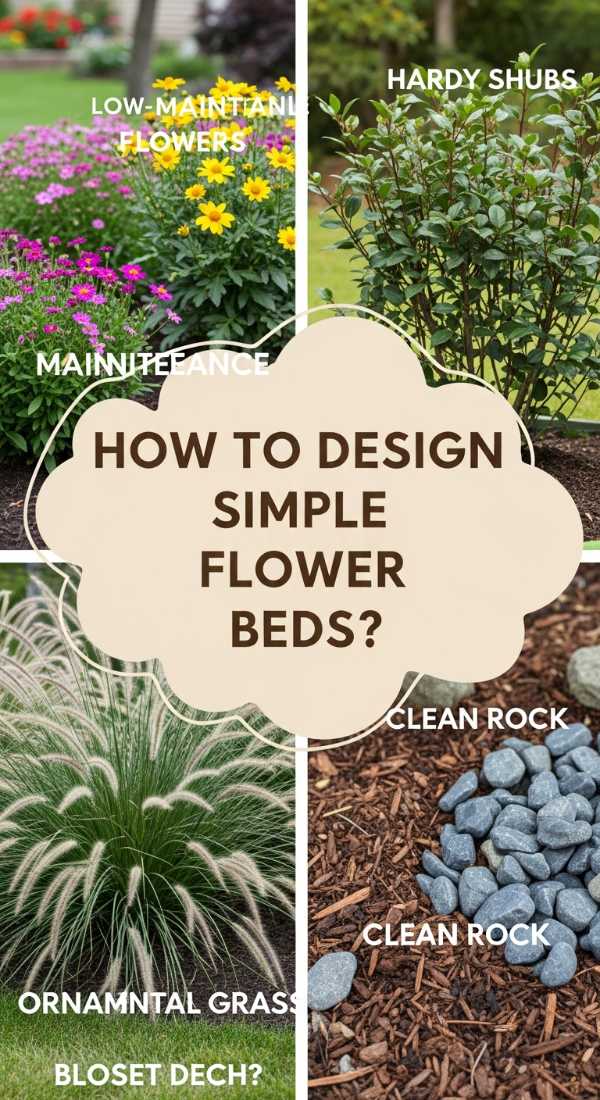
How to Design Simple Flower Beds for Minimal Weekend Upkeep

Why we love this
Modern life is hectic, which is why we are obsessed with flower beds that look professionally landscaped but require almost zero effort once established. This design philosophy focuses on the structural beauty of hardy plants and the clean lines of well-defined edges, offering a crisp, organized aesthetic. The subtle fragrance of evergreen shrubs and the rhythmic pattern of ornamental grasses create a sophisticated backdrop that remains vibrant and tidy throughout the year without demanding your entire Saturday.
Essential Elements:
- Slow-growing evergreen shrubs (Boxwood or Yew)
- Heavy-duty landscape fabric
- Decorative river rock or slate chips
- Drip irrigation system with timer
- Hardy perennials like Hostas or Sedum
How to make it
- Define your bed boundaries using a garden hose to create organic curves, then use a sharp spade to cut a clean 4-inch deep V-trench along the line for natural edging.
- Install a professional-grade weed barrier over the soil, cutting small “X” shapes only where you intend to plant to minimize future weed germination.
- Set up a simple battery-operated drip irrigation kit, snaking the lines directly to the base of each plant to ensure deep root hydration without water waste.
- Plant low-maintenance varieties like Hostas or ornamental grasses that fill space quickly and don’t require deadheading or frequent pruning.
- Cover the entire bed with a 3-inch layer of stone or high-quality bark mulch to lock in moisture and provide a polished, high-end finish that suppresses weeds for months.
How to Arrange an Inspiring Art Room for Limitless Creative Expression
Why we love this
A dedicated art room is a sanctuary for the soul, a place where the air is thick with the scent of oil paints, fresh paper, and infinite possibility. We love this because it prioritizes the “flow state,” organizing tools in a way that feels like a curated gallery while remaining functional and gritty. The visual stimulation of rainbow-sorted brushes and the tactile satisfaction of a perfectly smooth work surface invite you to leave the digital world behind and reconnect with the messy, beautiful act of creation.
Essential Elements:
- Large, sturdy work table with a washable surface
- Pegboard wall for vertical tool storage
- Natural light lamps or daylight-balanced bulbs
- Rolling utility carts for mobile supplies
- Comfortable, ergonomic stool or chair
How to make it
- Position your primary workspace near a window to utilize natural light, or install 5000K LED bulbs to ensure color accuracy during late-night sessions.
- Mount a heavy-duty pegboard across one entire wall, using varied hooks and baskets to keep scissors, tapes, and tubes of paint visible and within arm’s reach.
- Organize supplies by medium (watercolors, acrylics, sketches) in clear acrylic bins, allowing you to quickly identify what you need without rummaging through drawers.
- Create a dedicated “drying zone” with wire racks or a flat shelf to protect wet masterpieces from dust and accidental smudges.
- Include a small lounge area with an oversized chair and a mood board to serve as a space for reflection and planning before you start your next big project.
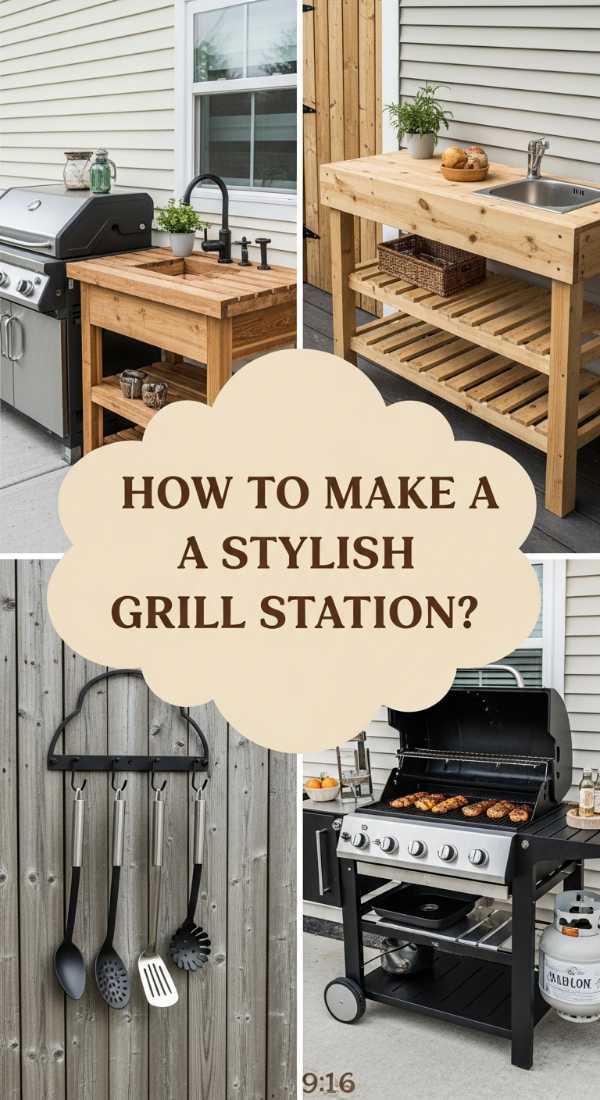
How to Make a Stylish Grill Station for Affordable Outdoor Entertaining
Why we love this
There is no better feeling than the sizzle of a summer barbecue and the aroma of woodsmoke drifting through the air. This stylish grill station turns a simple outdoor cookout into a sophisticated culinary event, providing a sturdy, handsome hub for the “grill master.” We love the blend of industrial metal and warm wood textures that make the station look like a custom designer piece, instantly upgrading your patio into a functional outdoor kitchen where memories are made over shared plates.
Essential Elements:
- Weather-treated timber or pressure-treated wood
- Stainless steel or stone countertop surface
- Built-in spice rack and utensil hooks
- Magnetic strip for grill tools
- Hidden compartment for the propane tank or charcoal
How to make it
- Build a sturdy frame using 4×4 pressure-treated posts, ensuring the height is a standard 36 inches for ergonomic cooking comfort.
- Clad the sides with cedar pickets or reclaimed wood, leaving a small gap for ventilation and a large hinged door to easily swap out propane tanks.
- Install a heat-resistant countertop, such as granite remnants or a thick stainless steel sheet, to provide a safe and sanitary prep area next to the heat source.
- Secure heavy-duty casters to the legs if you want a mobile station, allowing you to move the grill depending on the wind direction and smoke path.
- Finish the wood with a high-quality outdoor sealant and add a magnetic tool bar to the side for instant access to tongs and spatulas while cooking.
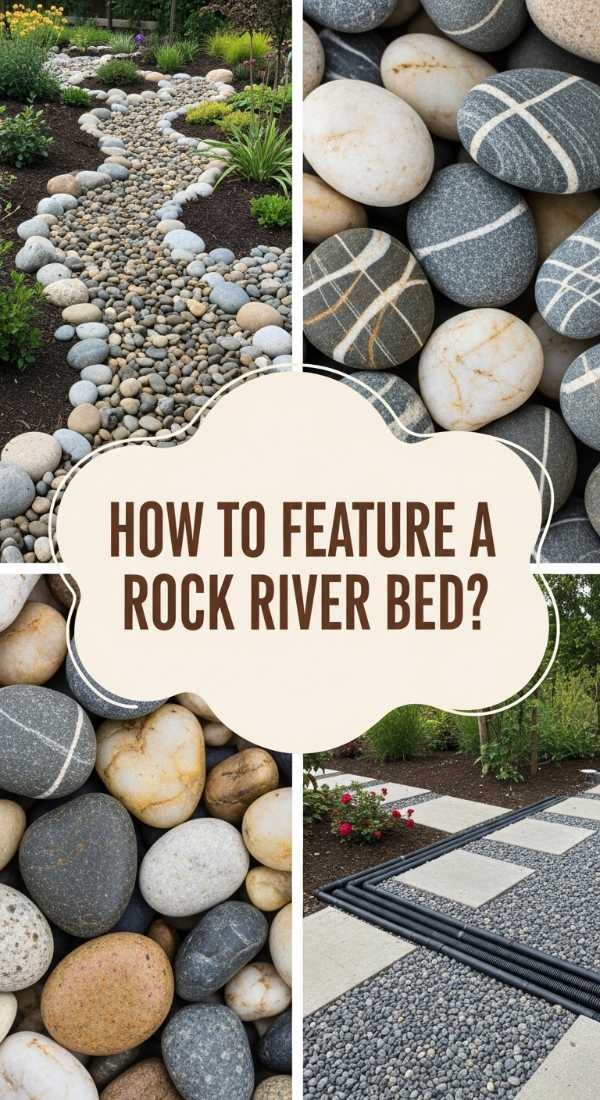
How to Feature a Rock River Bed for Elegant Natural Drainage
Why we love this
A rock river bed is the perfect marriage of form and function, solving drainage issues while adding an element of Zen-like beauty to your landscape. We love the way the different sizes of smooth river stones catch the light, mimicking the appearance of a dried-up stream that comes to life during a rainstorm. It adds a sophisticated, textural contrast to the soft foliage of a garden, creating a permanent structural element that feels both ancient and intentionally modern.
Essential Elements:
- Variety of river rocks (large boulders to small pebbles)
- Heavy-duty landscape liner
- Crushed gravel for the base
- Native grasses for the “banks”
- Shovel and trenching tool
How to make it
- Identify the natural path of runoff in your yard and dig a trench 12-18 inches wide and 6 inches deep along that route, creating a slight meandering curve.
- Line the trench with a professional-grade non-woven geotextile fabric to prevent the rocks from sinking into the mud and to stop weeds from poking through.
- Fill the base with 2 inches of coarse gravel to provide a stable foundation and facilitate faster water movement beneath the decorative stones.
- Place large “anchor” boulders at the curves and edges first to create a natural look, then fill in the center with medium and small river stones.
- Tuck moisture-loving plants like sedges or ferns along the edges to soften the look and anchor the river bed into the surrounding landscape.
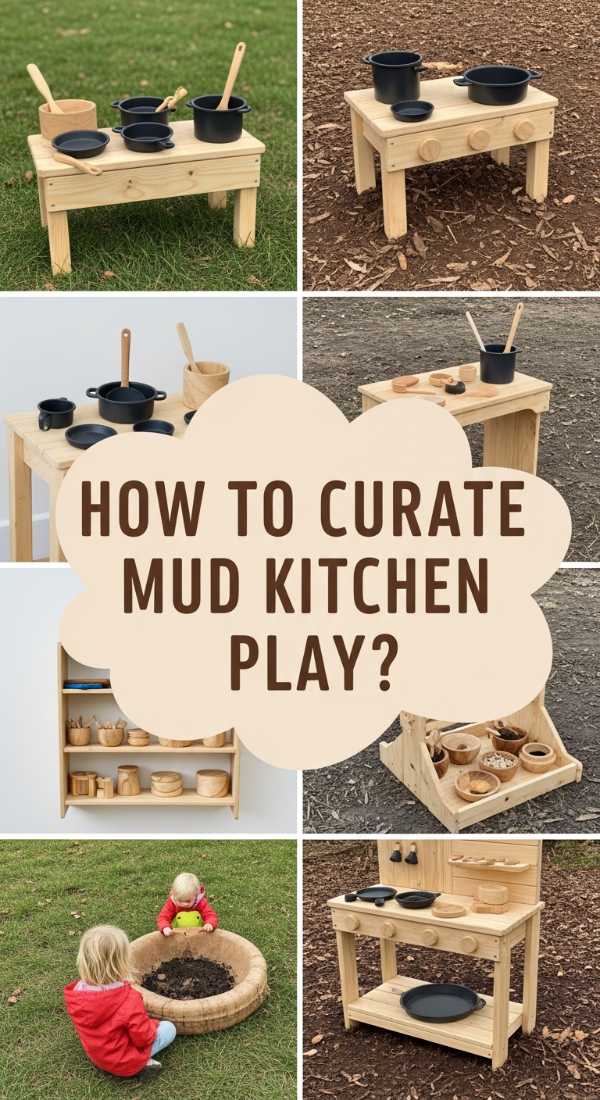
How to Curate Mud Kitchen Play for Joyful Outdoor Sensory Discovery
Why we love this
The mud kitchen is the ultimate childhood dream, where the squelch of mud and the glitter of dandelion “soup” become the highlights of the day. We love this project because it encourages unplugged, sensory play that is wonderfully messy and imaginative. The sight of a tiny chef earnestly “baking” with natural ingredients like pinecones and pebbles, surrounded by the fresh outdoor air, reminds us of the simple, tactile joys of being a kid in a digital-first world.
Essential Elements:
- Upcycled wooden pallets or potting bench
- Stainless steel bowls for “sinks”
- Old pots, pans, and wooden spoons
- A working water source (hose or water dispenser)
- Baskets for natural “ingredients”
How to make it
- Construct a simple wooden counter using heat-treated pallets, ensuring all surfaces are sanded smooth to prevent splinters for small hands.
- Cut out two circular holes in the countertop that are slightly smaller than the lip of your stainless steel bowls, allowing the bowls to drop in and serve as sinks.
- Install a backboard with small hooks to hang ladles, whisks, and measuring cups, keeping the “kitchen” organized and inviting.
- Set up a nearby “pantry” stocked with buckets of sand, soil, wood chips, and dried flower petals to serve as the base for various mud creations.
- Seal the wood with a non-toxic, water-resistant finish to ensure the kitchen survives the elements and the frequent water splashes of creative play.
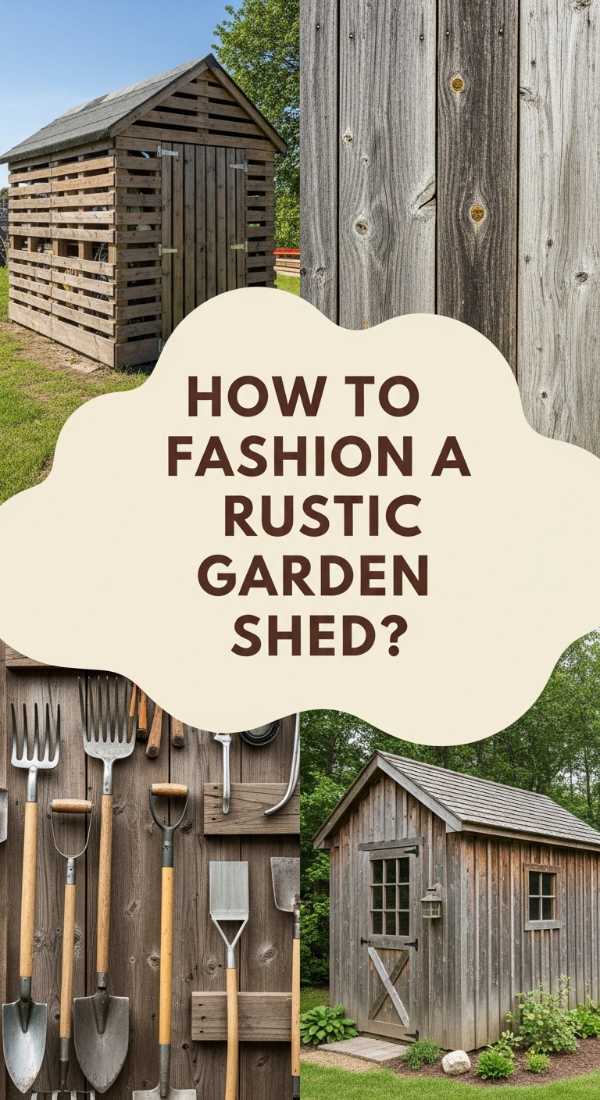
How to Fashion a Rustic Garden Shed for Sustainable Resourceful Storage

Why we love this
A rustic garden shed isn’t just a place to hide the lawnmower; it’s a charming focal point that tells a story of resourcefulness. We love the weathered patina of reclaimed wood and the organized, earthy scent of terracotta pots and twine that lives inside. It transforms a utilitarian need into a beautiful destination within the garden, providing a cozy nook where you can pot up seedlings while listening to the rain patter against a tin roof.
Essential Elements:
- Reclaimed timber or salvaged windows
- Corrugated metal or cedar shingle roofing
- Heavy-duty floor joists
- Wall-mounted tool racks
- Translucent roof panels for natural light
How to make it
- Level the ground and lay a foundation of concrete piers or a gravel pad to ensure the shed remains dry and doesn’t settle unevenly over time.
- Frame the walls using standard 2×4 construction, incorporating salvaged vintage windows to add character and provide essential natural light for indoor tasks.
- Install a sloped roof using corrugated metal sheets, ensuring a 2-inch overhang on all sides to direct rainwater away from the wooden siding.
- Use reclaimed barn wood or fence pickets for the exterior siding, applying a clear UV-protectant stain to preserve the “greyed-out” rustic look without the rot.
- Inside, maximize the small footprint by installing vertical shelving and magnetic tool strips, keeping the floor clear for larger equipment like wheelbarrows.
How to Style a Noughties Aesthetic Bedroom for Ultimate Nostalgic Vibes
Why we love this
The early 2000s are back, and they bring a sense of playful, unapologetic fun that we simply can’t resist. We love this aesthetic because it combines high-energy colors like butterfly blue and bubblegum pink with cozy, plush textures like faux fur and velvet. It’s a nostalgic trip back to a time of inflatable furniture and glitter lamps, but updated with a modern twist that feels chic, curated, and incredibly comforting for anyone who grew up in the era of pop-punk and flip phones.
Essential Elements:
- Sheer beaded curtains or faux fur rugs
- Lavender, teal, or soft pink color palette
- Y2K-style posters or collage wall
- Lava lamps or neon LED signs
- Inflatable or low-profile velvet seating
How to make it
- Start with a base of crisp white bedding and layer on a chunky faux-fur throw and assorted butterfly-shaped pillows to establish the “noughties” texture.
- Create a curated gallery wall using a mix of vintage magazine clippings, CD jewel cases, and polaroid photos secured with colorful washi tape.
- Swap out standard lighting for a mix of purple LED strip lights behind the headboard and a classic lava lamp on the nightstand for that iconic neon glow.
- Hang a sheer beaded curtain in the doorway or over a window to create movement and catch the light, adding that quintessential 2000s shimmer.
- Incorporate a “chill zone” with an inflatable chair or a bean bag, ensuring the colors pop against the rest of the room’s decor for a focal point.
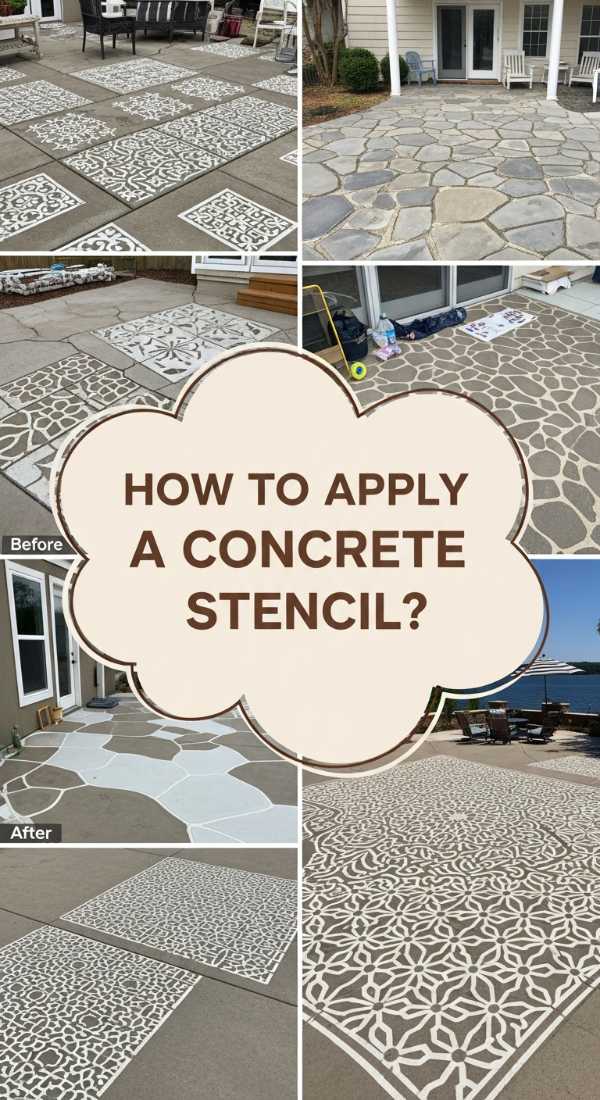
How to Apply a Concrete Stencil for a Luxurious Patio Refresh
[IMAGE_10]
Why we love this
There is nothing more satisfying than turning a drab, grey slab of concrete into a high-end Moroccan-tiled courtyard with just a bit of paint. We love this DIY because it creates an expensive, custom-designed look for a fraction of the cost of real tile. The intricate patterns and the cool, smooth feel of the finished surface under your feet make your outdoor space feel like a Mediterranean villa, providing a stunning backdrop for morning coffees and evening wine.
Essential Elements:
- Large-scale floor stencil pattern
- High-quality concrete porch and patio paint
- Small high-density foam rollers
- Painter’s tape and stencil adhesive spray
- Clear concrete sealer for durability
How to make it
- Deep clean the concrete using a pressure washer and a degreaser; the surface must be bone-dry and free of debris for the paint to bond permanently.
- Apply two coats of a solid base color across the entire patio and let it cure for at least 24 hours until it is no longer tacky.
- Position your stencil starting in the most visible corner, securing it firmly with painter’s tape and a light mist of spray adhesive to prevent “bleeding” under the edges.
- Use a nearly-dry foam roller to apply the contrasting stencil paint, using light pressure and multiple thin coats rather than one heavy one to ensure crisp lines.
- Once the entire pattern is complete and dry, roll on two coats of heavy-duty clear concrete sealer to protect your work from UV rays, rain, and foot traffic.
Wrapping Up Your Dream Home Journey
Creating a home that feels like a dream doesn’t require a miracle—it just requires a weekend and the willingness to try something new. Whether you’re building a sanctuary for ducks or stenciling your way to a luxury patio, the magic is in the details you create yourself. I hope these viral tips inspire you to pick up a brush or a shovel and start making your space uniquely yours!
Frequently Asked Questions
Is DIY really cheaper than hiring a professional? In almost every case, yes! While you invest your time, you save significantly on labor costs, which typically make up 60-70% of a professional home improvement quote.
What if I’ve never used power tools before? Start small! Projects like the Art Room or the Noughties Bedroom require zero power tools. For others, like the Shed or Grill Station, many hardware stores offer tool rental and quick tutorials.
How do I make my DIY projects last through the weather? The secret is in the prep and the finish. Always use weather-treated wood and high-quality sealants or outdoor-grade paints to protect your hard work from the elements.