

There is something undeniably magical about the way a beautifully arranged food board brings people together. Whether it is the laughter shared over a central platter or the collective ‘oohs’ and ‘aahs’ when you bring a steaming dish to the table, food is the ultimate love language. Lately, my social media feeds have been overflowing with these viral ‘simple food boards’—concept platters that take one star dish and surround it with all the fixings, making dinner feel like an event rather than a chore.
As someone who lives for the cozy hum of a busy kitchen, I’ve found that these viral boards aren’t just about the aesthetic; they are about reclaiming the joy of home cooking. We’ve moved away from fussy, multi-course meals and toward hearty, soul-warming dishes that invite everyone to grab a plate and dig in. It is about the steam rising from a bowl of creamy pasta or the satisfying crunch of a perfectly roasted potato, all shared with the people who matter most.
How to cook creamy pasta?
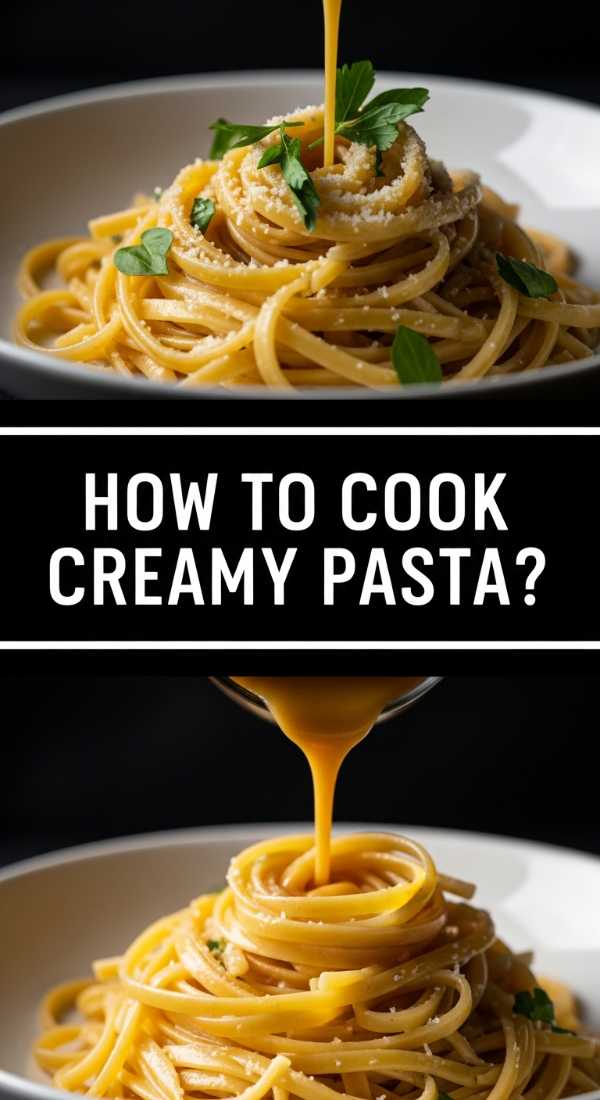
Why we love this
This creamy pasta board is the definition of comfort in a bowl, offering a luxurious, velvet-like texture that coats every single noodle in a rich, buttery embrace. As you swirl your fork, the aroma of toasted garlic and nutty Parmesan cheese fills the air, creating an olfactory experience that is just as satisfying as the taste itself. Each bite delivers a harmonious balance of salty cheese and smooth heavy cream, leaving a lingering warmth that makes you want to close your eyes and savor the moment.
Ingredients
- 1 lb Fettuccine or Pappardelle pasta
- 2 cups heavy cream
- 1/2 cup unsalted butter
- 1 1/2 cups freshly grated Parmesan cheese
- 4 cloves garlic, minced
- Salt and cracked black pepper to taste
- Fresh parsley for garnish
How to make it
- Fill a large pot with water and a generous handful of salt; bring to a rolling boil over high heat. Add the pasta and cook until just al dente—usually about 2 minutes less than the package directions—as the pasta will finish cooking in the sauce.
- While the pasta boils, place a large skillet over medium-low heat and melt the butter until it begins to foam slightly. Add the minced garlic and sauté for about 1 minute, or until it becomes fragrant and translucent, being careful not to let it brown or turn bitter.
- Pour in the heavy cream and increase the heat to medium. Bring the mixture to a gentle simmer, whisking constantly to prevent a skin from forming, and let it reduce for about 3-5 minutes until it slightly thickens.
- Reduce the heat to low and gradually whisk in the grated Parmesan cheese a handful at a time. Continue stirring until the cheese is completely melted and the sauce is smooth and glossy.
- Using tongs, transfer the cooked pasta directly from the boiling water into the skillet. Toss vigorously to coat every strand, adding a splash of the starchy pasta water if the sauce becomes too thick. Season with pepper and serve immediately while the sauce is still fluid.
How to slow cook beef?
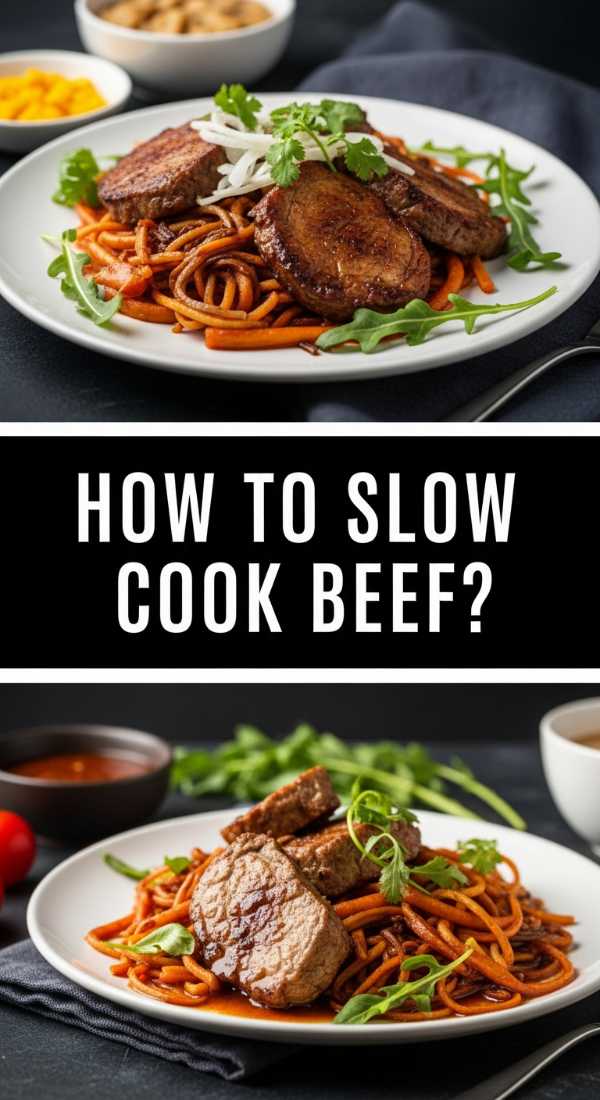
Why we love this
There is a primitive, deeply satisfying aroma that fills a home when beef is slow-cooked to perfection, a scent that speaks of patience and hearty nourishment. The meat becomes so incredibly tender that it practically melts on the tongue, releasing deep, savory juices that have been concentrated over hours of gentle heat. It’s the kind of dish that feels like a warm hug on a cold day, with rich, earthy undertones that pair beautifully with a glass of red wine and a side of rustic bread.
Ingredients
- 3 lb Chuck roast, trimmed
- 2 cups beef bone broth
- 1 large onion, sliced into thick wedges
- 4 cloves garlic, smashed
- 2 tablespoons tomato paste
- 2 sprigs fresh rosemary and thyme
- Salt and black pepper
- 2 tablespoons olive oil
How to make it
- Pat the beef roast dry with paper towels to ensure a good sear, then season aggressively with salt and pepper on all sides. Heat olive oil in a heavy Dutch oven over medium-high heat until it is shimmering.
- Sear the beef for about 5-7 minutes per side. You are looking for a deep, dark brown crust (the Maillard reaction), which provides the foundation for the flavor of the gravy later.
- Transfer the beef to your slow cooker. In the same pan used for searing, add the onions and cook for 3 minutes, then stir in the tomato paste and garlic for 1 minute until the paste turns a dark brick red.
- Deglaze the pan with a splash of the beef broth, scraping up all the flavorful browned bits (fond) from the bottom. Pour this liquid over the beef in the slow cooker.
- Add the remaining broth and the fresh herbs. Cover and cook on ‘Low’ for 8-10 hours. The meat is done when it easily pulls apart with two forks with zero resistance.
How to grill juicy burgers?

Why we love this
A truly great burger board is a symphony of textures—the charred, smoky exterior of the patty giving way to a dripping, tender center that is bursting with savory flavor. The way the melted cheese drapes over the edges of the meat like a golden blanket, combined with the cool, refreshing crunch of a crisp lettuce leaf, creates a multisensory experience. It smells like summer afternoons and backyard celebrations, offering a nostalgic taste of smoky flames and perfectly seasoned beef.
Ingredients
- 1.5 lbs ground beef (80/20 fat ratio)
- 4 brioche buns
- 4 slices sharp cheddar cheese
- 1 teaspoon garlic powder
- Salt and coarse black pepper
- Butter for toasting buns
- Toppings: Lettuce, tomato, red onion, pickles
How to make it
- Divide the cold ground beef into four equal portions. Gently shape them into patties about 1 inch thick, making sure not to overwork the meat, which can lead to a tough burger. Use your thumb to create a small indentation in the center of each patty to prevent it from puffing up while cooking.
- Preheat your grill to high heat (about 450°F). Just before placing the patties on the grates, season them liberally with salt, pepper, and garlic powder. Do not season the meat hours in advance as salt draws out moisture.
- Place patties on the grill and cook undisturbed for 4 minutes to develop a thick, charred crust. Flip the burgers only once using a sturdy spatula.
- Cook for another 3-4 minutes on the second side. About 1 minute before the burgers reach your desired doneness (160°F for medium), place a slice of cheese on each patty and close the grill lid to melt.
- While the meat rests for 2 minutes, butter the brioche buns and toast them on the grill for 30 seconds until golden brown. Assemble with fresh toppings and serve immediately.
How to bake tater casserole?
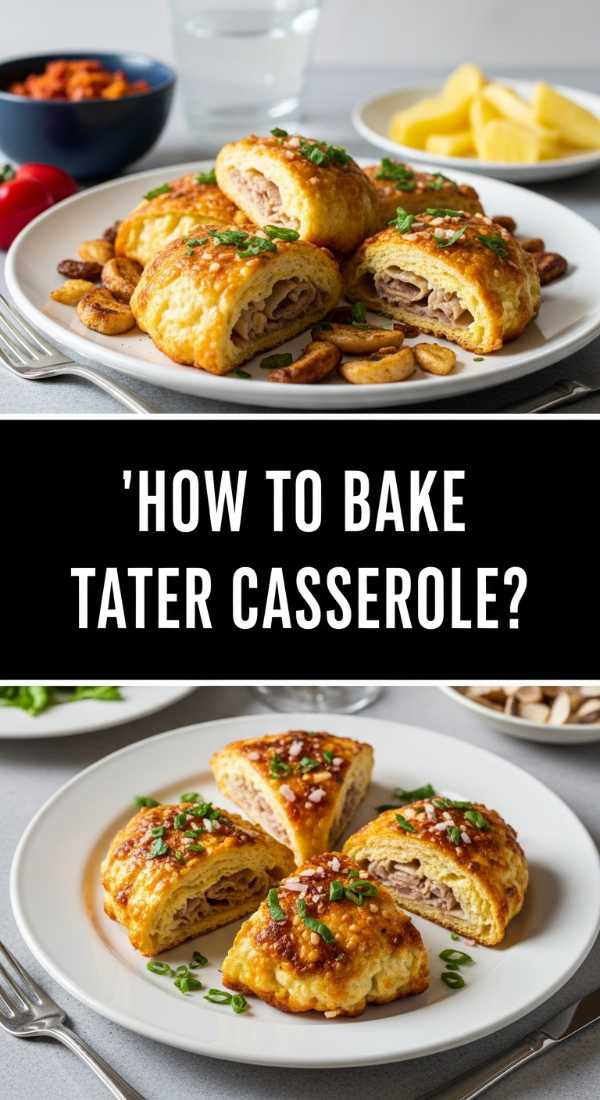
Why we love this
The tater casserole board is a nostalgic masterpiece, featuring a golden, craggy landscape of crispy potato puffs that hide a creamy, savory treasure underneath. Each spoonful delivers a satisfying contrast between the crunch of the baked tots and the bubbling, cheesy ground beef mixture that lies beneath, infused with a hint of onion and savory spices. It is the ultimate crowd-pleaser, smelling like a cozy family kitchen on a Sunday evening, promising a mouthful of salty, cheesy, and hearty goodness in every bite.
Ingredients
- 1 bag (32 oz) frozen tater tots
- 1 lb lean ground beef
- 1 can condensed cream of mushroom soup
- 2 cups shredded cheddar cheese
- 1/2 cup sour cream
- 1 small onion, finely diced
- 1 teaspoon onion powder
How to make it
- Preheat your oven to 375°F (190°C) and lightly grease a 9×13 inch baking dish. In a large skillet over medium-high heat, brown the ground beef and diced onions until the meat is fully cooked and the onions are translucent. Drain off any excess grease.
- In a large mixing bowl, combine the cooked beef mixture, cream of mushroom soup, sour cream, onion powder, and half of the shredded cheddar cheese. Stir until well combined and creamy.
- Spread the beef and cream mixture evenly across the bottom of the prepared baking dish. Smooth it out with a spatula to ensure an even base.
- Arrange the frozen tater tots in neat rows across the top of the mixture, covering the entire surface. For extra crispiness, ensure the tots are touching but not overlapping too much.
- Bake for 35-40 minutes until the tater tots are deep golden brown and the edges are bubbling. Sprinkle the remaining cheese over the top during the last 5 minutes of baking until it is melted and gooey.
How to sear fresh salmon?
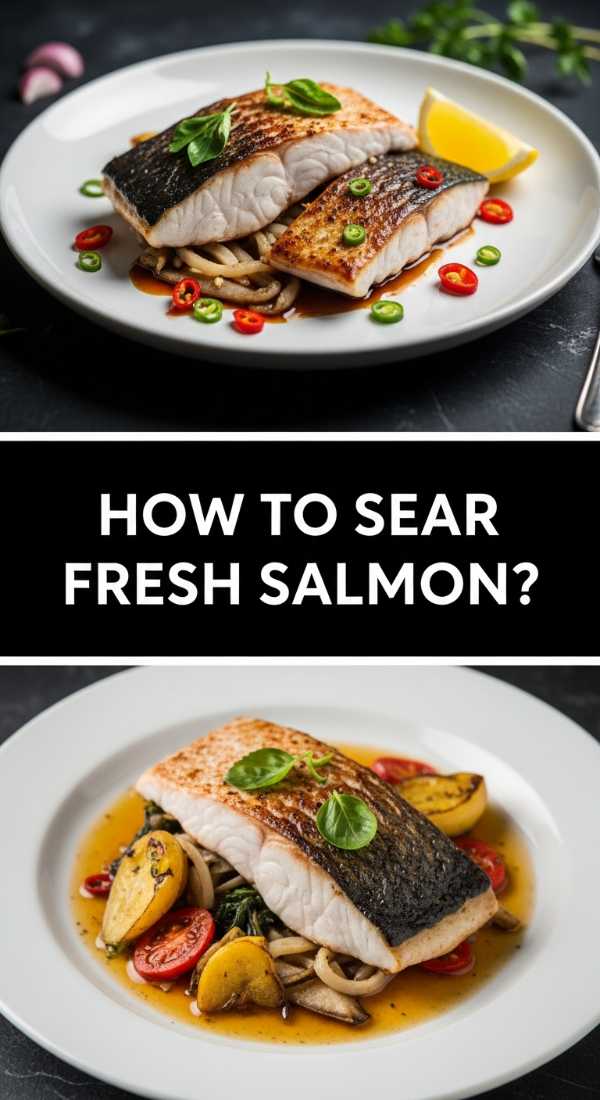
Why we love this
Searing salmon is an art form that results in a stunning contrast between a paper-thin, crackling-crisp skin and a succulent, butter-soft interior that flakes away at the slightest touch. The aroma is clean and light, elevated by a bright squeeze of lemon and the herbal fragrance of fresh dill or parsley. It feels incredibly sophisticated yet fundamentally simple, providing a clean, nutrient-rich meal that tastes like an upscale bistro dish served right in the comfort of your own home.
Ingredients
- 2 large salmon fillets (center-cut)
- 2 tablespoons avocado oil (high smoke point)
- 2 tablespoons unsalted butter
- 1 lemon, sliced into rounds
- Salt and cracked black pepper
- Fresh dill for garnish
How to make it
- Remove the salmon fillets from the refrigerator 15 minutes before cooking to bring them to room temperature. Pat the skin and flesh extremely dry with paper towels; moisture is the enemy of a crispy sear. Season with salt and pepper.
- Heat a stainless steel or cast-iron skillet over medium-high heat. Add the avocado oil and wait until it is shimmering and just starting to smoke.
- Place the salmon fillets in the pan, skin-side down. Use a spatula to press down firmly on the fillets for the first 30 seconds to prevent the skin from curling.
- Let the salmon cook undisturbed for about 5-6 minutes. You will see the color of the flesh change from opaque pink to a lighter cooked color moving up the side of the fillet. Once the skin releases easily from the pan, flip it over.
- Add the butter and lemon slices to the pan. Cook for an additional 2 minutes while spooning the melted butter over the skin. Remove from heat when the internal temperature reaches 125°F-130°F for a perfect medium-rare.
How to roast crispy potatoes?

Why we love this
There is nothing quite like the sound of a truly crispy roasted potato—a sharp, audible crunch that gives way to a center as light and fluffy as a cloud. These golden nuggets are tossed in shimmering oil and coarse sea salt, creating a savory crust that is seasoned with the woody fragrance of rosemary and the pungent kick of roasted garlic. They are the ultimate side dish, offering a rustic, earthy flavor profile that makes them impossible to stop eating, especially when they are still hot from the oven.
Ingredients
- 2 lbs Yukon Gold potatoes
- 1/4 cup extra virgin olive oil
- 1 tablespoon fresh rosemary, chopped
- 4 cloves garlic, minced
- 1 teaspoon sea salt
- 1/2 teaspoon black pepper
- 1/2 teaspoon baking soda
How to make it
- Peel and cut your potatoes into 1.5-inch chunks. Preheat your oven to 425°F (220°C). Place the potatoes in a large pot of cold water with a generous pinch of salt and the baking soda; bring to a boil.
- Parboil the potatoes for about 8-10 minutes until the exteriors are softened but the centers are still firm. Drain the water and let the potatoes sit in the pot for 2 minutes to allow steam to escape.
- Shake the pot vigorously to roughen up the edges of the potatoes; this starchy ‘mash’ on the surface is what creates the ultimate crunch. Toss with olive oil, rosemary, garlic, salt, and pepper until well coated.
- Spread the potatoes onto a large, preheated rimmed baking sheet. Ensure they are in a single layer with plenty of space between them to allow for air circulation.
- Roast for 45-50 minutes, flipping them with a spatula every 15 minutes, until they are deep golden brown and exceptionally crunchy on all sides.
How to make street tacos?

Why we love this
Street tacos are a vibrant explosion of flavor and color, bringing a sense of festive energy to any table with their zesty lime highlights and charred, savory meats. The smell of warm corn tortillas mingling with fresh cilantro and sharp white onions is instantly mouth-watering, promising a bite that is both refreshing and deeply satisfying. Each mini-taco is a customizable canvas of textures—from the creamy drizzle of avocado to the spicy snap of a radish—making the dining experience interactive and incredibly fun.
Ingredients
- 1 lb flank steak or chicken thighs
- Small corn tortillas
- 1/2 cup white onion, finely chopped
- 1/2 cup fresh cilantro, chopped
- 2 limes, cut into wedges
- 1 tablespoon chili powder
- 1 teaspoon cumin
- Oil for the griddle
How to make it
- Thinly slice your meat against the grain into small, bite-sized pieces. In a bowl, toss the meat with chili powder, cumin, salt, pepper, and a squeeze of lime juice. Let it marinate for at least 20 minutes.
- Heat a heavy cast-iron griddle or skillet over high heat until it is screaming hot. Add a tablespoon of oil and sear the meat in small batches to ensure it browns and chars rather than steams. Cook for 3-5 minutes until caramelized.
- While the meat rests, wipe the skillet and lightly grease it again. Place the corn tortillas on the hot surface for about 30 seconds per side until they develop charred spots and become pliable.
- Stack two tortillas together for each taco (the traditional street style) to prevent them from breaking under the weight of the fillings.
- Fill each taco with a generous portion of meat, then top with the chopped raw onions and cilantro. Serve immediately with extra lime wedges on the side to brighten the flavors just before eating.
How to bake soft cookies?

Why we love this
The scent of soft-baked cookies wafting through the air is the ultimate invitation to slow down and indulge in a moment of pure, sugary bliss. These cookies feature a delicate, golden edge and a center that remains wonderfully gooey, with pockets of melted dark chocolate that smear beautifully when pulled apart. The richness of brown sugar and the floral notes of high-quality vanilla extract create a nostalgic, comforting flavor that feels like a warm memory of childhood afternoons spent in a flour-dusted kitchen.
Ingredients
- 1 cup unsalted butter, softened
- 3/4 cup white sugar
- 3/4 cup brown sugar, packed
- 2 large eggs
- 2 teaspoons vanilla extract
- 2 1/4 cups all-purpose flour
- 1 teaspoon baking soda
- 2 cups semi-sweet chocolate chips
How to make it
- Preheat your oven to 350°F (175°C) and line two large baking sheets with parchment paper. In a large bowl, cream together the softened butter, white sugar, and brown sugar using a hand mixer for at least 3 minutes until the mixture is pale and fluffy.
- Add the eggs one at a time, beating well after each addition, then stir in the vanilla extract. The mixture should look smooth and well-emulsified.
- In a separate bowl, whisk together the flour and baking soda. Gradually add the dry ingredients to the wet ingredients, mixing on low speed until just combined. Do not overmix, or the cookies will become tough.
- Fold in the chocolate chips by hand with a spatula. For the best texture, chill the dough in the refrigerator for at least 30 minutes to prevent excessive spreading during baking.
- Scoop rounded tablespoons of dough onto the prepared sheets, spaced 2 inches apart. Bake for 9-11 minutes. The secret to soft cookies is removing them when the edges are barely golden but the centers still look slightly underbaked; they will firm up on the pan as they cool.
How to cook lemon chicken?

Why we love this
This lemon chicken board is a masterclass in bright, vibrant flavors, featuring succulent chicken breasts bathed in a glossy, citrus-infused sauce that sparkles with herbal notes of thyme. The aroma is incredibly uplifting—the sharp tang of lemon zest cutting through the richness of the pan juices to create a dish that feels light yet deeply nourishing. Every bite offers a perfect balance of savory salt and zesty acid, leaving your palate feeling refreshed and satisfied, making it an ideal choice for a sophisticated weeknight dinner.
Ingredients
- 2 large chicken breasts, halved lengthwise into cutlets
- 1/4 cup all-purpose flour
- 2 lemons (one juiced, one sliced)
- 1/2 cup chicken broth
- 3 tablespoons butter
- 2 cloves garlic, minced
- Fresh thyme sprigs
- Salt and pepper
How to make it
- Season the chicken cutlets with salt and pepper, then dredge them lightly in the flour, shaking off any excess. This thin coating will help the chicken brown and will naturally thicken the sauce later.
- Heat a large skillet over medium-high heat with a drizzle of oil. Cook the chicken cutlets for 3-4 minutes per side until they are golden brown and cooked through (165°F internal temperature). Remove the chicken from the pan and set aside.
- In the same skillet, add the minced garlic and lemon slices. Sauté for 1 minute until the garlic is fragrant and the lemon slices are slightly caramelized.
- Pour in the chicken broth and lemon juice. Use a wooden spoon to scrape the bottom of the pan. Let the liquid simmer and reduce by half, which should take about 3-4 minutes.
- Whisk in the butter and fresh thyme until the sauce is thick and glossy. Return the chicken to the pan, spooning the sauce over the meat for 1 minute to reheat. Serve garnished with the pan-roasted lemon slices.
How to make pot roast?
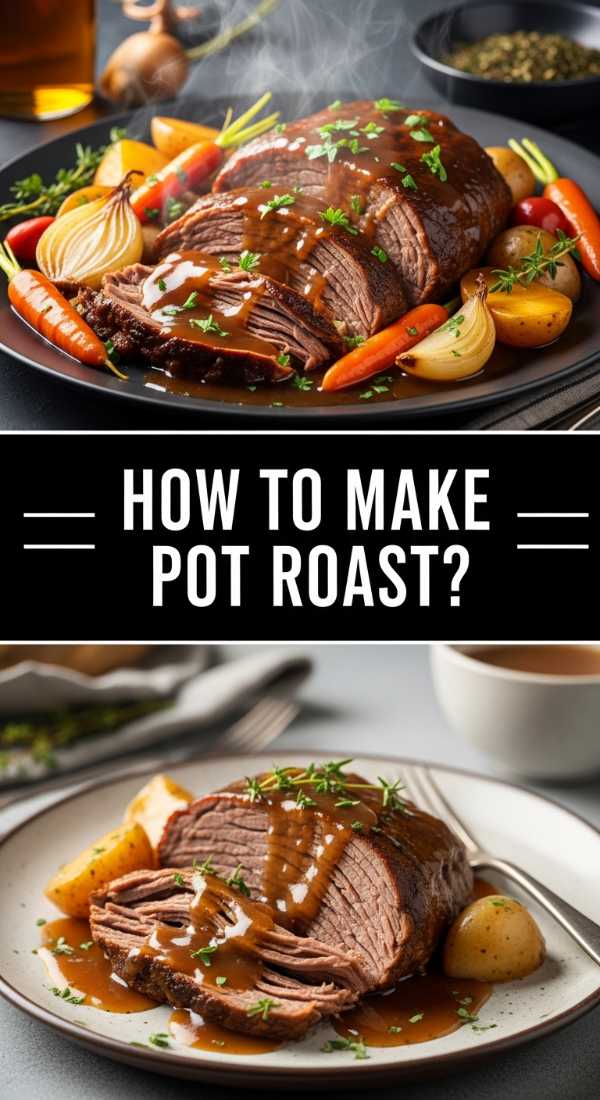
Why we love this
Pot roast is the quintessential slow-food staple, a dish that transforms humble ingredients into a rich, velvety feast that feels like the ultimate culinary comfort. The beef becomes tender enough to be eaten with a spoon, surrounded by carrots and potatoes that have soaked up all the deep, umami-rich flavors of the red wine and beef stock braising liquid. It smells of woodsy herbs and slow-cooked onions, filling the house with a sense of warmth and abundance that makes any evening feel like a special occasion.
Ingredients
- 3 lb beef chuck roast
- 1 lb carrots, cut into thick chunks
- 1 lb small red potatoes, halved
- 2 cups beef stock
- 1 cup dry red wine (like Cabernet)
- 2 tablespoons tomato paste
- 1 large onion, chopped
- 3 sprigs rosemary and thyme
How to make it
- Preheat your oven to 300°F (150°C). Season the beef generously with salt and pepper. In a large Dutch oven, heat oil over medium-high heat and sear the beef on all sides until a dark brown crust forms (about 10-12 minutes total).
- Remove the beef and set aside. Add the onions and carrots to the pot, cooking for 5 minutes until the onions begin to soften. Stir in the tomato paste and cook for 1 minute to remove the raw metallic taste.
- Pour in the red wine to deglaze the pan, scraping up all the browned bits. Let the wine simmer for 2 minutes to cook off the alcohol.
- Add the beef stock, herbs, and return the beef to the pot. Arrange the potatoes around the meat. The liquid should come about halfway up the side of the beef.
- Cover the Dutch oven with a tight-fitting lid and place in the oven. Braise for 3 to 4 hours, or until the meat is fork-tender. Let the roast rest for 15 minutes before serving to allow the juices to redistribute.
The Final Bite
Creating a viral food board is less about following a strict set of rules and more about embracing the spirit of sharing. These ten recipes are designed to be the centerpiece of your table, inviting your guests to linger, laugh, and enjoy the simple pleasure of a home-cooked meal. From the crunch of a roasted potato to the silkiness of a creamy pasta, there is a world of flavor waiting to be explored on your next platter.
Frequently Asked Questions
What makes a food board ‘viral’? Viral boards usually focus on a single, high-comfort dish surrounded by aesthetically pleasing garnishes and sides that make the meal look abundant and inviting.
Can I prepare these boards in advance? Many components, like slow-cooked meats or chopped vegetables, can be prepared ahead of time, but for the best texture, assembly should happen just before serving.
Do I need special equipment for these recipes? Most only require standard kitchen tools like a good skillet, a baking sheet, or a slow cooker, making them accessible for any home cook.