

We’ve all been there—the frantic house-cleaning, the endless scrolling through complex recipes, and that nagging feeling that you’ve forgotten something just as the doorbell rings. Hosting should be about the laughter and the stories shared over a meal, not about being tethered to the stove while your guests enjoy each other’s company. That’s why I am absolutely obsessed with the new ‘Food Board’ trend that is taking over my feed (and my kitchen!). It’s the ultimate way to bring people together with zero stress and maximum ‘wow’ factor.
Imagine a giant, beautiful board overflowing with vibrant colors, different textures, and a variety of flavors that cater to everyone’s cravings. It’s a choose-your-own-adventure style of dining that feels luxurious yet incredibly grounded. Whether you’re hosting a cozy girls’ night or a full-blown family gathering, these easy-to-prep components will turn your table into a masterpiece. Let’s dive into the ultimate guide to building the food board of your dreams!
How to prep salmon bowls?

Why we love this
There is something deeply satisfying about a perfectly flaky piece of salmon paired with the cooling crunch of fresh vegetables. The aroma of sesame oil and toasted seeds fills the room, creating an atmosphere of a high-end bistro right in your dining room. Each bite offers a harmonious blend of warm, buttery fish and chilled, crisp elements, making it a refreshing centerpiece for any board. It’s elegant, nutrient-dense, and looks like a work of art with its vibrant pinks and greens.
Ingredients
- 2 Fresh salmon fillets
- 2 cups cooked jasmine rice
- 1 ripe avocado, sliced
- 1 Lebanese cucumber, thinly sliced
- 2 tablespoons soy sauce
- 1 tablespoon toasted sesame oil
- 1 teaspoon honey
- Sesame seeds and scallions for garnish
How to make it
- Begin by preparing your jasmine rice according to package instructions, ensuring it is light and fluffy; keep it warm until assembly.
- Whisk together the soy sauce, sesame oil, and honey in a small bowl to create a glaze, then pat the salmon fillets completely dry with a paper towel to ensure a perfect sear.
- Heat a non-stick skillet over medium-high heat with a teaspoon of neutral oil; once the pan is shimmering, place the salmon skin-side down.
- Press firmly on the fillets with a spatula for 30 seconds to prevent curling, then cook for 4-5 minutes until the skin is incredibly crispy and golden.
- Flip the fillets carefully and brush the prepared glaze over the crispy skin side, cooking for another 2-3 minutes until the internal temperature reaches 125°F for medium-rare or 145°F for fully cooked.
- Remove the salmon from the heat and let it rest for 2 minutes before flaking it into large, succulent chunks.
- To assemble the bowl components for the board, place the rice in a bowl, top with the flaked salmon, avocado slices, and cucumbers, then finish with a heavy sprinkle of sesame seeds and sliced scallions.
How to roast sweet potatoes?

Why we love this
Roasting sweet potatoes transforms them into nature’s candy, with deeply caramelized edges that offer a slight crunch before giving way to a velvety, melt-in-your-mouth interior. The earthy sweetness is enhanced by the heat of the oven, releasing a comforting, sugary fragrance that makes the whole house feel like a home. They bring a gorgeous pop of orange to your food board and serve as the perfect hearty base for any of your other toppings. It’s the ultimate comfort food that feels both indulgent and wholesome at the same time.
Ingredients
- 3 Large sweet potatoes
- 3 tablespoons extra virgin olive oil
- 1 teaspoon smoked paprika
- 1/2 teaspoon cinnamon
- 1/2 teaspoon sea salt
- Fresh thyme for garnish
How to make it
- Preheat your oven to 425°F (220°C) and line a large, heavy-duty baking sheet with parchment paper to prevent sticking and ensure even browning.
- Scrub the sweet potatoes thoroughly and dice them into uniform 1-inch cubes; uniformity is key to ensuring every piece cooks at the same rate.
- In a large mixing bowl, toss the cubes with olive oil, smoked paprika, cinnamon, and salt until every single surface is well-coated in the spice mixture.
- Spread the sweet potatoes across the baking sheet in a single layer, ensuring they aren’t touching; crowding the pan will cause them to steam rather than roast.
- Slide the tray into the center of the oven and roast for 25 to 30 minutes, using a spatula to flip them halfway through the cooking time.
- Look for visual cues: the edges should be dark brown and slightly puffed, and the centers should be easily pierced with a fork.
- Remove from the oven and sprinkle with fresh thyme leaves while they are still hot to release the herb’s essential oils.
How to make chicken fajitas?

Why we love this
The sound of sizzling fajitas is the universal signal that the party has officially started! The smoky, charred aroma of peppers and onions mingling with cumin-spiced chicken is absolutely intoxicating and always draws a crowd. This dish offers a wonderful textural contrast between the tender, juicy strips of meat and the slightly softened yet snappy bell peppers. It’s a interactive, fun component for a food board that encourages guests to build their own perfect wraps.
Ingredients
- 1 lb chicken breast, thinly sliced into strips
- 3 Bell peppers (mixed colors), sliced into strips
- 1 Red onion, sliced into wedges
- 2 tablespoons avocado oil
- 1 tablespoon cumin
- 1 teaspoon garlic powder
- Juice of 1 lime
- Fresh cilantro
How to make it
- Toss the chicken strips in a bowl with half the oil, cumin, garlic powder, and a generous pinch of salt, letting it marinate for at least 15 minutes at room temperature.
- Heat a large cast-iron skillet over high heat until a drop of water sizzles and evaporates instantly; this high heat is crucial for achieving a ‘restaurant-style’ char.
- Add the remaining oil followed by the peppers and onions, sautéing them for 3-5 minutes until they have dark charred spots but still retain their structural snap.
- Push the vegetables to the perimeter of the skillet and add the chicken strips to the center in a single layer.
- Let the chicken sear undisturbed for 2 minutes to develop a golden crust, then toss everything together and cook for another 3-4 minutes until the chicken is fully opaque.
- Deglaze the pan by squeezing the lime juice over the mixture, scraping up any browned bits (fond) from the bottom of the pan for maximum flavor.
- Transfer to a serving dish and garnish with a handful of roughly chopped cilantro for a burst of freshness.
How to prepare steak bites?

Why we love this
Steak bites are the ultimate luxury finger food, offering all the richness of a full steak dinner in convenient, bite-sized portions. The contrast of the hard, salty sear on the outside against the tender, pink center is a sensory delight that never fails to impress. When basted in garlic and rosemary butter, the aroma is simply heavenly—savory, herbaceous, and deeply inviting. They are incredibly satisfying and disappear within minutes of hitting the food board, making them a certified crowd-pleaser.
Ingredients
- 1.5 lbs Sirloin or Ribeye steak, cut into 1-inch cubes
- 3 tablespoons unsalted butter
- 4 cloves garlic, smashed
- 2 sprigs fresh rosemary
- 2 tablespoons high-heat oil (like grapeseed)
- Coarse salt and cracked black pepper
How to make it
- Take your steak out of the refrigerator 30 minutes before cooking to bring it to room temperature; this ensures the meat cooks evenly throughout.
- Pat the steak cubes extremely dry with paper towels—moisture is the enemy of a good crust—and season generously with coarse salt and black pepper.
- Heat a heavy skillet (preferably cast iron) over high heat with the oil until it is just starting to smoke.
- Add the steak bites in a single layer, ensuring they aren’t crowded; you may need to work in batches to maintain the pan’s high temperature.
- Sear the meat for 2 minutes without moving them to develop a deep brown crust, then turn them to sear the other sides for another 1-2 minutes.
- Lower the heat to medium and add the butter, smashed garlic, and rosemary sprigs to the pan.
- As the butter foams, tilt the pan and use a large spoon to continuously baste the steak bites with the flavored butter for about 60 seconds.
- Remove the steak immediately to a plate to rest for 5 minutes, allowing the juices to redistribute so every bite remains succulent.
How to cook lemon chicken?

Why we love this
Lemon chicken is like a burst of sunshine on your plate, offering a bright and zesty flavor profile that cuts through the richness of other board components. The skin becomes beautifully golden and crisp, while the meat remains incredibly moist and infused with the citrusy tang of fresh lemons. The scent of roasted garlic and oregano creates a Mediterranean vibe that is both sophisticated and comforting. It’s a versatile protein that feels light yet satisfying, making it a staple for any seasonal gathering.
Ingredients
- 1 lb boneless, skinless chicken thighs
- Juice and zest of 2 lemons
- 3 tablespoons olive oil
- 1 tablespoon dried oregano
- 3 cloves garlic, minced
- Salt and pepper to taste
How to make it
- In a gallon-sized resealable bag or a shallow dish, combine the lemon juice, lemon zest, olive oil, oregano, and minced garlic to create a bright marinade.
- Place the chicken thighs in the marinade, ensuring they are fully submerged, and refrigerate for at least 30 minutes (but no more than 2 hours to prevent the acid from ‘cooking’ the meat).
- Preheat a large skillet over medium-high heat and add a drizzle of oil.
- Remove the chicken from the marinade, shaking off excess liquid, and place in the hot skillet.
- Cook for 5-7 minutes on the first side without moving it until a deep golden-brown crust has formed.
- Flip the chicken and continue cooking for another 5-6 minutes, or until the internal temperature reaches 165°F.
- During the last minute of cooking, pour two tablespoons of the remaining marinade (or fresh lemon juice) into the pan to glaze the chicken and create a light pan sauce.
How to bake garlic broccoli?
Why we love this
If you think you don’t like broccoli, this recipe will change your mind—it’s all about that high-heat transformation! The florets become tender with delightfully crispy, charred tips that mimic the flavor of popcorn, while the garlic becomes mellow and sweet in the oven. The addition of sharp parmesan cheese adds a nutty, salty finish that rounds out the earthy tones of the vegetable. It’s a vibrant, textural addition to your board that provides a necessary hit of green and a satisfying crunch.
Ingredients
- 2 large heads of broccoli, cut into bite-sized florets
- 4 tablespoons olive oil
- 4 cloves garlic, thinly sliced
- 1/4 cup grated parmesan cheese
- 1/2 teaspoon red pepper flakes (optional)
- Salt and pepper
How to make it
- Preheat your oven to 400°F (200°C) and ensure your broccoli florets are completely dry; any water will cause them to steam rather than roast.
- In a large bowl, toss the florets with the olive oil, sliced garlic, salt, pepper, and red pepper flakes until the oil is evenly distributed.
- Spread the broccoli onto a baking sheet in a single layer, ensuring the ‘flat’ sides of the florets are touching the pan for maximum browning.
- Roast for 15-20 minutes, checking at the 10-minute mark to toss them slightly with a spatula.
- The broccoli is done when the stalks are tender-crisp and the tops of the florets have turned a dark, crispy brown.
- Immediately upon removing from the oven, sprinkle the grated parmesan over the hot broccoli so it melts slightly into the crevices.
- Serve warm or at room temperature as a healthy, flavorful side for your board.
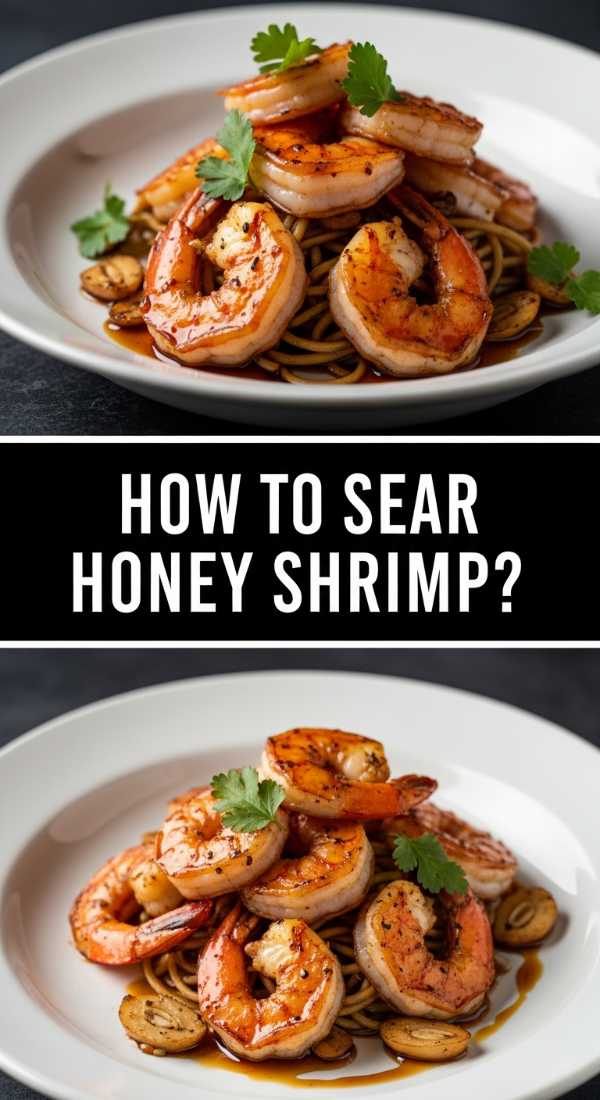
How to sear honey shrimp?
Why we love this
Honey shrimp are the perfect balance of sweet, savory, and spicy, creating an addictive flavor profile that keeps guests coming back for more. The shrimp cook in a flash, developing a glossy, amber glaze that clings to their snappy, tender shells. The aroma of bubbling honey and caramelized soy sauce is sweet and inviting, promising a decadent treat. These are a great way to add seafood variety to your board without hours of prep, and they look stunning with their jewel-like, translucent finish.
Ingredients
- 1 lb large shrimp, peeled and deveined
- 3 tablespoons honey
- 2 tablespoons soy sauce
- 1 teaspoon red chili flakes
- 1 tablespoon fresh ginger, grated
- 2 tablespoons butter
How to make it
- In a small bowl, whisk together the honey, soy sauce, chili flakes, and grated ginger until the honey is fully incorporated.
- Pat the shrimp dry with a paper towel; this is essential for getting the sauce to stick and for a proper sear.
- Melt the butter in a large skillet over medium-high heat until it starts to foam and turn slightly brown.
- Add the shrimp to the pan in a single layer, cooking for 1-2 minutes until they just begin to turn pink and opaque.
- Pour the honey mixture over the shrimp and stir constantly to coat each one as the sauce begins to bubble and thicken.
- Continue cooking for another 1-2 minutes until the sauce has reduced to a sticky glaze and the shrimp are curled into a tight ‘C’ shape.
- Do not overcook, or the shrimp will become rubbery; remove from heat as soon as they are fully opaque and glazed.
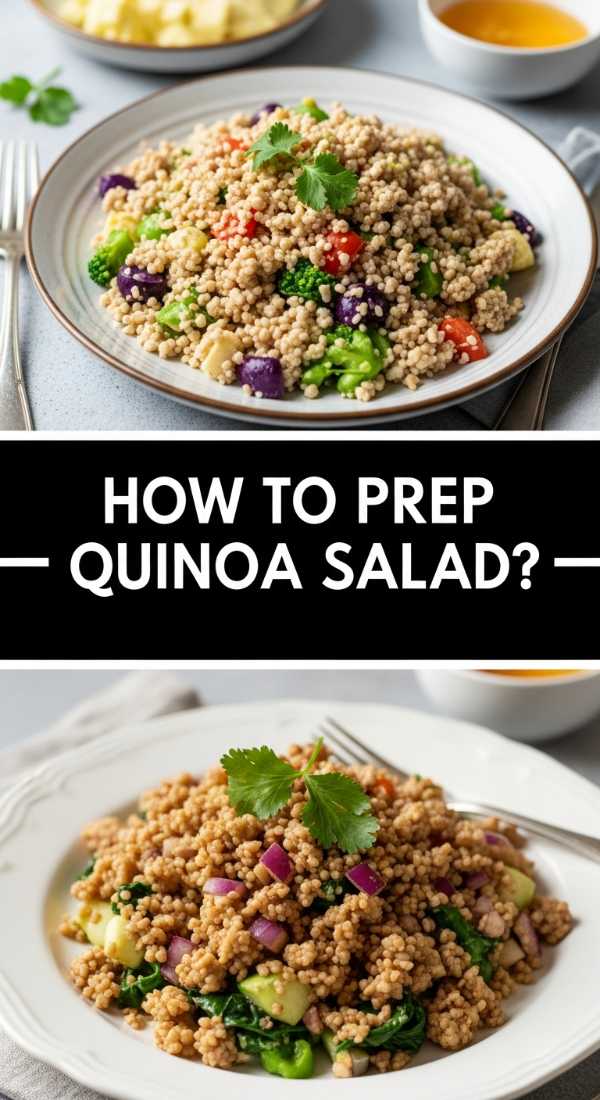
How to prep quinoa salad?

Why we love this
This quinoa salad acts as a refreshing palate cleanser, offering a bright, herbaceous note that balances the heavier grilled meats on the board. The quinoa provides a light, nutty base that is peppered with the crunch of fresh cucumbers and the creamy tang of crumbled feta. Every bite is a explosion of freshness from the lemon and parsley, making it feel like a summer day in bowl form. It’s a fantastic make-ahead option that actually tastes better as the flavors sit and mingle together.
Ingredients
- 1 cup dry quinoa
- 2 cups water or vegetable broth
- 1 English cucumber, diced
- 1/2 cup fresh parsley, chopped
- 1/2 cup feta cheese, crumbled
- Juice of 1 lemon
- 3 tablespoons extra virgin olive oil
- Salt and pepper
How to make it
- Rinse the quinoa under cold water in a fine-mesh sieve to remove its natural bitter coating (saponin).
- Combine quinoa and water/broth in a pot, bring to a boil, then reduce heat to low, cover, and simmer for 15 minutes.
- Remove from heat and let the quinoa sit covered for 5 minutes before fluffing it with a fork to release steam.
- Spread the fluffed quinoa on a baking sheet to cool quickly to room temperature; this prevents the vegetables from wilting when mixed.
- In a large mixing bowl, whisk the lemon juice and olive oil with a pinch of salt and pepper.
- Add the cooled quinoa, diced cucumber, chopped parsley, and feta cheese to the bowl.
- Toss everything together gently until well combined, then taste and adjust the seasoning with more lemon or salt if needed before serving.
How to air fry tofu?

Why we love this
Air-fried tofu is a total game-changer for plant-based guests, offering a satisfyingly crunchy exterior that mimics the texture of fried chicken without the heavy oil. Inside, the tofu remains soft and light, acting as a perfect vessel for whatever dipping sauces you have on your board. The subtle, toasted aroma of the cornstarch coating is understated but appetizing. It’s an easy, mess-free way to provide a high-protein vegetarian option that even meat-eaters will reach for once they taste that crunch.
Ingredients
- 1 block extra-firm tofu
- 2 tablespoons cornstarch
- 1 tablespoon soy sauce
- 1 teaspoon garlic powder
- 1 tablespoon olive oil
How to make it
- Press the tofu block for at least 20 minutes using a tofu press or by wrapping it in a clean towel and placing a heavy skillet on top to remove excess moisture.
- Cut the pressed tofu into 1-inch cubes and place them in a bowl.
- Drizzle with soy sauce and olive oil, tossing gently to coat without breaking the cubes.
- Sprinkle the cornstarch and garlic powder over the tofu and toss again until each cube is evenly dusted with a white, powdery coating.
- Arrange the cubes in a single layer in the air fryer basket, ensuring they are not touching so the air can circulate around all sides.
- Air fry at 400°F (200°C) for 15-18 minutes, shaking the basket halfway through the cooking time.
- The tofu is ready when the outside is golden-brown and feels firm and crispy to the touch.
How to roast honey carrots?
[IMAGE_10]
Why we love this
Roasted honey carrots are the elegant, jewel-toned beauties of the food board, bringing a sophisticated sweetness and a gorgeous pop of color. As they roast, the natural sugars in the carrots concentrate, while the honey creates a glossy, sticky exterior that is seasoned with earthy thyme. They become tender enough to cut with a fork but maintain a pleasant bite, offering a flavor that is both nostalgic and refined. The warm, floral scent of honey and roasted root vegetables is incredibly inviting and adds a touch of rustic charm to your spread.
Ingredients
- 1 lb whole carrots (thinner ones work best)
- 2 tablespoons honey
- 2 tablespoons olive oil
- 1 teaspoon fresh thyme leaves
- 1/2 teaspoon sea salt
How to make it
- Preheat your oven to 400°F (200°C) and line a baking sheet with parchment paper for easy cleanup.
- Peel the carrots and trim the tops, leaving about an inch of the green stem for a rustic, ‘farm-to-table’ look.
- In a small bowl, mix the honey, olive oil, and sea salt until well combined.
- Place the carrots on the baking sheet and pour the honey mixture over them, using your hands or a brush to ensure every carrot is fully coated.
- Arrange them in a single layer, ensuring they have plenty of space to roast rather than steam.
- Roast for 20-25 minutes, turning the carrots once halfway through to ensure they are evenly caramelized on all sides.
- Remove from the oven once they are tender and have developed beautiful dark brown glazed spots, then sprinkle with fresh thyme while the glaze is still tacky.
The Art of the Board: Bringing it All Together
Once you’ve prepped your vibrant salmon, sizzling fajitas, and crispy tofu, it’s time for the fun part: assembly! Arrange your bowls and platters on a large wooden board, filling in the gaps with handfuls of fresh greens, nuts, or sliced fruits. The beauty of this trend is that there are no rules—just a focus on variety, color, and communal eating. Your guests will love the freedom to build their own plates, and you’ll love the fact that you actually got to sit down and enjoy the party. So, grab a board and start creating your own viral masterpiece tonight!