
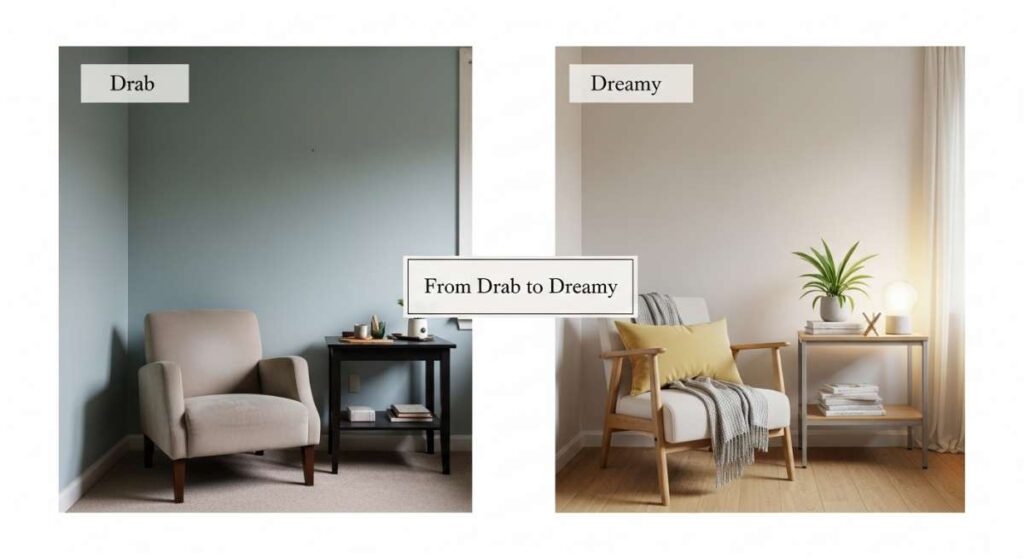
You know that feeling when you walk through your front door and it just feels… ‘fine’? Not ‘wow,’ not ‘dreamy,’ just okay. We’ve all been there, staring at that patch of yard that won’t grow or that porch that looks just a little too bare. Life is busy, and sometimes our homes become the backdrop rather than the sanctuary we deserve. But here’s the secret: you don’t need a massive renovation budget to turn your living space into a Pinterest-worthy escape.
This weekend, we’re reclaiming our spaces. Whether it’s the tactile joy of smoothing down new wallpaper or the grounding feeling of stacking stone in the garden, there is a special kind of magic in working with your hands. I’ve rounded up ten of my favorite DIY projects that bridge the gap between ‘drab’ and ‘dreamy.’ These aren’t just chores; they are opportunities to infuse your personality into every corner of your property.
Get ready to roll up your sleeves and breathe new life into your home. From the front porch to the backyard retreat, these upgrades are designed to provide maximum impact with a touch of handmade charm. Let’s dive into these dreamy transformations!
How to Build a Low Retaining Wall for a Sloped Dream Garden

Why we love this
There is something incredibly grounding about the earthy weight of stone and the way a well-placed wall provides architecture to a wild landscape. This project transforms a difficult, sloping yard into a structured masterpiece, creating levels that catch the golden afternoon light beautifully. As you stack each block, you feel the permanence of your work, and by the time you’re finished, the scent of damp earth and fresh mulch fills the air, signaling a garden that is finally ready to bloom. It adds a sophisticated, tiered texture that makes even the simplest flower beds look professionally landscaped.
Essential Elements:
- Retaining wall blocks or natural stones
- Leveling sand and crushed gravel base
- Landscape fabric
- Torpedo level and string line
- Drainage pipe (if height exceeds 12 inches)
- Rubber mallet and hand tamper
How to make it
- Mark your path using a garden hose or spray paint to create a smooth, flowing curve; then, dig a trench approximately 6 inches deep and twice as wide as your blocks to ensure a stable foundation.
- Pour 3 inches of crushed gravel into the trench and use a hand tamper to compress it until it is rock-solid and perfectly flat; this prevents the wall from shifting during winter freeze-thaw cycles.
- Lay your first course of blocks carefully, checking each one with a torpedo level both front-to-back and side-to-side; use a rubber mallet to tap high spots down into the sand/gravel mix until they are perfectly aligned.
- Install a perforated drainage pipe behind the first layer if your slope is steep, then backfill the space behind the blocks with additional gravel to allow water to move freely without putting pressure on the wall.
- Stack subsequent layers in a ‘running bond’ pattern (staggering the joints like bricks) and use masonry adhesive on the top capstones to secure them permanently for a polished, professional finish.
How to Style Front Porch Flower Pots for a Welcoming Home Entrance

Why we love this
Your front porch is the handshake of your home, and nothing says ‘welcome’ like the vibrant, living colors of a perfectly styled planter. The combination of velvety petals, the crisp scent of damp potting soil, and the visual movement of vines spilling over the edge creates an immediate sense of joy for anyone walking up your steps. We love this because it’s a sensory experience that changes with the seasons, offering a fresh burst of energy and a soft, organic contrast to the hard lines of your home’s architecture. It’s an instant mood lifter that says someone cares deeply about the life happening inside.
Essential Elements:
- Large weather-resistant planters (terracotta, ceramic, or resin)
- High-quality potting mix with perlite
- ‘Thriller’ plant (e.g., Fountain Grass or Canna Lily)
- ‘Filler’ plants (e.g., Geraniums or Petunias)
- ‘Spiller’ plants (e.g., Sweet Potato Vine or Creeping Jenny)
- Slow-release fertilizer granules
How to make it
- Select a pot with adequate drainage holes and fill the bottom third with empty plastic milk jugs or crushed cans to reduce weight and save on soil, then fill the remainder with premium potting mix.
- Incorporate slow-release fertilizer into the top few inches of soil to ensure your plants have a steady ‘diet’ of nutrients throughout the growing season, preventing the mid-summer fade-out.
- Plant your ‘Thriller’—the tallest, most architectural plant—in the center or the back of the pot; ensure the root ball is level with the soil surface and tease the roots gently if they are pot-bound.
- Surround the center plant with ‘Fillers’—mounding plants that provide bulk and color—spacing them about 4 inches apart to allow for rapid growth and airflow to prevent powdery mildew.
- Tuck your ‘Spillers’ along the very edge of the pot, angling them slightly outward so they immediately begin to cascade down the sides, creating that lush, overflowing ‘dreamy’ aesthetic.
How to Create a Cute Campsite Setup for a Cozy Backyard Retreat

Why we love this
There is a nostalgic magic in sleeping under the stars, but doing it in your own backyard adds a layer of luxury and comfort that a remote forest can’t provide. This setup is all about the soft glow of lanterns against canvas, the crackle of a small fire, and the smell of toasted marshmallows drifting through the night air. We love it because it turns an ordinary patch of grass into a portal for adventure, providing a sanctuary where screens are forgotten and the only thing that matters is the warmth of a wool blanket and the sound of crickets. It’s the ultimate way to romanticize your home life.
Essential Elements:
- Canvas bell tent or high-quality teepee
- Outdoor rugs and faux fur throws
- Portable fire pit or chiminea
- String lights (Edison bulbs) and LED lanterns
- Floor cushions and inflatable mattresses
- Small wooden crate for a nightstand
How to make it
- Choose a level, well-drained area of the lawn and lay down a heavy-duty tarp slightly smaller than your tent footprint to prevent moisture from seeping through the floor during the night.
- Erect your tent, ensuring the tension on the guy lines is even all around; for a ‘dreamy’ look, choose a cream-colored canvas that will glow like a lamp when lit from within.
- Layer the interior with a large outdoor rug to provide insulation from the ground, then add an inflatable mattress topped with high-thread-count sheets and several heavy, textured quilts.
- String Edison bulbs along the perimeter of the tent and hang a cluster of battery-operated lanterns from the center pole to create a warm, multi-layered lighting scheme that feels cozy and safe.
- Place a portable fire pit at least 10 feet away from the tent entrance and arrange wooden Adirondack chairs with extra pillows to create a dedicated zone for storytelling and campfire snacks.
How to Apply Spring Flowers Wallpaper for a Fresh Seasonal Refresh

Why we love this
Wallpaper is the ultimate transformational tool; it’s like giving a room a brand-new personality in just a few hours. A delicate spring floral pattern brings the outside in, offering a permanent bloom that never wilts and fills the space with visual rhythm. We love the tactile process of smoothing the paper, watching the patterns align perfectly, and seeing a boring ‘beige’ wall turn into a vibrant garden. It changes the way light bounces around the room, making the space feel taller, brighter, and infinitely more curated. It’s a bold statement that feels soft and romantic all at once.
Essential Elements:
- Rolls of peel-and-stick or pre-pasted floral wallpaper
- Craft knife with sharp replacement blades
- Wallpaper smoothing tool (plastic or felt-edged)
- Plumb line or spirit level
- Large sponge and bucket of clean water
- Metal straight edge
How to make it
- Prepare your walls by wiping them down with a damp cloth to remove dust and oils; if the wall is newly painted, wait at least 4 weeks for the paint to fully ‘outgas’ or the adhesive may fail.
- Use a plumb line or level to draw a perfectly vertical pencil line on the wall where your first panel will go; never rely on the corner of the room, as walls are rarely perfectly square.
- Peel back about 12 inches of the backing and align the edge of the paper with your vertical line, leaving an extra inch at the ceiling to trim later for a perfect fit.
- Use the smoothing tool to press the paper from the center outward, applying firm pressure to remove all air bubbles; if you encounter a stubborn bubble, use a tiny pin to prick it and smooth the air out.
- Align the second panel by matching the pattern at eye level first, then work your way up and down; use a fresh, sharp blade to trim the excess at the ceiling and baseboards for a crisp, professional edge.
How to Install a Hog Wire Fence for a Modern Rustic Look
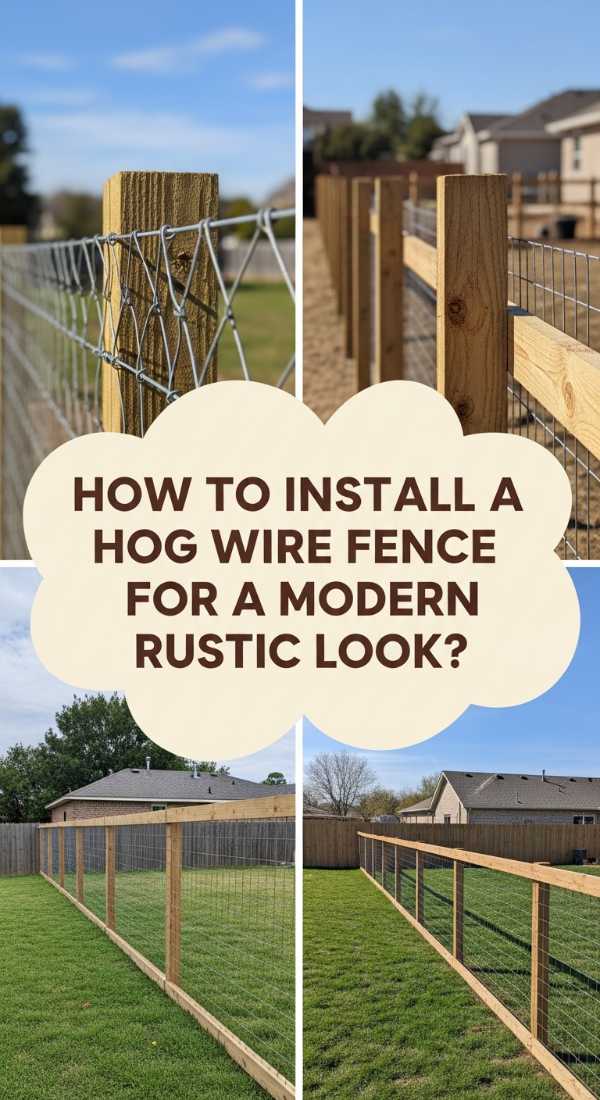
Why we love this
The hog wire fence is the darling of modern farmhouse design for a reason: it provides security and boundary without sacrificing the view. We love the contrast between the industrial, galvanized steel mesh and the warm, natural tones of cedar or pressure-treated lumber. It feels open and airy, allowing the wind to pass through and the landscape to remain visible, yet it has a rugged durability that feels incredibly satisfying. It’s a ‘dreamy’ upgrade because it frames your property like a piece of art, blending into the environment rather than blocking it out.
Essential Elements:
- 4-gauge galvanized hog wire panels
- 4×4 wooden posts and 2×4 framing lumber
- Heavy-duty wire snips or an angle grinder
- Fence staples or U-nails
- Post-hole digger and quick-set concrete
- Level and string line
How to make it
- Dig post holes 24 inches deep and 6 to 8 feet apart, ensuring each hole is wide enough for concrete; set your 4×4 posts using a level and let the concrete cure for at least 24 hours until the posts are immovable.
- Install a bottom ‘rail’ using 2×4 lumber positioned about 2 inches above the ground, and a top rail at your desired height; these will act as the frame for your metal panels.
- Measure the interior of the wooden frame and cut your hog wire panel to size using an angle grinder, making sure to wear eye protection and gloves as the cut edges are extremely sharp.
- Sandwich the wire panel between your 2×4 frame and a second set of 1×2 ‘stop’ boards, or use heavy-duty fence staples every 6 inches to secure the wire directly to the back of the frame.
- Apply a high-quality exterior stain or clear sealant to the wood to protect it from graying and rot, ensuring the modern-rustic aesthetic lasts for decades against the elements.
How to Select Pool Stone and Tile for a Luxurious Backyard Oasis

Why we love this
There is nothing quite as evocative of luxury as the cool, smooth touch of natural stone beneath your feet on a hot summer day. Choosing the right pool tile is about creating a sensory escape; the way the water shimmer reflects off iridescent glass or the earthy, grounded feeling of tumbled travertine. We love this project because it elevates a standard pool into a high-end resort experience. The visual transition from the blue of the water to the sand-colored stone creates a harmonious palette that feels both timeless and deeply relaxing.
Essential Elements:
- Travertine or Slate pavers (for the deck)
- Glass or Ceramic waterline tiles
- Waterproof thin-set mortar
- Pool-grade grout with antimicrobial properties
- Wet saw with a diamond blade
- Stone sealer
How to make it
- Select a stone for the deck that has a high ‘solar reflectance index’ (SRI) like light-colored travertine, which stays cool to the touch even in direct 100-degree sunlight.
- Ensure the pool shell is properly ‘scarified’ or roughened so the mortar can create a mechanical bond; then, apply a layer of waterproof thin-set using a notched trowel.
- Press your waterline tiles into the mortar, using spacers to maintain 1/8-inch gaps; choose glass tiles with a subtle shimmer to catch the ‘visual cue’ of moving water and sunlight.
- Apply grout using a rubber float, pushing it deep into the joints at a 45-degree angle; wait about 15 minutes (until it looks hazy) then wipe away excess with a barely-damp sponge.
- Once the grout is fully cured, apply two coats of a penetrating stone sealer to the pavers to prevent chlorine or salt-water erosion and to keep the stone’s natural color vibrant.
How to Build a DIY Planter Light Post for Beautiful Nighttime Ambience

Why we love this
As the sun sets, your garden shouldn’t disappear into the shadows. We love the DIY planter light post because it adds vertical interest and a warm, inviting glow that extends your living space into the night. The combination of a sturdy wooden post, a base filled with fragrant blooming jasmine or cascading ivy, and a soft lantern on top creates a ‘nook’ feeling anywhere in your yard. It’s a clever way to add lighting without digging trenches for wires, providing a sophisticated and functional focal point that guides guests along a path or anchors a seating area.
Essential Elements:
- Large wooden or plastic whiskey barrel planter
- 4×4 pressure-treated wooden post (6-8 feet tall)
- Fast-setting concrete mix
- Solar-powered post cap light or a hanging lantern
- Decorative hooks and hardware
- Potting soil and climbing plants
How to make it
- Place your 4×4 post in the center of the empty planter; use a level to ensure it is perfectly vertical and secure it temporarily with scrap wood braces.
- Pour a bag of dry fast-setting concrete into the planter around the post, then add water according to the package instructions; the concrete should fill about half the planter to provide a heavy, wind-resistant base.
- Once the concrete has hardened (usually within 30-60 minutes), drill several drainage holes in the side of the planter just above the concrete line to allow excess rainwater to escape.
- Attach a decorative solar light to the top of the post or screw in a large ‘shepherd’s hook’ to hang a vintage-style lantern; ensure the solar panel has a clear view of the sky for maximum charging.
- Fill the remaining space in the planter with potting soil and plant high-climbing vines like Clematis or Morning Glories that will eventually wrap around the post, softening the look with green textures.
How to Design a Mud Kitchen for Endless Creative Outdoor Play

Why we love this
A mud kitchen is a celebration of childhood in its purest form—messy, imaginative, and completely immersive. We love the way this project encourages little ones to engage with the natural world, using pinecones as ‘spices’ and mud as ‘cake batter.’ It’s a dreamy addition to the backyard because it looks like a miniature version of a rustic farmhouse kitchen, complete with little hooks for utensils and a ‘sink’ for cleaning up. The sound of wooden spoons clacking against metal bowls and the focused silence of a child ‘cooking’ is the soundtrack of a happy home.
Essential Elements:
- Recycled wooden pallets or cedar boards
- Old stainless steel mixing bowls (for sinks)
- Discarded kitchen faucet (for decoration)
- Outdoor-rated wood screws
- Hooks for hanging ladles and whisks
- Non-toxic outdoor paint or stain
How to make it
- Build a basic rectangular frame using cedar 2x4s, standing about 24 inches high (the perfect height for toddlers); use weather-resistant screws to ensure the structure survives the rain.
- Create a ‘countertop’ using slats of wood, but leave a large circular cutout sized slightly smaller than your stainless steel bowls so they can drop in and rest securely on their rims.
- Mount a vertical backboard to the frame and attach a series of small hooks; this is where you’ll hang old whisks, slotted spoons, and measuring cups to give it a ‘professional’ kitchen feel.
- Add a lower shelf for storing ‘supplies’ like buckets of sand, stones, and dried flower petals; this keeps the play area organized and encourages kids to gather their own ingredients.
- Sand all surfaces thoroughly to prevent splinters and finish with a coat of food-safe linseed oil or a bright, cheerful outdoor paint that invites children to come and play.
How to Choose Color Palettes for a Harmonious Home Aesthetic

Why we love this
Color is the silent conductor of a home’s mood. When a palette is chosen correctly, a house feels like a cohesive story rather than a collection of random rooms. We love the ‘dreamy’ effect of a well-balanced home aesthetic—the way a soft sage green in the mudroom can lead into a creamy linen living room, creating a sense of flow and calm. It’s about more than just paint; it’s the way light hits a specific shade of ochre or how a cool blue can make a small, cramped hallway feel like it’s filled with fresh air. It’s the ultimate foundation for all other design choices.
Essential Elements:
- Paint swatches and sample pots
- A ‘hero’ inspiration item (a rug, a painting, or a pillow)
- Color wheel
- Natural and artificial light sources for testing
- Poster board for large-scale swatches
How to make it
- Start by identifying one ‘hero’ item that you absolutely love, like a vintage Turkish rug or a botanical print, and pull three core colors from it to serve as your primary palette.
- Apply the ’60-30-10′ rule: 60% of the space should be a dominant neutral (walls), 30% a secondary color (upholstery/curtains), and 10% a bold accent color (pillows/art).
- Observe your paint samples at three different times of day—morning, noon, and evening—as the shifting ‘color temperature’ of the sun can turn a beautiful gray into a muddy purple in an instant.
- Ensure a ‘visual thread’ by carrying one color throughout the entire home; for example, use the same trim color or door hardware finish in every room to provide a sense of continuity and professional design.
- Test your colors on large poster boards rather than the wall itself; this allows you to move the ‘color’ around the room to see how it looks in dark corners versus next to bright windows.
How to Make Garden Labels for a Perfectly Organized Herb Patch

Why we love this
Organization can be beautiful, and these handcrafted garden labels prove it. There is a deep satisfaction in seeing your herb patch clearly marked with stylish, weather-worn tags. We love the way they look nestled among the feathery fronds of dill or the woody stems of rosemary, providing a finished, ‘curated’ look to a simple garden bed. They evoke the feeling of an old English potager garden, where every plant is known and tended to with care. Plus, the scent of crushed herbs on your fingers as you place the markers is the perfect reward for a weekend spent outdoors.
Essential Elements:
- Large, flat river stones or wooden shims
- Permanent outdoor paint markers or an engraving tool
- Clear weatherproof sealant (matte or gloss)
- Copper wire or twine (if hanging)
- Small hammer and metal stamps (optional)
- Isopropyl alcohol for surface prep
How to make it
- Clean your stones or wooden labels thoroughly with isopropyl alcohol to remove any dirt or oils that would prevent the ink or paint from adhering to the surface.
- Sketch your plant names lightly in pencil before committing with the paint marker; for a ‘dreamy’ look, use a faux-calligraphy style with thick downstrokes and thin upstrokes.
- If using metal stamps on wooden shims, strike the stamp firmly with a hammer once to create a deep, legible indent, then rub a little dark paint into the groove to make the letters pop.
- Apply two thin coats of clear UV-resistant sealant over the lettering, allowing at least 2 hours of ‘dry time’ between coats to ensure the labels won’t fade under the harsh summer sun.
- Place the markers at the base of your plants or tie them to garden stakes using copper wire; the copper will develop a beautiful green patina over time, adding to the rustic, dreamy aesthetic.
Creating Your Own Sanctuary
Transforming your home from drab to dreamy isn’t about perfection; it’s about the process. Each of these projects adds a layer of ‘you’ to your environment. Whether you’re building a wall that will stand for decades or just labeling a few herbs, you’re creating a space that nurtures your soul and welcomes your loved ones. So go ahead, pick one project, grab your tools, and make this weekend the start of something beautiful.
Frequently Asked Questions
- Q: Which project is best for a complete beginner?
A: Styling front porch pots or making garden labels are perfect starting points! They require very few tools and provide immediate visual satisfaction. - Q: Do I need expensive power tools for the hog wire fence?
A: Not necessarily! While an angle grinder makes cutting the wire faster, a pair of heavy-duty bolt cutters and a simple hand saw for the wood will get the job done just fine. - Q: How do I choose the right wallpaper pattern for a small room?
A: For small spaces, look for a pattern with a ‘large scale’ but plenty of ‘white space.’ This prevents the room from feeling cluttered while still making a big style statement. - Q: Is the mud kitchen safe for toddlers?
A: Yes! Just ensure you sand the wood thoroughly to remove splinters and use non-toxic, lead-free paints or natural oils for the finish.