

15 Stunning Wedding Nail Designs for the Modern Bride
Oh, my loves, there is something so magical about the soft, quiet moments before the big ‘I do.’ When the dress is hanging perfectly and the light hits your ring just right, you realize it’s the tiniest details that carry the most heart. Your hands will be held, photographed, and admired all day, and I want them to feel like a cloud-soft embrace of elegance.
Choosing your wedding nails is such a sweet ritual of self-care. It’s not just about the polish; it’s about how you feel when you look down at your bouquet. Whether you are a classic romantic or a bold modern spirit, I’ve gathered my favorite inspirations to make sure your bridal glow reaches right down to your fingertips. Let’s dive into these dreamy designs together, shall we?
4 simple steps to style blue wedding nails
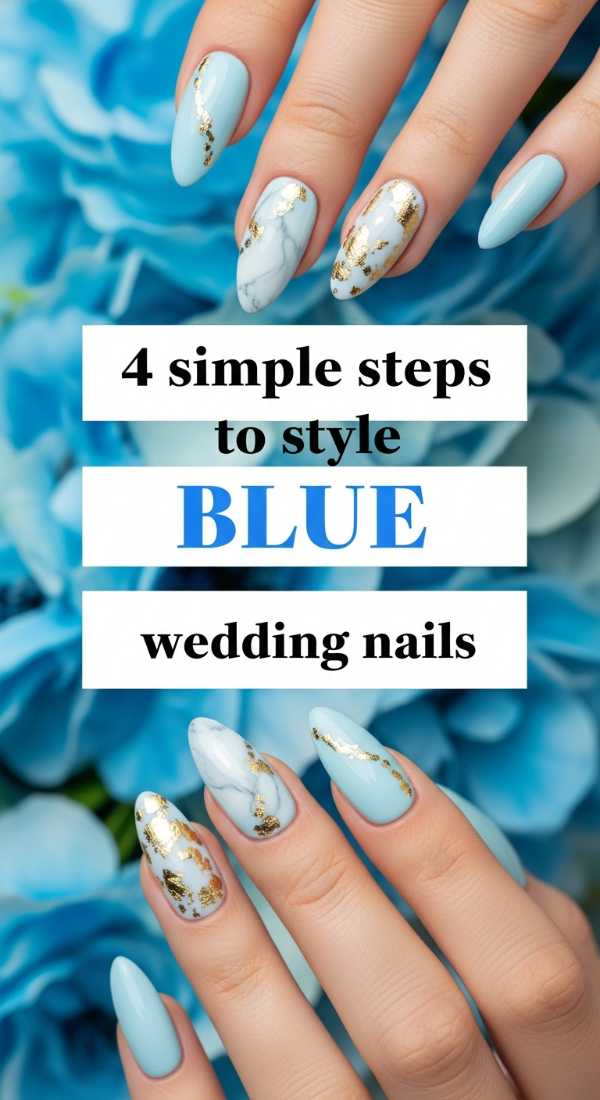
Why to love these Nails:
There is something so poetic about wearing your ‘something borrowed’ right on your fingertips. These soft blue nails are like a whisper of a clear summer sky, offering a serene and unexpected touch to your bridal look that feels both traditional and refreshingly modern.
Essential Items:
- Dusty blue gel polish
- Silver foil flakes
- High-shine top coat
- Cuticle oil
How to Prepare:
- Gently push back cuticles for a clean canvas.
- Apply a thin base coat and cure under UV light.
- Apply two coats of soft blue, adding silver foil to the ring finger while tacky.
- Seal with a glossy top coat for that water-like shine.
Budget Range
- Essie ‘Airy Blue’ – $10
- OPI ‘It’s a Boy!’ – $11
- Nail Art Foil Set – $6
5 easy tips for perfect white wedding nails
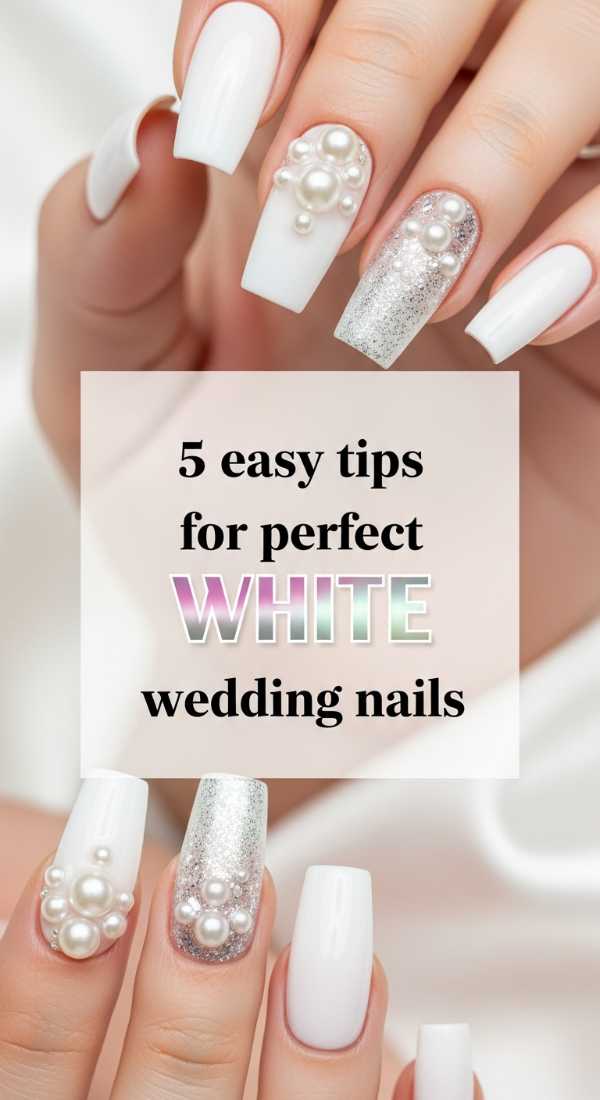
Why to love these Nails:
White is the ultimate symbol of new beginnings, my darlings. A perfect white manicure looks like fresh silk against your gown. It’s clean, it’s crisp, and it makes every diamond spark just a little bit brighter under the altar lights.
Essential Items:
- Opaque white polish
- Ridge filler base
- Detailing brush
- Matte or Glossy top coat
How to Prepare:
- Use a ridge filler to ensure a perfectly smooth surface.
- Apply white polish in three thin, even strokes to avoid streaks.
- Clean the edges with a brush dipped in acetone.
- Apply a second coat once the first is completely dry.
- Finish with a UV-protective top coat to prevent yellowing.
Budget Range
- Zoya ‘Purity’ – $12
- Seche Vite Dry Fast Top Coat – $9
- Orly Ridgefiller – $15
Apply 3 pearl wedding nails designs in minutes
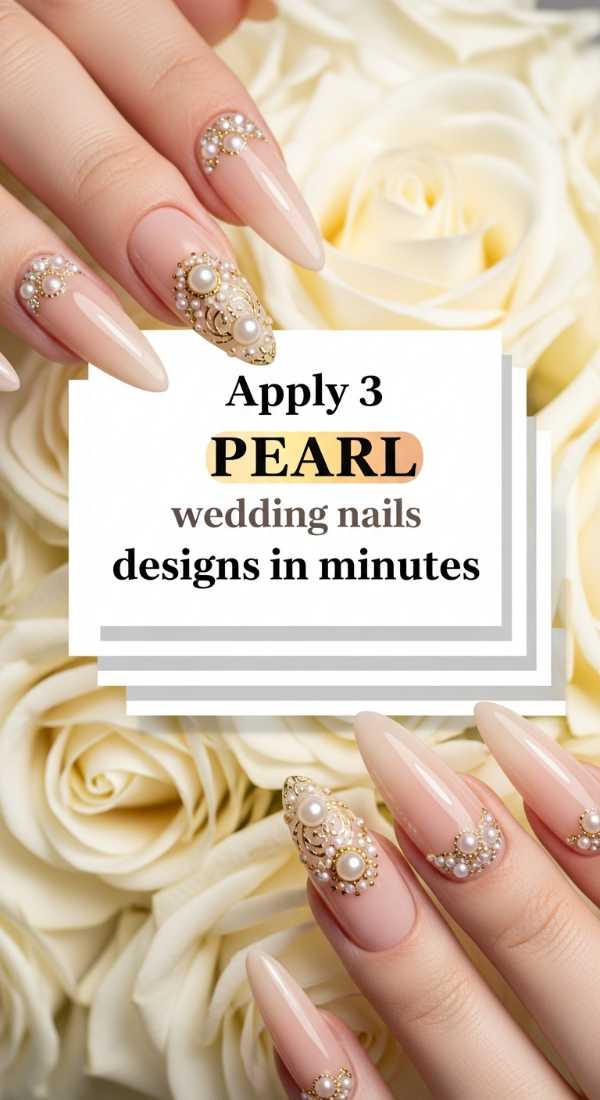
Why to love these Nails:
Pearls are the gems of the sea and the timeless choice for a sophisticated bride. Adding a pearlescent sheen or tiny 3D pearls creates a texture that is so romantic and soft, it’s like wearing a piece of vintage jewelry on every nail.
Essential Items:
- Pearlescent chrome powder
- Tiny flat-back pearls
- Nail glue
- Sheer nude base
How to Prepare:
- Apply a sheer nude base and cure.
- Rub chrome powder over the nail for a glazed finish.
- Place three tiny pearls near the cuticle using nail glue.
- Secure everything with a thick gel top coat.
Budget Range
- Chrome Powder Kit – $14
- Bulk Flat-back Pearls – $8
- Kiss Nail Glue – $4
6 ways to create elegant pink wedding nails
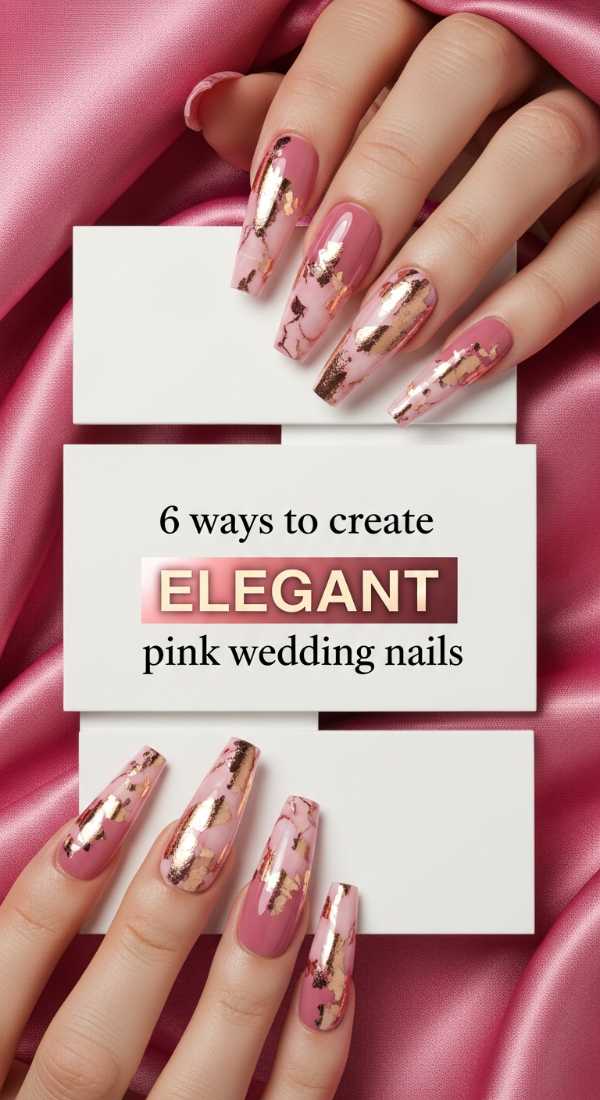
Why to love these Nails:
Pink is the color of a blushing bride’s cheeks and the softest peony petals. It’s a classic for a reason—it’s feminine, warm, and blends seamlessly with any skin tone, giving you a natural yet polished glow that feels so incredibly ‘you.’
Essential Items:
- Sheer pink polish
- Rose gold glitter
- Sponge for ombre effect
- Fine liner brush
How to Prepare:
- Start with a sheer pink base.
- Sponge rose gold glitter onto the tips for a soft ombre.
- Use a liner brush to paint a delicate heart on the thumb.
- Layer a second coat of sheer pink over the glitter for a ‘lit-from-within’ look.
- Cure under LED light.
- Finish with a plump top coat.
Budget Range
- DND ‘Sheer Pink’ – $9
- Holler and Glow Glitter – $5
- Sally Hansen Miracle Gel – $10
3 secret ways to achieve classy bridal nails

Why to love these Nails:
True class is found in the subtlety of the execution. These ‘secret’ methods focus on the health and natural architecture of your nails, creating a look that is expensive, understated, and utterly timeless for the bride who loves quiet luxury.
Essential Items:
- Glass nail file
- Buffing block
- Nude polish matching skin undertone
- Vitamin E oil
How to Prepare:
- Use a glass file to prevent peeling and create a soft almond shape.
- Buff the nail plate to a high natural shine before applying any color.
- Select a nude that matches your skin’s undertone (cool or warm) for an elongated finger look.
Budget Range
- Glass Nail File – $12
- Deborah Lippmann ‘Naked’ Polish – $20
- SolarOil Cuticle Care – $13
Get 5 beach wedding nails looks for summer
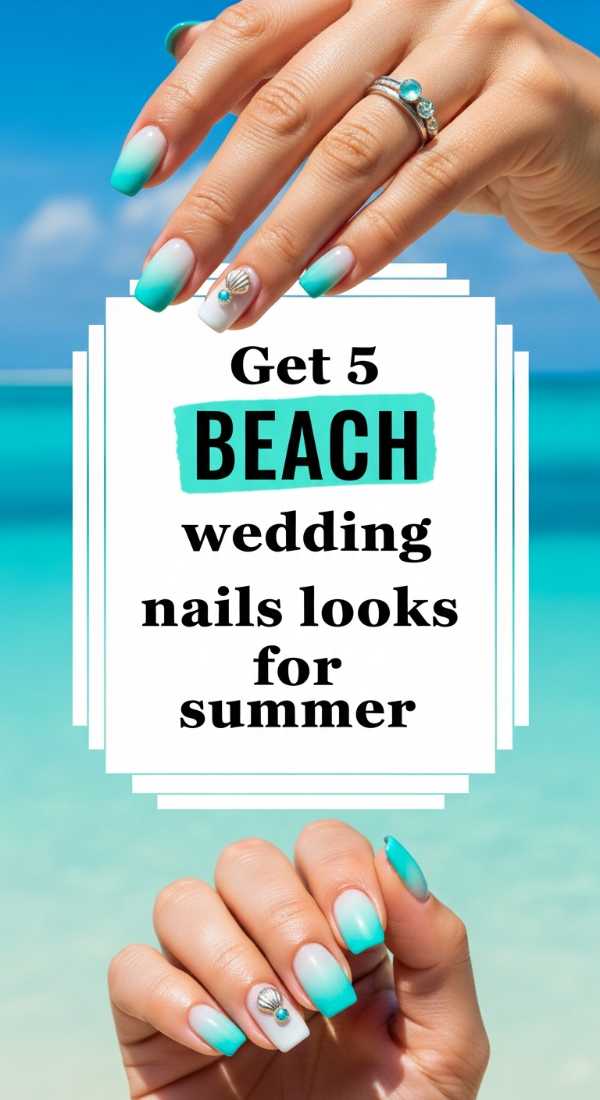
Why to love these Nails:
For my beach babes, these nails are all about capturing the light of the sun on the water. They are playful, breezy, and look absolutely stunning against a backdrop of sand and surf. It’s like bringing the ocean’s magic to your wedding day.
Essential Items:
- Seafoam green polish
- Gold leaf
- Matte top coat
- Tiny seashell decals
How to Prepare:
- Apply seafoam green as a base.
- Add gold leaf to represent sunlight on the sand.
- Press on a tiny seashell decal for a 3D touch.
- Seal with a matte top coat for a sea-glass finish.
- Hydrate with coconut-scented oil.
Budget Range
- Olive & June ‘KMC’ – $9
- Gold Leaf Flakes – $7
- Nail Decal Set – $10
7 steps to master spring wedding nails art
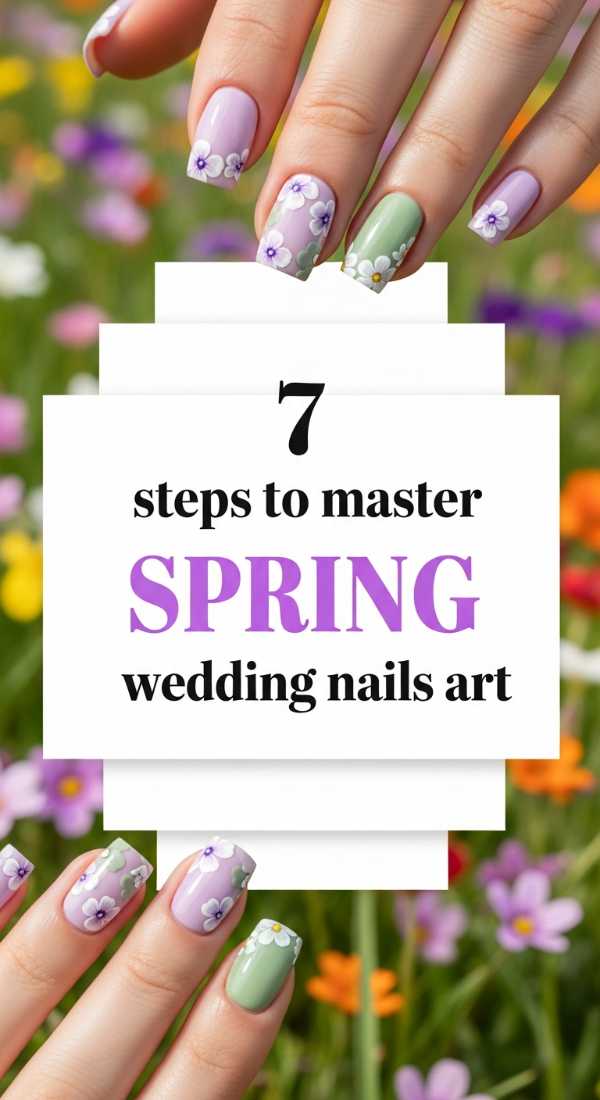
Why to love these Nails:
Spring is a time of blooming love and fresh starts. These floral-inspired designs are delicate and sweet, perfect for a garden wedding where the flowers in your bouquet match the art on your nails. It’s pure, botanical bliss.
Essential Items:
- Lavender and mint polishes
- Dotting tool
- Fine art brush
- Pressed dried flowers
How to Prepare:
- Apply a clear or milky base.
- Carefully place a tiny pressed flower on the center of the nail.
- Use a dotting tool to create small white petals around the flower.
- Add a tiny leaf with mint polish using the fine brush.
- Encapsulate with a thick builder gel.
- Shape the edges once cured.
- Wipe with alcohol for a streak-free shine.
Budget Range
- Pressed Flower Nail Art Kit – $12
- Beetles Pastel Gel Set – $20
- Detail Brush Set – $8
Shape 4 simple wedding nails in square style
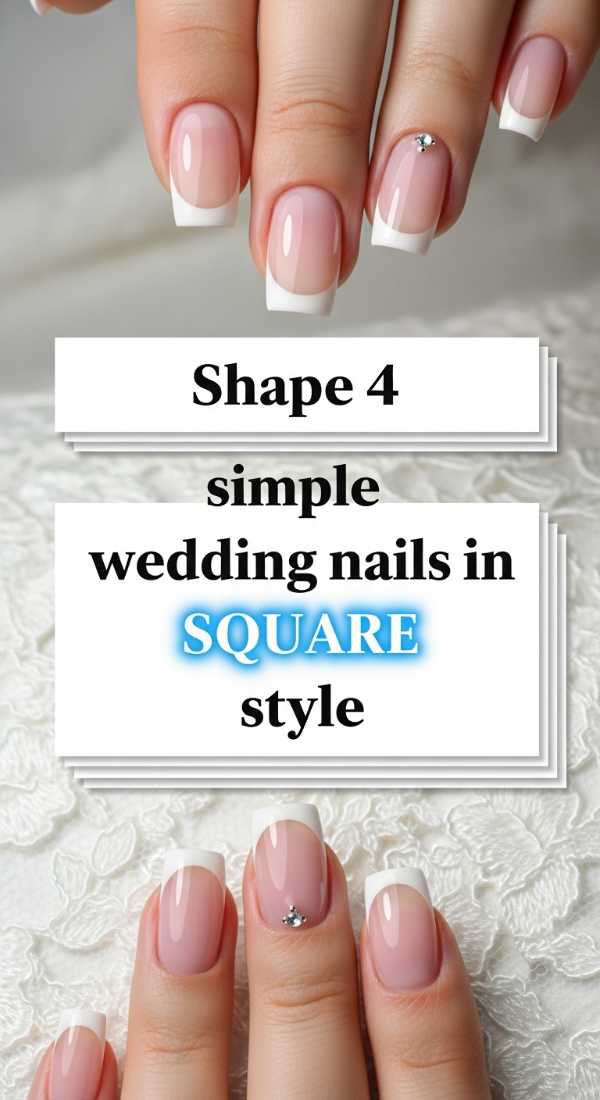
Why to love these Nails:
The square shape is for the bride who loves a bit of edge and modern structure. It’s bold, clean, and provides a wonderful canvas for French tips or geometric designs. It feels confident and chic, just like you, my love.
Essential Items:
- Straight-edge nail clipper
- Medium grit file
- Tapered French tip guides
- Stark white polish
How to Prepare:
- Clip nails straight across in one go.
- File the sides perfectly vertical to the nail bed.
- Smooth the top edge but keep the corners sharp.
- Apply a crisp French tip using the guides for a modern look.
Budget Range
- Professional Nail Clippers – $15
- OPI ‘Alpine Snow’ – $11
- French Manicure Guides – $5
Follow 3 steps for chic black wedding nails

Why to love these Nails:
Who says you can’t wear black on your wedding day? For the unconventional, moody, and deeply romantic soul, black nails are a stunning statement of strength and mystery. They are incredibly chic and look breathtaking paired with gold jewelry.
Essential Items:
- True black gel polish
- Gold chrome pigment
- High-gloss top coat
How to Prepare:
- Apply two thin layers of jet black polish, curing between each.
- Apply a gold chrome ‘smile line’ at the base of the nail.
- Finish with the glossiest top coat you can find for a liquid-obsidian effect.
Budget Range
- Gelish ‘Black Shadow’ – $14
- Gold Chrome Powder – $9
- Vena Lisa Tempered Top Coat – $12
Design 5 sets of wedding nails for bridesmaids
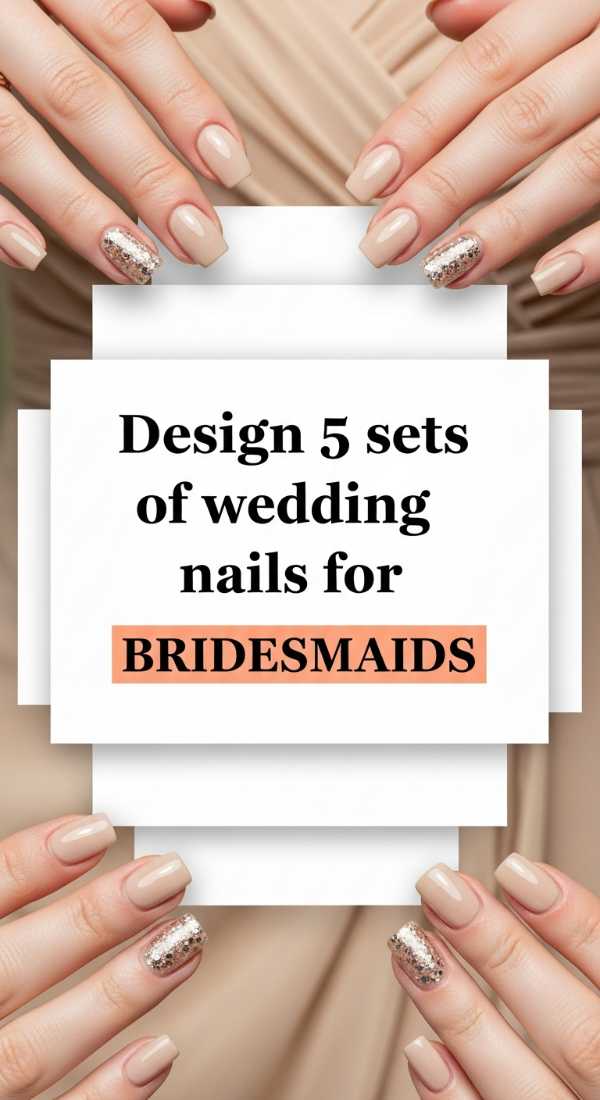
Why to love these Nails:
Your bridesmaids are your support system, and having a cohesive nail look ties the whole bridal party together! These designs are versatile and sweet, ensuring your besties look polished while letting your bridal nails take center stage.
Essential Items:
- Champagne shimmer polish
- Mauve cream polish
- Clear top coat
- Assorted nail gems
How to Prepare:
- Choose a color palette that complements the bridesmaid dresses.
- Assign a different texture (matte, shimmer, cream) to each bridesmaid for variety.
- Add a single gem to each girl’s ring finger for a touch of sparkle.
- Ensure everyone uses the same top coat for a unified finish.
- Provide a mini ‘touch-up’ kit for each girl.
Budget Range
- Bulk 10-pack Polishes – $35
- Mixed Rhinestone Case – $10
- Mini Buffer Packs – $8
Embrace Your Bridal Glow
Choosing your wedding nails is such a personal journey, a little love letter to yourself on the biggest day of your life. Whether you chose the softest blue or a bold, chic black, remember that the most beautiful thing you can wear is your joy. Let your hands tell the story of your love as you embark on this beautiful new chapter. I am sending you so much love and light for your special day!
Frequently Asked Questions
How long before the wedding should I get my nails done?
I always recommend getting your nails done 1-2 days before the ceremony. This ensures they are fresh and chip-free, but gives you one less thing to worry about on the morning of the wedding!
Should I choose gel or regular polish?
For a wedding, gel is almost always the way to go! It’s durable, shiny, and won’t chip while you’re greeting guests or dancing the night away. Plus, there’s zero dry time.
What nail shape is most flattering for wedding photos?
Almond and oval shapes are generally the most flattering as they elongate the fingers and look very soft in close-up ring shots. However, square is a beautiful choice for a more modern, structured vibe!