

Breathe New Life Into Your Home: Top-Tier DIY Garden and Interior Hacks
There is a unique kind of magic that happens when you decide to stop seeing your home as a finished product and start seeing it as a living, breathing canvas. We’ve all been there—staring at that one corner of the yard that feels a bit lackluster or a pantry that seems to swallow boxes of pasta whole. The shift from ‘I wish this looked better’ to ‘I can make this amazing’ is where the real joy of homeownership begins, and it doesn’t always require a massive contractor bill.
In this guide, I’m sharing my favorite transformative projects that blend aesthetic luxury with practical DIY spirit. Whether you’re looking to boost your curb appeal with vibrant blooms or create a nostalgic sanctuary inside your walls, these hacks are designed to ground you in the present moment. Let’s roll up our sleeves and turn those ‘someday’ projects into the beautiful reality you get to wake up to every single morning.
How to Design Dreamy Front Yard Flower Beds for Instant Curb Appeal
Why we love this
There is something profoundly therapeutic about the scent of damp, nutrient-rich soil as you press delicate roots into their new home. Imagine stepping out onto your porch to see a tapestry of velvety petals in shades of lavender and butter-yellow, gently swaying in the morning breeze. The crisp, clean edge of the mulch creates a professional frame that makes your home feel loved and cared for, turning a simple plot of dirt into a living piece of art that greets you every single day with a burst of natural fragrance.
Essential Elements:
- High-quality garden soil and organic compost
- A mix of perennials (hostas, cone-flowers) and annuals (petunias, marigolds)
- Natural cedar mulch or dark hardwood mulch
- Long-handled shovel and a hand trowel
- Garden hose with a misting nozzle
- Decorative stone edging or a trenching tool
How to make it
- Begin by sketching a curved layout on the ground using a garden hose or spray paint; curves feel more organic and high-end than rigid straight lines.
- Remove the existing grass within your marked area by digging 3-4 inches deep, ensuring you remove all root systems to prevent weeds from returning.
- Amend your soil by mixing in a 2-inch layer of organic compost to provide the drainage and nutrients necessary for vibrant blooms.
- Place your tallest plants in the back (nearest the house) and taper down to the shortest at the front edge; this creates a professional, multi-dimensional look.
- Dig holes twice as wide as the plant’s root ball, place the plant so the top of the root ball is level with the soil, and firm the earth gently around it to remove air pockets.
- Apply a 2-3 inch layer of mulch around the plants, keeping it an inch away from the stems to prevent rot, then soak the entire bed until the water penetrates at least 4 inches deep.
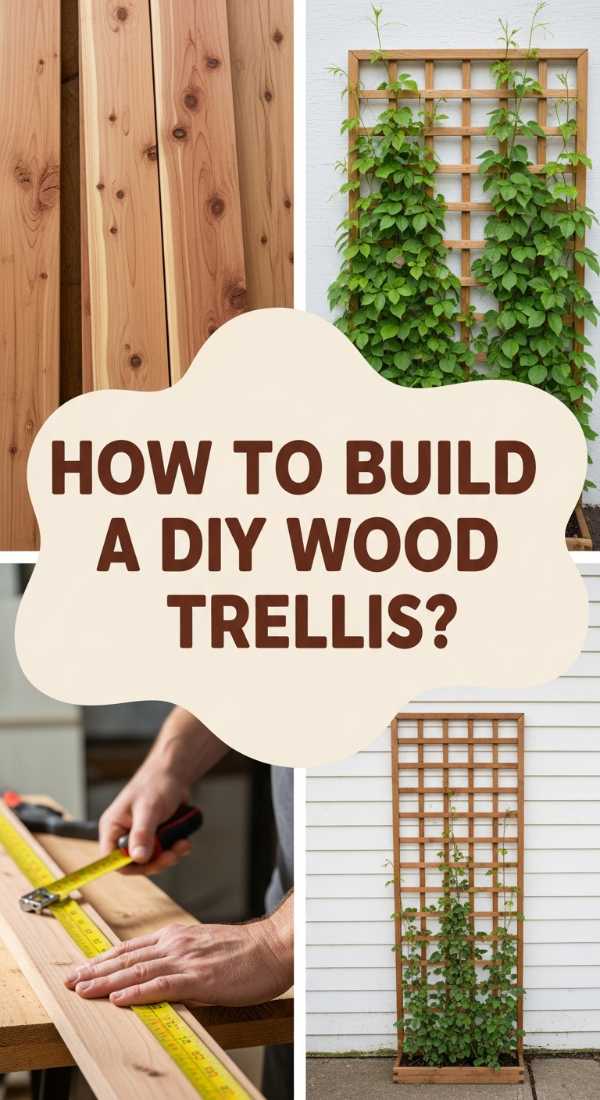
How to Build a Custom DIY Wood Trellis for a Lush Garden Oasis

Why we love this
Vertical gardening is the secret to making a small space feel like a sprawling botanical garden. The sight of climbing jasmine or ivy weaving through warm, sun-kissed cedar slats brings a sense of height and architectural sophistication to any backyard. As the wood weathers to a beautiful silver-grey or retains its rich honey hue, it provides a sturdy skeleton for emerald leaves to cling to, filling the air with the sweet, heady perfume of climbing vines and creating a private, secluded sanctuary from the outside world.
Essential Elements:
- Pressure-treated or cedar 2×2 boards
- Galvanized wood screws (2.5 inch)
- Power drill and pilot bits
- Measuring tape and a carpenter’s square
- Exterior wood stain or sealant
- Climbing plants like Clematis or Star Jasmine
How to make it
- Measure the height of your wall or fence and cut two vertical support beams to length, then lay them flat on a level surface.
- Cut your horizontal cross-slats; for a modern look, space them 4-6 inches apart, ensuring each cut is perfectly square for a professional finish.
- Pre-drill pilot holes at every intersection point to prevent the wood from splitting, which is a common mistake that ruins the structural integrity of thin slats.
- Drive your galvanized screws through the slats and into the support beams, using your carpenter’s square to check the 90-degree angle after every second screw.
- Apply a high-quality exterior stain with a brush, working with the grain, and let it cure for at least 24 hours before mounting it to your wall using masonry or wood anchors.
- Plant your vines at the base and gently weave the primary stems through the lower slats to ‘train’ them to grow upward.
How to Create a Serene Hot Tub Area for Ultimate Backyard Relaxation

Why we love this
There is no greater luxury than stepping into steaming, bubbling water while the cool evening air nips at your shoulders. By surrounding your hot tub with soft textures like outdoor rugs and the warm glow of amber string lights, you transform a plastic tub into a high-end spa retreat. The sound of water gently lapping against the sides, combined with the tactile comfort of plush towels waiting nearby, creates an immersive sensory experience that melts away the stress of the day and invites deep, soulful conversation under the stars.
Essential Elements:
- Weather-resistant outdoor rug
- Privacy screens or tall potted bamboo
- Solar-powered warm LED string lights
- Small side table for drinks and candles
- Plush, oversized Turkish cotton towels
- Scented outdoor candles or citronella coils
How to make it
- Clear a 10×10 foot area around your hot tub and level the ground using sand or a pre-fabricated spa pad to ensure the weight is evenly distributed.
- Roll out an oversized outdoor rug that extends at least two feet beyond the tub’s edge to provide a soft, slip-resistant surface for wet feet.
- Install 6-foot privacy screens or plant a row of clumping bamboo in large planters to create a ‘walled-in’ garden feel that blocks the neighbors’ view.
- Drape string lights in a ‘zigzag’ pattern overhead, ensuring they are high enough to be out of splash range but low enough to cast a cozy, golden light.
- Position a low-profile side table within arm’s reach of the water for towels and refreshments, opting for materials like teak or resin that handle moisture well.
- Add a basket of rolled towels and a small waterproof Bluetooth speaker to complete the atmosphere with soft, ambient music.
How to Master Rock River Bed Landscape Design for a Natural Garden Flow
Why we love this
A dry creek bed is the ultimate solution for drainage issues that looks like a masterpiece of natural engineering. We love the way smooth, multi-colored river rocks catch the light after a rainstorm, mimicking the look of a mountain stream. The contrast between the rugged textures of the stones and the soft fronds of surrounding ferns creates a balanced, Zen-like atmosphere. It’s a low-maintenance feature that adds movement and a sense of ‘flow’ to your yard, making it feel grounded and connected to the Earth.
Essential Elements:
- Assorted river rocks (ranging from 1 inch to 8 inches)
- Large ‘anchor’ boulders for visual weight
- Heavy-duty landscape fabric
- Steel landscape staples
- Shovel and garden rake
- Moisture-loving plants (ferns, sedge grass)
How to make it
- Dig a shallow, meandering trench approximately 12 inches deep and 2-3 feet wide, following the natural slope of your yard where water tends to collect.
- Line the entire trench with heavy-duty landscape fabric, overlapping edges by 6 inches and securing them with steel staples to prevent weed growth.
- Place your largest ‘anchor’ boulders at the bends of your ‘river’ first; these should look partially buried to appear as though they’ve been there for centuries.
- Fill the bottom of the trench with medium-sized river rocks, then scatter smaller pebbles over the top to fill in the gaps and create a realistic ‘streambed’ texture.
- Use a rake to ensure the rocks are slightly lower in the center than at the edges to guide water flow during heavy rain.
- Plant ornamental grasses and ferns along the edges, tucking them slightly behind the larger rocks to soften the transition between the stone and the lawn.
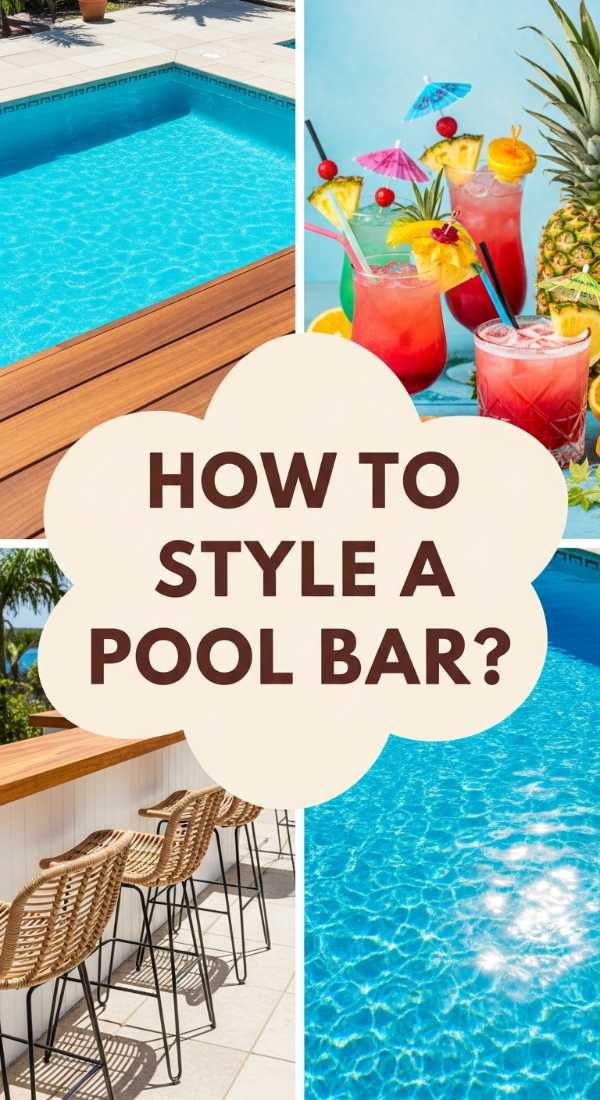
How to Style Above Ground Pool Bar Ideas for a Luxury Summer Vibe
Why we love this
Turning an above-ground pool into a luxury destination is all about the ‘resort’ mindset. A poolside bar with a sleek countertop and tropical stools creates a social hub where memories are made over ice-cold lemonade and sunblock. We love the juxtaposition of the cool blue water against the warm wood of a bar top. It’s about creating a space where the transition from swimming to snacking is seamless, making your backyard the undisputed go-to spot for every summer weekend gathering.
Essential Elements:
- Weatherproof bar counter (reclaimed wood or stone)
- Counter-height outdoor bar stools
- Large cantilever umbrella for shade
- Outdoor-rated ice chest or mini-fridge
- Garnish station with fresh mint and citrus
- Non-breakable acrylic glassware
How to make it
- Construct a simple frame using 4×4 pressure-treated posts anchored into the ground or attached to the pool’s existing deck frame.
- Mount a wide, smooth countertop (at least 18 inches deep) at a height of 42 inches, which is the standard height for comfortable standing or stool seating.
- Sand the wood surface to a fine 220-grit finish and apply three coats of marine-grade spar urethane to protect it from chlorine splashes and UV rays.
- Arrange 3-4 stools with a minimum of 24 inches of space between them to allow guests to move freely without feeling cramped.
- Install a dedicated ‘wet zone’ nearby with a small prep area and an insulated cooler hidden inside a wooden cabinet for a cohesive, high-end look.
- Finish the look with a large umbrella that covers both the bar and a portion of the pool, providing a cool retreat from the midday sun.
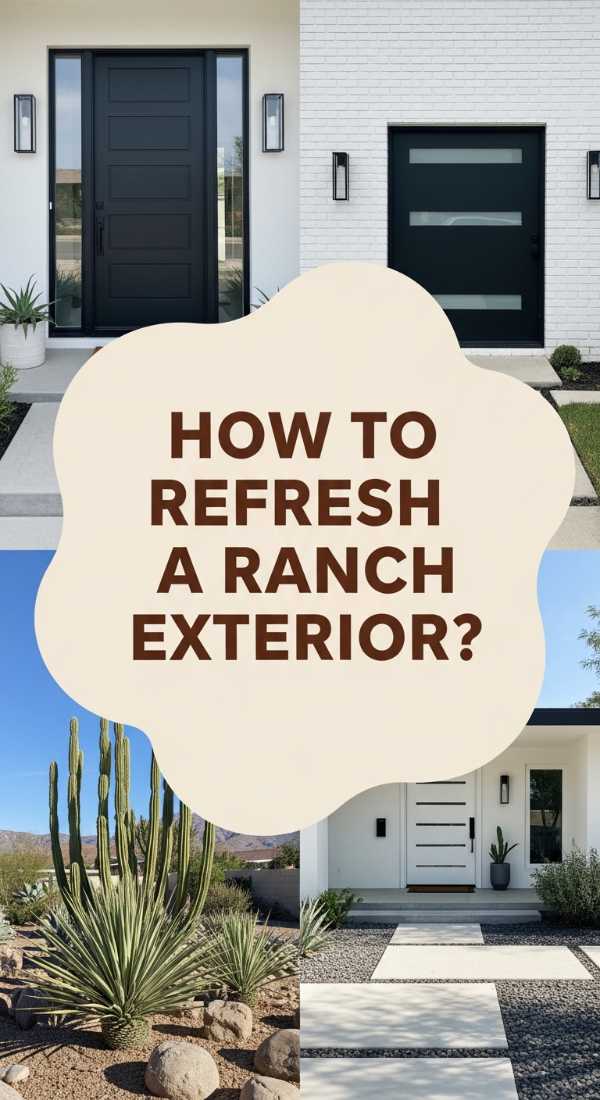
How to Refresh a Retro Ranch Exterior Remodel for Modern Luxury Living

Why we love this
There is a quiet dignity in a ranch-style home, and updating its exterior is like helping an old friend find their modern confidence. The clean lines of mid-century design meet the sophistication of the 21st century through deep charcoal paints and natural wood accents. We love the way a simple change in hardware or a bold new door color can make the entire house feel ‘expensive’ and intentional. It’s a transformation that honors the home’s history while embracing a sleek, minimalist future that radiates warmth and curb appeal.
Essential Elements:
- Modern matte black door hardware and house numbers
- High-quality exterior paint in ‘greige’ or charcoal
- Cedar or faux-wood siding accents for the entryway
- Modern ‘up-down’ exterior lighting fixtures
- Fresh, structural landscaping (boxwoods or grasses)
- Power washer and high-grit sandpaper
How to make it
- Start by power washing the entire brick or siding surface to remove decades of oxidation and dirt, which is essential for proper paint adhesion.
- Apply a high-adhesion exterior primer, followed by two coats of premium satin-finish paint; using a sprayer will give you that flawless, factory-like finish.
- Replace dated, ornate light fixtures with sleek, geometric matte black sconces that direct light both up and down to highlight the home’s texture.
- Install a natural wood ‘feature wall’ around the front door using horizontal cedar slats; this provides a warm, organic contrast to the cool paint tones.
- Swap out old house numbers for 5-inch modern floating numbers, ensuring they are perfectly level and visible from the street.
- Finish by painting the front door a ‘pop’ color like deep sage or navy, using a high-gloss finish to make the entryway the undeniable focal point.
How to Craft a Pallet Mud Kitchen for Endless Outdoor Childhood Play
Why we love this
A mud kitchen is a portal to a world where imagination runs wild and ‘dirt’ is the main ingredient in a five-star feast. We love the rustic, chunky feel of the repurposed pallet wood and the clatter of old metal spoons against stainless steel bowls. It encourages children to get their hands messy, to explore the textures of water, sand, and leaves, and to engage in sensory play that feels timeless. It’s a sturdy, sustainable piece of backyard furniture that grows more beautiful with every ‘mud pie’ served on its surface.
Essential Elements:
- 2-3 heat-treated pallets (marked ‘HT’)
- Old stainless steel mixing bowls (to act as sinks)
- Discarded kitchen utensils and old pots
- Battery-operated ‘tap’ or a simple garden hose attachment
- Outdoor-safe wood glue and heavy-duty screws
- Sandpaper (60, 120, and 220 grit)
How to make it
- Select pallets marked ‘HT’ to ensure they haven’t been treated with harmful chemicals, then dismantle them carefully using a crowbar.
- Sand every single board thoroughly, starting with 60-grit and ending with 220-grit, until the wood is buttery smooth to prevent splinters during play.
- Build a basic rectangular frame for the ‘countertop’ and attach four sturdy legs, ensuring the height is appropriate for your child (usually 20-24 inches).
- Cut circular holes in the countertop using a jigsaw, sized slightly smaller than the lip of your stainless steel bowls, and drop the ‘sinks’ into place.
- Add a vertical backboard made of pallet slats to hang spoons, ladles, and whisks using simple cup hooks for easy access.
- Seal the entire structure with a non-toxic, food-grade mineral oil or beeswax finish, which will protect the wood while remaining safe for curious hands.
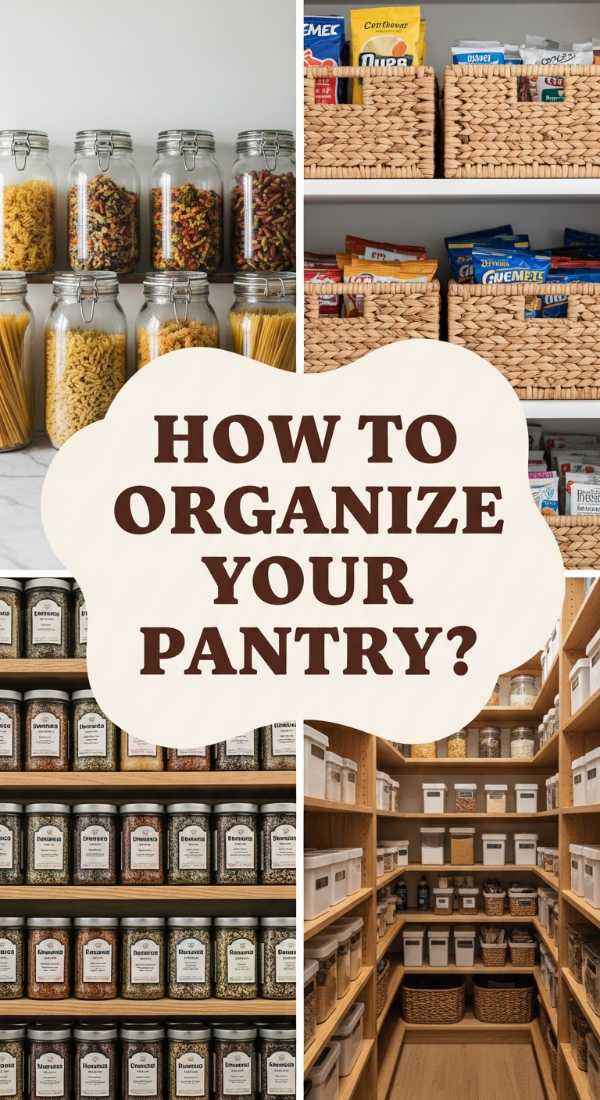
How to Achieve Realistic Pantry Organization for a Stress Free Kitchen Life

Why we love this
Walking into an organized pantry feels like a deep, cleansing breath for your brain. The visual harmony of uniform glass jars, the satisfying ‘pop’ of an airtight seal, and the clear sightlines to every ingredient make cooking feel like a joy rather than a chore. We love the tactical feel of pouring grains into jars and the way a simple labeling system can turn a chaotic closet into a boutique-style market. It’s about reclaiming your time and reducing the mental load of ‘what’s for dinner?’ through pure, functional beauty.
Essential Elements:
- Matching glass or BPA-free plastic canisters
- Airtight lids with silicone seals
- A label maker or custom vinyl decals
- Woven or wire baskets for ‘bulky’ items
- Lazy Susans for oils and vinegars
- Tiered ‘stadium’ shelving for canned goods
How to make it
- Empty your entire pantry and wipe down the shelves with a damp cloth; you must start with a completely blank canvas to see the space’s potential.
- Group like items together (baking, snacks, pastas, breakfast) and discard any expired items or half-empty bags that are cluttering the space.
- Decant ‘dry’ goods like flour, sugar, and pasta into your matching canisters; this not only looks better but keeps food fresher for much longer.
- Place labels exactly halfway down each jar for a uniform, professional look that makes it easy for every family member to find what they need.
- Use Lazy Susans in the corners or on high shelves to prevent bottles of oil or honey from getting ‘lost’ in the back of the pantry.
- Implement a ‘First-In, First-Out’ (FIFO) system where newer items are placed behind older ones, ensuring nothing goes to waste and your inventory stays fresh.
How to Use Dollar Tree Solar Light Ideas for a Magical Evening Glow

Why we love this
High-end landscape lighting can cost thousands, but we love the ‘hack’ of turning budget-friendly solar lights into a magical evening display. There is a whimsical, firefly-like quality to small, scattered lights tucked into garden beds or hanging from tree branches. The soft, diffused glow creates shadows and highlights that make your garden feel twice as large and infinitely more romantic. It’s proof that you don’t need a massive budget to create an atmosphere that feels expensive, intentional, and utterly enchanting.
Essential Elements:
- Standard stake-style solar lights
- Glass jars or decorative lanterns
- Frosted glass spray paint (optional)
- Jute twine or shepherd’s hooks
- Strong outdoor adhesive (like E6000)
- Rechargeable AAA solar batteries (for upgrades)
How to make it
- Remove the plastic stakes from your budget solar lights, leaving just the ‘puck’ (the top part containing the solar panel and LED).
- Spray the inside of cheap glass jars with frosted glass paint to create a soft, diffused glow that hides the internal wiring of the light.
- Glue the solar puck to the lid of the jar using a weatherproof adhesive, ensuring the solar panel is facing upward and unobstructed.
- For a hanging ‘lantern’ effect, wrap jute twine around the neck of the jar, creating a sturdy loop to hang from tree branches or fence posts.
- Place several jars along a pathway or cluster them in groups of three on an outdoor table to create a high-end ‘flickering candle’ centerpiece.
- Pro Tip: Replace the cheap stock batteries with high-quality NiMH rechargeable batteries; this will make your budget lights stay bright for up to 8 hours.
How to Recreate a Nostalgic Teen Room for the Perfect Y2K Aesthetic
[IMAGE_10]
Why we love this
Stepping into a Y2K-inspired room is like a warm hug from your favorite 90s movie. It’s a playful explosion of textures—think fuzzy lavender pillows, glossy inflatable chairs, and the shimmering glow of a lava lamp. We love this aesthetic because it refuses to take itself too seriously; it’s about neon colors, butterfly motifs, and a sense of unbridled optimism. It creates a space that feels energetic and youthful, providing a much-needed escape into a world of glitter and ‘cool’ that celebrates individuality and retro-cool comfort.
Essential Elements:
- Faux fur rugs and butterfly-shaped pillows
- Neon LED wall signs or ‘sunset’ lamps
- Inflatable furniture or a classic bean bag chair
- Beaded curtains for the doorway
- Photo wall collage with ‘lo-fi’ filter prints
- Sheer pastel fabrics for window treatments
How to make it
- Choose a primary ‘vibe’ color—think hot pink, lime green, or electric blue—and use it as the anchor for your bedding and large decor pieces.
- Create a ‘maximalist’ photo wall by printing 4×6 photos of your favorite memories and taping them in a tight grid using colorful washi tape.
- Swap out boring ceiling lights for a color-changing smart bulb or a neon sign that reflects your personality (e.g., a lightning bolt or a heart).
- Hang a beaded curtain in the closet or main doorway to add that classic tactile ‘clack’ and visual separation that defined the early 2000s.
- Layer textures by placing a fuzzy faux-fur rug over a standard carpet, and add an inflatable accent chair in a corner for a truly authentic Y2K feel.
- Finish the room with a ‘tech’ corner featuring a vintage-style record player or a stack of classic magazines to ground the aesthetic in its nostalgic roots.
Conclusion: Your Home, Your Masterpiece
Transforming your living space doesn’t require a master’s degree in design or an endless bank account; it simply requires the willingness to try. Each of these projects is a stepping stone toward a home that doesn’t just look better, but feels more like *you*. From the first shovel in the ground for a flower bed to the last jar labeled in your pantry, you are building a life of intention and beauty. So pick the one project that speaks to your heart today, and start creating the haven you deserve.