
Chasing Sunlight: Creating Your Ultimate Indoor-Outdoor Haven
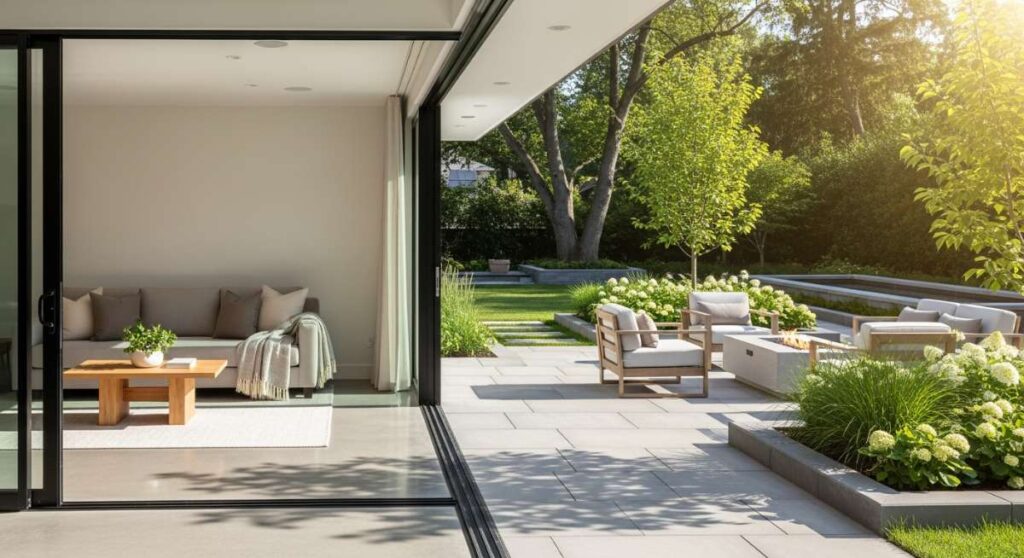
There’s a specific kind of magic that happens when the golden hour hits just right, casting long, honey-colored shadows across a space that feels like a true extension of your soul. For the longest time, I thought a home was defined by four walls, but lately, I’ve realized that the most enchanting parts of our lives happen in the transition zones—the sun-drenched porch, the organized digital desktop, and the quiet corners of a garden where the air smells like damp earth and possibility. It’s about creating a haven that doesn’t just look like a Pinterest board, but feels like a deep exhale after a long day.
In this guide, we are diving deep into the art of aesthetic living, from the way we curate our outdoor sanctuaries to how we organize the digital spaces that house our biggest dreams. Whether you are looking to overhaul your backyard with rustic textures or simply want to refresh your workspace with a calming color palette, these projects are designed to invite more light, more peace, and more beauty into your everyday rhythm. Let’s roll up our sleeves and start chasing that sunlight together.
How to Create Low Maintenance Flower Beds for Effortless Curb Appeal

Why we love this
There is nothing quite like the sight of a flourishing garden that doesn’t demand every second of your weekend. We love this approach because it leans into the natural rhythm of the seasons, using hardy perennials and rich, dark mulch to create a tapestry of textures that only gets better with time. Imagine stepping outside to the sweet, subtle perfume of lavender and the soft rustle of ornamental grasses against your siding, knowing that you can simply sit back with a glass of iced tea and enjoy the view rather than weeding under a hot sun. It’s about achieving that lush, professional landscape look while maintaining a slow, intentional lifestyle.
Essential Elements:
- Native perennial plants (like Coneflowers, Sedum, or Hosta)
- High-quality landscape fabric
- Double-shredded hardwood mulch
- Stone or brick edging
- Drip irrigation kit
How to make it
- Begin by mapping out your bed with a garden hose to create organic, flowing curves; this looks more natural than rigid straight lines.
- Remove all existing grass and weeds from the area, ensuring you dig deep enough to get the roots, then level the soil with a steel rake.
- Lay down a heavy-duty, breathable landscape fabric to suppress future weed growth, securing it tightly with landscape staples every 12 inches.
- Cut ‘X’ shapes into the fabric where your plants will go, then dig holes twice the width of the root balls to allow for easy expansion.
- Incorporate a mix of compost and native soil into each hole before placing your plants, ensuring the crown of the plant is level with the ground surface.
- Install a simple drip irrigation line under the fabric or directly on top to ensure deep, consistent watering without the evaporation waste of sprinklers.
- Cover the entire area with a 3-inch layer of mulch, keeping it a few inches away from the stems of the plants to prevent rot and allow for proper air circulation.
How to Design a Pink Spring Layout for a Dreamy Digital Aesthetic

Why we love this
Your digital environment is just as important as your physical one, and a pink spring layout brings a sense of soft optimism to every click. We adore the way blush tones and cherry blossom motifs can transform a cluttered desktop into a serene sanctuary that sparks creativity rather than stress. The visual warmth of a soft rose palette mimics the first light of a spring morning, making even the most mundane administrative tasks feel like a moment of self-care. It’s a gentle reminder that beauty can exist in the tools we use to build our futures, providing a soft landing for your eyes during a busy workday.
Essential Elements:
- Custom high-resolution aesthetic wallpapers
- Coordinating folder icons in pastel shades
- Transparent widget overlays
- A curated Pinterest board for inspiration
- Hex code palette (e.g., #FCE4EC, #F8BBD0, #F48FB1)
How to make it
- Start by clearing your desktop of all unnecessary files, moving them into a single ‘Archive’ folder to create a blank slate for your new design.
- Select a high-resolution background image that features soft textures—think silk ribbons, macro flower petals, or a hazy spring sunset.
- Use a graphic design tool to create custom folder icons; export them as .png files with transparent backgrounds to keep the look airy and light.
- On macOS or Windows, right-click your folders and use the ‘Get Info’ or ‘Properties’ tab to paste your new pink icons over the default ones.
- Download a widget app to add a minimalist clock or calendar to your screen, ensuring the font style is thin and elegant to match the soft aesthetic.
- Organize your most-used apps into a dock or taskbar that is hidden by default, allowing the beauty of your pink layout to shine through when not in use.
- Adjust your monitor’s color temperature to a slightly warmer setting to enhance the pink hues and reduce blue light strain on your eyes.
How to Build a Simple Outdoor Shower for Refreshing Summer Afternoons

Why we love this
There is a primal, liberating joy in rinsing off under the open sky, surrounded by the scent of cedar and the cool breeze of a summer afternoon. We love the outdoor shower because it turns a daily routine into a spa-like ritual, bridging the gap between the untamed garden and the comforts of home. The feeling of cool water hitting sun-warmed skin while you look up at the swaying tree canopy is unparalleled. It’s a practical addition for rinsing off after a pool day or gardening, but more than that, it’s a soul-cleansing experience that celebrates the raw beauty of the elements.
Essential Elements:
- Pressure-treated lumber or cedar planks for the enclosure
- Outdoor-rated shower head and faucet kit
- Stainless steel plumbing fixtures
- Pea gravel or river stones for drainage
- Waterproof sealant or outdoor wood stain
How to make it
- Select a location close to your home’s existing water lines or an outdoor spigot, ensuring it has good natural drainage and plenty of sunlight to dry the wood.
- Dig a 12-inch deep pit for the shower floor and fill it with 8 inches of coarse gravel followed by 4 inches of decorative river stones to facilitate rapid drainage.
- Construct a simple three-sided U-frame using 4×4 cedar posts set in concrete, ensuring the posts are perfectly level to prevent the structure from leaning over time.
- Attach horizontal cedar slats to the posts, leaving a 1/2-inch gap between boards to allow for airflow and a “peek-a-boo” view of the garden while maintaining privacy.
- Mount your outdoor shower kit to the main post, using PEX piping or a high-quality garden hose adapter for the water connection.
- Seal the wood with a high-grade UV-resistant clear coat to protect the cedar’s natural honey color from turning grey in the sun.
- Add a few hooks for towels and a small wooden bench for a truly elevated, functional experience.
How to Style a Cute Campsite Setup for Ultimate Nature Comfort
Why we love this
Camping doesn’t have to mean roughing it; we believe in ‘glamping’ with a personal touch that makes the great outdoors feel like a cozy living room. We love this setup because it combines the ruggedness of a forest clearing with the tactile luxury of chunky knit blankets, battery-operated fairy lights, and vintage-style lanterns. The aroma of pine needles mixed with the smell of freshly brewed coffee in a ceramic mug creates a sensory heaven that grounds you in the present moment. It’s about creating a space where you can watch the stars in total comfort, feeling both safe and wild at the exact same time.
Essential Elements:
- Aesthetic canvas bell tent or dome tent
- Portable outdoor rugs
- Rechargeable LED warm-glow string lights
- Folding wooden chairs with plush cushions
- Enamelware dish set and a portable fire pit
How to make it
- Choose a level campsite and clear away any large rocks or debris before laying down a heavy-duty tarp to protect your tent’s floor from moisture.
- Pitch your tent with the entrance facing the best view—whether that’s a lake or a cluster of pines—and ensure all guy lines are taut for a crisp look.
- Layer the interior floor with foam tiles for insulation, then cover them with colorful outdoor rugs to provide a soft, barefoot-friendly surface.
- Drape warm-toned string lights along the interior ceiling and outside the entrance to create a soft, inviting glow that isn’t as harsh as traditional flashlights.
- Set up a dedicated ‘kitchen’ area using a folding wooden table, arranging your enamelware and coffee station neatly to keep the space organized.
- Place a few weather-resistant floor pillows and a thick wool throw inside the tent to invite lounging during the cooler evening hours.
- Position two wooden chairs and a small table outside the tent entrance, creating a perfect ‘front porch’ for morning birdwatching.
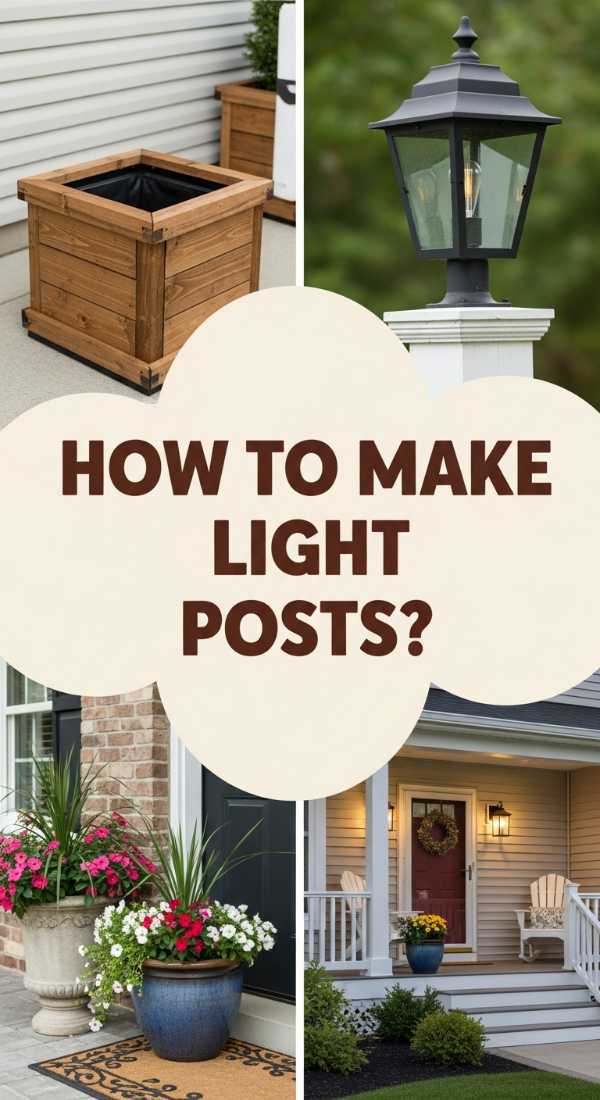
How to Assemble a DIY Planter Light Post for a Bright Welcoming Entrance

Why we love this
First impressions start at the curb, and a planter light post offers a warm, glowing welcome that feels both sophisticated and cozy. We love this project because it serves a dual purpose: providing much-needed illumination for your walkway while showcasing a burst of seasonal floral color at eye level. The sight of soft yellow light spilling over trailing ivy and bright petunias creates a magical, storybook atmosphere as the sun goes down. It’s a weekend project that adds immediate architectural interest and a sense of safety, making your home feel lived-in and loved from the very first glance.
Essential Elements:
- Large heavy-duty ceramic or resin planter
- 4×4 pressure-treated wooden post (6-8 feet tall)
- Quick-setting concrete mix
- Solar-powered or hardwired outdoor lantern
- Potting soil and various trailing and upright plants
How to make it
- Place your wooden post in the center of the planter, ensuring it is perfectly upright using a spirit level.
- Mix the quick-setting concrete according to the package instructions and pour it into the planter around the post, stopping about 6 inches from the rim.
- Hold the post steady for several minutes until the concrete begins to set, then allow it to cure fully for 24 hours before moving the planter.
- Drill a pilot hole into the top of the post and screw in the mounting bracket for your outdoor lantern, ensuring it is secure and straight.
- If using a solar lantern, ensure it is positioned to receive direct sunlight during the day; if hardwired, run the outdoor-rated wire down the back of the post.
- Fill the remaining 6 inches of the planter with high-quality potting soil mixed with a slow-release fertilizer.
- Plant a ‘thriller’ (like a tall grass), ‘fillers’ (like geraniums), and ‘spillers’ (like Creeping Jenny) around the base of the post for a lush, professional look.
How to Install Hog Wire Fencing for a Modern Rustic Backyard

Why we love this
Hog wire fencing is the ultimate design hack for those who want to define their boundaries without sacrificing the view. We love the contrast between the thick, warm wooden frames and the industrial, cool grey of the galvanized metal mesh. It creates a modern rustic aesthetic that feels incredibly high-end yet remains humble enough to blend into a garden setting. The open grid allows the breeze to flow through and lets you keep an eye on the landscape beyond, making even a small backyard feel expansive and airy. It’s the perfect backdrop for climbing roses or jasmine to weave through over time.
Essential Elements:
- Pressure-treated 4×4 posts and 2×4 rails
- Galvanized hog wire panels (4-gauge thickness)
- Stainless steel staples or fencing clips
- Circular saw and a heavy-duty wire cutter
- Level and post-hole digger
How to make it
- Measure your perimeter and mark your post holes every 6 to 8 feet, ensuring the spacing matches the length of your hog wire panels to minimize waste.
- Dig holes 2 feet deep, insert your 4×4 posts, and fill with concrete, using a level to ensure every post is perfectly vertical as it sets.
- Measure and cut your 2×4 wooden rails to fit horizontally between the posts, creating a ‘picture frame’ look with a top, middle, and bottom rail.
- Secure the rails to the posts using heavy-duty exterior screws, pre-drilling the holes to prevent the wood from splitting.
- Use wire cutters to trim the hog wire panels to the exact size of the interior of your wooden frames, leaving a small gap for expansion.
- Position the mesh panel inside the frame and secure it to the backside of the rails using galvanized staples driven in with a hammer every 6 inches.
- Finish the wood with a dark walnut or slate grey stain to provide a sharp, modern contrast against the silver wire mesh.
How to Construct a Mud Kitchen for Creative Outdoor Play

Why we love this
There is something deeply nostalgic and joyful about a mud kitchen; it’s a space where the only limit is a child’s imagination. We love this project because it encourages tactile, sensory play—the squelch of mud between fingers, the scent of crushed mint leaves, and the clinking of stainless steel bowls. It’s a beautiful way to get kids outside, away from screens, and into the raw, messy business of being a kid. Plus, when built with natural wood and vintage accessories, it becomes a charming garden feature rather than an eyesore of plastic toys. It’s where ‘stone soup’ and ‘mud pies’ become the finest delicacies on the menu.
Essential Elements:
- Upcycled wooden pallets or cedar boards
- Stainless steel mixing bowls (to serve as sinks)
- Old kitchen faucets and knobs
- S hooks for hanging utensils
- Exterior grade wood glue and screws
How to make it
- Build a simple rectangular frame for the base using 2×4 lumber, setting the height based on the age of the children (usually 20-24 inches).
- Create a sturdy countertop using cedar planks, ensuring they are sanded completely smooth to prevent any splinters during play.
- Use a jigsaw to cut circular holes in the countertop that are slightly smaller than the lip of your stainless steel bowls, then drop the bowls in.
- Construct a vertical ‘backsplash’ using more planks, attaching it to the back of the base to provide a place for shelves and hooks.
- Install your old faucets and knobs onto the backsplash or counter; they don’t need to be hooked to water to be fun, though a garden hose nearby is a plus!
- Mount a small shelf for ‘spices’ (jars of sand, pebbles, and dried flower petals) and add S-hooks to hang whisks, spoons, and colanders.
- Apply a non-toxic, water-resistant sealer to the entire structure to protect it from the ‘cooking’ messes and the outdoor elements.
How to Organize a Blue Layout for a Calm Digital Workspace

Why we love this
In a world of constant digital noise, a blue-themed layout acts as a visual anchor that promotes focus and tranquility. We love the way deep navy and soft sky blues mimic the vastness of the ocean or the stillness of a twilight sky, naturally lowering the heart rate during a high-stakes project. This aesthetic is clean, professional, and incredibly soothing, reducing the harshness of white light and helping your mind stay in a ‘flow’ state. It’s about curating a digital workspace that feels like a quiet library, allowing you to breathe deeply and think clearly amidst the chaos of your inbox.
Essential Elements:
- Gradient blue wallpapers or minimalist ocean photography
- Navy and slate blue icon packs
- Blue-light filtering software (like f.lux or built-in Night Shift)
- Custom fonts in a clean, sans-serif style
- Minimalist organizational folders
How to make it
- Choose a wallpaper that features a deep blue gradient; darker tones at the bottom help ground your dock, while lighter tones at the top keep the screen feeling open.
- Group your files into four main quadrants on your desktop: ‘To-Do,’ ‘In Progress,’ ‘Finished,’ and ‘Personal,’ using blue-tinted folder icons for each.
- Customize your browser theme to a ‘Midnight Blue’ or ‘Cool Slate’ setting to maintain color consistency across all your most-used windows.
- Set your system-wide accent color to a vibrant cobalt or a soft periwinkle to highlight buttons and sliders without being distracting.
- Use a widget to display a daily quote or a productivity timer in a matching blue shade, placing it in a corner where it doesn’t overlap your icons.
- Adjust the opacity of your taskbar to 50% to allow the blue hues of your wallpaper to bleed through, creating a seamless, integrated look.
- Review your layout once a week to delete temporary files, ensuring the ‘calm’ aesthetic isn’t buried under digital clutter.
How to Choose Two Tone Deck Colors for a Sophisticated Outdoor Space

Why we love this
A single-color deck can often feel flat, but a two-tone approach adds architectural depth and a ‘custom-build’ feel that is incredibly sophisticated. We love the way a dark charcoal frame can make a light grey or natural wood center pop, defining the space like a high-end area rug. It’s a design trick that directs the eye and creates visual zones for dining and lounging without the need for physical barriers. The contrast feels intentional and modern, elevating your entire backyard into a resort-style retreat where every plank feels like part of a larger, beautiful puzzle.
Essential Elements:
- High-quality solid deck stain (Dark tone)
- High-quality semi-transparent deck stain (Light tone)
- Painter’s tape and high-density rollers
- Deck cleaner and a stiff-bristled brush
- Power washer (set to a low, safe pressure)
How to make it
- Thoroughly clean your deck using a specialized deck wash and a power washer to remove old stain, dirt, and mildew; let it dry for at least 48 hours.
- Sand any rough spots to ensure the stain adheres evenly and the surface feels smooth underfoot.
- Apply your darker ‘frame’ color first to the outer perimeter boards and the railings, using a brush for precision around the edges.
- Use high-quality painter’s tape to mask off the dark boards once they are completely dry, ensuring a crisp, clean line for your second color.
- Apply the lighter ‘inlay’ color to the main floorboards using a roller, working in long, continuous strokes to avoid lap marks.
- Back-brush the stain into the wood grain while it is still wet to ensure deep penetration and a long-lasting finish.
- Apply a second coat to both sections if necessary for color depth, then allow the deck to cure for 72 hours before moving furniture back onto the surface.
How to Upgrade Singlewide Mobile Home Exteriors for Luxury Living
[IMAGE_10]
Why we love this
We are firm believers that luxury is a feeling, not a price tag, and upgrading a singlewide exterior can produce a stunning transformation. We love this process because it challenges the status quo, using smart design choices like faux-stone skirting, oversized shutters, and modern lighting to create a home that feels substantial and bespoke. The addition of texture and height can completely change the silhouette of the home, making it feel like a high-end cottage tucked into the landscape. It’s about taking pride in your space and proving that with a little creativity, any home can be a showstopper.
Essential Elements:
- Faux-stone or brick skirting panels
- Wide, modern window shutters (wood or high-quality vinyl)
- Statement outdoor light fixtures
- Large wooden steps or a wrap-around porch kit
- Fresh coat of premium exterior paint in a modern neutral
How to make it
- Start by replacing standard vinyl skirting with faux-stone or stacked-brick panels; this adds visual ‘weight’ to the base of the home and makes it look more permanent.
- Paint the exterior in a sophisticated, modern neutral like ‘Greige’ or ‘Charcoal Blue,’ using a high-quality satin finish to hide minor imperfections in the siding.
- Install oversized shutters that are 1/4 the width of the windows to add a sense of scale and luxury; choose a contrasting color for a bold look.
- Swap out small, builder-grade porch lights for oversized, modern lanterns that make a statement and provide a warm, inviting glow.
- Construct a wide set of wooden steps with integrated planters on either side to create a grand entrance that leads the eye toward the door.
- Add ‘window boxes’ filled with trailing flowers to soften the lines of the home and add a splash of organic color.
- Incorporate some simple landscaping around the base—like ornamental grasses or boxwood shrubs—to further integrate the home with its environment.
Conclusion
Creating an indoor-outdoor haven isn’t about perfection; it’s about the intentional choices we make to surround ourselves with beauty and function. Whether you are building a sanctuary for your kids in the backyard or curating a calm workspace on your laptop, each of these projects is a step toward a more inspired life. Remember, the best homes are those that reflect the people living inside them—full of warmth, light, and a touch of the wild. Go ahead, start small, and watch how your world transforms when you start chasing the sunlight.