
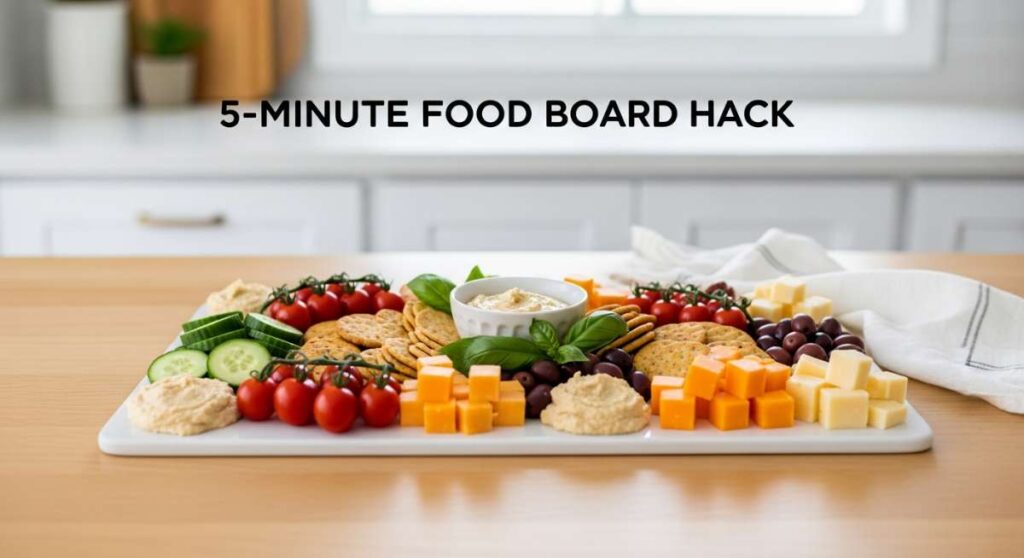
I still remember the first time I saw one of those Pinterest-perfect grazing boards; I felt a mix of awe and complete intimidation. My own kitchen usually looked more like a flour-dusted disaster zone than a sleek aesthetic dream. But lately, I’ve discovered a secret that has completely changed how I host friends and feed my family—a ‘Food Board’ hack that focuses on one hero element surrounded by simple, delicious bites. It’s not about spending hours with a tiny pair of tweezers; it’s about making one incredible thing and letting it shine.
There is something so deeply comforting about a spread that invites everyone to dig in with their hands, where the aromas of roasted garlic and melted chocolate mingle in the air. This isn’t just about food; it’s about the laughter that happens over a shared platter and the collective ‘oh my god’ when you pull something golden and bubbling out of the oven. Today, I’m sharing the viral building blocks that will make your next board the talk of the neighborhood, all without the stress of a five-course meal.
How to make crispy potatoes?

Why we love this
There is nothing quite like the shattering crunch of a perfectly roasted potato yielding to a fluffy, cloud-like interior. When you get that deep golden-brown crust just right, it carries the earthy aroma of rosemary and the sharp tang of sea salt that makes your mouth water before you even take a bite. It’s the ultimate comfort food, providing a satisfying tactile snap that feels like a warm hug for your soul, making them the undisputed star of any savory board you assemble.
Ingredients
- 2 lbs Yukon Gold potatoes, peeled and cubed
- 1/4 cup extra virgin olive oil
- 3 sprigs fresh rosemary, chopped
- 4 cloves garlic, smashed
- 1 tsp flaky sea salt
- 1/2 tsp cracked black pepper
How to make it
- Start by parboiling your cubed potatoes in a large pot of heavily salted water. Bring to a boil and cook for about 8-10 minutes until the edges are tender but the centers are still firm; this ensures a fluffy interior.
- Drain the potatoes and let them steam dry for 2 minutes in the colander. This step is crucial because moisture is the enemy of crispiness. Give the colander a vigorous shake to roughen up the edges—those fuzzy bits will turn into the best crunchy parts later.
- Preheat your oven to 425°F (220°C) and place a sturdy baking sheet inside to get screaming hot. Carefully remove the hot sheet and pour your olive oil onto it, followed by the potatoes, garlic, and rosemary.
- Spread the potatoes in a single layer, ensuring they aren’t crowded. Roast for 20 minutes, then use a metal spatula to flip them. You want to see a deep mahogany color developing.
- Continue roasting for another 15-20 minutes until they sound ‘hollow’ and crunchy when tapped. Finish with a final sprinkle of flaky salt while they are still glistening with oil.
How to bake cheesy bread?

Why we love this
The scent of garlic-infused butter and melting mozzarella wafting through the house is enough to bring anyone running to the kitchen. This cheesy bread is all about the contrast between the crusty, toasted exterior of the loaf and the gooey, elastic pull of the cheese that stretches out in satisfying ribbons. Each bite is a rich explosion of savory herbs and creaminess that feels indulgent and celebratory, making it the perfect centerpiece for a communal grazing experience.
Ingredients
- 1 large Italian loaf or baguette
- 1/2 cup unsalted butter, softened
- 3 cloves garlic, minced
- 2 cups shredded mozzarella cheese
- 1/2 cup grated Parmesan
- 1 tbsp fresh parsley, chopped
How to make it
- Preheat your oven to 375°F (190°C). Prepare your bread by slicing it lengthwise or making deep cross-hatched cuts (Hasselback style) without cutting all the way through the bottom crust.
- In a small bowl, cream together the softened butter, minced garlic, and chopped parsley until it forms a smooth, fragrant paste.
- Using a knife or small spatula, generously spread the garlic butter into every crevice of the bread. Don’t be shy here; the butter needs to soak into the crumb to create that luscious texture.
- Stuff the shredded mozzarella deep into the cuts and sprinkle the entire top with the grated Parmesan for a salty, umami-rich crust.
- Wrap the loaf loosely in aluminum foil to prevent the top from burning while the cheese melts. Bake for 10 minutes, then open the foil and bake for another 5-8 minutes until the cheese is bubbling and starting to brown in spots.
How to grill tender steak?
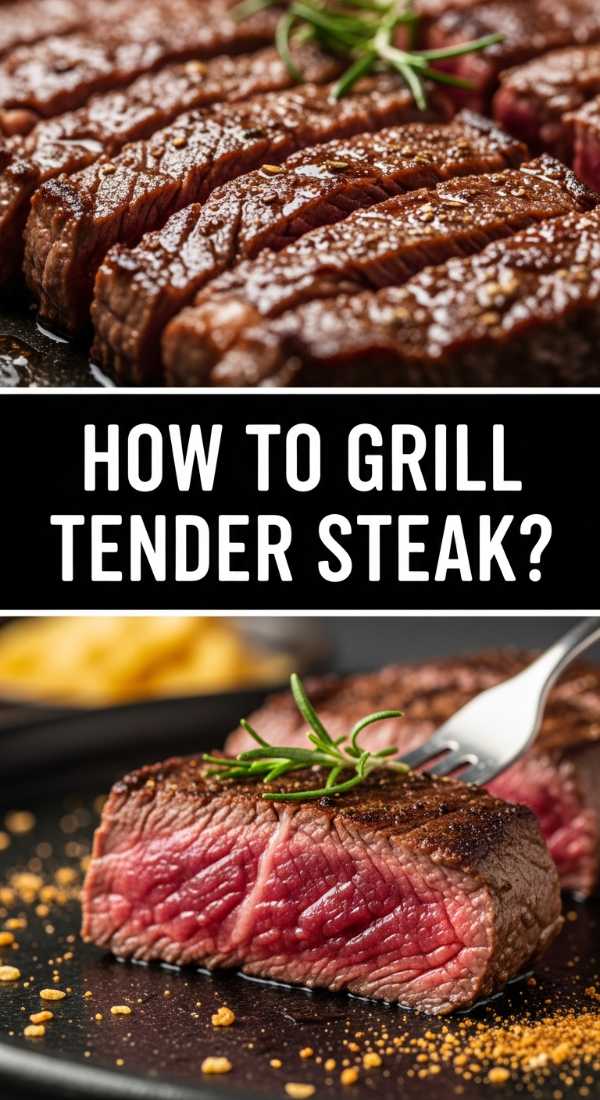
Why we love this
A perfectly grilled steak is a sensory masterpiece, featuring a charred, smoky exterior that gives way to a butter-tender, rose-pink center. The Maillard reaction creates a complex, savory crust that pairs beautifully with the rich, metallic notes of high-quality beef. As it rests, the juices redistribute, ensuring that every slice is succulent and dripping with flavor, providing a high-protein anchor for your food board that feels sophisticated yet primal.
Ingredients
- 2 Ribeye or New York Strip steaks (1.5 inches thick)
- 2 tbsp Kosher salt
- 1 tbsp coarse black pepper
- 2 tbsp unsalted butter
- 2 sprigs fresh thyme
How to make it
- Take your steaks out of the refrigerator at least 45 minutes before cooking. Bringing the meat to room temperature is the secret to an even cook; otherwise, the center will stay cold while the outside overcooks.
- Pat the steaks extremely dry with paper towels. Rub generously with salt and pepper on all sides, including the fatty edges.
- Heat your grill or a heavy cast-iron skillet to high heat. You want it just starting to smoke. Place the steaks down and leave them alone for 3-4 minutes to develop a deep brown crust.
- Flip the steaks and immediately add the butter and thyme sprigs to the pan (if using a skillet). Baste the steaks by spooning the foaming butter over them repeatedly for the final 3-4 minutes of cooking.
- Use a meat thermometer to check for doneness: 130°F (54°C) for medium-rare. Remove from heat and rest on a cutting board for at least 10 minutes before slicing against the grain to maintain maximum tenderness.
How to cook creamy pasta?

Why we love this
There is a silky, luxurious mouthfeel to a truly well-executed creamy pasta that feels like pure decadence on a plate. The sauce should cling to every ridge of the noodle, creating a velvety coating that carries the warmth of garlic and the sharpness of aged cheese. It’s a comforting, filling dish that invites you to twirl your fork slowly, savoring the harmony between the tender pasta and the rich, emulsified sauce that glows under the kitchen lights.
Ingredients
- 12 oz Fettuccine or Penne pasta
- 1 cup heavy cream
- 1/2 cup pasta water (reserved)
- 1 cup freshly grated Parmesan cheese
- 2 tbsp butter
- 2 cloves garlic, grated
How to make it
- Boil your pasta in a large pot of water that is ‘salty like the sea.’ Cook until it is just shy of al dente (usually 1-2 minutes less than the package directions) because it will finish cooking in the sauce.
- Before draining, dip a measuring cup into the pot to reserve at least 1 cup of the starchy pasta water. This is liquid gold for creating a smooth emulsion.
- In a wide skillet over medium heat, melt the butter and gently sauté the grated garlic for about 30 seconds until fragrant but not brown. Pour in the heavy cream and bring to a gentle simmer.
- Add the cooked pasta directly into the skillet with the cream. Sprinkle the Parmesan cheese over the top and add 1/4 cup of the reserved pasta water.
- Toss vigorously with tongs or a wooden spoon. The starch in the water and the fat in the cheese/cream will bond together. If it looks too thick, add more pasta water a tablespoon at a time until the sauce is glossy and coats the pasta perfectly.
How to roast spiced chicken?

Why we love this
The aroma of roasting chicken seasoned with warm spices like cumin and paprika is enough to make a house feel like a home. This dish offers a beautiful play of textures, from the crackling, spice-rubbed skin to the juicy, steam-released meat underneath. It brings a vibrant, smoky depth to your food board that feels both exotic and familiar, providing a rustic elegance that encourages guests to reach for seconds and thirds.
Ingredients
- 1.5 lbs chicken thighs, bone-in and skin-on
- 1 tbsp smoked paprika
- 1 tsp ground cumin
- 1 tsp garlic powder
- 1/2 tsp onion powder
- 2 tbsp avocado oil
How to make it
- Preheat your oven to 400°F (200°C). In a small bowl, whisk together the paprika, cumin, garlic powder, onion powder, salt, and pepper to create your spice rub.
- Pat the chicken thighs completely dry. Rub the oil all over the skin and meat, then coat thoroughly with the spice blend, ensuring you get under the skin for maximum flavor penetration.
- Place a heavy oven-safe skillet over medium-high heat. Place the chicken thighs skin-side down and sear for 5-6 minutes. Do not move them! You want the fat to render out and the skin to become crispy and dark red from the spices.
- Once the skin is crispy, flip the thighs over and transfer the entire skillet into the oven.
- Roast for 15-20 minutes or until the internal temperature reaches 165°F (74°C). Let the chicken rest for 5 minutes before serving so the juices lock into the meat.
How to bake chocolate cake?

Why we love this
This chocolate cake is the definition of dark, moist perfection, with a crumb so tender it almost melts on your tongue. The deep, bittersweet scent of high-quality cocoa combined with a hint of vanilla creates an intoxicating aroma that promises pure indulgence. It’s the kind of cake that doesn’t need heavy frosting to shine—it’s rich, sophisticated, and has a lingering chocolate finish that satisfies even the most intense sugar cravings.
Ingredients
- 1 3/4 cups all-purpose flour
- 2 cups granulated sugar
- 3/4 cup unsweetened cocoa powder
- 2 large eggs
- 1 cup buttermilk
- 1/2 cup vegetable oil
- 1 cup hot brewed coffee
How to make it
- Preheat your oven to 350°F (175°C) and grease a 9-inch round cake pan thoroughly. Sift together the flour, sugar, cocoa, baking soda, and salt in a large bowl to ensure there are no lumps.
- Add the eggs, buttermilk, oil, and vanilla extract to the dry ingredients. Mix on medium speed for about 2 minutes until the batter is smooth and slightly thickened.
- The secret step: pour in the hot coffee. The batter will be very thin and watery, but the hot liquid ‘blooms’ the cocoa powder, releasing a much deeper chocolate flavor. Stir gently by hand until combined.
- Pour the batter into the prepared pan and bake for 30-35 minutes. Test with a toothpick; it should come out with just a few moist crumbs attached.
- Allow the cake to cool in the pan for 10 minutes before transferring to a wire rack. This prevents the delicate structure from collapsing while it’s still hot.
How to sear lemon salmon?

Why we love this
Searing salmon with lemon and butter results in a dish that is light, bright, and incredibly sophisticated. The skin becomes as crisp as a potato chip, while the flesh remains tender and flaky, practically falling apart at the touch of a fork. The citrus notes cut through the richness of the fish, creating a refreshing zing that clears the palate and makes every bite feel like a breezy summer evening by the coast.
Ingredients
- 2 salmon fillets (6 oz each)
- 1 tbsp olive oil
- 2 tbsp unsalted butter
- 1/2 lemon, sliced into rounds
- 1 tbsp fresh dill, chopped
- Salt and pepper to taste
How to make it
- Season your salmon fillets generously with salt and pepper. Let them sit for 5 minutes, then pat the skin side once more with a paper towel to remove any moisture that has drawn out.
- Heat olive oil in a non-stick or stainless steel skillet over medium-high heat. Once the oil shimmers, place the salmon fillets in the pan, skin-side down.
- Press down lightly on the fillets with a spatula for the first 30 seconds to prevent the skin from curling. Cook for 4-5 minutes until the skin is golden and releases easily from the pan.
- Flip the fillets and immediately add the butter and lemon slices to the pan. As the butter melts and foams, tilt the pan and spoon the lemon-infused butter over the salmon for 2-3 minutes.
- Remove the salmon when it is still slightly translucent in the very center (medium-rare to medium). It will continue to cook as it rests. Garnish with fresh dill and the pan-seared lemon slices.
How to prepare fresh salad?
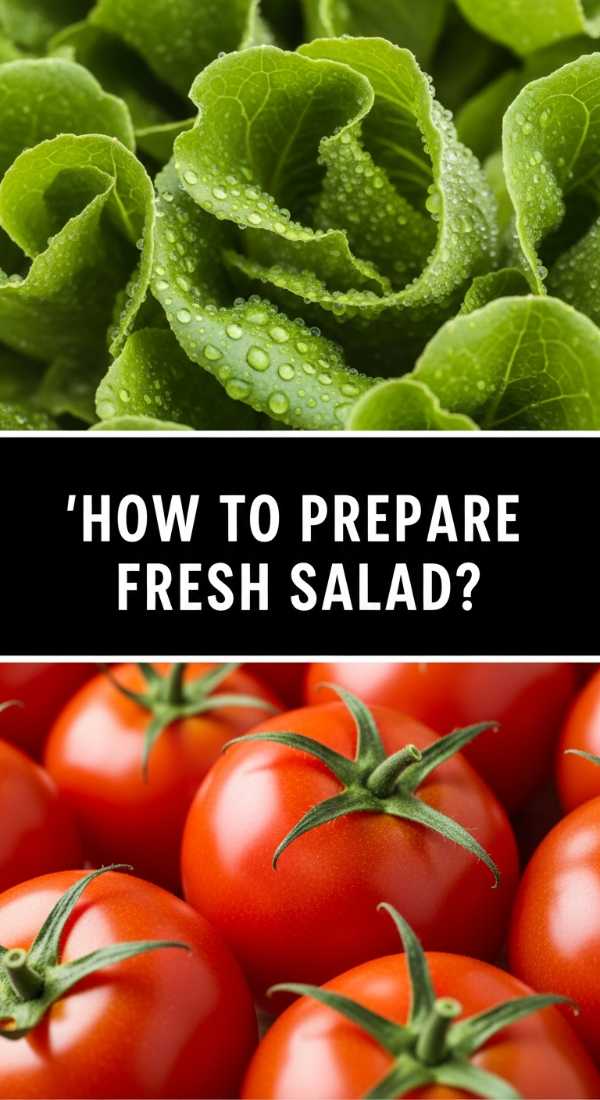
Why we love this
A fresh salad is the vibrant, crunchy heartbeat of any good food board, providing a necessary counterpoint to richer, heavier dishes. The snap of garden-fresh greens combined with the bite of radishes and the creamy tang of a homemade vinaigrette creates a symphony of textures and flavors. It smells like rain-washed herbs and sunshine, offering a clean, revitalizing experience that makes the whole meal feel balanced and thoughtful.
Ingredients
- 4 cups mixed baby greens or arugula
- 3 radishes, thinly sliced
- 1/4 cup toasted walnuts
- 1/4 cup shaved Parmesan
- 3 tbsp olive oil
- 1 tbsp fresh lemon juice
- 1 tsp Dijon mustard
How to make it
- Wash your greens in cold water and use a salad spinner to get them bone-dry. Wet leaves will cause the dressing to slide off and make the salad soggy.
- In a small jar or bowl, whisk together the olive oil, lemon juice, Dijon mustard, and a pinch of salt and pepper. Emulsify the mixture until it is thick and pale yellow.
- Place the dried greens in a large wooden bowl. Add the thinly sliced radishes and toasted walnuts.
- Drizzle about half of the dressing over the greens and use your hands (or salad servers) to gently toss. You want every leaf to have a microscopic coating of oil, not a heavy bath.
- Top with the shaved Parmesan and a final crack of black pepper. Serve immediately to maintain the ‘loft’ and crunch of the leaves.
How to brew iced coffee?

Why we love this
There is a specific visual magic to watching a splash of cream swirl into a dark glass of iced coffee, creating marble-like patterns that promise a bold, refreshing caffeine kick. The aroma is clean and energizing, with the cold temperature tempering the bitterness of the beans to reveal notes of chocolate or fruit. It’s a crisp, clinking glass of pure motivation that feels like a treat whether it’s 8 AM or a mid-afternoon pick-me-up.
Ingredients
- 1/2 cup coarsely ground coffee beans
- 2 cups cold filtered water
- Ice cubes (coffee ice cubes are better!)
- 1 tbsp simple syrup or maple syrup
- Splash of heavy cream or oat milk
How to make it
- For the best flavor, use a cold-brew method. Mix your coarse coffee grounds with cold water in a jar and let it steep in the fridge for 12-18 hours. This results in a low-acid, super smooth concentrate.
- Strain the mixture through a fine-mesh sieve lined with a coffee filter or cheesecloth to ensure no grit remains in your glass.
- Fill a tall glass to the brim with ice. If you want to be a pro, freeze leftover coffee into ice cubes so your drink never gets watered down as they melt.
- Pour 1 cup of your coffee concentrate over the ice. Add your sweetener of choice while the liquid is still moving to help it dissolve.
- Finish with a generous pour of cream or milk. Watch the ‘swirl’ happen—it’s the best part! Stir gently and serve with a straw.
How to fry golden onions?

Why we love this
Frying onions until they are golden and caramelized is a lesson in patience that rewards you with a jammy, sweet, and deeply savory topping. The harsh bite of a raw onion is transformed by low heat into a mellow, amber-colored delicacy that smells like a professional French bistro. They add a layer of ‘umami’ to the board that bridges the gap between meat, cheese, and bread, making everything they touch taste exponentially more expensive.
Ingredients
- 2 large yellow onions, thinly sliced
- 2 tbsp unsalted butter
- 1 tbsp olive oil
- 1/2 tsp salt
- 1 tsp balsamic vinegar (optional)
How to make it
- Heat the butter and oil in a wide, heavy-bottomed skillet over medium heat. The oil prevents the butter from burning while it cooks for a long duration.
- Add the thinly sliced onions and toss to coat them in the fat. Sprinkle with salt immediately; this draws out the moisture and helps the breakdown process.
- Reduce the heat to medium-low. This is the ‘slow and low’ phase. Cook the onions for 30-45 minutes, stirring every 5 minutes. If they start to stick or brown too quickly, add a tablespoon of water to the pan.
- You are looking for a deep caramel color, similar to an old penny. The onions should be soft and reduced to about a third of their original volume.
- In the last 2 minutes, add a splash of balsamic vinegar or water to ‘deglaze’ the pan, scraping up all the brown bits (fond) from the bottom. These bits contain all the concentrated flavor. Serve warm or at room temperature.
Conclusion: Your Board, Your Rules
Building a viral-worthy food board isn’t about perfection; it’s about picking one or two of these ‘hero’ items and surrounding them with love. Whether you go for the crunch of the potatoes or the gooey pull of the cheesy bread, the magic happens when you bring people together around a table filled with soul-warming food. So, grab a board, pick a recipe, and start your own kitchen tradition tonight!
Frequently Asked Questions
Everything you need to know to master the art of the 5-minute food board hack.