

There is something deeply magical about the way a simple wooden board can transform a room full of people. We’ve all been there: the frantic kitchen cleanup, the stress of timing the oven, and that nagging feeling that you’re spending more time at the stove than with your favorite humans. That’s exactly why I fell in love with the viral ‘Simple Food Board’ trend—it’s not just about eating; it’s about creating a landing zone for laughter, stories, and shared bites.
I remember the first time I ditched the formal three-course dinner for a sprawling, colorful board spread across my coffee table. The energy in the room shifted instantly. Instead of stiff postures at a dining table, my friends were leaning in, reaching for a wedge of brie or a crispy potato, and the conversation flowed as freely as the wine. It’s effortless, it’s beautiful, and it’s a lifestyle shift that prioritizes connection over perfection.
How to make easy appetizers?

Why we love this
Easy appetizers are the heartbeat of any gathering because they remove the barrier between the host and the guests. Imagine the aroma of whipped feta topped with warm, honey-drenched cherry tomatoes wafting through your living room. The texture is a cloud-like dream—salty, creamy, and slightly tangy—perfectly countered by the burst of sweet, roasted fruit. It’s the kind of dish that feels like a Mediterranean vacation on a cracker, inviting everyone to dig in without a second thought.
Ingredients
- 8 oz high-quality Greek Feta cheese
- 1/2 cup Greek yogurt
- 1 pint cherry tomatoes
- 3 tablespoons extra virgin olive oil
- 1 tablespoon honey
- 2 cloves garlic, minced
- Fresh oregano for garnish
How to make it
- Begin by preheating your oven to 400°F (200°C). In a small baking dish, toss the cherry tomatoes with 1 tablespoon of olive oil, the minced garlic, and a pinch of salt. Roast for 15-20 minutes until the skins burst and they look slightly charred and syrupy.
- While the tomatoes roast, crumble the feta into a food processor. Add the Greek yogurt and the remaining olive oil. Process on high speed for 2-3 minutes. You are looking for a completely smooth, airy consistency; if it feels too thick, add a teaspoon of water or more yogurt.
- Once smooth, spread the whipped feta onto a shallow serving bowl or directly onto your board, using the back of a spoon to create deep swirls and wells.
- Remove the tomatoes from the oven and carefully spoon them—along with all their flavorful juices—into the center of the feta swirls.
- Drizzle the honey over the top and garnish with fresh oregano leaves. Serve immediately while the tomatoes are warm and the feta is cool.
How to make spicy pasta?

Why we love this
There is an undeniable comfort in a bowl of glossy, silk-smooth pasta that carries a lingering heat. This spicy pasta isn’t just about the burn; it’s about the depth of flavor—the way the rich tomato paste caramelizes into a deep umami base, brightened by a splash of cream. The aroma is intoxicating, filled with toasted garlic and the sharp kick of Calabrian chiles, creating a sensory experience that warms you from the inside out and keeps everyone coming back for ‘just one more’ forkful.
Ingredients
- 1 lb Rigatoni or Penne pasta
- 2 tablespoons olive oil
- 1 shallot, finely diced
- 3 cloves garlic, sliced thin
- 4 oz tomato paste
- 1-2 tablespoons Calabrian chili paste (adjust for heat)
- 1/2 cup heavy cream
- 1/2 cup grated Parmesan cheese
- Fresh basil
How to make it
- Bring a large pot of heavily salted water to a rolling boil. Add your pasta and cook until it is about 2 minutes shy of al dente; it should still have a firm bite as it will finish cooking in the sauce.
- In a large skillet over medium heat, add the olive oil and sauté the shallots and garlic. Cook slowly for 4-5 minutes until they are translucent and fragrant, but not browned.
- Add the tomato paste to the skillet. This is the most important step: use a wooden spoon to ‘fry’ the paste for 5-7 minutes, stirring constantly, until it turns from bright red to a deep, dark brick color. This removes the tinny taste and develops a rich sweetness.
- Stir in the Calabrian chili paste, then slowly pour in the heavy cream. Whisk until a smooth, vibrant orange sauce forms. Reduce heat to low.
- Before draining the pasta, reserve 1 cup of starchy pasta water. Add the undercooked pasta directly to the sauce, along with a splash of the pasta water and the Parmesan cheese.
- Toss vigorously over medium-high heat for 2 minutes. The starch in the water will emulsify with the cream and cheese to create a restaurant-quality glaze that clings to every ridge of the pasta. Garnish with torn basil.
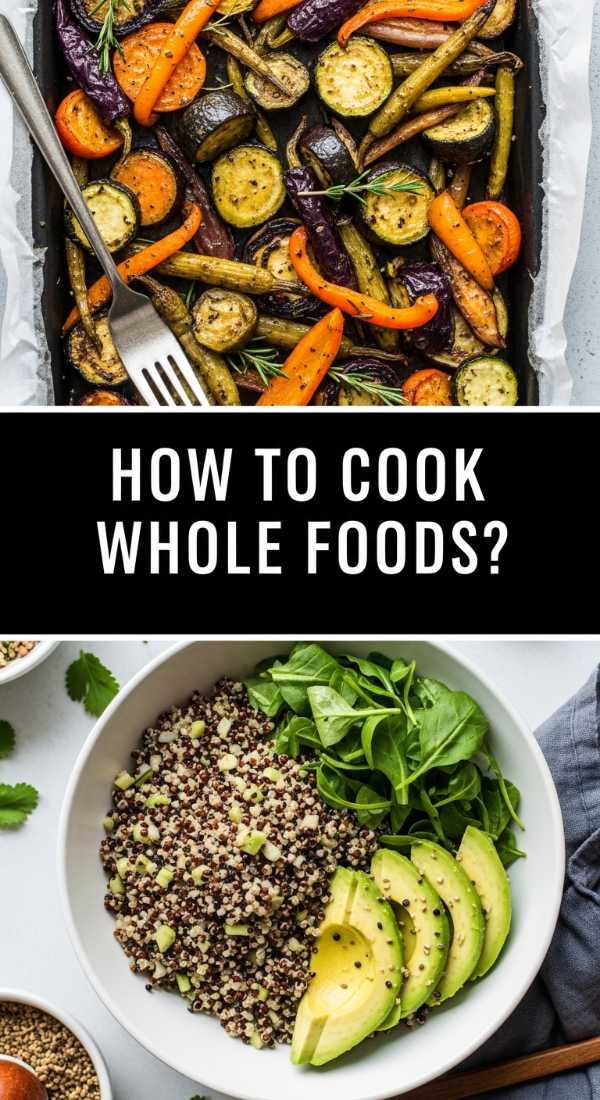
How to cook whole foods?
Why we love this
Cooking whole foods is about celebrating the raw, unadulterated beauty of nature’s bounty. There is a rustic elegance in serving vegetables in their near-original form—long, slender carrots with a bit of green stem, or halved radishes that still look like jewels. The texture is a delightful play between a tender, succulent interior and a slightly crisp, caramelized exterior. It smells of the earth, fresh herbs, and the wholesome goodness that only comes from ingredients that haven’t been over-processed.
Ingredients
- 1 bunch heirloom carrots (multicolored)
- 1 lb baby potatoes, halved
- 2 tablespoons avocado oil
- 1 teaspoon sea salt
- 2 sprigs fresh rosemary
- 1 lemon, sliced into rounds
How to make it
- Preheat your oven to 425°F (220°C). High heat is essential for whole foods to ensure you get caramelization (the Maillard reaction) without turning the vegetables into mush.
- Scrub the carrots and potatoes thoroughly, leaving the skins on to preserve nutrients and texture. Pat them completely dry with a kitchen towel; moisture is the enemy of a good roast.
- On a large rimmed baking sheet, spread the vegetables in a single layer. Drizzle with avocado oil and sprinkle with sea salt. Toss with your hands to ensure every nook and cranny is coated.
- Tuck the rosemary sprigs and lemon slices between the vegetables. The lemon will slightly dehydrate and intensify in flavor, while the rosemary oils will infuse the entire tray.
- Roast for 25-30 minutes. Halfway through, use a spatula to flip the vegetables. You’ll know they are done when a fork easily pierces the thickest part of the carrot and the potato edges are golden brown and crispy.
- Transfer to your board immediately, allowing the natural shapes and colors to lead the visual design.
How to make crispy potatoes?

Why we love this
Crispy potatoes are the universal love language of food. There is nothing quite like that first bite into a perfectly ‘smashed’ potato where the exterior shattered like glass while the inside remains fluffy and buttery. The sound of the crunch followed by the salty, starchy finish is pure euphoria. When seasoned with flaky salt and a hint of garlic, they become the centerpiece of the board, disappearing faster than anything else as guests reach for the most golden, jagged pieces.
Ingredients
- 1.5 lbs small Yukon Gold potatoes
- 4 tablespoons melted butter
- 2 tablespoons olive oil
- 1 teaspoon garlic powder
- 1 teaspoon flaky sea salt
- Fresh parsley, chopped
How to make it
- Place the whole potatoes in a large pot and cover with cold water. Add a generous tablespoon of salt. Bring to a boil and cook for 15-20 minutes, or until the potatoes are completely tender when pierced with a knife.
- Drain the potatoes and let them sit in the colander for 5 minutes to steam dry. This step is crucial for maximum crispiness later.
- Preheat your oven to 450°F (230°C). Grease a large baking sheet with a bit of olive oil.
- Place the potatoes on the sheet. Using the bottom of a heavy glass or a potato masher, gently press down on each potato until it is about 1/2 inch thick but still holds together.
- In a small bowl, whisk together the melted butter, olive oil, and garlic powder. Brush this mixture generously over the tops and into the nooks of each smashed potato.
- Roast for 20-25 minutes. Do not flip them. Look for the edges to turn a deep mahogany brown. Finish with flaky salt and parsley before serving.
How to style food displays?

Why we love this
Styling a food display is where cooking turns into art. It’s about creating a landscape of abundance that tells a story of hospitality. A well-styled board is a tactile experience; it’s the contrast between a smooth ceramic bowl of dip and the rough grain of the wood, the vibrant pop of green herbs against rich, brown roasted meats. It’s a visual feast that signals to your guests that they are cared for, turning a simple meal into an intentional, curated event.
Ingredients
- A large wooden board or slate platter
- Small ramekins or bowls of various heights
- Fresh herbs (rosemary, thyme, mint) for filling gaps
- Seasonal fruits (grapes, figs, berries) for color
- Nuts and dried fruits for texture
How to make it
- Start with your ‘anchors.’ Place your largest items first—these are usually the bowls of dips, sauces, or warm pasta. Position them off-center to create a more organic, asymmetrical look.
- Create ‘movement’ using the ‘S-curve’ method. Arrange your main proteins or larger vegetables in a flowing line that snakes across the board, leading the eye from one corner to the other.
- Group items by color and texture but ensure there is contrast. Don’t put two beige items (like crackers and bread) right next to each other; separate them with a pile of bright green grapes or red strawberries.
- Height is your friend. Stack sliced meats or cheeses to create vertical interest. If everything is flat, the board will look two-dimensional and less appetizing.
- The ‘Gap-Fill’ Phase: Once the main components are down, look for any visible wood or empty spaces. Fill these with small handfuls of nuts, sprigs of herbs, or edible flowers. The goal is ‘controlled chaos’—it should look overflowing and bountiful.
How to make healthy snacks?

Why we love this
Healthy snacks shouldn’t feel like a compromise; they should feel like a celebration of clean energy. These stuffed Medjool dates are the perfect example—they offer a chewy, caramel-like sweetness that satisfies the deepest dessert cravings while providing fiber and healthy fats. The contrast of the creamy nut butter against the sea salt creates a complex flavor profile that feels incredibly indulgent, yet leaves you feeling light and energized for the rest of the party.
Ingredients
- 12 large Medjool dates
- 4 tablespoons unsweetened almond or peanut butter
- 1/4 cup crushed walnuts or pistachios
- Dark chocolate shavings
- Flaky sea salt
How to make it
- Using a small paring knife, make a longitudinal slit down the center of each date. Be careful not to cut all the way through. Remove and discard the pit.
- Open the date slightly to create a ‘boat’ shape. Using a small teaspoon, fill each cavity with about a teaspoon of your chosen nut butter. Do not overfill, or it will become messy to pick up.
- Press the crushed nuts into the surface of the nut butter. The crunch of the pistachio or walnut adds a necessary textural contrast to the soft date.
- For an extra touch of decadence, use a vegetable peeler to shave a bit of dark chocolate over the top.
- Finish with a tiny pinch of flaky sea salt on each date. Arrange them in a neat row or a small cluster on your board. These can be made up to 24 hours in advance and stored in the fridge.
How to prepare party food?

Why we love this
Party food is all about portability and the ‘one-handed bite.’ These mini Caprese skewers are the ultimate crowd-pleaser because they are fresh, vibrant, and incredibly easy to eat while mingling. The aroma of bruised basil leaves is instantly refreshing, and the combination of milky mozzarella with acidic tomatoes and a sweet balsamic glaze is a timeless trio. It’s a clean, mess-free way to bring high-quality flavor to a casual setting.
Ingredients
- 1 container of fresh mozzarella pearls (bocconcini)
- 1 pint cherry tomatoes (red and yellow)
- 1 bunch fresh large basil leaves
- 6-inch wooden skewers or toothpicks
- Balsamic glaze for drizzling
How to make it
- Wash the tomatoes and basil leaves, then pat them dry. Keeping the ingredients dry ensures the balsamic glaze will stick to the surface rather than sliding off.
- Assemble the skewers in a consistent pattern for a professional look. Start with one cherry tomato, followed by a basil leaf folded in half, and finish with a mozzarella pearl. The mozzarella at the bottom acts as a stable base if you want to stand them up.
- Arrange the skewers on a flat platter or nestled into a section of your board. For a more dynamic look, you can lay them in a circular ‘wreath’ pattern.
- Just before guests arrive, drizzle a thick balsamic glaze in a zigzag motion across all the skewers. Do not do this too early, as the acid can start to break down the cheese and wilt the basil.
- Sprinkle with a final touch of cracked black pepper for a bit of savory depth.
How to cook spicy chicken?

Why we love this
Spicy chicken brings a necessary ‘wow’ factor to any food board, offering a juicy, protein-packed bite with a kick. We love the Hot Honey glaze technique because it provides a sticky, glossy coating that balances fire with floral sweetness. The scent of frying spices and sweet honey is magnetic, drawing people toward the board the moment the tray hits the table. It’s succulent, bold, and provides that addictive sweet-and-spicy profile that makes modern appetizers so viral.
Ingredients
- 1 lb chicken breast tenders
- 1 cup Panko breadcrumbs
- 1/2 cup flour
- 2 eggs, beaten
- 1/2 cup honey
- 2 tablespoons hot sauce (like Frank’s or Sriracha)
- 1 teaspoon cayenne pepper
How to make it
- Preheat your oven to 400°F (200°C) or set an air fryer to 375°F. For the crispiest result, place a wire rack over a baking sheet; this allows hot air to circulate under the chicken.
- Set up a dredging station: one bowl for flour mixed with cayenne and salt, one for the beaten eggs, and one for the Panko breadcrumbs.
- Coat each chicken tender in flour (shake off excess), dip in egg, then press firmly into the Panko until fully encrusted.
- Bake for 15-18 minutes (or air fry for 10-12) until the internal temperature reaches 165°F and the breading is a pale golden brown.
- While the chicken cooks, whisk together the honey and hot sauce in a small saucepan over low heat just until bubbling and combined.
- Once the chicken is done, immediately toss the hot tenders in the honey mixture or drizzle it heavily over the top while they are on the board. Serve with a side of ranch or blue cheese to cool things down.
How to style pretty food?

Why we love this
Styling ‘pretty’ food is about honoring the aesthetic potential of every ingredient. It’s the difference between tossing a salad in a bowl and carefully placing edible pansies and microgreens on top like a garden portrait. This approach appeals to our sense of wonder; when food looks this beautiful, it tastes better because we’ve already ‘eaten’ with our eyes. It’s soft, whimsical, and adds a touch of high-end catering flair to a home-cooked gathering.
Ingredients
- Mixed microgreens or baby arugula
- Edible flowers (violas, pansies, or nasturtiums)
- Thinly shaved radishes (use a mandoline)
- Pomegranate arils
- Light citrus vinaigrette
How to make it
- Start with a neutral background, like a white ceramic platter or a light marble slab, to let the colors of the food pop.
- Lay down a bed of greens. Instead of dumping them, gently place handfuls to maintain loft and volume. Drizzle very lightly with vinaigrette—too much dressing will weigh down the greens and make them look limp.
- Scatter the shaved radishes. Use a mandoline on the thinnest setting so the radishes are translucent; they will curl slightly, adding beautiful texture.
- The ‘Hero’ element: Use tweezers or clean fingers to place the edible flowers. Group them in odd numbers (3 or 5) for the most pleasing visual balance.
- Finish with a ‘jewelry’ sprinkle of pomegranate arils. These act like little rubies, catching the light and adding a final burst of color and sweetness.
How to make gourmet burgers?

Why we love this
Gourmet sliders are the ultimate luxury addition to a viral food board. They take the humble burger and elevate it with decadent ingredients like truffle aioli and buttery brioche. The smell of high-fat wagyu beef searing on a hot griddle is enough to make anyone’s mouth water. It’s a bite-sized explosion of richness—the melt-in-your-mouth beef paired with a sharp white cheddar and a pillowy bun is pure indulgence in a 3-inch package.
Ingredients
- 1 lb Ground Wagyu or high-quality 80/20 beef
- 6 Mini Brioche buns
- 3 slices Sharp White Cheddar, halved
- 2 tablespoons Truffle oil mixed with 1/2 cup Mayo (Truffle Aioli)
- Caramelized onions
How to make it
- Form the beef into small, 2-ounce patties. Make them slightly larger than the buns, as they will shrink during cooking. Press a small thumbprint into the center of each to prevent them from puffing up into balls.
- Heat a cast-iron skillet over high heat until it is smoking slightly. Do not add oil; the beef has enough fat.
- Sear the patties for 2-3 minutes per side. You want a deep, dark crust (the ‘smash burger’ style works great here). As soon as you flip them, place the cheese on top and cover the pan with a lid for 30 seconds to melt it perfectly.
- Toast the brioche buns in a separate pan with a little butter until the edges are golden and crisp. This prevents the sauce from making the bun soggy.
- Assemble: Spread a generous layer of truffle aioli on the bottom bun, place the patty, top with a spoonful of warm caramelized onions, and finish with the top bun.
- Secure with a long bamboo skewer and place them in a neat line at the edge of your board.
The Art of the Gathering
Mastering the viral simple food board isn’t about following a strict set of rules; it’s about the spirit of the ‘open table.’ When you put effort into the textures, the colors, and the detailed preparation of these dishes, you’re creating an environment where people feel special. The best part? Once the board is set, your work is done. You get to pour yourself a drink, sit down with your favorite people, and enjoy the beautiful, delicious bounty you’ve created together. Happy hosting!