
We’ve all been there—scrolling through Pinterest or Instagram at 2 AM, heart racing as we look at gorgeous designer homes, only to look around our own space and feel a little ‘meh.’ There is a certain magic in a home that feels curated and high-end, but the price tags on professional landscaping or custom carpentry can feel like a punch to the gut. I used to think that achieving that ‘magazine look’ required a secret stash of gold or a team of contractors, but I’ve learned that the most viral, head-turning home improvements usually come from a little grit, some elbow grease, and a Saturday spent in the sun.
This weekend, I want to invite you to stop scrolling and start creating. Whether you’re looking to boost your curb appeal or turn your backyard into a private oasis, these projects are designed to give you that luxury feel for a fraction of the cost. There is nothing quite like the satisfaction of stepping back, wiping the dust off your hands, and realizing that the most beautiful part of your home is something you built yourself. Let’s dive into these viral DIYs that will make your neighbors do a double-take.
How to Design Front Yard Flower Beds for Effortless Curb Appeal
Why we love this
There is something profoundly soul-soothing about a perfectly manicured flower bed that greets you the moment you pull into the driveway. Imagine the sweet, earthy aroma of fresh cedar mulch mingling with the delicate fragrance of blooming hydrangeas and lavender as the breeze brushes past. The visual texture of dark, damp soil contrasting against the vibrant greens and soft petals creates a living tapestry that feels both sophisticated and welcoming. It’s not just about the plants; it’s about the feeling of pride that washes over you when you see your home framed in nature’s finest colors, glowing under the golden hour sun.
Essential Elements:
- High-quality landscape fabric and garden staples
- A mix of ‘Thriller, Filler, and Spiller’ plants
- Natural stone or metal edging
- Premium organic garden soil and mulch
- Transplanting trowel and garden rake
How to make it
- Start by marking the perimeter of your bed using a garden hose or spray paint to create fluid, organic curves rather than rigid straight lines for a more designer feel.
- Remove all grass and weeds from the marked area using a spade, ensuring you dig deep enough to remove the root systems entirely.
- Amend the existing soil with high-quality organic compost and garden soil, mixing it thoroughly to a depth of about 6 inches to ensure your plants have the nutrients they need.
- Place your plants (still in their pots) within the bed to test the layout; put the tallest plants (thrillers) in the back or center, medium plants (fillers) around them, and trailing plants (spillers) near the edges.
- Dig holes twice as wide as the root balls, place the plants in, and pack the soil firmly but gently around them to eliminate air pockets.
- Install your edging material along the perimeter to keep the grass out and the mulch in, then finish by spreading a 2-3 inch layer of mulch, being careful not to pile it against the plant stems.
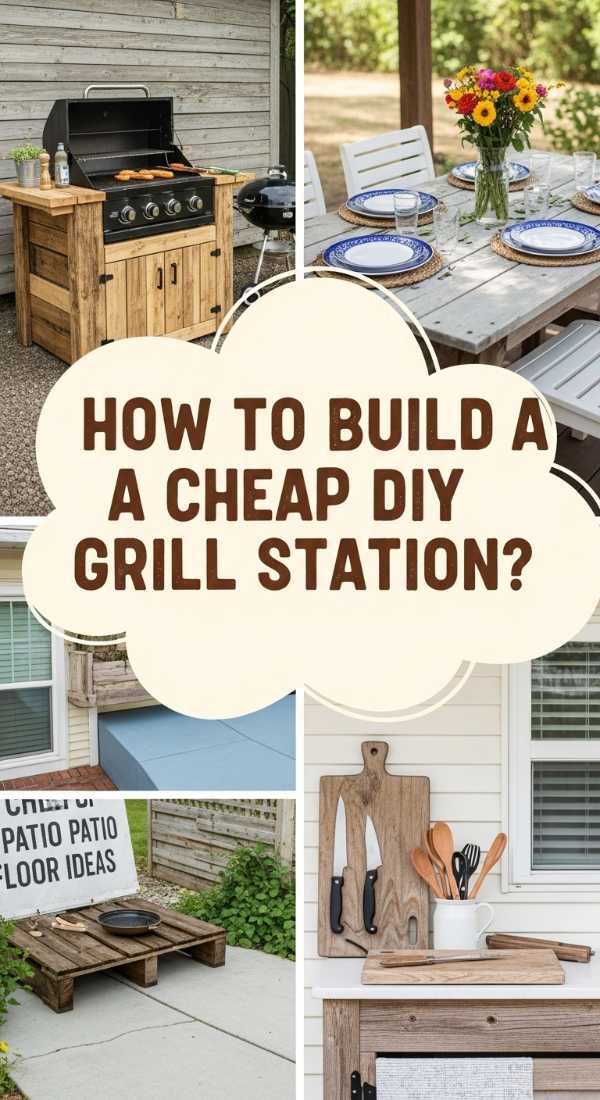
How to Build a Custom Grill Station for the Ultimate Summer Cookout
Why we love this
Picture the ultimate outdoor hosting scenario: the sizzle of premium steaks on the grate, the aromatic clouds of hickory smoke swirling through the air, and you, standing behind a sleek, custom-built station like a professional chef. This project transforms a basic grill into a culinary command center, offering smooth, cool-to-the-touch countertops and the solid, grounded feeling of handcrafted woodwork. It is the centerpiece of the backyard where laughter is shared over cold drinks and the warmth of the grill creates a cozy, inviting atmosphere that lingers long after the sun goes down.
Essential Elements:
- Pressure-treated lumber or cedar for the frame
- Outdoor-rated countertop material (granite, concrete, or tile)
- Stainless steel cabinet pulls and hooks
- Weather-resistant wood stain or exterior paint
- Heavy-duty locking casters for mobility
How to make it
- Measure your grill accurately, leaving at least 2-3 inches of clearance on all sides for heat dissipation and ease of cleaning.
- Construct a sturdy frame using 4×4 posts for the legs and 2×4 boards for the shelving supports, using pocket hole screws for strong, hidden joints.
- Add horizontal slats or solid plywood panels to the sides and back to create a finished look, ensuring you leave one side open or gated for propane tank access.
- Sand the wood thoroughly, moving from 80-grit to 220-grit sandpaper until the surface feels like silk, then apply two coats of weather-resistant stain.
- Secure your countertop material to the top of the frame using construction adhesive, ensuring it is perfectly level so liquids don’t pool.
- Install hooks on the side for your tongs and spatula, and attach a bottle opener for that extra touch of convenience that makes the station feel truly custom.
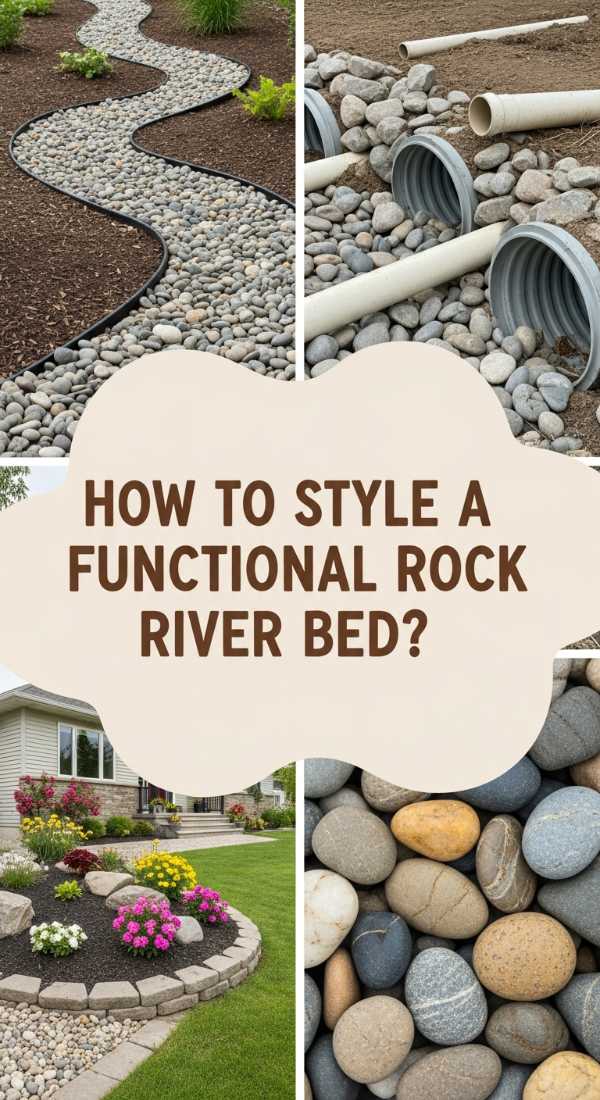
How to Install a Rock River Bed for Better Property Drainage
Why we love this
A rock river bed is the perfect marriage of utility and Zen-like beauty, turning a problematic drainage area into a stunning landscape feature. There is a tactile joy in the smooth, rounded surfaces of river rocks—cool greys, warm tans, and deep charcoals—nestled together to mimic a dried-up stream. When the rain falls, you can watch the water dance over the stones, moving purposefully away from your foundation with a soft, trickling sound that replaces the stress of a muddy yard. It adds an architectural weight to your property, making the entire garden feel grounded, intentional, and harmoniously balanced with the elements.
Essential Elements:
- River rocks of various sizes (from pea gravel to large boulders)
- Heavy-duty landscape fabric (non-woven)
- PVC drainage pipe (if a French drain is needed underneath)
- Shovels, picks, and wheelbarrows
- Sand for leveling and stabilizing the base
How to make it
- Trace a natural, winding path through the area where water naturally pools, digging a trench about 12-18 inches wide and 6-8 inches deep.
- Ensure the trench has a slight downward slope (at least 1 inch for every 10 feet) to keep water moving in the right direction away from structures.
- Line the entire trench with heavy-duty, non-woven landscape fabric, overlapping edges by 12 inches and pinning it securely into the soil.
- Place a layer of coarse sand at the bottom to provide a stable base, then start positioning your largest boulders along the edges to define the ‘banks’ of your river.
- Fill the center of the path with medium-sized river rocks, then use smaller pea gravel to fill in the gaps and create a natural, layered appearance.
- Test the drainage by running a hose at the high end of the river bed, adjusting stone placement to ensure the water flows smoothly without pooling or eroding the edges.
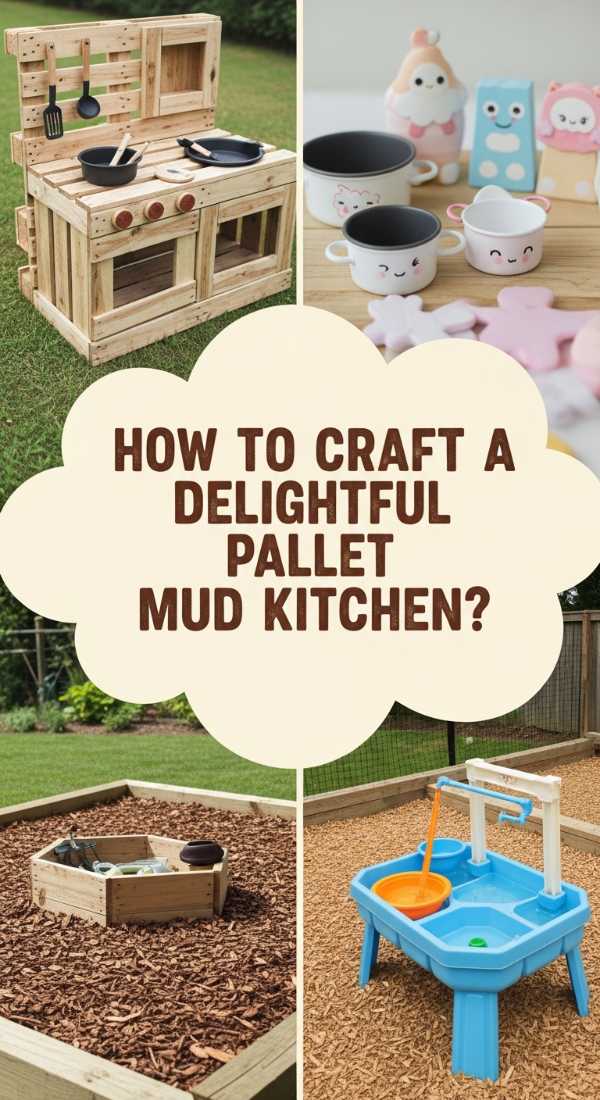
How to Create a Pallet Mud Kitchen for Endless Outdoor Play
Why we love this
Watching a child engage with a mud kitchen is like witnessing pure, unadulterated creativity in action. The earthy smell of damp garden soil, the ‘clink’ of old metal spoons against stainless steel bowls, and the messy, squelching joy of making ‘mud pies’ creates a sensory-rich playground that no plastic toy can match. It’s a rustic, charming addition to any backyard that feels nostalgic and wholesome, encouraging kids to get their hands dirty and explore the world around them. The rough-hewn texture of the pallet wood gives it a sturdy, farmhouse vibe that only gets better as it weathers with time and play.
Essential Elements:
- Heat-treated (HT) wooden pallets (ensure they are safe for kids)
- Old stainless steel sink or plastic washbins
- Discarded kitchen utensils and pots/pans
- Exterior-grade wood glue and deck screws
- Chalkboard paint for a ‘menu’ board
How to make it
- Select two pallets in good condition; use one for the main vertical backboard and dismantle the second one to provide wood for the countertop and shelving.
- Build a sturdy frame for the countertop at a height appropriate for your child (usually 20-24 inches), ensuring all edges are sanded incredibly smooth to prevent splinters.
- Cut a hole in the countertop wood slightly smaller than the lip of your sink or washbin, then drop the bin into place and secure it.
- Attach the backboard pallet to the countertop frame, adding small shelves and ‘hooks’ (old nails or screws with the heads removed) to hang utensils.
- Paint a section of the backboard with chalkboard paint so kids can write out their daily specials or ‘recipes.’
- Apply a non-toxic, exterior-grade sealant to the entire structure to protect it from the elements and the inevitable splashes of mud and water.
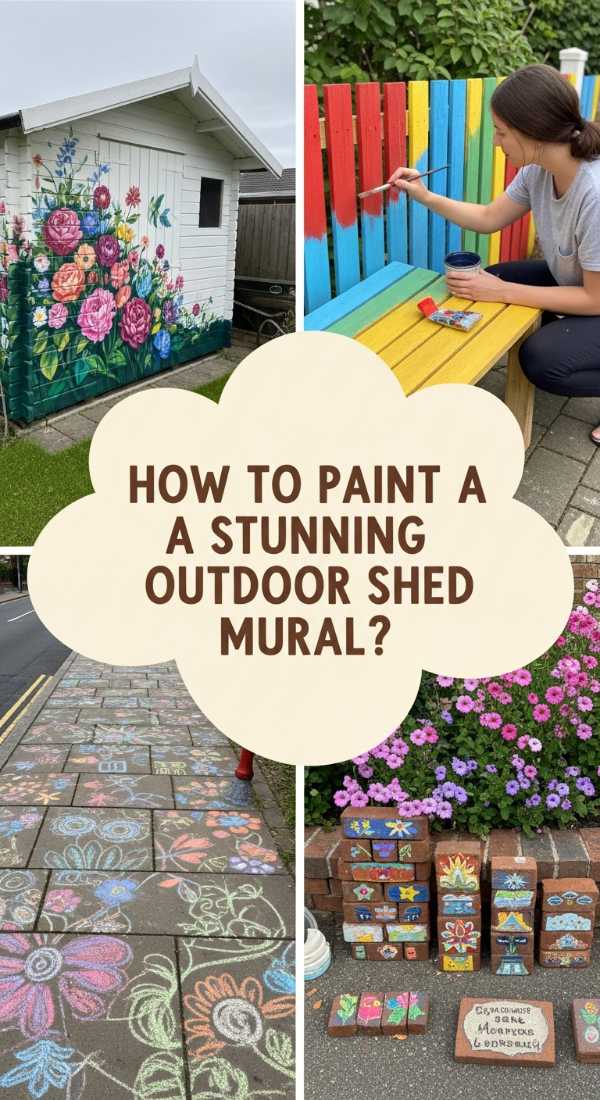
How to Paint a Vibrant Shed Mural for a Unique Backyard Vibe
Why we love this
Turning a drab, utilitarian garden shed into a giant canvas is the ultimate way to inject personality and ‘wow factor’ into your backyard. The sight of a bold, colorful mural peeking through the foliage feels like discovering a hidden art gallery in the middle of nature. Whether you choose soft botanical shapes or striking geometric patterns, the vibrant pigments breathe life into the space, catching the light and changing mood as the day progresses. It’s an empowering project that transforms a boring structure into a focal point that sparks conversation and radiates a joyful, artistic energy throughout your entire outdoor living area.
Essential Elements:
- High-quality exterior house paint in multiple colors
- Assorted paint brushes and rollers
- Painter’s tape for clean lines or geometric shapes
- Shed cleaner or power washer
- UV-resistant clear topcoat
How to make it
- Prepare the surface by power washing the shed to remove dirt, mold, and loose paint; let it dry completely for at least 24-48 hours.
- Sketch your design on a piece of paper first, then use a pencil or chalk to lightly outline the main shapes onto the shed wall.
- Prime the area if the shed is made of raw wood or metal to ensure the paint adheres properly and the colors stay vibrant.
- Start painting the background colors first using a roller for large areas, then work your way forward with smaller brushes for the detailed elements of the mural.
- Use painter’s tape for crisp edges if your design is geometric, but don’t be afraid to hand-paint organic shapes for a more whimsical, artistic feel.
- Once the paint is dry, apply a UV-resistant exterior clear coat to protect your masterpiece from fading in the sun or peeling due to rain.
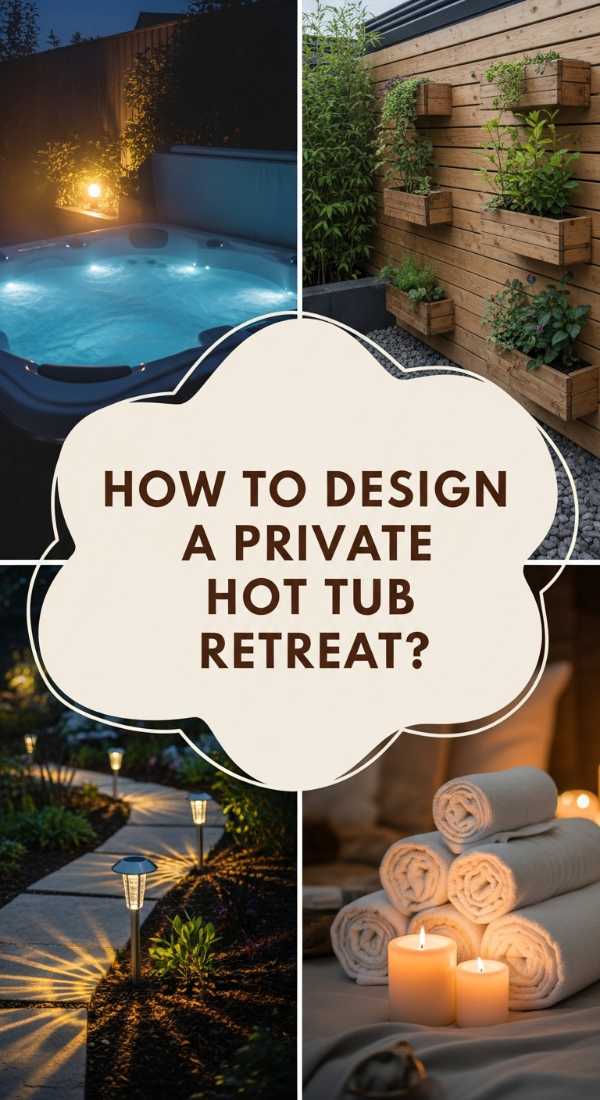
How to Style a Cozy Hot Tub Area for Maximum Backyard Privacy

Why we love this
There is nothing quite like sinking into bubbling, hot water while the cool night air settles around you, especially when you feel completely secluded from the outside world. A well-styled hot tub area feels like a high-end spa retreat, where the gentle glow of string lights reflects off the steam and the scent of cedar privacy screens fills the air. It’s about creating a sanctuary where you can truly let go of the day’s stress, surrounded by soft textures like outdoor rugs and plush towels, and shielded by lush greenery that makes the rest of the world simply disappear into the background.
Essential Elements:
- Cedar or bamboo privacy screens
- Weatherproof outdoor string lights (Edison bulbs recommended)
- Large potted plants (like tall grasses or evergreens)
- Outdoor rug and a waterproof towel rack
- Comfortable seating for the ‘cooling off’ zone
How to make it
- Identify the sightlines from your neighbors’ windows and place your privacy screens strategically to block those views without making the space feel claustrophobic.
- Install the screens securely into the ground or attach them to your deck, ensuring they can withstand high winds.
- String the lights in a ‘criss-cross’ or ‘zig-zag’ pattern above the hot tub, keeping them high enough to avoid splashes but low enough to create a warm, intimate canopy.
- Surround the base of the hot tub with large, moisture-loving potted plants to soften the edges of the tub and add a natural, ‘jungle-spa’ aesthetic.
- Place an outdoor-rated rug near the steps of the tub to provide a soft, clean place to step out onto, and install a wall-mounted rack for towels and robes.
- Add a small side table for drinks and an aromatic candle or essential oil diffuser to complete the sensory experience.
How to Style a Retro Teen Room for a Total Nostalgia Trip
Why we love this
Stepping into a retro-themed room is like a warm hug from the past, blending the best of the 70s, 80s, and 90s into a vibrant, high-energy space. The mix of tactile velvet pillows, the neon glow of a ‘sign’ on the wall, and the analog charm of a record player creates an environment that is both stimulating and incredibly cozy. It’s a space that celebrates individuality and vintage cool, where every corner tells a story through posters, colors, and textures. For a teen, it becomes a sanctuary of self-expression that feels far more personal and ‘cool’ than any cookie-cutter modern bedroom ever could.
Essential Elements:
- Neon wall signs or LED light strips
- Vintage-inspired posters or vinyl record wall displays
- Textured textiles (velvet, corduroy, or faux fur)
- Inflatable furniture or bean bag chairs
- Retro-style tech like a record player or lava lamp
How to make it
- Choose a bold color palette—think mustard yellows, burnt oranges, or vibrant teals—and use these for an accent wall or through large textiles like bedding.
- Create a focal point by arranging a gallery wall of vintage records or ‘retro’ art prints, using uniform frames for a cleaner look or eclectic ones for a thrifted vibe.
- Layer your lighting by adding a neon sign, a lava lamp, and some warm-toned floor lamps to create a moody, ‘hangout’ atmosphere that works for studying or relaxing.
- Incorporate vintage furniture pieces like a low-profile nightstand or a retro desk, and soften the look with plenty of textured throw pillows and blankets.
- Organize a dedicated ‘analog corner’ with a record player and a small collection of vinyl, providing a tactile break from digital screens.
- Finish the look with a large-scale shag rug that ties all the colors together and provides a comfortable spot for floor lounging with friends.
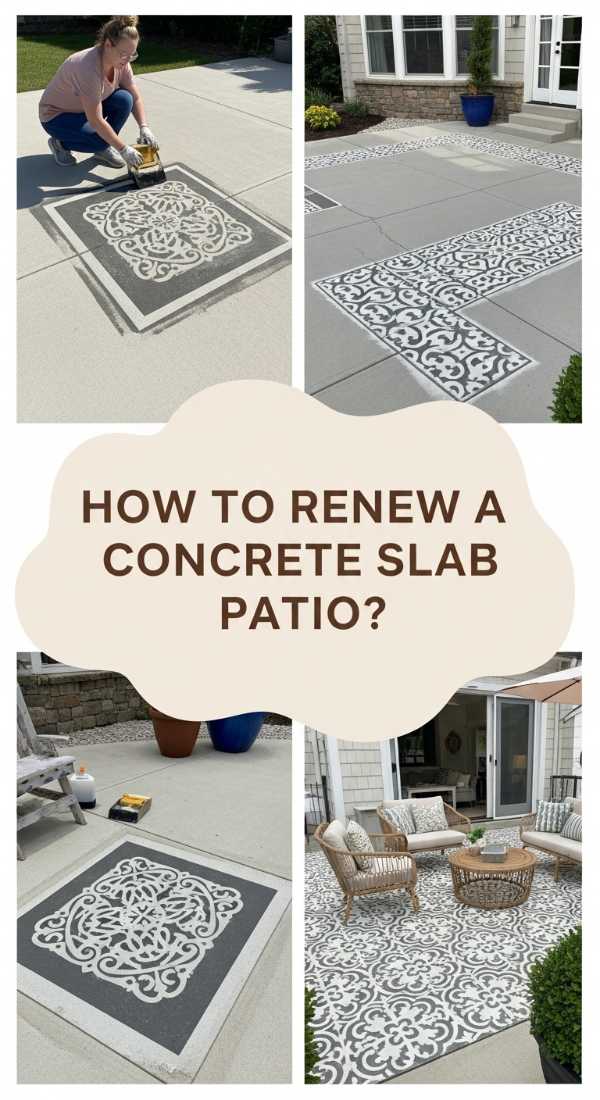
How to Stencil a Concrete Patio for a High End Designer Look
Why we love this
Few DIY projects offer such a dramatic ‘before and after’ as stenciling a plain concrete patio. The process transforms a cold, grey slab into what looks like an expensive Mediterranean courtyard or a high-end Moroccan tiled space. When you finish, the intricate patterns look so crisp and professional that it’s hard to believe it’s just paint. The texture of the concrete beneath the design gives it an authentic, stone-like feel, and the way the patterns play with the sunlight throughout the day adds a sophisticated architectural layer to your outdoor living room that feels incredibly luxurious underfoot.
Essential Elements:
- Large-scale floor stencil (tile or mandala patterns work best)
- High-quality porch and patio paint (base color and accent color)
- Small high-density foam rollers and stencil brushes
- Painter’s tape and a measuring tape
- Concrete sealer (slip-resistant)
How to make it
- Power wash the concrete thoroughly and let it dry for 48 hours; any dirt or oil left behind will prevent the paint from bonding.
- Apply two coats of your base color (the ‘grout’ color) to the entire patio and let it cure for at least 24 hours.
- Find the exact center of your patio and start your stenciling there to ensure the pattern is symmetrical; secure the stencil with painter’s tape.
- Using a very small amount of paint on a ‘dry’ foam roller (the key is to off-load most of the paint onto a paper towel first), roll over the stencil to prevent bleeding.
- Carefully lift the stencil, align it with the registration marks, and repeat the process across the entire surface, cleaning the stencil every few rounds to keep the lines sharp.
- Once the entire design is dry, apply two coats of clear, slip-resistant concrete sealer to protect the pattern from foot traffic and weather.
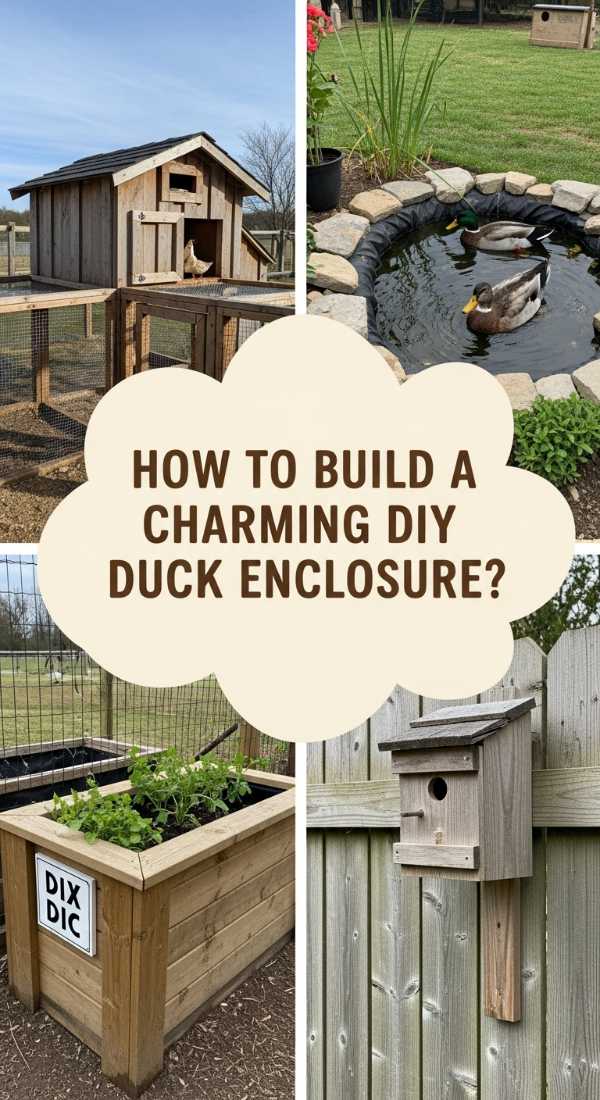
How to Construct a Functional Duck Enclosure for a Happy Backyard Flock
Why we love this
There is a unique, pastoral joy in watching ducks waddle through a beautifully built enclosure that feels like a miniature farmhouse. The smell of fresh pine shavings and the sound of soft quacking as they splash in their water feature brings a touch of countryside serenity to any backyard. A well-designed enclosure isn’t just a cage; it’s a protected little world where the wood feels sturdy and safe, and the mesh is taut and secure. It offers a sense of connection to the rhythms of nature, providing a peaceful focal point that feels sustainable, purposeful, and full of life.
Essential Elements:
- Hardware cloth (not chicken wire) for predator protection
- Pressure-treated 2x4s for the frame
- Corrugated metal or asphalt shingles for the roof
- A pre-formed pond or large galvanized tub
- Easy-to-clean flooring (like vinyl or thick rubber mats)
How to make it
- Design the enclosure with at least 4 square feet of space per duck inside the house and 10 square feet per duck in the outdoor run.
- Build the frame using 2×4 lumber, ensuring you bury the hardware cloth at least 12 inches into the ground around the perimeter to stop digging predators.
- Construct the ‘house’ portion with an elevated floor to keep the ducks dry and include a large door for easy cleaning and a smaller ‘duck-sized’ ramp for entry.
- Install a sloped roof using corrugated metal, ensuring it has an overhang to keep rain from blowing into the enclosure.
- Incorporate a water feature like a galvanized tub with a drain valve, making sure it’s easy for the ducks to get in and out of safely.
- Add plenty of ventilation near the top of the house to prevent moisture buildup, but ensure all openings are covered with hardware cloth to keep pests out.
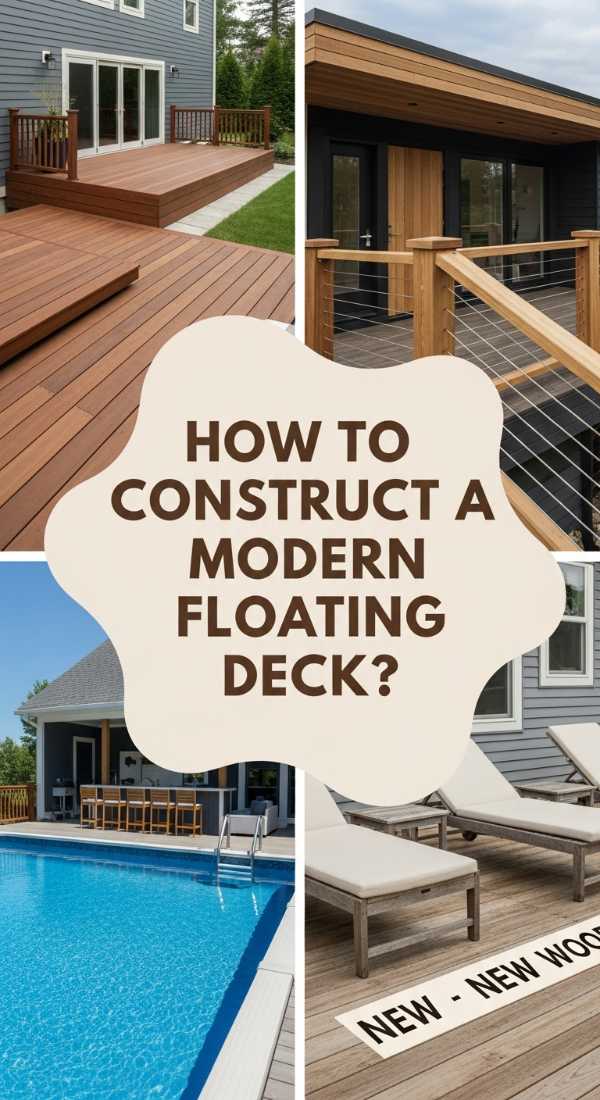
How to Build a Floating Deck for a Sophisticated Outdoor Lounge
[IMAGE_10]
Why we love this
A floating deck is the ultimate ‘low-risk, high-reward’ project that instantly elevates your backyard from ‘just a yard’ to a sophisticated lounge destination. The clean, straight lines of the decking boards provide a modern, architectural feel that seems to hover just above the grass. It’s the perfect place to set up a sleek outdoor sofa and a fire pit, where you can feel the solid, rhythmic thrum of wood under your feet and the warmth of the sun-baked planks. It creates a defined ‘zone’ for relaxation that feels intentional, expensive, and incredibly inviting, transforming any empty patch of grass into a designer-worthy retreat.
Essential Elements:
- Concrete deck blocks (no digging or pouring required)
- Pressure-treated 2×6 boards for the joists
- Premium cedar or composite decking boards
- Hidden deck fasteners for a ‘screw-free’ surface look
- Landscape fabric and gravel for the base
How to make it
- Clear the area of grass and level the ground, then lay down heavy-duty landscape fabric and a layer of gravel to prevent weeds and help with drainage.
- Position your concrete deck blocks in a grid pattern, ensuring they are perfectly level with one another using a long straight edge and a spirit level.
- Install the 2×6 joists into the slots of the deck blocks, creating a rectangular frame and adding internal joists every 16 inches for structural support.
- Check that the frame is perfectly square by measuring the diagonals; they must be exactly the same length.
- Lay your decking boards across the joists, using hidden fasteners or deck screws to secure them, and leave a 1/8-inch gap between boards for drainage and expansion.
- Trim the edges of the boards with a circular saw for a perfectly flush finish, then sand and stain the deck to match your home’s aesthetic.
Wrapping Up Your Weekend Transformation
Creating a home that feels high-end doesn’t require a massive renovation budget—it just requires a bit of vision and the willingness to get your hands dirty. These ten projects prove that with the right materials and a clear plan, you can turn your living space into a viral-worthy sanctuary. I hope these ideas inspire you to pick up a tool this weekend and make your home a little more beautiful, one DIY at a time. Happy building!