
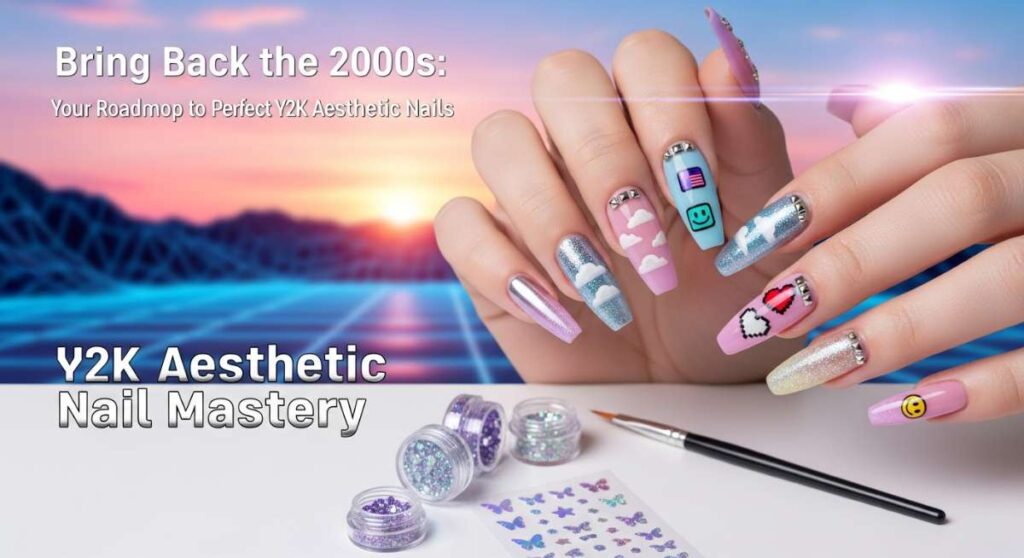
Bring Back the 2000s: Your Roadmap to Perfect Y2K Aesthetic Nails
Hello, my sweetest loves! There is something so magical about the way nostalgia wraps around us like a soft, velvet tracksuit. Lately, I’ve been daydreaming about simpler times—butterfly clips, lip gloss that sparkled under the sun, and the pure joy of a fresh set of nails that screamed ‘main character energy.’ Bringing back the Y2K aesthetic isn’t just about fashion; it’s about reclaiming that playful, fearless spirit we all carried in our hearts.
I wanted to create this little haven for you, a roadmap to help you navigate the shimmering world of 2000s nail mastery. Whether you’re a DIY darling or a salon regular, these designs are meant to make you feel like the radiant, beautiful soul you are. Grab a cup of lavender tea, get cozy, and let’s dive into these dreamy designs together.
5 Easy Steps for French Heart Nails

Why to love this Design:
There is something so deeply romantic and playful about a heart-tipped French mani. It’s the ultimate soft-girl aesthetic mixed with that punchy 2000s energy we all crave, making your hands look delicate yet bold.
Essential Elements:
- Sheer pink base coat
- Opaque white or cherry red polish
- Fine detailing brush
- High-shine top coat
How to Prepare:
- Gently buff your nails and apply a sheer nude-pink base.
- Using a detailing brush, mark two dots where the ‘humps’ of the heart will be.
- Connect the dots into a ‘V’ shape at the center of the free edge.
- Fill in the heart shape carefully with your chosen color.
- Seal the love with a thick layer of glossy top coat.
Budget Range
- OPI Bubble Bath Polish ($11)
- Sally Hansen White On ($6)
- Winstonia Detailing Brush Set ($8)
3 Ways to Master 2000s Stripes
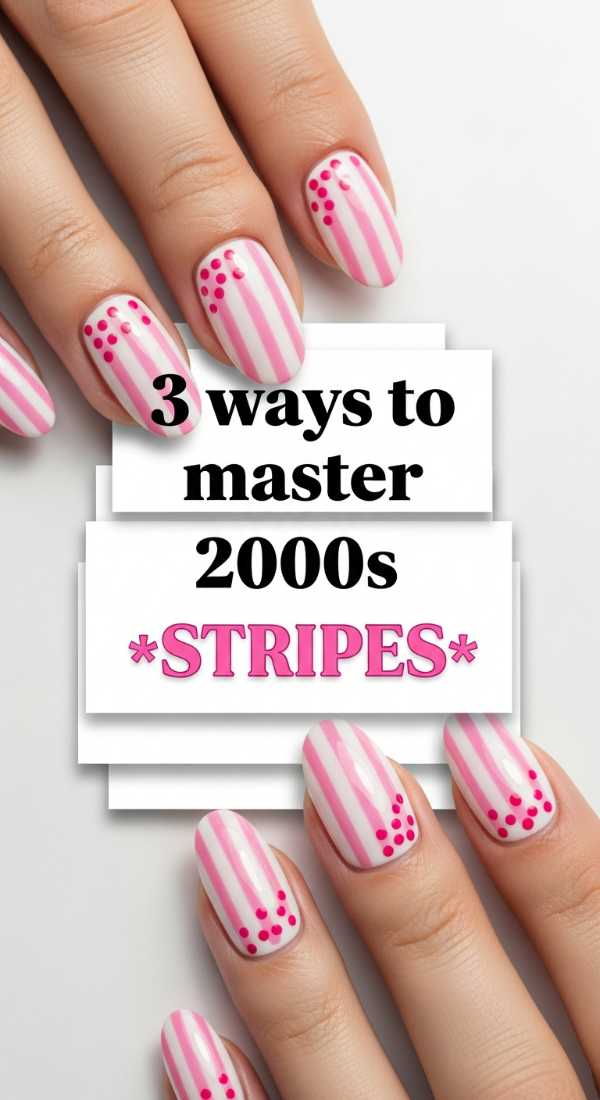
Why to love this Design:
Stripes were the backbone of every cool-girl locker decoration and notebook doodle in 2004. Bringing them to your nails adds an instant graphic pop that feels both retro and high-fashion.
Essential Elements:
- Neon striping tape
- Contrasting polish colors (think lime green and hot pink)
- Steady hand or guide stickers
How to Prepare:
- Paint a solid base color and let it dry completely (this is key, loves!).
- Apply striping tape in diagonal or vertical patterns across the nail.
- Paint over the tape with a second color and peel the tape away immediately while wet.
Budget Range
- Holler and Glow Neon Polish ($4)
- Amazon Nail Striping Tape Roll ($5)
- Beetles Gel Liner Set ($15)
4 Secrets to Perfect Y2K Acrylics
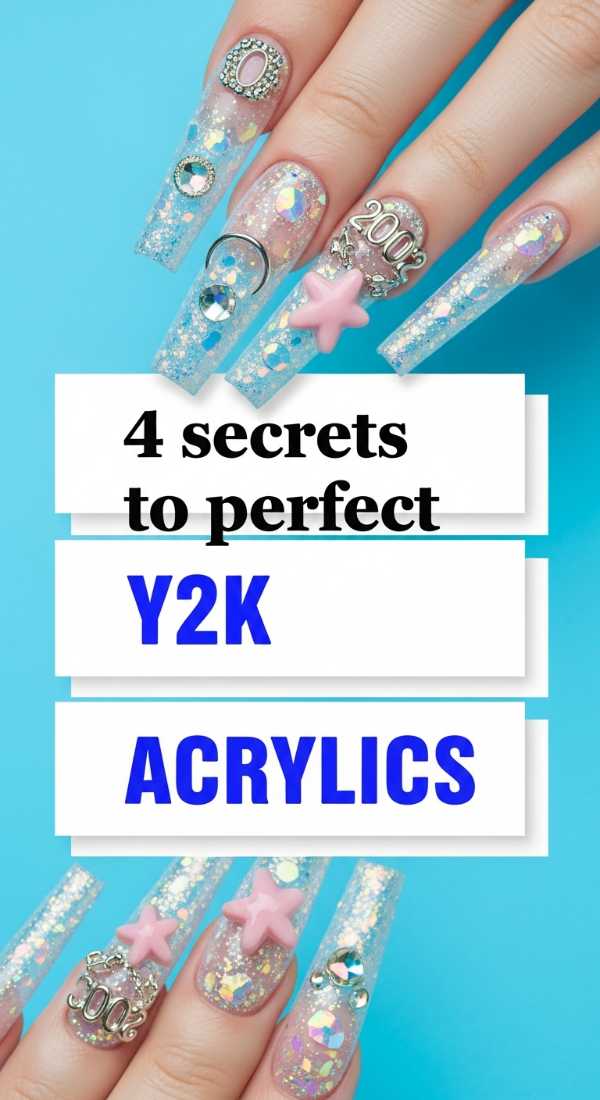
Why to love this Design:
Acrylics are the canvas of the Y2K era. They give you the length needed for those iconic charms and 3D art pieces that make your hands feel like a literal work of art.
Essential Elements:
- Extra-long square tips
- Clear acrylic powder
- Monomer with low odor
- Butterfly nail charms
How to Prepare:
- Prep the natural nail bed by pushing back cuticles gently.
- Apply tips and blend the seam until it’s invisible.
- Lay your acrylic beads starting from the free edge, working toward the cuticle.
- File into a crisp ‘tapered square’ shape before adding your 3D charms.
Budget Range
- Mia Secret Acrylic Kit ($25)
- Makartt Nail Tips ($10)
- Mixed Resin Butterfly Charms ($7)
6 Trends for Your 2026 Manicure
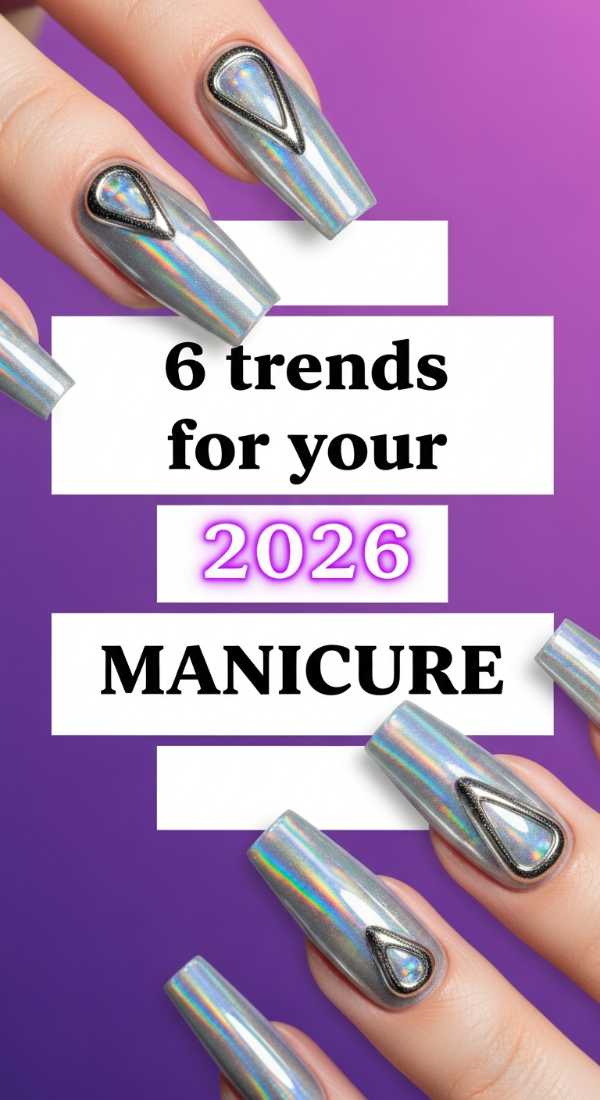
Why to love this Design:
We are looking ahead! The 2026 vibe takes Y2K and gives it a ‘cyber-glow’ twist. It’s perfect for the trendsetters who want to stay ahead of the curve while keeping that nostalgic heart.
Essential Elements:
- Chrome powders
- Holographic finishes
- Aura-style airbrushing
- Translucent jelly tips
How to Prepare:
- Start with a clear jelly extension for a ‘glass’ look.
- Use a sponge to dab a darker ‘aura’ color in the center of the nail.
- Apply a light dusting of silver chrome around the edges.
- Add ‘cyber’ lines using a silver spider gel.
- Finish with a futuristic matte top coat on specific fingers for contrast.
- Top it all with a UV-reactive charm.
Budget Range
- Born Pretty Chrome Powder ($9)
- Modelones Jelly Gel Set ($18)
- Saviland Spider Gel ($12)
7 Tips to Style 2000s Nails
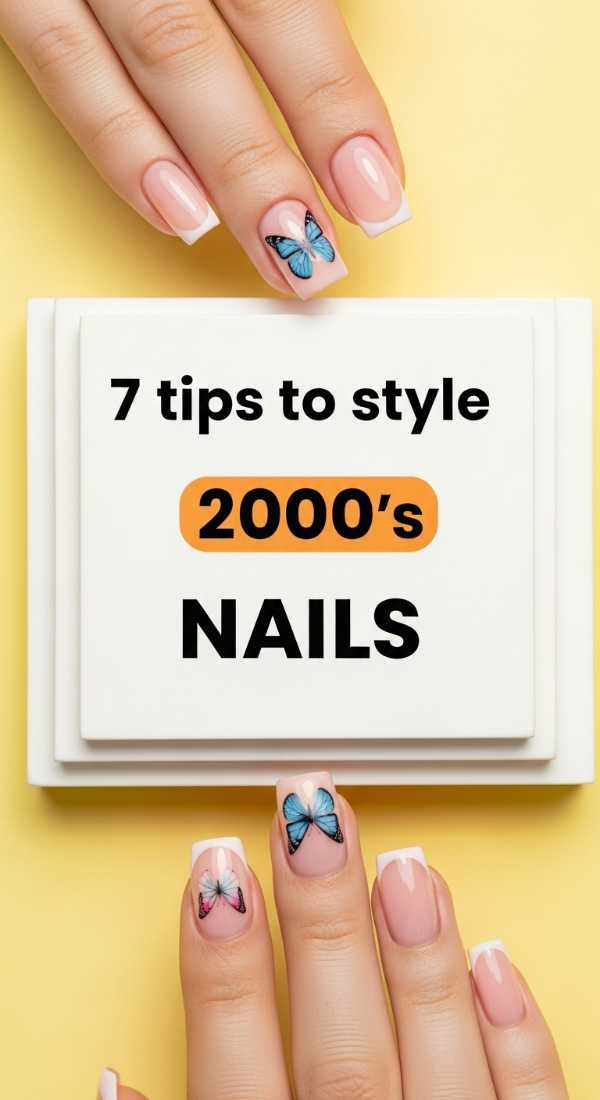
Why to love this Design:
A manicure is never just a manicure; it’s an outfit! Styling your nails with the right accessories elevates the whole look from ‘cute’ to ‘iconic.’
Essential Elements:
- Stackable chunky rings
- Beaded bracelets
- Small rhinestone accents
- Matching phone charms
How to Prepare:
- Choose a color palette that matches your favorite velour hoodie.
- Apply tiny rhinestones near the cuticle of your ring finger.
- Stack plastic ‘bubble’ rings on your middle and index fingers.
- Ensure your nail length doesn’t hinder your ability to type on your vintage flip phone (or your smartphone!).
- Coordinate your toe polish for a cohesive ‘full-body’ vibe.
- Use a cuticle oil that smells like vanilla or strawberry for the full sensory experience.
- Take photos under a flash to get that authentic 2000s digital camera glow.
Budget Range
- Claire’s Rhinestone Pack ($5)
- Etsy Custom Beaded Rings ($12)
- H&M Plastic Ring Set ($9)
4 Easy Steps for Clean Hearts
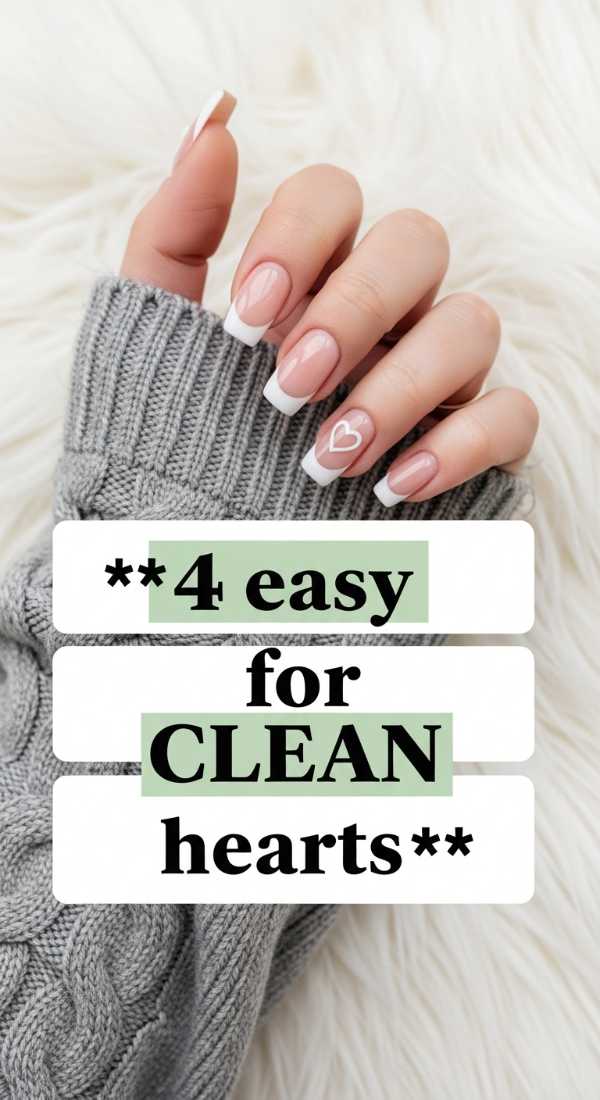
Why to love this Design:
If the French heart is too much, the ‘clean heart’ is the minimalist’s dream. It’s subtle, sweet, and looks incredibly sophisticated on shorter, natural nails.
Essential Elements:
- Nude or ‘milky’ base coat
- A single toothpick or dotting tool
- Pastel polish
How to Prepare:
- Apply two coats of a milky white or sheer nude.
- Take a dotting tool and place two tiny dots side-by-side in the center of the nail.
- Drag the bottom of each dot downward to meet in a point.
- Wait for it to dry fully before applying a thin, protective top coat.
Budget Range
- Essie ‘Marshmallow’ ($10)
- Zoya Pastel Polish ($12)
- Nail Art Dotting Tools ($6)
3 Techniques for Y2K Polka Dots
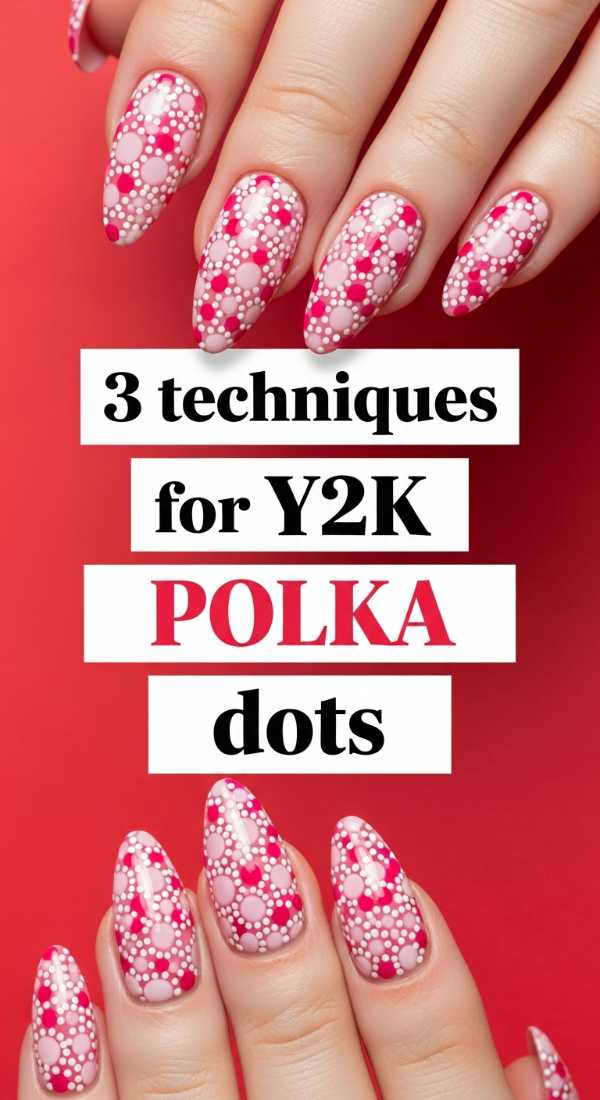
Why to love this Design:
Polka dots are the ultimate ‘bubbly’ design. They feel high-energy and look amazing in those classic 2000s color combos like turquoise and chocolate brown.
Essential Elements:
- Various sizes of dotting tools
- Contrasting ‘clash’ colors
- Quick-dry spray
How to Prepare:
- The ‘Random Scatter’: Place dots of different sizes all over the nail for a confetti look.
- The ‘Ordered Grid’: Use a ruler or guide to place dots in perfect rows for a structured retro vibe.
- The ‘Gradient Dot’: Start with large dots at the base and make them smaller as you reach the tip.
Budget Range
- Sinful Colors Polish ($3)
- Beauty Secrets Quick Dry Spray ($8)
- Double-Ended Dotting Pens ($5)
5 Steps to Shape Acrylic Nails
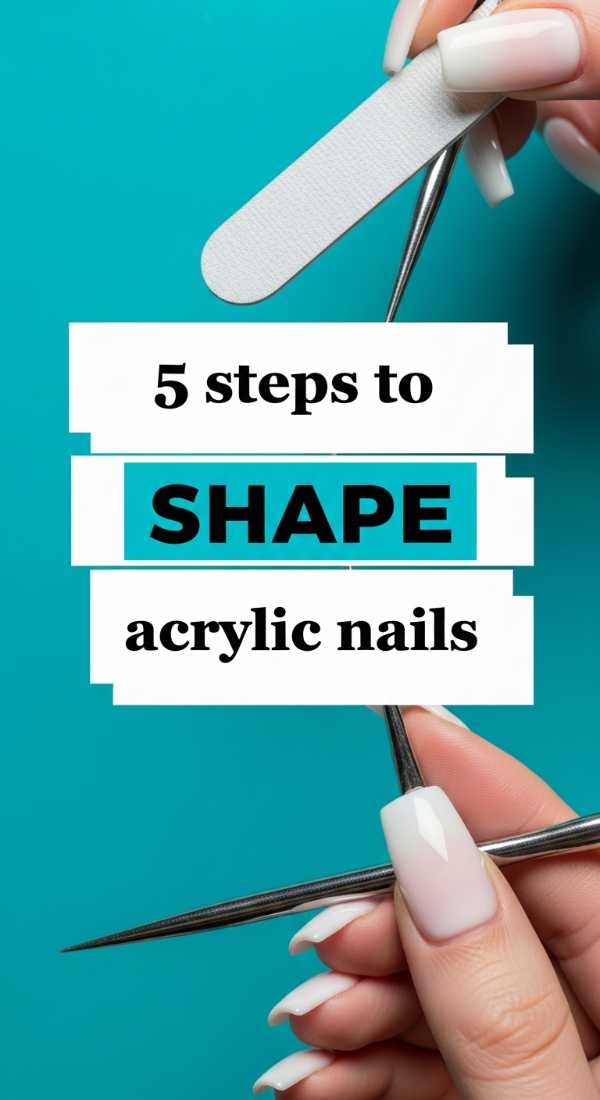
Why to love this Design:
The shape of your nail defines your entire hand’s silhouette. In the 2000s, it was all about the ‘tapered square’—it’s fierce, it’s functional, and it looks incredible in photos.
Essential Elements:
- 100/180 grit nail file
- Metal cuticle pusher
- Buffer block
- Dehydrator
How to Prepare:
- File the side walls of the acrylic straight out from the nail bed.
- Hold the file perpendicular to the tip to create a perfectly flat top edge.
- Taper the sides slightly inward as you move toward the tip for a slimming effect.
- Smooth the surface with a buffer block to remove any file lines.
- Cleanse with alcohol to see the true shape before polishing.
Budget Range
- Flowery Professional Nail Files ($4)
- Supernail Nail Dehydrator ($7)
- Tropical Shine Buffer ($3)
8 Color Combos for 2000s Vibes
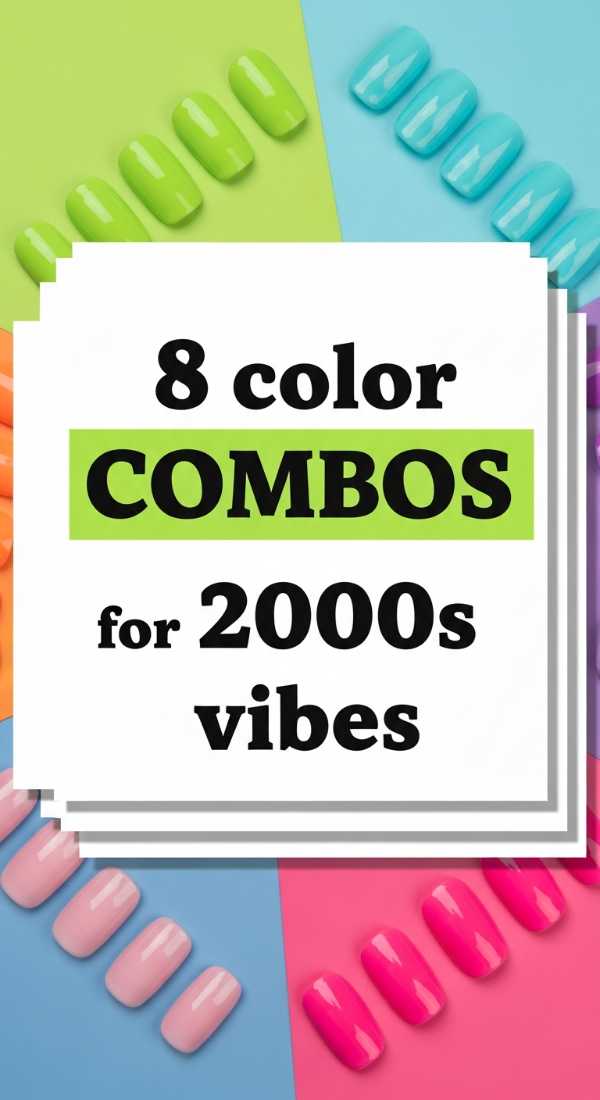
Why to love this Design:
Color is the heartbeat of Y2K. These pairings are specifically curated to evoke that sense of teenage nostalgia and vibrant energy.
Essential Elements:
- Baby Pink & Sky Blue
- Lime Green & Lavender
- Hot Pink & Silver Chrome
- Brown & Tiffany Blue
How to Prepare:
- Pick your duo: choose a dominant ‘base’ color and an ‘accent’ color.
- Apply the base to three fingers and the accent to the other two.
- Use the accent color for small details on the base nails (like stars or swirls).
- Try a two-tone French tip where the base and tip are from your chosen combo.
- Add a ‘sugar’ glitter coat to the ring finger for extra texture.
- Experiment with matte vs. glossy finishes within the same color story.
- Always use a base coat to prevent staining from those high-pigment neons.
- Finish with a cuticle massage using coconut oil.
Budget Range
- Orly Neon Heat ($12)
- Pacific Bio-Glitter ($10)
- China Glaze ‘For Audrey’ ($8)
10 Daily Ideas for Nails Inspo
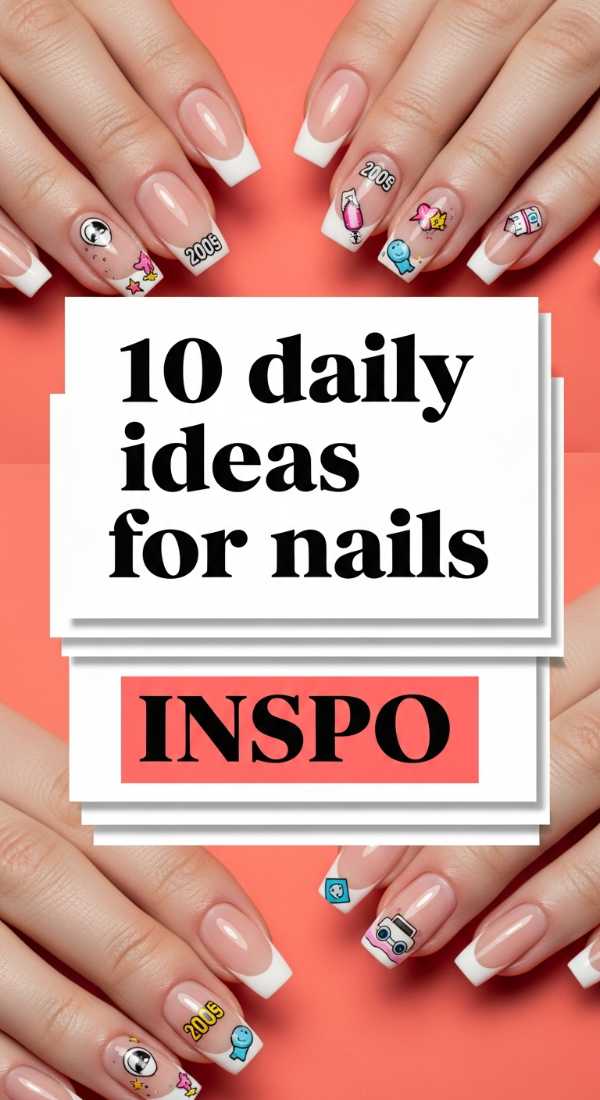
Why to love this Design:
Sometimes you just need a quick spark of inspiration! This is your go-to list for those ‘I don’t know what to do’ days, keeping your look fresh every single week.
Essential Elements:
- Nail stickers
- Inspo board (Pinterest)
- Phone camera
- Open mind
How to Prepare:
- Day 1: Classic French with a glitter line.
- Day 2: Tiny hand-painted cherries.
- Day 3: ‘Aura’ nails using eyeshadow and a sponge.
- Day 4: Mismatched ‘skittle’ nails in pastels.
- Day 5: Silver star decals on a clear base.
- Day 6: Flame art on the tips in hot pink.
- Day 7: Zebra print accent nail.
- Day 8: Iridescent ‘mermaid’ scales.
- Day 9: Smiley faces on the thumbs.
- Day 10: 3D water droplets using thick top coat gel.
Budget Range
- Deco Miami Nail Stickers ($8)
- Drugstore Eyeshadow Palette ($5)
- Kiss PowerFlex Nail Glue ($4)
Stay Sparkly and Fearless
Loves, I hope this roadmap brings a little extra sunshine to your day. Remember that your nails are an extension of your beautiful light. There are no rules in the world of Y2K aesthetic—only joy, color, and a whole lot of glitter. Whether you’re rocking extra-long acrylics or a sweet, clean heart design, wear it with confidence. You are the main character of your own story, and your hands are ready to write the next gorgeous chapter. Stay sparkly!