
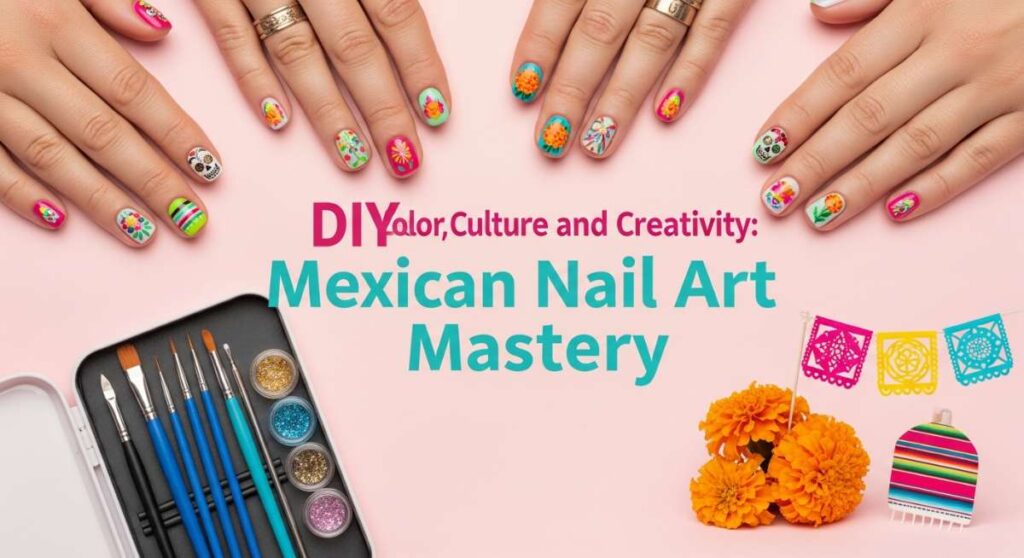
Color, Culture, and Creativity: Your Guide to DIY Mexican Nail Designs
Hello, my loves! Pull up a chair and let me wrap you in a warm, cloud-soft embrace. Today, we are embarking on a journey that is so close to my heart—a celebration of heritage, vibrant soul, and the sheer joy of self-expression. There is something profoundly magical about the way color can tell a story, and Mexican culture has some of the most beautiful stories to share with the world.
I’ve always felt that our nails are like tiny canvases, perfect for holding the things we love most. Whether you’re preparing for a festive celebration or you simply want to carry a piece of sunshine and history with you through your day, these designs are for you. We’re going to take it slow, breathe deep, and let our creativity flow as we explore the intricate patterns and bold hues of Mexico together.
So, grab your favorite cozy drink, find a patch of sunlight, and let’s dive into this DIY mastery. We aren’t just painting nails today; we are honoring a legacy of artistry and warmth. I can’t wait to see what you create, my sweet friends.
7 simple steps for Talavera nail art
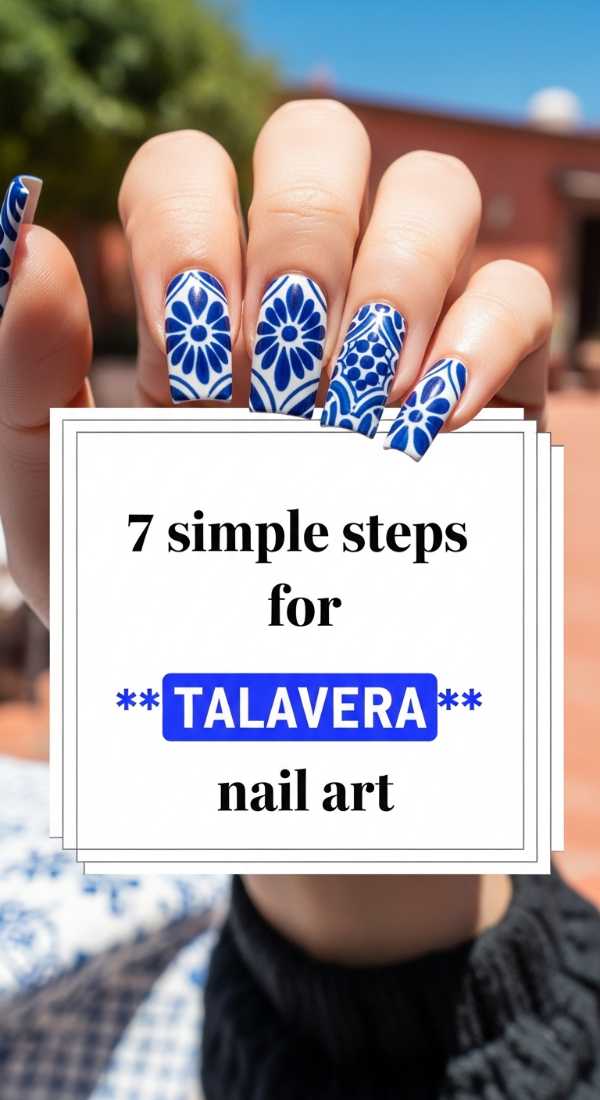
Why to love this Design:
There is something so poetic about the deep cobalt blues and crisp whites of Talavera pottery. It reminds me of quiet afternoons in a sunny courtyard, where every tile tells a story of craftsmanship and patience. It’s a classic, sophisticated look that feels like wearing a piece of history on your fingertips.
Essential Elements:
- Cobalt blue polish
- Opaque white base
- Ultra-fine detailing brush
- Glossy top coat
How to Prepare:
- Apply a clear base coat to protect your natural nails.
- Paint two thin layers of crisp white polish and let them dry completely.
- Dip your fine brush into the cobalt blue and paint a small diamond in the center.
- Add delicate curved lines extending from the diamond corners.
- Place tiny dots of blue in the open white spaces for that authentic tile feel.
- Refine any lines with a clean brush dipped in remover.
- Seal with a thick, glossy top coat for a ceramic-like finish.
Budget Range
- Sally Hansen White On ($4.00)
- Essie ‘Butler Please’ Blue ($10.00)
- Nail Art Brush Set ($6.00)
5 easy ways to style Mexican flag colors
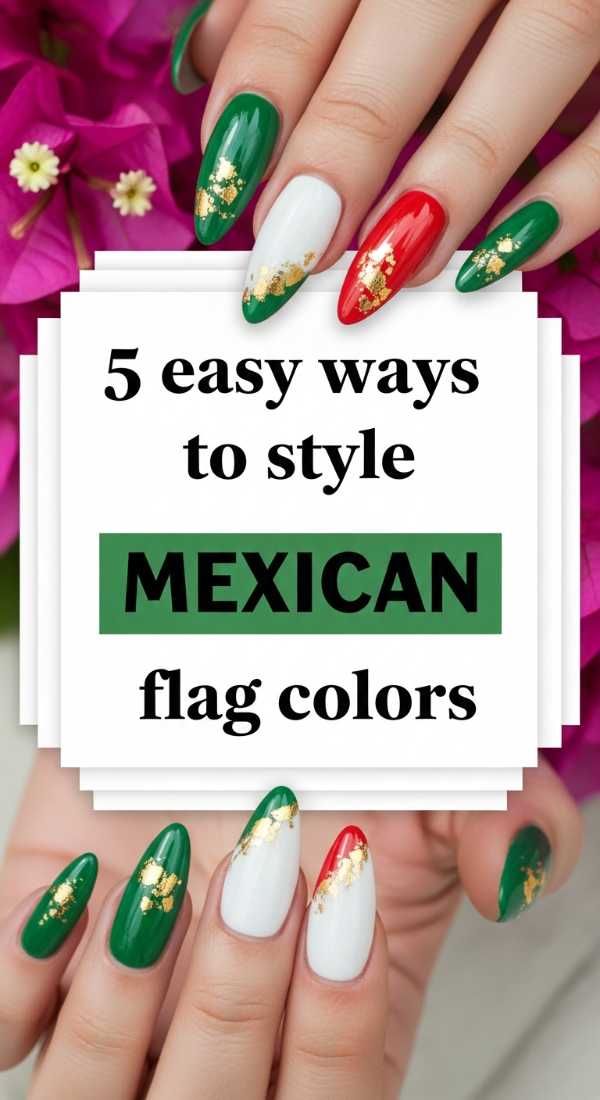
Why to love this Design:
Oh, loves, there is nothing like the pride and vibrance of the green, white, and red. These colors together represent hope, unity, and the blood of heroes, but they also just feel so incredibly festive and alive. It’s a wonderful way to show your love for the culture in a bold yet simple way.
Essential Elements:
- Emerald green polish
- Pure white polish
- Crimson red polish
- Gold striping tape or glitter
How to Prepare:
- The Vertical Tri-Color: Paint each third of the nail green, white, and red vertically.
- The Accent Finger: Keep four nails neutral and paint one with the flag’s trio.
- The Gradient Blend: Softly sponge the three colors together for a sunset flag effect.
- The Minimalist Dot: A white base with one green and one red dot at the cuticle.
- The French Twist: A green tip on one side and red on the other, meeting at a white center.
Budget Range
- OPI ‘Big Apple Red’ ($11.50)
- Zoya ‘Merida’ Green ($12.00)
- Wet n Wild White ($2.00)
4 steps to paint festive serape stripes
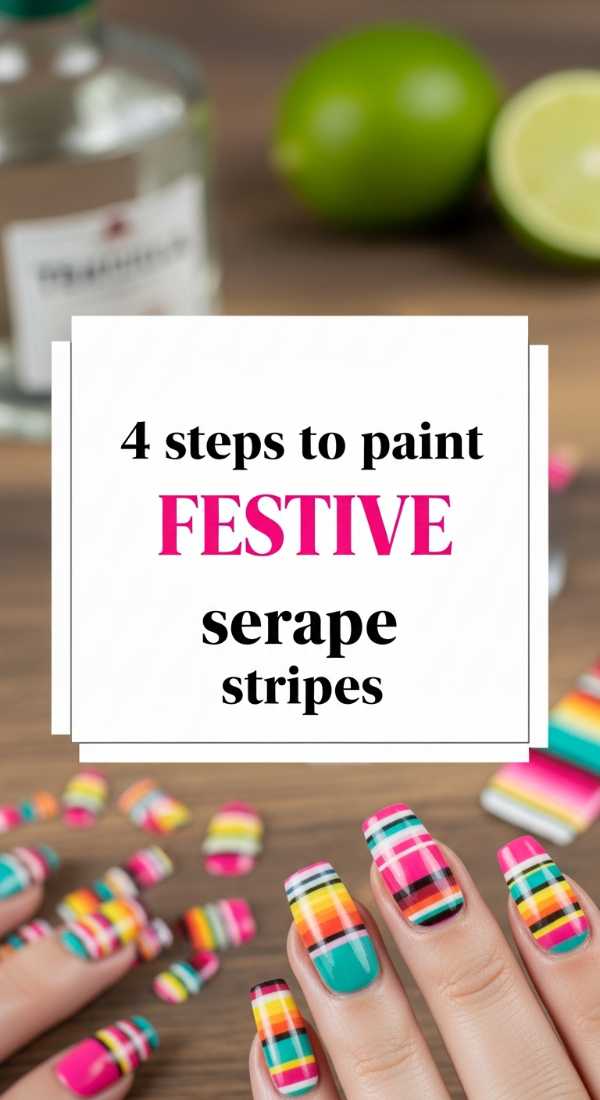
Why to love this Design:
Think of a cozy serape blanket wrapped around your shoulders on a cool evening. These stripes are a celebration of every color under the sun! It’s the ultimate “happy” manicure because there are no rules—just a beautiful rhythm of lines that make your hands look like a party.
Essential Elements:
- Multi-colored polishes (yellow, pink, teal, orange)
- Black and white striper pens
- Steady hand or striping tape
How to Prepare:
- Paint your nails a bright base color like turquoise or sunny yellow.
- Using a thin brush, paint horizontal stripes of varying widths in contrasting colors.
- Add very thin black and white lines between the colors to create the ‘woven’ look.
- Finish with a matte top coat to mimic the texture of traditional fabric.
Budget Range
- Orly Neon Heat ($9.50)
- L.A. Colors Art Deco Striper ($3.00)
- China Glaze ‘Too Yacht to Handle’ ($7.50)
6 quick steps for Otomi embroidery nails
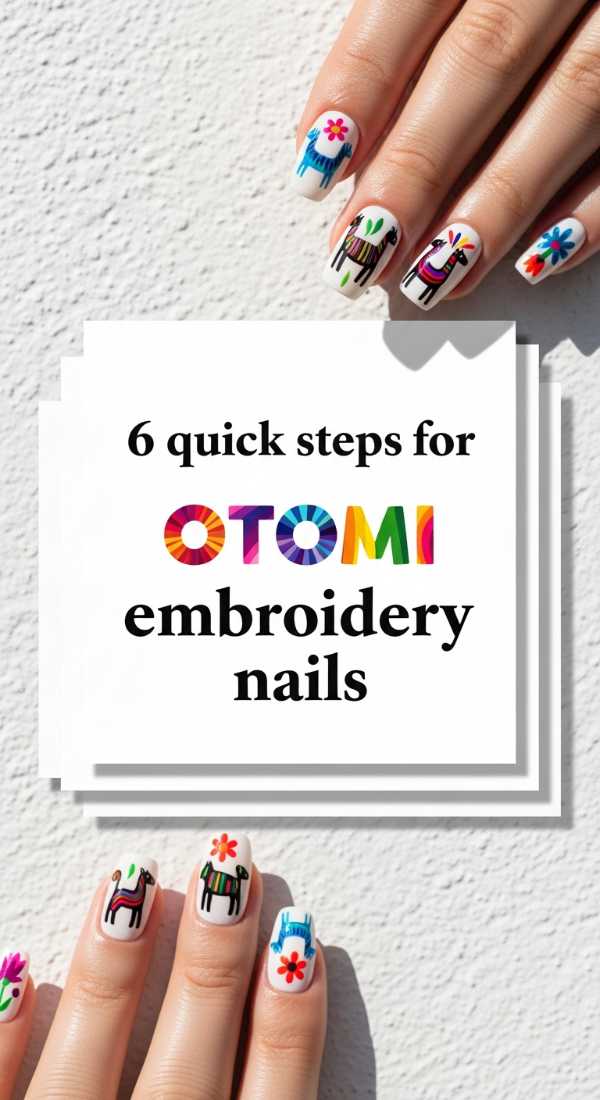
Why to love this Design:
The Otomi people of Hidalgo have given us one of the most whimsical gifts: their embroidery. It’s filled with stylized animals and flowers that feel like they’ve jumped straight out of a dream. Doing this on your nails feels like stitching a little bit of folk-magic into your day.
Essential Elements:
- Matte white base
- Bright, saturated colors (pink, orange, blue)
- Detailing needle or toothpick
How to Prepare:
- Start with a clean, matte white base to act as your ‘canvas’.
- Sketch a simple bird or flower silhouette with a light pencil (yes, it works!).
- Fill in the shapes with bright blocks of color.
- Use a tiny brush to add short, diagonal lines inside the shapes to look like stitches.
- Add tiny leaves or dots around the main figure to fill the space.
- Lock it all in with a protective top coat.
Budget Range
- Holt Cobalt ‘Life in Poly’ ($13.00)
- Color Club Neon Set ($15.00)
- Matte Top Coat by Revlon ($6.00)
3 ways to design mini desert cacti
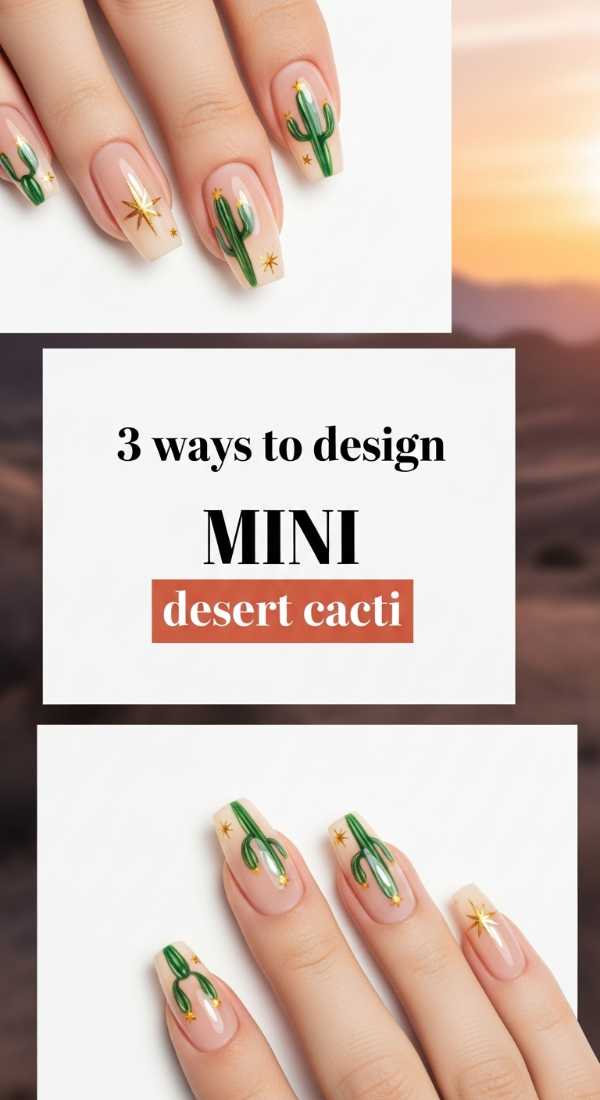
Why to love this Design:
Sometimes we just need a little bit of the desert’s quiet strength. Cacti are symbols of endurance and beauty in harsh conditions. These mini designs are incredibly cute, a little bit quirky, and surprisingly easy to achieve even for beginners.
Essential Elements:
- Sage and forest green polishes
- Tiny pink or yellow gems for ‘flowers’
- Dotting tool
How to Prepare:
- The Saguaro Silhouette: Paint an ‘upward fork’ shape in green on a nude base.
- The Prickly Pear: Use a dotting tool to create overlapping green ovals.
- The Potted Friend: Draw a small terracotta square at the base with a round cactus on top.
Budget Range
- Essie ‘Win Me Over’ Green ($9.00)
- Nail Art Rhinestones ($5.00)
- Nail Dotting Tool ($4.00)
8 steps to create Loteria card nails
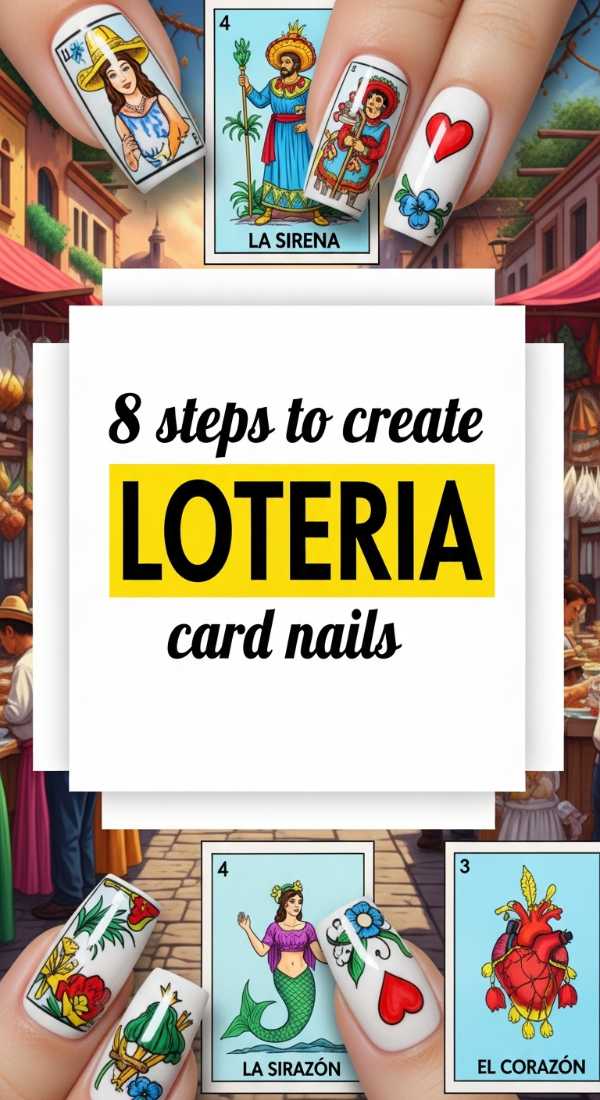
Why to love this Design:
Remember the laughter of family game nights? Bringing Loteria cards—the Mexican Bingo—to your nails is such a nostalgic and playful move. Whether it’s ‘La Luna’ or ‘El Corazón’, these icons are instantly recognizable and full of charm.
Essential Elements:
- Nail decals or very steady brushes
- Traditional Loteria colors (yellow, blue, red)
- Square-shaped nail tips
How to Prepare:
- Paint each nail a different background color found in the cards (light blue, yellow, pink).
- Carefully paint a thin black frame around the edge of the nail.
- Decide on your icon (the moon, the heart, the star).
- Paint the basic shape of the icon in the center.
- Add secondary colors for detail (e.g., white for the moon’s face).
- Outline the icon in black for that ‘printed’ look.
- Write the number of the card at the top if you have room!
- Seal with a high-shine top coat.
Budget Range
- Loteria Nail Stickers ($7.00)
- Manicure Black Detail Pen ($8.00)
- Sinful Colors ‘Yellow’ ($2.00)
4 simple steps for Papel Picado designs
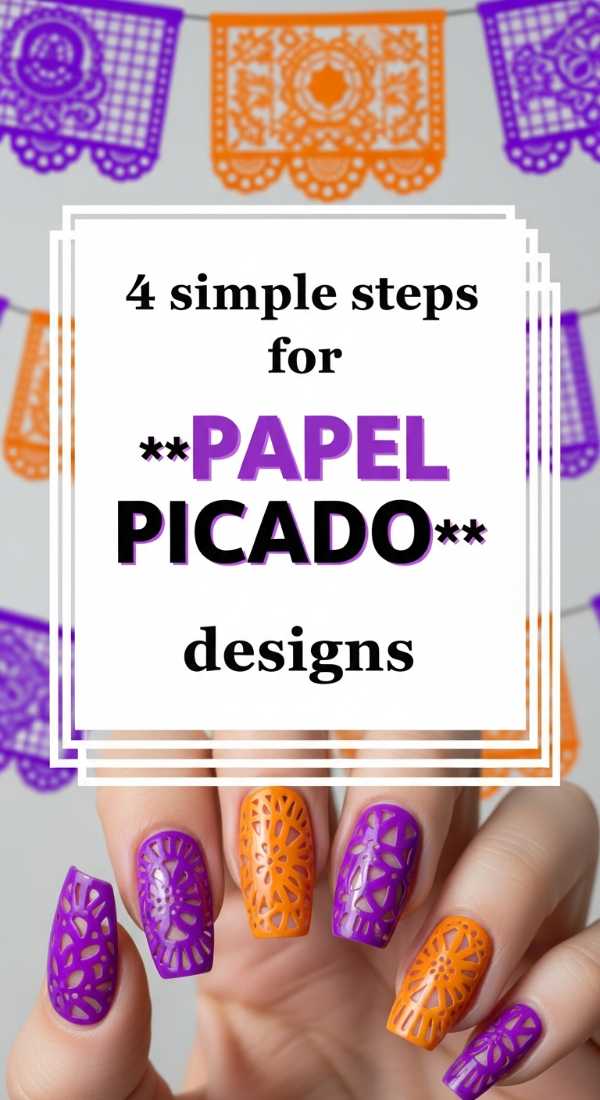
Why to love this Design:
The way the light dances through Papel Picado during a fiesta is pure joy. These ‘cut paper’ designs look incredibly intricate but are actually about geometric repetition. They make your nails look like delicate lace banners.
Essential Elements:
- Bright neon polishes
- Small hole punch (for DIY stencils) or a steady brush
- Patience and a light touch
How to Prepare:
- Paint a vibrant base color like hot pink or bright purple.
- Using a slightly darker or lighter shade, paint a series of small triangles or circles in a grid.
- Connect the shapes with thin lines to create the ‘string’ effect.
- Add a scalloped edge to the tip of your nail to mimic the bottom of the paper banner.
Budget Range
- Color Club ‘Poptastic’ ($8.00)
- Dotting Tool Set ($5.00)
- Maybelline Color Show ($4.00)
5 ways to apply Mexican folk art patterns
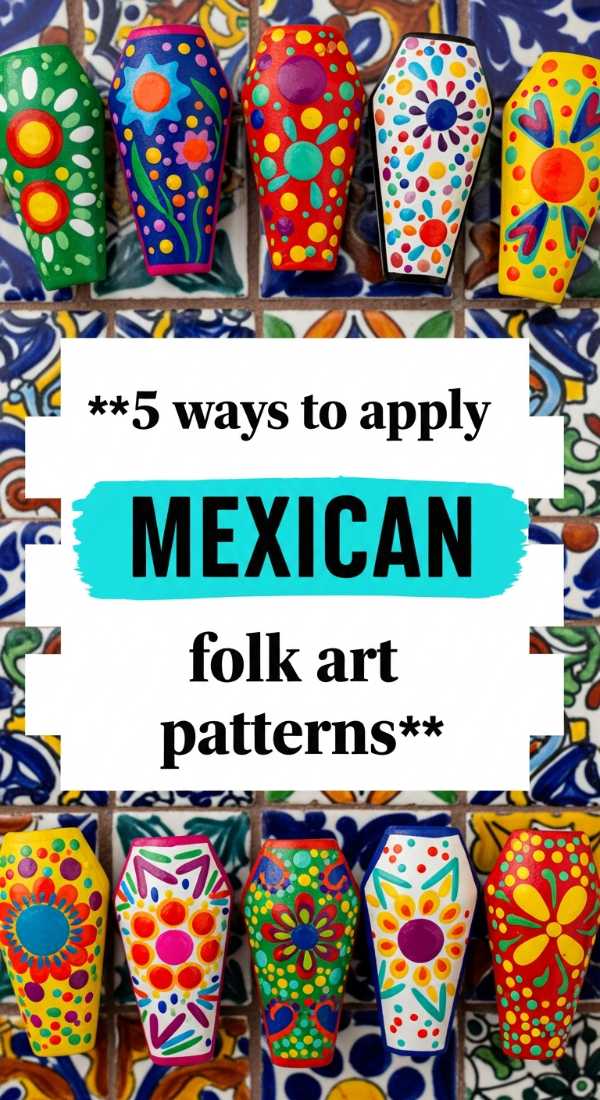
Why to love this Design:
Mexican folk art is a love letter to the imagination. It’s often inspired by Alebrijes—fantastical creatures—and features swirling patterns and dots. It’s the perfect way to use up all those polish colors you have sitting around!
Essential Elements:
- Black base polish
- Neon dotting polishes
- Creativity
How to Prepare:
- The Dot Mandala: Start with one large center dot and surround it with smaller ones.
- The Spiraled Vine: Paint thin, swirling lines that connect different colored dots.
- The Animal Print: Use bright ‘leopard’ spots in neon pink and green.
- The Scalloped Edge: Layer different colored semi-circles from the cuticle upward.
- The Starburst: Small lines radiating from a central bright point.
Budget Range
- Black Onyx by OPI ($11.00)
- Neon Nail Art Pens ($12.00)
- Seche Vite Top Coat ($9.00)
6 steps for vibrant Sugar Skull details
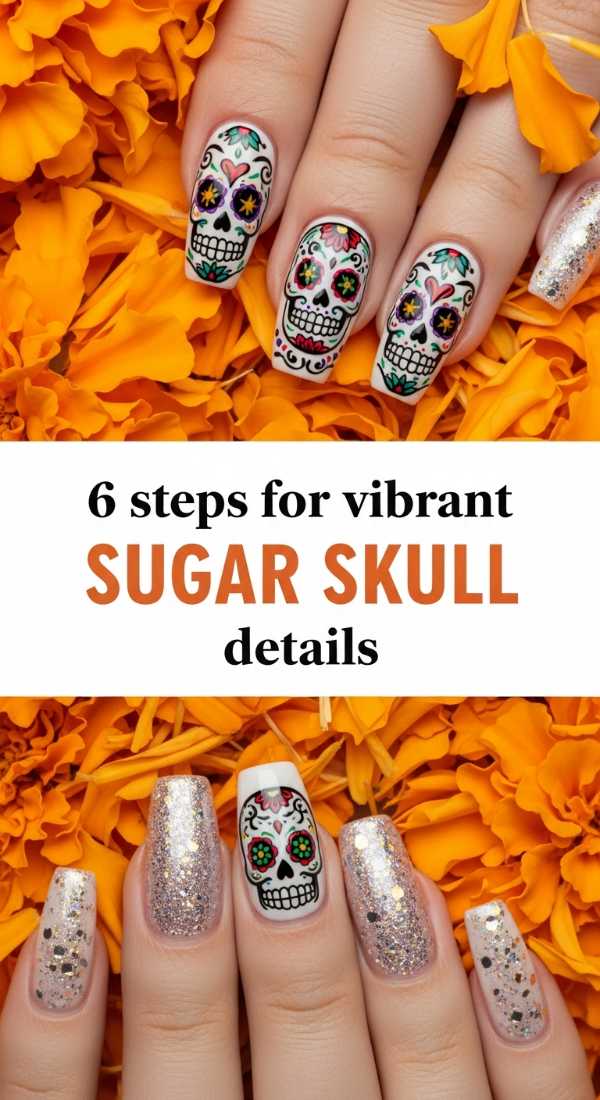
Why to love this Design:
Celebrating the lives of those we hold dear is a beautiful ritual, and the Calavera (Sugar Skull) is the heart of it. These designs are a mix of edge and sweetness—floral eyes, heart noses, and bright smiles. It’s a powerful way to wear your heart on your sleeve (and nails!).
Essential Elements:
- White polish for the skull base
- Black for the hollows
- Bright colors for the floral crown
How to Prepare:
- Paint a large white oval covering most of the nail.
- Add two large black circles for the eyes.
- Paint a small upside-down heart for the nose.
- Draw a horizontal line with vertical ‘stitch’ marks for the mouth.
- Use a dotting tool to create a ‘flower’ around each eye.
- Add tiny dots or swirls on the forehead for decoration.
Budget Range
- White Acrylic Paint (for details) ($3.00)
- DND Gel Polish ($10.00)
- Nail Art Gems ($6.00)
3 steps to master Mexican floral accents
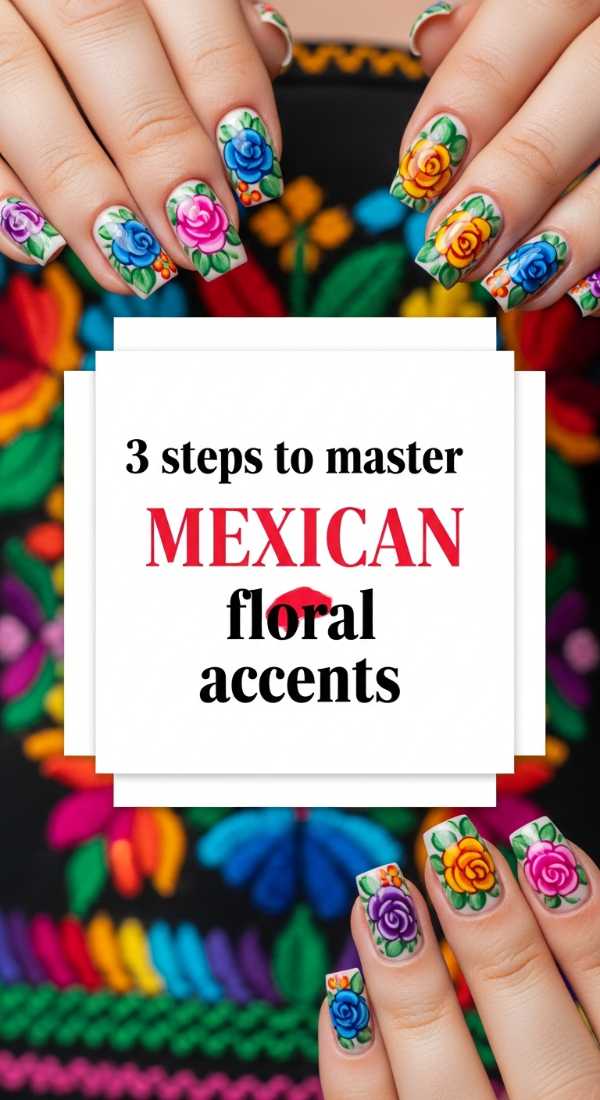
Why to love this Design:
No Mexican-inspired look is complete without the lush, overflowing blooms of a traditional embroidered dress or Frida Kahlo’s hair. These flowers are thick, textured, and full of passion. They add a feminine, soft touch to any look.
Essential Elements:
- Red, pink, and orange polishes
- Green for leaves
- A small brush with rounded bristles
How to Prepare:
- The Petal Drop: Place five dots in a circle and drag them toward the center with a toothpick.
- The Rose Swirl: Paint a red circle and use white to swirl a ‘C’ shape inside it.
- The Leafy Frame: Add two teardrop shapes in green to the side of every flower.
Budget Range
- Essie ‘Geranium’ ($9.00)
- OPI ‘I’m Not Really a Waitress’ ($11.00)
- Small Detail Brush ($5.00)
A Fiesta of Self-Love
My loves, I hope these designs bring a little bit of extra warmth and sunshine to your week. Remember, there is no such thing as perfection when you are creating from the heart. If a line is a little wiggly, call it ‘character’! If the colors are bright, call it ‘spirit’! The most important thing is that you enjoyed the process and took a little time for yourself. You deserve to feel as vibrant and beautiful as these designs. Wear them with pride, and let them remind you of the rich, colorful world we share. Until next time, stay beautiful!