

There is a specific kind of magic that happens when you step out of your back door and into a space that feels like a living, breathing extension of your home. For years, I viewed my garden as just a patch of grass that needed mowing, but when I began to treat it as an outdoor ‘room,’ everything changed. Designing a contemporary garden isn’t just about aesthetics; it’s about creating a sanctuary where the morning air feels fresher and the evening glass of wine tastes sweeter amidst the rustle of ornamental grasses and the soft glow of well-placed lanterns.
We all crave that sense of ‘outdoor elegance’—that Pinterest-perfect curb appeal that makes you smile before you even turn the key in the lock. Whether you’re looking to protect your home’s foundation with smart drainage or you’re dreaming of a quirky backyard duck habitat, every element contributes to the narrative of your lifestyle. In this guide, we are diving deep into the art of modern garden design, blending high-end style with the practical DIY spirit that makes a house a home.
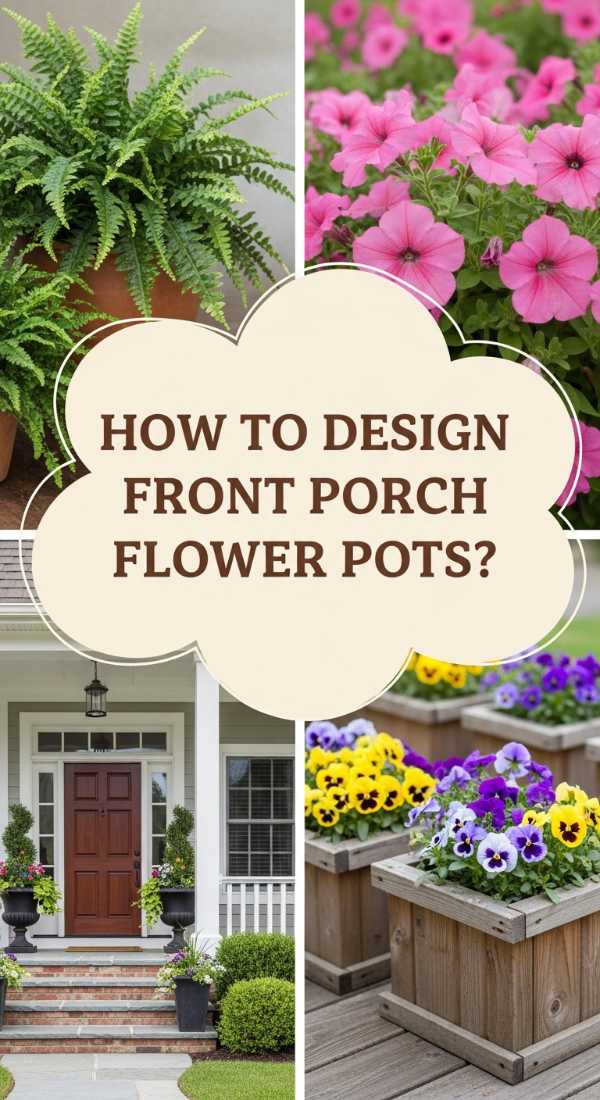
How to Design Front Porch Flower Pots for a Welcoming Home Entrance
Why we love this
There is nothing quite like the immediate sensory embrace of a perfectly curated porch pot as you approach the front door. We love the way the velvet petals of a deep purple petunia catch the afternoon sun, while the earthy, spicy scent of rosemary planted nearby grounds the experience. The visual weight of a heavy ceramic planter provides a sense of permanence and luxury, making even the shortest walk to the mailbox feel like a stroll through a high-end botanical garden.
Essential Elements:
- Large, frost-resistant ceramic or stone planters
- High-quality potting mix with perlite
- A ‘Thriller’ plant (e.g., Dracaena or Fountain Grass)
- ‘Filler’ plants (e.g., Geraniums or Lantana)
- ‘Spiller’ plants (e.g., Sweet Potato Vine or Creeping Jenny)
- Slow-release fertilizer granules
How to make it
- Select a container that is at least 15-20 inches in diameter to allow for root growth and moisture retention. Ensure there are adequate drainage holes at the bottom.
- Fill the bottom third of the pot with lightweight filler if it is exceptionally deep, then top with a premium potting soil, leaving about two inches of space below the rim.
- Position your ‘Thriller’—the tallest focal point—dead center if the pot is viewed from all sides, or toward the back if it sits against a wall. Ensure the root ball is level with the soil surface.
- Surround the focal point with ‘Fillers.’ These should be mounding plants that hide the ‘legs’ of your thriller. Space them evenly to create a lush, full appearance.
- Tuck your ‘Spillers’ around the edges of the pot. Angle them slightly outward so they are encouraged to drape over the sides of the container immediately.
- Firm the soil gently around all plants to remove air pockets, water thoroughly until water runs out the bottom, and apply a liquid seaweed extract to help the plants settle.
How to Style Outdoor Fake Flower Pot Ideas for Low Maintenance Beauty

Why we love this
Let’s be honest: sometimes the weather or a busy schedule just doesn’t cooperate with our gardening dreams. We love this approach because it offers a permanent, vibrant pop of color that never wilts in the scorching sun or shrivels in a sudden frost. There is a sleek, modern satisfaction in knowing your entryway looks impeccably styled 365 days a year, with silk petals that mimic the soft, matte texture of real blooms and UV-resistant foliage that stays a crisp, deep emerald.
Essential Elements:
- UV-resistant artificial outdoor flowers
- Heavy decorative planters
- Floral foam or quick-set spray foam
- Natural river rocks or dried moss
- Real soil (for a convincing base)
- UV-protectant spray
How to make it
- Select high-quality, UV-rated silk or plastic flowers that have ‘real-touch’ textures. Look for variations in color on the leaves to mimic natural growth.
- Secure a block of floral foam inside your planter using a bit of hot glue or by wedging it tightly. If using a large pot, fill the bottom with bricks for weight so the wind doesn’t blow it over.
- Begin inserting your tallest artificial stems into the center of the foam. Bend the wire stems slightly to give them a natural, organic ‘lean’ rather than a stiff, upright look.
- Layer in the secondary blooms, ensuring you vary the heights. A common mistake is keeping everything at the same level; instead, stagger them to create depth.
- Cover the visible foam and the base of the stems with a layer of real potting soil or dark mulch. This is the ‘secret sauce’ that tricks the eye into thinking the plants are rooted.
- Finish the look by tucking in natural preserved moss or decorative river stones around the edges and spray the entire arrangement with an extra layer of UV-protectant spray to prevent fading.
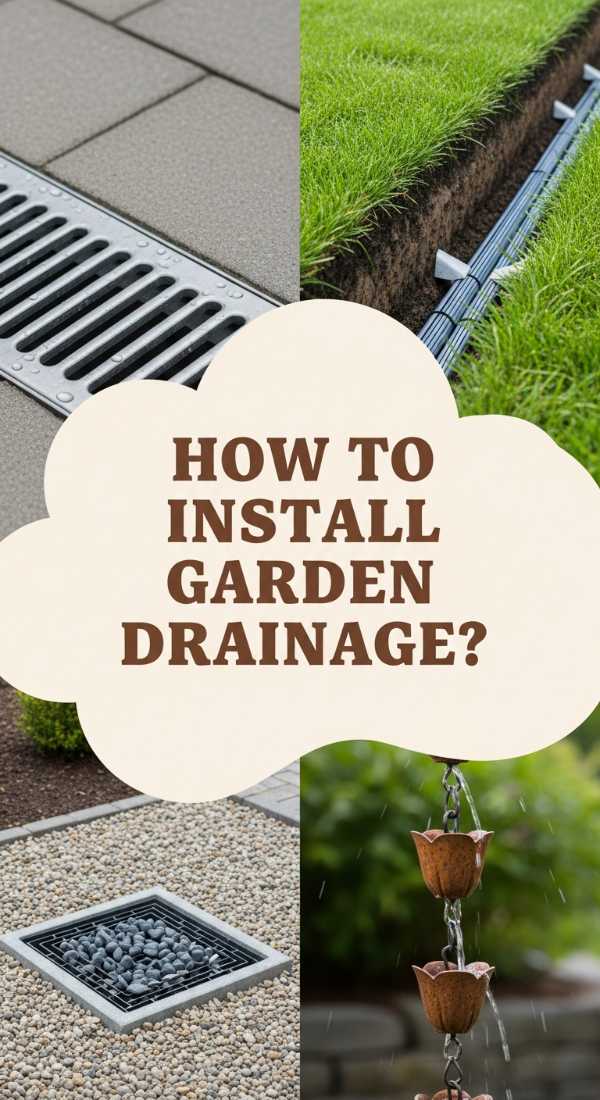
How to Manage Drainage Around House for a Protected Foundation
Why we love this
While drainage might not seem glamorous, the peace of mind it provides is the ultimate luxury. We love the feeling of watching a torrential downpour and knowing that your home is safe, with water being whisked away through hidden channels. There is a rhythmic, soothing quality to a well-designed dry creek bed or a hidden French drain that turns a potential flood hazard into a functional piece of landscape art that protects your most valuable investment.
Essential Elements:
- Perforated drainage pipe
- Filter fabric (sock)
- ¾ inch washed gravel or river rock
- Shovel or trencher
- Catch basins
- Pop-up emitters
How to make it
- Identify the low spots where water pools. Use a line level or laser level to ensure you have a minimum slope of 1 inch for every 10 feet of pipe leading away from the foundation.
- Dig a trench roughly 12 to 18 inches deep and 10 inches wide. Ensure the path leads to a safe discharge point, like a storm sewer or a lower part of the yard.
- Line the trench with non-woven geotextile filter fabric. This prevents fine silt from clogging your gravel and pipe over time, ensuring decades of functionality.
- Lay a 2-inch bed of gravel at the bottom of the trench. Place your perforated pipe (holes facing down) on top of the gravel bed.
- Fill the trench with more gravel, leaving about 3-4 inches of space at the top. Fold the excess filter fabric over the top of the gravel like a burrito.
- Cover the remaining space with topsoil and sod, or top with decorative river rock to create a ‘dry creek’ aesthetic that blends into your contemporary garden design.
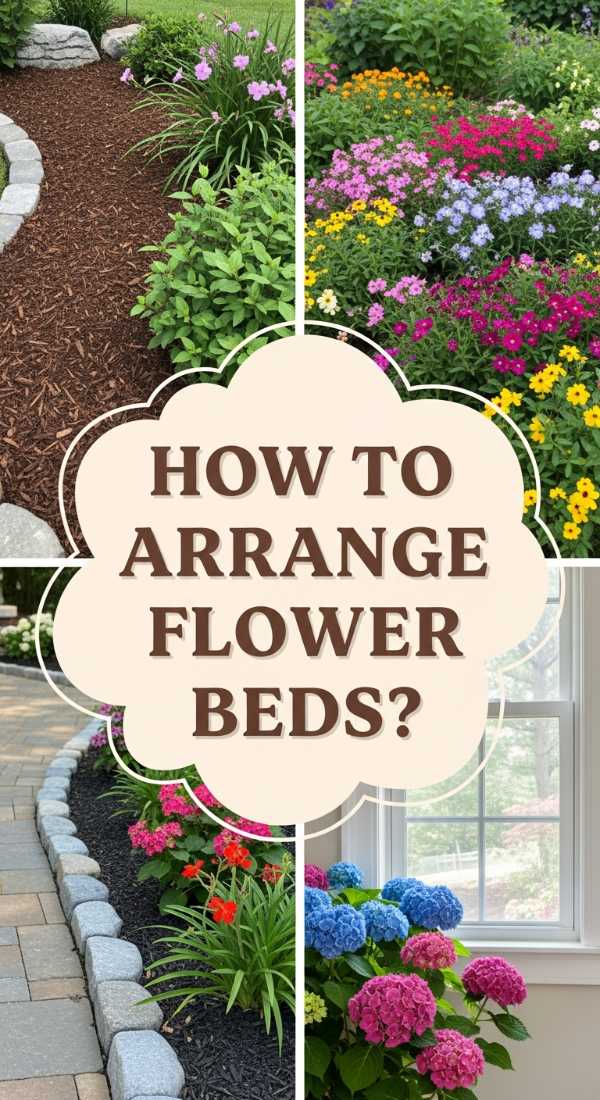
How to Arrange Flower Beds in Front of House for Instant Curb Appeal
Why we love this
A well-arranged flower bed is like a beautifully composed painting that changes with the seasons. We love the way layers of varying heights create a sense of movement and mystery, leading the eye toward the front door. The scent of damp earth mixed with the sweet fragrance of blooming lavender or roses creates an olfactory welcome that tells guests they’ve arrived somewhere special. It’s about that ‘wow’ factor that makes your home the jewel of the neighborhood.
Essential Elements:
- Native perennial plants
- Evergreen shrubs for year-round structure
- Dark hardwood mulch
- Stone or metal edging
- Compost for soil amendment
- Gardening gloves and a sharp spade
How to make it
- Sketch a plan that follows the ‘Rule of Three’: Background (tall), Middle (mounding), and Foreground (low/groundcover). Use curved lines for the bed edges to soften the hard angles of the house.
- Clear all weeds and grass from the area. Dig in 2-3 inches of organic compost to revitalize the soil and ensure your new plants have the nutrients they need to thrive.
- Place your largest evergreen shrubs first. These are your ‘bones’—they provide structure in the winter. Space them according to their mature width, not their current size.
- Position your perennials in groups of three or five. Planting in odd numbers looks more natural and intentional to the human eye than even rows.
- Install edging—such as a crisp ‘Victorian’ trench edge or modern steel edging—to keep the grass from encroaching on your beautiful new beds.
- Apply a 3-inch layer of dark mulch. This keeps moisture in, suppresses weeds, and provides that professional, high-contrast look that makes the colors of your flowers pop.
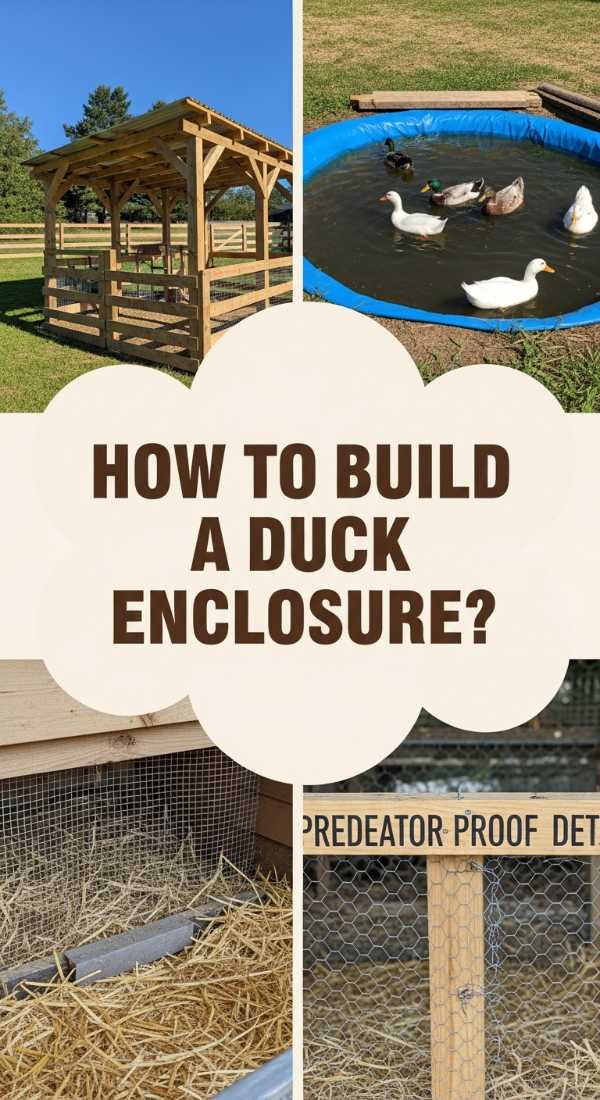
How to Build DIY Duck Enclosure Ideas for a Happy Backyard Habitat
Why we love this
There is a whimsical, pastoral charm to having ducks in a contemporary backyard. We love the soft ‘patter-patter’ of webbed feet on grass and the joyful splashing sounds of a morning bath. Designing a habitat that is both functional and stylish means your feathered friends live in luxury while your garden maintains its high-end aesthetic. It’s a sustainable, lively addition that brings a sense of farm-to-table purpose to your outdoor living space.
Essential Elements:
- Hardware cloth (not chicken wire)
- Pressure-treated lumber
- Corrugated roofing panels
- Kidney bean-shaped pond or heavy-duty tub
- Secure latching mechanism (predator-proof)
- Straw or wood shavings for bedding
How to make it
- Choose a level spot that offers both sun and shade. Frame out a ‘house’ section (the coop) using 2×4 lumber, ensuring it is well-ventilated but draft-free.
- Attach hardware cloth to the exterior of the frame. Dig the wire at least 6-12 inches into the ground or create a ‘skirt’ to prevent predators like foxes or raccoons from digging under.
- Build a slanted roof using corrugated metal or polycarbonate panels. This ensures rain runoff and keeps the interior dry and cozy for the ducks at night.
- Integrate a water feature. Ducks need to submerge their heads to stay healthy. A pre-formed pond liner with a sturdy drain system makes cleaning much easier.
- Install a wide ramp with ‘cleats’ (small horizontal strips of wood) so the ducks can easily enter and exit their house without slipping.
- Add a secure, predator-proof door with a carabiner or a complex latch. Ducks are vulnerable at night, so a fortress-like enclosure is key to their happiness and your peace of mind.
How to Create Layered Front Porch Flower Pots for a Statement Look
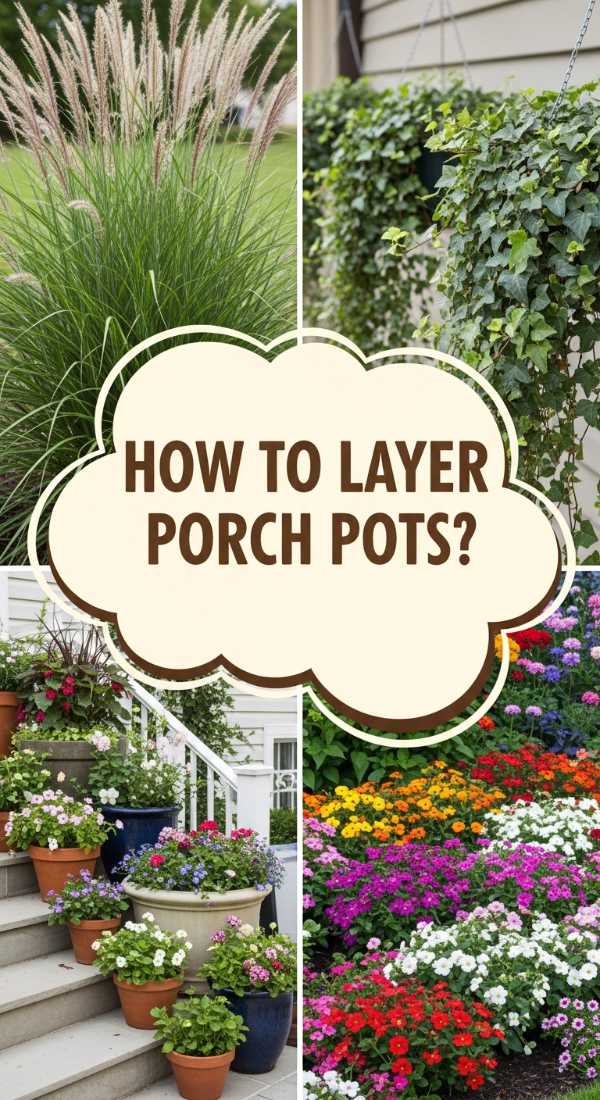
Why we love this
Layering is the secret language of professional designers. We love how this technique adds a dimension of ‘more is more’ while still feeling organized and chic. It’s about the interplay of textures—the fuzzy leaf of a dusty miller against the slick, waxy surface of a begonia. When you layer your porch pots, you create a miniature ecosystem that feels lush, abundant, and deeply intentional, providing a grand entrance that commands attention.
Essential Elements:
- Multiple pots of varying heights
- Consistent color palette (e.g., all white and silver)
- Vines for verticality
- Sphagnum moss for finishing
- Stools or plant stands
How to make it
- Group your pots in odd numbers (three or five). Use pots of the same material but different heights to create a ‘staircase’ effect for the eyes.
- In the tallest, back pot, plant high-reaching grasses or a small ornamental tree like a dwarf citrus or topiary boxwood.
- In the mid-sized pots, focus on high-density color. Use plants with different leaf shapes to create visual interest even when the flowers aren’t in peak bloom.
- In the smallest, front pots, use cascading plants that ‘kiss’ the ground. This connects the arrangement to the porch floor and makes the collection feel like a single installation.
- Elevate one of the smaller pots on a wooden stool or an inverted crate. This ‘hidden’ layer adds unexpected height and breaks up the horizontal line.
- Water all pots simultaneously with a wand attachment to ensure even moisture, and deadhead spent blooms weekly to maintain that high-end, manicured appearance.
How to Choose Realistic Outdoor Fake Flower Pot Ideas for Year Round Color

Why we love this
The quest for the ‘perfect’ fake plant is like a treasure hunt for the modern homeowner. We love the thrill of finding a faux stem that is so realistic, you actually find yourself leaning in to smell it. It’s about the freedom to have ‘blooming’ hydrangeas in the middle of a November chill or vibrant ferns in a corner that never sees a drop of sunlight. It’s practical elegance at its finest, giving you back your weekends without sacrificing the beauty of a lush garden.
Essential Elements:
- UV-stabilized polyethylene plants
- Polyurethane ‘real touch’ petals
- Weighted bases
- Real dried branches or driftwood
- High-quality exterior spray paint (for pots)
How to make it
- Check the ‘sheen.’ Realistic fake plants have a matte or slightly waxy finish, whereas cheap ones look like shiny plastic. Always opt for the matte versions.
- Look for ‘new growth’ details. The most realistic faux plants have smaller, lighter green leaves at the tips, mimicking how a real plant actually grows.
- Incorporate natural elements. Stick a few real, dried branches into the soil around your fake plant. This physical connection to real wood makes the entire arrangement more believable.
- Vary the leaf direction. When you take the plant out of the box, don’t leave it flat. Spend ten minutes ‘fluffing’ and bending every single wire stem into a unique, irregular shape.
- Place them in ‘logical’ spots. A fake sun-loving hibiscus in a pitch-black corner is a dead giveaway. Place your faux plants where their real counterparts would naturally thrive.
- Clean them! Every few months, take a damp cloth and wipe the dust off the leaves. Real plants don’t have dust, so keeping them clean is the best way to maintain the illusion.
How to Install Better Drainage Around House for a Healthier Garden
Why we love this
A healthy garden starts from the ground up, and nothing is more vital than the way water moves through your soil. We love the transformation that happens when a soggy, ‘sad’ patch of lawn is turned into a thriving, vibrant garden bed through better drainage. It’s the difference between plants that struggle with root rot and plants that explode with growth because their roots can finally breathe. It’s a foundational act of love for your landscape.
Essential Elements:
- Catch basins with grates
- PVC or corrugated piping
- Sand and crushed stone
- Landscape fabric
- Sod cutter or shovel
How to make it
- Perform a ‘perk test.’ Dig a hole, fill it with water, and see how long it takes to drain. If it takes more than 24 hours, you need an active drainage solution like a catch basin.
- Install catch basins at the lowest points of your garden or directly under downspouts. These act as ‘drains’ for your yard, collecting surface water before it can soak in.
- Connect the basins to a solid PVC pipe. While corrugated pipe is easier to install, solid PVC is less likely to clog and can be cleaned out with a plumber’s snake if needed.
- Surround the pipe with a layer of crushed stone and wrap it in landscape fabric. This creates a secondary ‘drainage envelope’ that pulls water from the surrounding soil.
- Direct the discharge to a ‘Rain Garden’—a specialized planting area with water-loving plants like Irises or Sedges that naturally filter the water back into the earth.
- Backfill with a mix of 50% native soil and 50% coarse sand in the areas around the drains to increase the percolation rate of the surface ground.
How to Plant Sustainable Flower Beds in Front of House for Eco Friendly Living

Why we love this
Sustainability is the ultimate trend that never goes out of style. We love the feeling of a garden that works *with* nature rather than against it. There is a deep, soul-level satisfaction in watching bees and butterflies flock to your front yard because you chose native nectar-rich blooms. It’s about creating a landscape that requires less water, zero harsh chemicals, and offers a lush, wild beauty that feels both modern and timelessly connected to the earth.
Essential Elements:
- Native plant species (local to your region)
- Organic cedar mulch
- Drip irrigation system (optional but efficient)
- Rain barrel for watering
- Compost bins
How to make it
- Research your local ecoregion and select ‘keystone’ plants. These are species that support the highest number of local pollinators and birds.
- Group plants with similar ‘hydro-zones’ or water needs. This prevents you from overwatering one plant just to keep its neighbor alive.
- Replace a portion of your thirsty lawn with ‘clover’ or a native wildflower mix. This reduces mowing time and provides a soft, green carpet that stays green even in droughts.
- Apply ‘Living Mulch.’ Instead of leaving gaps between plants for wood chips, plant low-growing groundcovers that knit together to protect the soil and prevent weeds.
- Install a rain barrel at your downspout. Use this ‘soft’ water—which is free of chlorine and fluoride—to hand-water your beds during dry spells.
- Avoid ‘double-flowered’ varieties. While pretty, these often hide the nectar from bees. Choose ‘single’ flowers where the center of the bloom is easily accessible to wildlife.
How to Construct Safe DIY Duck Enclosure Ideas for Small Backyard Spaces

Why we love this
Think you don’t have room for a backyard habitat? Think again! We love the creative challenge of a small-space duck enclosure because it forces a focus on verticality and multi-functional design. There’s something incredibly cozy about a compact, perfectly designed ‘duck cottage’ tucked into a garden corner, surrounded by edible herbs and climbing roses. It proves that you don’t need an acreage to experience the joy of sustainable, animal-integrated living.
Essential Elements:
- Elevated duck house (to save floor space)
- Mobile ‘duck tractor’ or fixed run
- Vertical herb garden panels
- Easy-clean plastic flooring
- Solar-powered lighting
How to make it
- Go vertical. Build the sleeping quarters 2 feet off the ground. This allows the ducks to use the space underneath for shade and ‘puddle time,’ effectively doubling their square footage.
- Use a ‘Deep Litter’ method inside the house. Layering pine shavings allows the waste to compost in place, keeping the small space smelling fresh and providing warmth.
- Choose a ‘compact’ duck breed. Call ducks or Welsh Harlequins are smaller and better suited for tight quarters than heavy Pekins.
- Install a vertical garden on the outside of the enclosure. Plant kale, peas, and lettuce that can grow up the wire—this provides snacks for the ducks and beauty for you.
- Incorporate a ‘filtration’ system for their pool. In a small space, water gets dirty fast. Use a small pond pump and a bio-filter to keep the water clear and odor-free.
- Add a ‘porch’ with a roof. In a small yard, ducks spend more time in their run, so providing a covered outdoor area ensures they stay dry and happy regardless of the weather.
Conclusion: Your Garden, Your Sanctuary
Designing a contemporary garden is a journey of layers—from the invisible magic of proper drainage to the visible joy of a perfectly placed flower pot. By blending the practical with the beautiful, you create more than just a landscape; you create a lifestyle. Remember, there are no ‘brown thumbs,’ only people who haven’t yet discovered the right system for their space. Whether you are welcoming guests with a vibrant porch or tending to your backyard ducks, enjoy every moment of your outdoor elegance.