
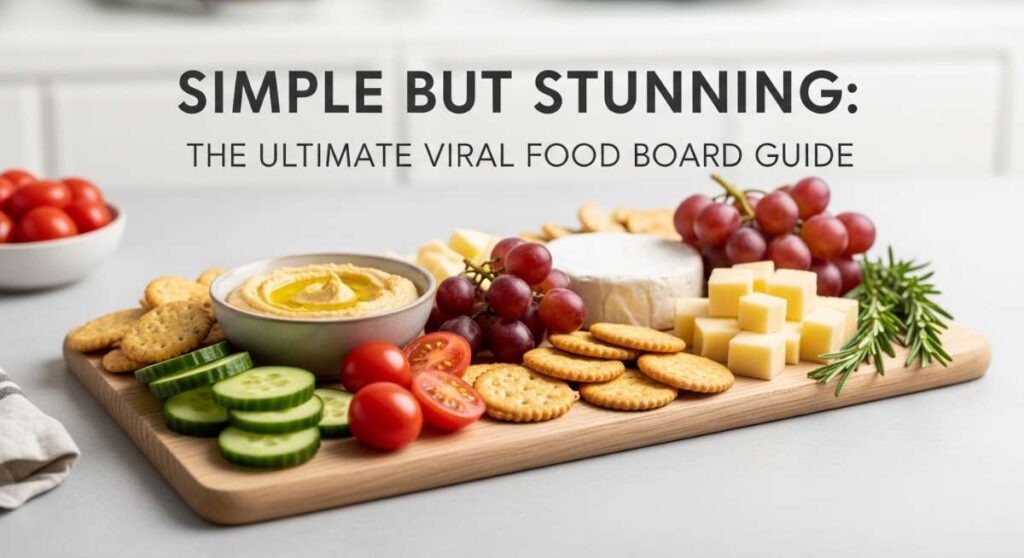
Simple but Stunning: The Ultimate Viral Food Board Guide
There is something inherently magical about a morning where time seems to slow down, and the kitchen is filled with the scent of freshly brewed coffee and sizzling butter. We’ve all seen those gorgeous, overflowing food boards on our feeds—the ones that look like a work of art but feel like a warm hug. It’s about more than just food; it’s about creating a centerpiece for connection, a place where friends and family can graze, laugh, and linger over a beautiful spread of breakfast favorites.
Building a viral-worthy breakfast board doesn’t require a culinary degree, but it does require a little bit of heart and some savvy techniques. Whether you’re hosting a lazy Sunday brunch or surprising your family with ‘breakfast for dinner,’ the secret lies in the variety of textures and the vibrant colors that make the board pop. Let’s dive into the essential components that will turn your simple ingredients into a stunning masterpiece that everyone will be talking about.
How to bake breakfast casserole

Why we love this
There is nothing quite like the comforting weight of a heavy ceramic dish filled with a golden, bubbling breakfast casserole. As it bakes, the aroma of savory sausage and melted sharp cheddar wafts through the house, acting as a natural alarm clock for even the deepest sleepers. Every bite offers a delightful contrast between the crisp, browned edges of the crust and the soft, custard-like center that melts on your tongue. It is the ultimate ‘set it and forget it’ crowd-pleaser that provides a hearty, warm anchor for any breakfast board.
Ingredients
- 1 lb ground breakfast sausage (mild or spicy)
- 10 large eggs
- 2 cups whole milk
- 1 tsp dry mustard
- 1/2 tsp smoked paprika
- 4 cups cubed sourdough bread (day-old is best)
- 2 cups shredded sharp cheddar cheese
- Fresh chives for garnish
How to make it
- Begin by browning your sausage in a large skillet over medium-high heat. Use a wooden spoon to break it into small crumbles, cooking until no pink remains and the edges are slightly crispy. Drain the excess fat thoroughly to prevent a greasy casserole.
- In a large mixing bowl, whisk together the eggs, milk, dry mustard, smoked paprika, salt, and pepper. Whisk vigorously for at least 2 minutes to incorporate air, which ensures a light and airy texture once baked.
- Grease a 9×13 inch baking dish generously with butter. Layer the bread cubes at the bottom, sprinkle the cooked sausage evenly over the bread, and then cover with 1.5 cups of the shredded cheese.
- Pour the egg mixture slowly over the layers, ensuring every piece of bread is soaked. Cover the dish with foil and refrigerate for at least 2 hours, or ideally overnight, to allow the bread to fully absorb the custard.
- Preheat your oven to 350°F (175°C). Bake the casserole covered for 20 minutes, then remove the foil, sprinkle the remaining cheese on top, and bake for another 20-25 minutes. You’ll know it’s done when the center is set (it shouldn’t jiggle) and the top is a deep golden brown. Let it rest for 10 minutes before slicing to allow the layers to firm up.
How to make crispy potatoes

Why we love this
Crispy potatoes are the unsung heroes of the breakfast world, providing that essential salty crunch that balances out softer elements like eggs or pancakes. When done right, they have a glass-like outer shell that shatters upon impact, revealing a fluffy, cloud-like interior that tastes like pure comfort. The scent of roasted rosemary and garlic infused into the oil creates an earthy, irresistible fragrance that draws everyone to the board. They are the perfect finger food for grazing, especially when paired with a zesty dipping sauce.
Ingredients
- 2 lbs Yukon Gold potatoes, cut into 1-inch cubes
- 3 tbsp extra virgin olive oil
- 1 tbsp unsalted butter, melted
- 2 sprigs fresh rosemary, finely chopped
- 4 cloves garlic, smashed
- 1 tsp sea salt and 1/2 tsp cracked black pepper
How to make it
- The secret to ultimate crunch is par-boiling. Place your cubed potatoes in a pot of cold salted water. Bring to a boil and simmer for exactly 5 minutes. The edges should be soft, but the potatoes should still hold their shape.
- Drain the potatoes and let them steam dry in the colander for 2 minutes. Shake the colander vigorously to ‘rough up’ the edges of the potatoes; those starchy bits will turn into the crispiest parts in the oven.
- Preheat your oven to 425°F (220°C). Place a large rimmed baking sheet inside while it preheats. Roasting on a hot pan prevents sticking and starts the searing process immediately.
- In a bowl, toss the potatoes with olive oil, melted butter, rosemary, salt, and pepper. Carefully spread them onto the hot baking sheet in a single layer—do not overcrowd the pan or they will steam instead of roast.
- Bake for 30-40 minutes, flipping them with a metal spatula every 15 minutes. In the last 10 minutes of cooking, toss in the smashed garlic cloves. Remove when they are deep mahogany brown and sound hollow when tapped.
How to roll breakfast burritos

Why we love this
The breakfast burrito is a masterpiece of portability and flavor density, wrapping up all the best parts of a morning meal into one tidy, toasted package. We love the way the melted cheese acts as a glue, binding the spicy chorizo, fluffy eggs, and creamy avocado into a harmonious blend. There’s something incredibly satisfying about the tactile experience of holding a warm, heavy burrito and seeing the steam rise as you take that first bite. They add a great structural element to a food board, especially when sliced on a diagonal to reveal their colorful cross-sections.
Ingredients
- 4 large flour tortillas (burrito size)
- 6 eggs, softly scrambled
- 1 cup cooked chorizo or bacon crumbles
- 1 cup tater tots, cooked and crispy
- 1 cup shredded Mexican blend cheese
- 1/2 cup fresh pico de gallo, drained
- 1 ripe avocado, sliced
How to make it
- Warm your tortillas for 15 seconds in a dry skillet or microwave. This makes them pliable and prevents cracking during the folding process.
- Lay the tortilla flat and place your ingredients in the center, forming a horizontal log. Start with a base of cheese (to help with sealing), then add the eggs, meat, tater tots, and avocado. Avoid overfilling; leave at least 2 inches of space on the sides.
- Fold the left and right sides of the tortilla inward toward the center, over the ends of the filling.
- While holding the side flaps down with your pinkies, use your thumbs to lift the bottom edge of the tortilla over the filling. Tuck the edge tightly under the ingredients, pulling back slightly to create tension.
- Roll the burrito forward tightly until the seam is on the bottom. To ‘viral-proof’ your burrito, place it seam-side down in a hot, lightly oiled skillet for 60 seconds. This seals the burrito shut and adds a delicious toasted crunch to the exterior.
How to prep healthy breakfasts
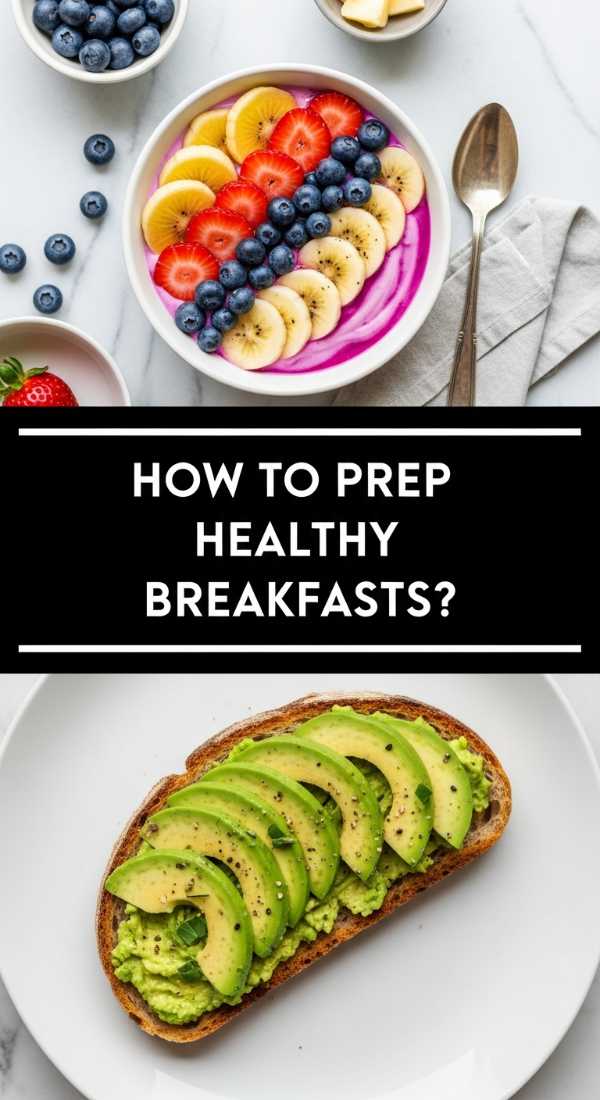
Why we love this
Integrating healthy options into a food board doesn’t just add nutritional value; it introduces a vibrant palette of colors and refreshing flavors that cleanse the palate. We love the bright pop of magenta from dragon fruit or the deep greens of fresh kale and avocado, which make the entire spread look alive and nourishing. These components provide sustained energy without the mid-morning sugar crash, making the meal feel balanced and thoughtful. It’s about celebrating fresh, whole ingredients that look just as good as they taste.
Ingredients
- Greek yogurt (plain or honey-infused)
- Fresh berries (blueberries, raspberries, strawberries)
- Chia seeds and hemp hearts
- Steel-cut oats or quinoa
- Hard-boiled eggs
- Sliced cucumber and radishes
- Smoked salmon
How to make it
- Focus on ‘Component Prepping.’ Wash and thoroughly dry all berries and greens. Use a salad spinner for greens to ensure they stay crisp and don’t make other items on the board soggy.
- Prepare ‘overnight oats’ or chia pudding in small glass jars. Mix 1 part seeds/oats with 2 parts almond milk and a touch of maple syrup. Let them set in the fridge for at least 4 hours. These jars look stunning placed directly on the food board.
- Boil ‘perfect’ healthy eggs: Place eggs in boiling water for 8 minutes for a jammy yolk or 10 minutes for a firm yolk. Immediately plunge into an ice bath to stop the cooking and ensure easy peeling.
- Slice hardy vegetables like radishes and cucumbers very thin using a mandoline. Store them in ice water until the moment you assemble the board to keep them ultra-crispy and vibrant.
- Arrange healthy fats like smoked salmon or avocado slices last, drizzling them with a little lemon juice to prevent browning and add a bright acidity.
How to master meal prep
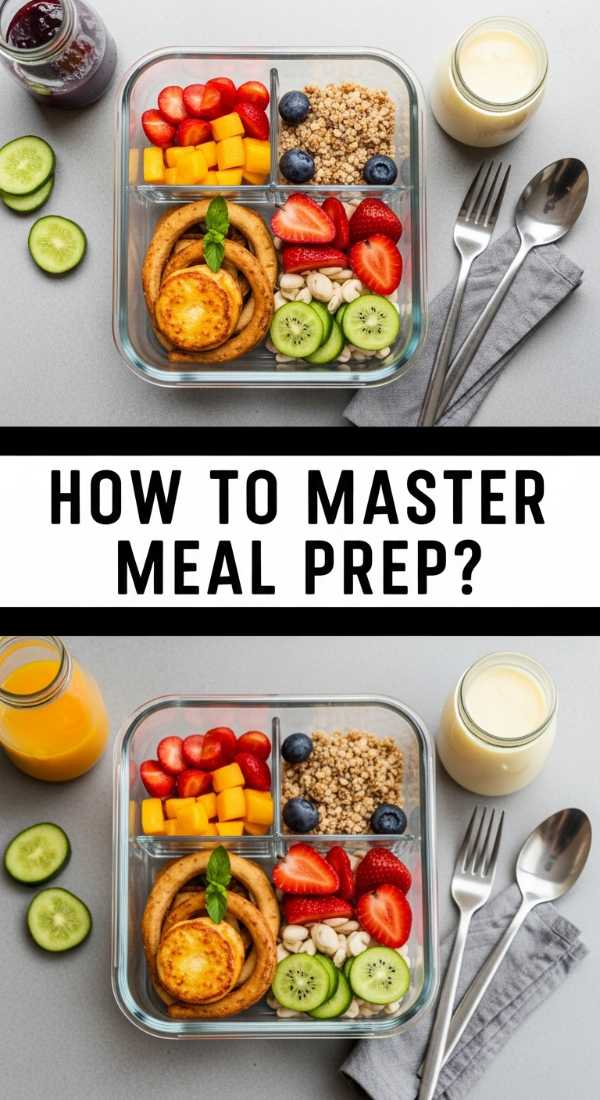
Why we love this
The beauty of mastering meal prep is the gift of time and the elimination of morning decision fatigue. There is a profound sense of satisfaction in looking into a fridge filled with neatly organized, prepped components that are ready to be assembled into a viral-worthy board in minutes. It allows the cook to actually enjoy the gathering rather than being stuck behind the stove. We love the ritual of the ‘prep day,’ where the kitchen becomes a production line of delicious possibilities, ensuring every weekday feels as special as a weekend brunch.
Ingredients
- Bulk proteins (bacon, sausage, tofu)
- Pre-cut seasonal fruits
- Home-made granola
- Washed and dried leafy greens
- Batch-cooked grains (quinoa or farro)
- Vinaigrettes and sauces in mason jars
How to make it
- Start with a plan: Write down the 3 main textures you want for the week (crunchy, creamy, savory). This ensures variety.
- Dedicate a 2-hour window for ‘active’ prep. Use your oven to its full capacity—roast bacon on one rack, potatoes on another, and perhaps a tray of granola on the third. This is ‘zonal cooking’ at its most efficient.
- Invest in high-quality, airtight glass containers. Glass keeps food fresher longer than plastic and doesn’t retain odors. Label everything with a date using masking tape and a marker.
- For items like pancakes or waffles, ‘flash freeze’ them. Lay them in a single layer on a baking sheet for 30 minutes until hard, then toss them into a freezer bag. This prevents them from sticking together.
- Prepare your ‘wet’ and ‘dry’ components separately. For example, don’t mix the dressing into the salad or the fruit into the yogurt until you are ready to plate. This prevents sogginess and keeps the textures distinct.
How to serve breakfast dinner

Why we love this
Breakfast for dinner, or ‘Brinner,’ is the ultimate cozy rebellion against traditional meal times. There’s a playful, nostalgic energy to serving maple syrup and eggs as the sun goes down, often accompanied by soft lighting and a glass of sparkling cider or a mimosa. We love the versatility of this concept—it can be a low-effort way to clear the fridge or a sophisticated, elevated spread featuring savory waffles and poached eggs. It turns an ordinary Tuesday night into a celebrated event that feels both whimsical and deeply satisfying.
Ingredients
- Savory waffle batter (add chives and cheddar)
- Fried chicken tenders or thick-cut ham
- Maple-bourbon syrup
- Arugula salad with lemon vinaigrette
- Soft scrambled eggs with truffle oil
- Roasted tomatoes on the vine
How to make it
- The key to a successful Brinner board is the ‘Sweet-Savory Balance.’ Start by preparing your savory base, such as cheddar-chive waffles. Use a high-quality waffle iron set to a medium-high heat to ensure a crisp exterior that can support toppings.
- Cook your proteins to a ‘dinner’ standard. If using chicken, ensure it is double-breaded and fried until the internal temperature reaches 165°F (74°C). If using ham, sear it in a hot pan with a brown sugar glaze until the edges are caramelized.
- Elevate the eggs. Since this is dinner, move away from basic scrambles. Try a slow-scramble method: cook eggs over low heat, stirring constantly with a silicone spatula for 5-8 minutes until they form tiny, creamy curds. Finish with a drizzle of truffle oil.
- Add a ‘dinner’ side to the board, like a bright arugula salad. The bitterness of the greens cuts through the richness of the syrup and eggs, making the meal feel more complete.
- Assemble the board by placing the hot items in the center and surrounding them with small bowls of elevated condiments like spicy honey, whipped honey butter, and flakey sea salt.
How to cook amazing breakfasts

Why we love this
Cooking an ‘amazing’ breakfast is about the art of the little things—the extra pinch of salt, the quality of the butter, and the patience to let flavors develop. It’s the difference between a meal that just fills you up and one that nourishes your soul. We love the sensory journey: the rhythmic sound of a whisk against a bowl, the sizzle of a hot pan, and the vibrant colors of fresh produce. An amazing breakfast board feels like an invitation to slow down and savor the morning, turning a daily routine into a luxurious experience.
Ingredients
- High-quality European-style butter (higher fat content)
- Farm-fresh eggs (bright orange yolks)
- Artisan sourdough or brioche
- Maldon sea salt flakes
- Pure Grade A maple syrup
- Organic, seasonal fruits
How to make it
- Master temperature control. The most common mistake in breakfast cooking is using heat that is too high. For eggs and delicate pastries, medium-low is your best friend. This prevents browning where it isn’t wanted and keeps textures tender.
- Season in layers. Don’t just salt the finished product. Season your eggs while whisking, salt your potato water, and add a pinch of salt to your pancake batter to enhance the sweetness.
- Use ‘The Butter Technique.’ For almost everything on a breakfast board, finishing with a pat of cold, high-quality butter adds a glossy sheen and a rich mouthfeel. Melt it over pancakes, stir it into oats, or let it pool on top of a hot casserole.
- Focus on ‘plating for the eyes.’ Use varied heights on your board by using small ramekins or overturned bowls to prop up certain items. Tuck fresh herbs like mint or parsley into the gaps to add life and a fresh aroma.
- Timing is everything. Warm your plates and your serving board in a low oven (150°F) before assembling. This gives you a 5-10 minute buffer to get everything perfectly placed without the food getting cold.
How to make fluffy pancakes

Why we love this
A tall stack of fluffy pancakes is the centerpiece of any iconic food board. We love that first sight of a thick, airy pancake with a perfectly even golden-brown surface, topped with a melting knob of butter that slowly cascades down the sides. The texture should be almost like a sponge—porous enough to soak up maple syrup but sturdy enough to hold its shape. The gentle scent of vanilla and toasted flour evokes childhood memories and creates an atmosphere of pure, unadulterated joy.
Ingredients
- 2 cups all-purpose flour
- 2 tbsp sugar
- 1 tbsp baking powder
- 1/2 tsp salt
- 1 1/2 cups whole milk
- 1 large egg
- 4 tbsp melted butter
- 1 tsp vanilla extract
How to make it
- The Golden Rule: Do not overmix. Whisk your dry ingredients in one bowl and wet ingredients in another. Pour the wet into the dry and stir with a spatula until *just* combined. Lumps are your friends; they contain pockets of air that expand during cooking.
- Let the batter rest for at least 10-15 minutes. This allows the flour to fully hydrate and the baking powder to activate, resulting in a much loftier pancake.
- Heat a non-stick griddle or cast-iron skillet over medium heat. Test the heat by dropping a bead of water on the pan; it should sizzle and dance. Wipe the pan with a tiny bit of oil or butter using a paper towel—you want a thin film, not a puddle.
- Pour 1/4 cup of batter for each pancake. Wait until you see bubbles forming on the surface and the edges look set and matte. This usually takes about 2-3 minutes.
- Flip once with a confident, quick motion. Cook the other side for only 1-2 minutes until golden. Never press down on the pancake with your spatula, as this collapses the air bubbles you’ve worked so hard to create.
How to poach perfect eggs

Why we love this
Poached eggs are the height of breakfast elegance. There is a theatrical beauty in slicing into a perfectly white, opaque exterior only to have the rich, liquid gold yolk spill out and coat everything underneath. The delicate, silky texture of the whites is a sophisticated contrast to the crunchy toast or salty bacon they usually sit upon. Mastering the poach feels like a culinary rite of passage, and adding them to a food board immediately elevates the entire aesthetic to ‘gourmet’ status.
Ingredients
- The freshest eggs possible (cold from the fridge)
- 1 tbsp white distilled vinegar
- A large pot of water
- Slotted spoon
- Paper towels
How to make it
- Use the ‘Mesh Strainer Trick.’ Crack your egg into a fine-mesh strainer over a bowl. Let the thin, watery part of the egg white drain away for 30 seconds. This leaves only the thick white, which will stay tightly wrapped around the yolk.
- Bring a deep pot of water to a very gentle simmer (around 180°F to 190°F). You want small bubbles rising from the bottom, not a rolling boil. Add the vinegar to the water; this helps the proteins in the egg white coagulate faster.
- Create a ‘gentle whirlpool’ by stirring the water in a circular motion with a spoon. Drop the egg carefully into the center of the vortex. The motion will help the white wrap around the yolk.
- Cook for exactly 3 minutes for a classic runny yolk. Do not stir the water once the egg is in.
- Use a slotted spoon to gently lift the egg out. Touch the white to ensure it’s firm but the yolk still feels soft. Blot the bottom of the spoon on a paper towel to remove excess water before placing the egg on your board or toast.
How to bake french toast
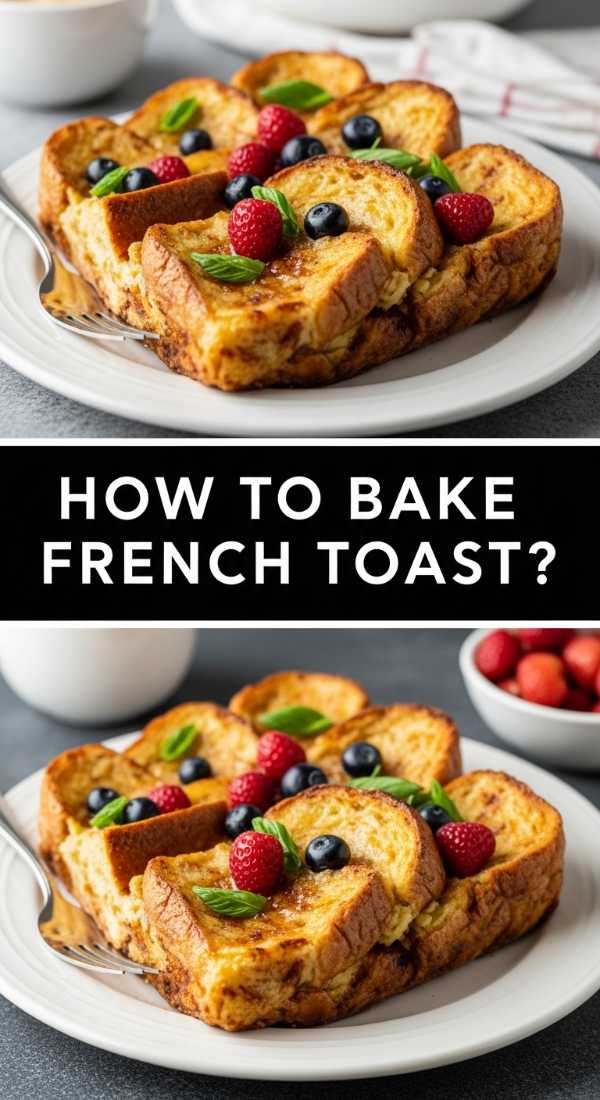
Why we love this
Baking French toast transforms a labor-intensive stove-top task into a stress-free, luxurious bake that ensures everyone gets a hot slice at the same time. We love the way the edges of the bread become caramelized and slightly crunchy while the inside stays soft and custard-like, reminiscent of a bread pudding. Infused with cinnamon, nutmeg, and vanilla, it fills the kitchen with a bakery-fresh scent that is utterly intoxicating. It’s the perfect canvas for fresh berries, powdered sugar, and a heavy drizzle of syrup.
Ingredients
- 1 loaf of thick-cut Brioche or Challah (stale is better)
- 6 large eggs
- 1 1/2 cups heavy cream or half-and-half
- 1/4 cup brown sugar
- 2 tsp cinnamon
- 1/4 tsp nutmeg
- 1 tbsp vanilla paste
- Pinch of salt
How to make it
- Prepare your bread by cutting it into 1.5-inch thick slices. If the bread is fresh, lay the slices on a baking sheet and ‘dry’ them in a 300°F oven for 10 minutes. Dry bread acts like a sponge, whereas fresh bread will just turn mushy.
- Whisk together the eggs, cream, brown sugar, spices, vanilla, and salt until completely smooth. Ensure the cinnamon is well-incorporated and not just floating on top.
- Dip each slice into the custard, allowing it to soak for about 20-30 seconds per side. Don’t rush this; the custard needs to reach the center of the bread.
- Arrange the soaked slices in a buttered baking dish. They can be slightly overlapping for a ‘shingled’ look, which creates a variety of textures between the exposed edges and the covered centers.
- Bake at 375°F (190°C) for 25-30 minutes. Halfway through, you can brush the tops with a little extra melted butter and a sprinkle of cinnamon sugar. The toast should be puffed and golden. Let it stand for 5 minutes before serving so the custard sets fully.
The Art of the Final Spread
Creating a viral food board is about finding the balance between the ‘wow’ factor and the simple joy of eating. By combining a few of these master techniques—like the crunch of perfect potatoes and the silkiness of a poached egg—you create a landscape of flavor that invites everyone to dig in. Remember, the best boards aren’t just beautiful; they are a reflection of the care you put into the food. So, grab your largest wooden board, pick your favorite recipes from this guide, and start building your own stunning masterpiece. Your guests (and your Instagram feed) will thank you!