
Why Everyone Is Obsessed With This Minimalist Food Board Trend
Have you ever noticed how the best memories always seem to happen around a table piled with good food, but without the stress of a five-course meal? Lately, I’ve found myself moving away from those overly complicated, cluttered charcuterie boards and leaning into something much more intentional: the minimalist food board. It’s about picking one hero dish, perfecting the technique, and letting it shine on a simple wooden surface surrounded by just a few thoughtful sides.
There is something deeply grounding about the simplicity of this trend. It invites us to slow down, to appreciate the sear on a steak or the perfect golden flake of a salmon fillet, rather than getting lost in a sea of crackers and jams. It’s a warm, inviting way to host that feels less like a performance and more like a shared experience. When you bring one of these boards to the center of the table, the room goes quiet for a second—not because it’s fancy, but because it looks and smells like true comfort.
How to cook perfect steak?

Why we love this
There is an undeniable magic in a perfectly seared steak, where the exterior carries a deep, mahogany crust that crackles slightly under the knife, while the center remains a buttery, edge-to-edge medium-rare. As you slice into it, the aroma of browned butter and fresh thyme wafts up, immediately making the kitchen feel like a high-end steakhouse. The contrast between the salty, savory exterior and the tender, juicy interior is a sensory experience that feels both indulgent and primal, making it the ultimate centerpiece for a minimalist board.
Ingredients
- 1.5-inch thick Ribeye or New York Strip
- Kosher salt and coarse black pepper
- 3 tbsp unsalted butter
- 3 cloves garlic, smashed
- 2 sprigs fresh thyme or rosemary
- High-smoke point oil (avocado or grapeseed)
How to make it
- Remove the steak from the refrigerator at least 45 minutes before cooking to allow it to reach room temperature, ensuring even heat distribution.
- Pat the steak extremely dry with paper towels; moisture is the enemy of a good crust. Season aggressively on all sides, including the edges, with kosher salt and pepper.
- Place a cast-iron skillet over high heat until it begins to wisps with smoke. Add two tablespoons of oil and carefully lay the steak away from you.
- Press down slightly to ensure full contact. Sear for 3 minutes without moving it until a deep crust forms. Flip and sear the other side for 2 minutes.
- Reduce heat to medium, add the butter, garlic, and herbs. Tilt the pan and use a large spoon to continuously baste the steak with the foaming, aromatic butter for the final 2 minutes.
- Remove the steak when the internal temperature hits 130°F (50°C) for medium-rare. Let it rest on a cutting board for at least 10 minutes before slicing to allow the juices to redistribute.
How to make crispy potatoes?

Why we love this
Crispy potatoes are the ultimate comfort food, offering a satisfying shatter that gives way to a center as light and fluffy as a cloud. When tossed in a minimalist board layout, they catch the light with their jagged, golden-brown edges, seasoned just enough to enhance their natural earthiness. The smell of roasting starch and garlic oil fills the home, promising a side dish that is often more popular than the main event itself, providing that addictive crunch we all crave.
Ingredients
- 2 lbs Yukon Gold or Russet potatoes
- 1/2 tsp baking soda
- 1/4 cup extra virgin olive oil
- 1 tsp garlic powder
- 1 tbsp chopped fresh rosemary
- Flaky sea salt to finish
How to make it
- Peel and cut potatoes into 1.5-inch chunks. Place them in a pot of cold water with a heavy pinch of salt and the baking soda, which helps break down the exterior for maximum surface area.
- Bring to a boil and simmer for about 10 minutes until the edges are softened but the centers are still firm. Drain and let the steam escape for 2 minutes.
- Shake the potatoes vigorously in the pot to roughen up the edges; this creates a starchy paste that will crisp up beautifully in the oven.
- Toss with olive oil, garlic powder, and rosemary. Spread them out on a preheated baking sheet, ensuring they aren’t crowded.
- Roast at 425°F (220°C) for 45-50 minutes, flipping every 20 minutes, until they are deep gold and audibly crunchy when tapped. Finish with flaky sea salt immediately.
How to roast juicy chicken?
Why we love this
A roast chicken is the hallmark of home cooking, representing a warmth and simplicity that never goes out of style. The skin should be paper-thin and glassy, glistening with rendered fat and herbs, while the meat underneath remains incredibly succulent and dripping with natural juices. It’s a dish that invites you to use your hands, tearing off a wing or a drumstick while standing around the board, enjoying the rustic charm of a meal that feels like a big, culinary hug.
Ingredients
- 1 whole roasting chicken (4-5 lbs)
- 4 tbsp softened salted butter
- 1 lemon, halved
- 1 head of garlic, sliced crosswise
- Small bunch of fresh sage and parsley
- Salt and cracked pepper
How to make it
- Preheat your oven to 425°F (220°C). Thoroughly pat the chicken dry inside and out. This is critical for achieving that shatter-crisp skin.
- Generously season the cavity with salt and pepper, then stuff with the lemon, garlic, and half the herbs.
- Tuck the wing tips behind the back and truss the legs with kitchen twine to ensure the chicken roasts evenly and stays juicy.
- Rub the softened butter all over the skin, then season the exterior heavily with salt. Place the chicken on a rack in a roasting pan.
- Roast for 60-75 minutes. The skin should be a deep amber color, and the juices should run clear. Use a thermometer to check that the thickest part of the thigh reaches 165°F (74°C).
- Allow the chicken to rest uncovered for 15-20 minutes before carving; this keeps the moisture locked inside the meat rather than on the board.
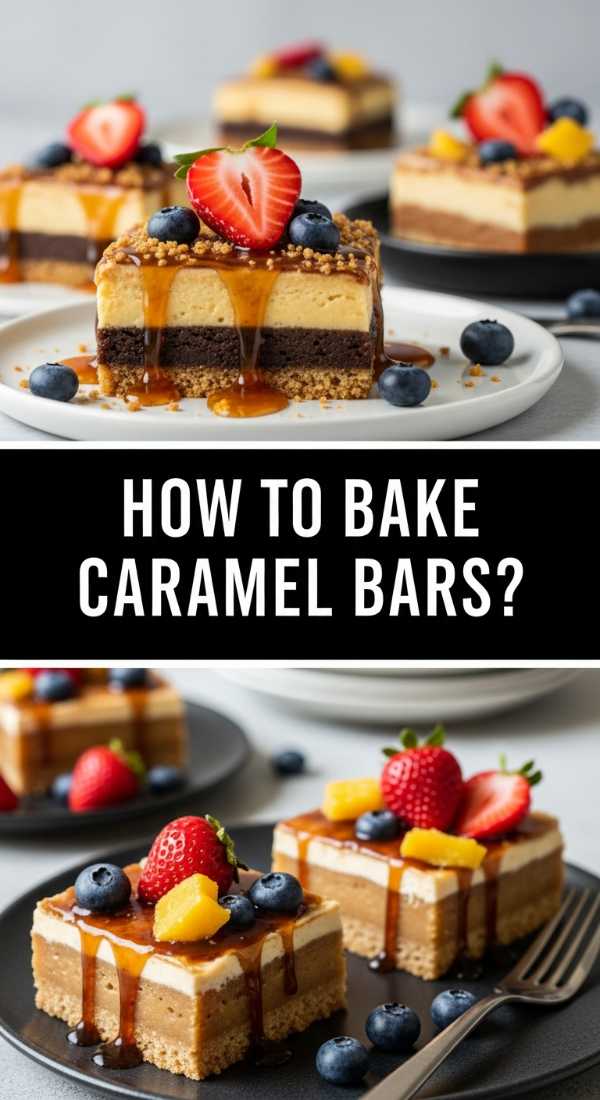
How to bake caramel bars?
Why we love this
There is something dangerously decadent about a caramel bar that balances a buttery, shortbread-like base with a thick, gooey layer of amber-hued caramel. As you bite through the layers, you experience the sandy crumble of the crust followed by the smooth, stretchy pull of the filling, often topped with a hint of dark chocolate or sea salt. It’s a rich, sensory delight that looks stunning on a dessert board, enticing everyone to reach in for just one more square of sweet, buttery perfection.
Ingredients
- 1 cup unsalted butter, softened
- 1/2 cup granulated sugar
- 2 cups all-purpose flour
- 1 can (14 oz) sweetened condensed milk
- 1/2 cup brown sugar
- 4 tbsp butter (for caramel)
- 1 tsp vanilla extract
How to make it
- Preheat oven to 350°F (175°C) and line an 8×8 pan with parchment paper. Cream together 1 cup butter and granulated sugar until pale and fluffy.
- Stir in the flour until a crumbly dough forms. Press two-thirds of this mixture into the bottom of the pan and bake for 15 minutes until lightly golden.
- In a heavy-bottomed saucepan, combine the condensed milk, brown sugar, 4 tbsp butter, and vanilla. Heat over medium-low, stirring constantly.
- Continue stirring for 5-8 minutes as the mixture thickens and turns a light caramel color. Do not let it burn; the goal is a smooth, thick consistency.
- Pour the caramel over the baked crust. Crumble the remaining dough over the top of the caramel layer.
- Bake for another 20-25 minutes until the top is golden and the caramel is bubbling at the edges. Let them cool completely in the pan before slicing into neat squares.
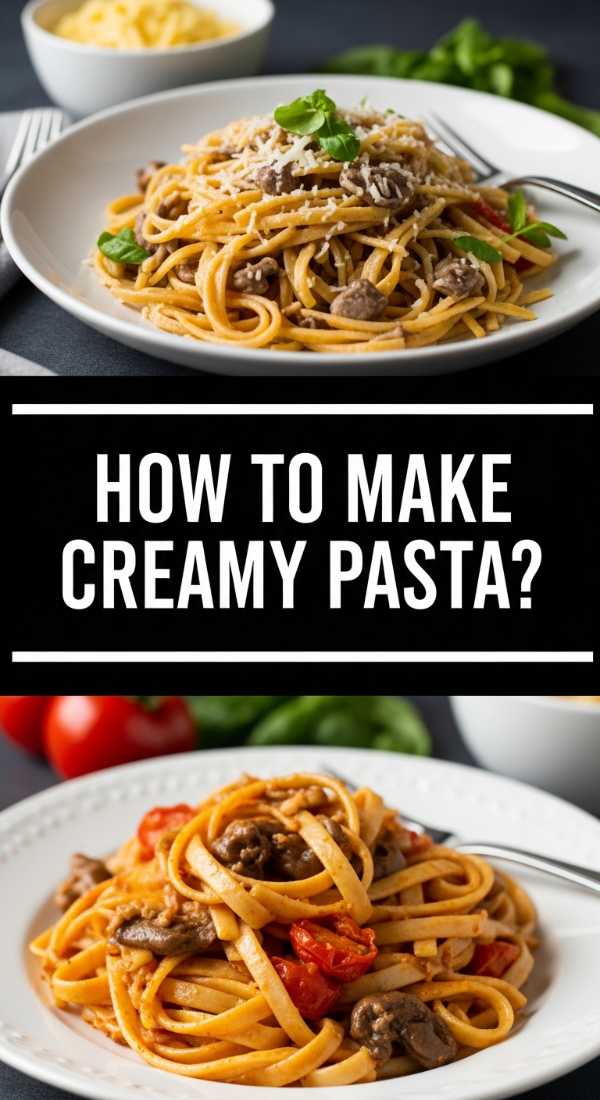
How to make creamy pasta?
Why we love this
Creamy pasta is the ultimate blank canvas for comfort, offering a silky, velvety texture that coats every strand of noodle in a rich, cheesy embrace. The aroma of toasted garlic and aged Parmesan creates an intoxicating scent that draws everyone to the kitchen, promising a meal that is both sophisticated and deeply satisfying. On a board, it can be served in a large, shallow bowl surrounded by crusty bread, encouraging a communal style of eating that is all about the joy of a shared, indulgent sauce.
Ingredients
- 1 lb Fettuccine or Pappardelle
- 2 cups heavy cream
- 1 cup freshly grated Parmesan cheese
- 2 tbsp unsalted butter
- 3 cloves garlic, minced
- Freshly cracked black pepper and parsley
How to make it
- Bring a large pot of heavily salted water to a boil. Cook the pasta 1-2 minutes less than the package directions (al dente); it will finish cooking in the sauce.
- In a large skillet, melt the butter over medium heat. Add the minced garlic and sauté for 1 minute until fragrant but not browned.
- Pour in the heavy cream and bring to a gentle simmer. Let it reduce for about 3-5 minutes until it slightly thickens and can coat the back of a spoon.
- Whisk in the Parmesan cheese a handful at a time, stirring constantly to ensure a smooth, emulsified sauce without lumps.
- Add the cooked pasta directly into the sauce along with 1/4 cup of reserved pasta water. Toss vigorously over low heat to marry the flavors.
- Season with plenty of black pepper. If the sauce is too thick, add more pasta water a tablespoon at a time until it reaches a glossy, silken consistency.
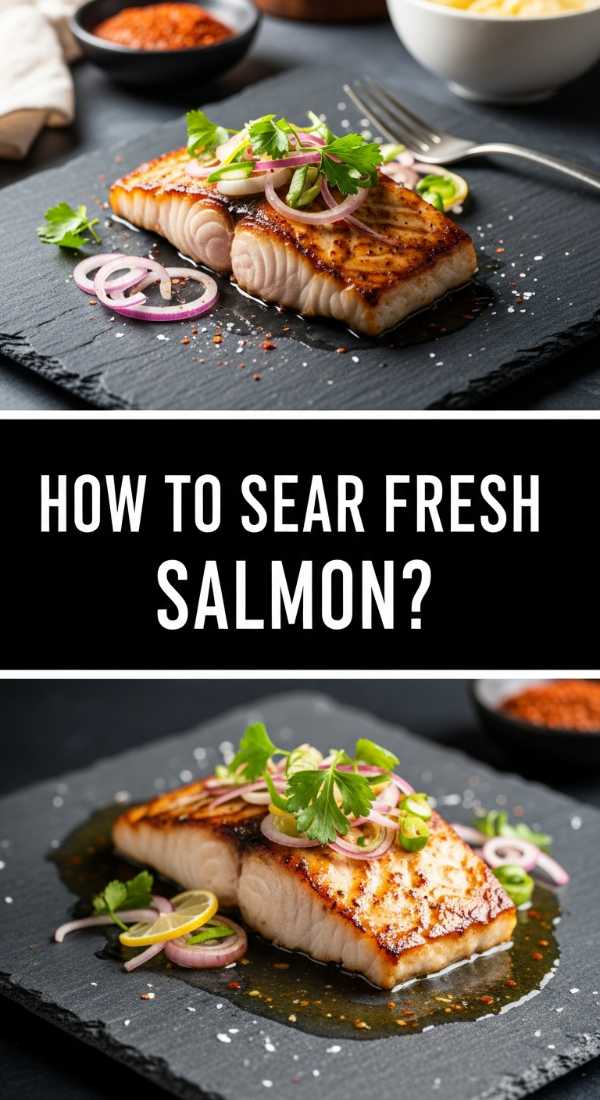
How to sear fresh salmon?
Why we love this
A perfectly seared salmon fillet is a masterclass in texture, featuring a skin so crisp it crackles like a potato chip and a center that is tender, moist, and barely opaque. The natural oils of the fish lend a rich, clean flavor that pairs beautifully with the bright acidity of a squeeze of lemon or a sprinkle of fresh herbs. Presented on a board, the vibrant coral color of the fish provides a stunning visual pop that feels light, healthy, and incredibly upscale all at once.
Ingredients
- 2 large center-cut salmon fillets
- 1 tbsp neutral oil (like canola)
- Kosher salt
- Lemon wedges
- Fresh dill or chives
How to make it
- Remove the salmon from the fridge 15 minutes prior. Use a sharp knife to gently score the skin, which prevents the fish from curling during cooking.
- Pat the skin side extremely dry. This is the most important step for crispness. Season both sides generously with salt.
- Heat a non-stick or stainless steel skillet over medium-high heat. Add the oil and wait until it is shimmering and hot.
- Place the salmon skin-side down in the pan. Immediately press down on the fillets with a spatula for 30 seconds to ensure the skin remains flat against the heat.
- Reduce heat to medium and cook for 5-6 minutes on the skin side without moving it. You will see the color change slowly creeping up the side of the fish.
- Carefully flip the salmon and cook for only 1-2 minutes more to finish the interior. Serve skin-side up to maintain the crunch.
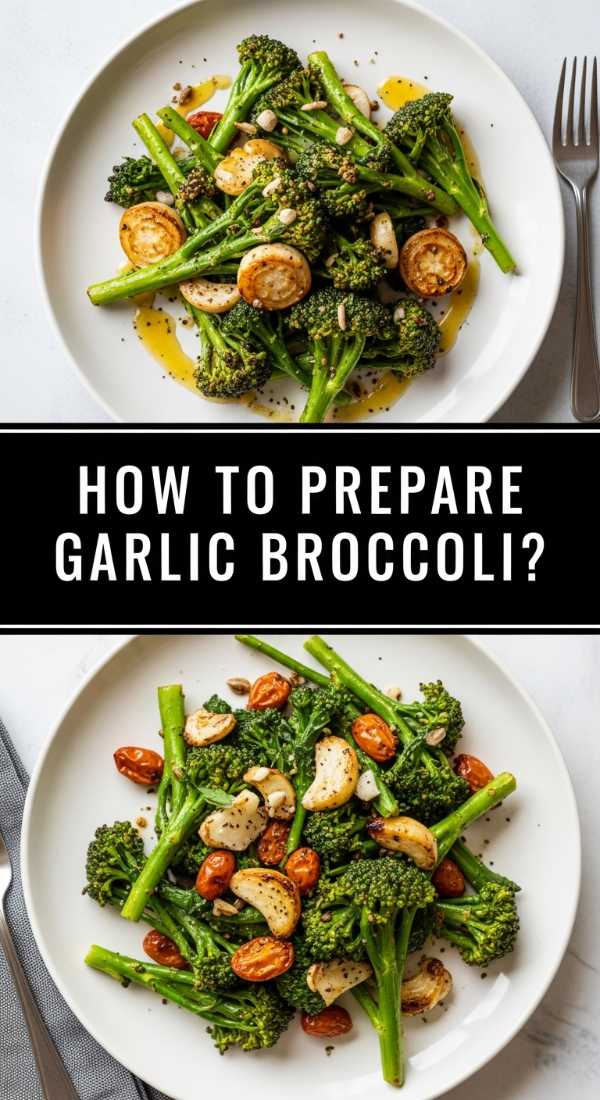
How to prepare garlic broccoli?

Why we love this
Garlic broccoli is the unsung hero of the minimalist board, offering a vibrant green hue and a satisfying char that brings a smoky depth to the vegetable. The tiny florets act like sponges, soaking up the infused garlic oil and lemon juice, while the stems provide a tender-crisp snap that keeps things fresh. It’s a side dish that manages to be both healthy and intensely flavorful, providing the perfect zesty counterpoint to richer proteins like steak or roast beef.
Ingredients
- 2 large heads of broccoli, cut into florets
- 4 tbsp olive oil
- 4 cloves garlic, thinly sliced
- Red pepper flakes (optional)
- Juice of half a lemon
- Salt and pepper
How to make it
- Toss the broccoli florets in a large bowl with 3 tablespoons of olive oil, salt, and pepper until every piece is lightly coated.
- Spread the broccoli on a large baking sheet. Ensure there is plenty of space between pieces; if they are crowded, they will steam instead of charring.
- Roast at 425°F (220°C) for 15-20 minutes. Look for dark brown, crispy edges on the florets and a bright green color overall.
- While the broccoli roasts, heat the remaining tablespoon of oil in a small pan over low heat. Add the sliced garlic and red pepper flakes.
- Cook the garlic for 2-3 minutes until it turns a very light golden brown. Be careful not to burn it, as bitter garlic will ruin the dish.
- Remove the broccoli from the oven, toss with the warm garlic oil and fresh lemon juice, and serve immediately while hot.
How to slow roast beef?

Why we love this
Slow-roasted beef is the epitome of patience rewarded, resulting in meat so tender it practically falls apart at the mere suggestion of a fork. The long, slow cooking process allows the connective tissues to melt away, creating a rich, savory gravy of sorts within the meat itself. The deep, beefy aroma that fills the house over several hours is pure nostalgia, making it the perfect centerpiece for a Sunday afternoon board where the only agenda is to eat well and linger over conversation.
Ingredients
- 3-4 lb Chuck roast or Rump roast
- 2 tbsp olive oil
- 2 cups beef stock
- 1 large onion, quartered
- 3 carrots, cut into chunks
- Fresh rosemary and thyme
- Salt and pepper
How to make it
- Preheat your oven to 300°F (150°C). A lower temperature is vital for breaking down the tough fibers of the roast over several hours.
- Season the beef aggressively with salt and pepper on all sides. Sear the meat in a large Dutch oven with oil over high heat until browned all over.
- Remove the meat and briefly sauté the onions and carrots in the same pot for 3-4 minutes to pick up the browned bits (fond) from the bottom.
- Place the meat back in the pot. Pour in the beef stock and add the fresh herbs. The liquid should come about halfway up the side of the roast.
- Cover with a tight-fitting lid and place in the oven. Roast for 3 to 4 hours, or until the meat is completely tender and pulls apart easily.
- Let the roast rest in its juices for 20 minutes before serving. Skim any excess fat from the liquid and serve the jus alongside the beef.
How to make fluffy pancakes?

Why we love this
There’s a specific kind of joy in a stack of pancakes that are impossibly tall, airy, and golden-brown. Each bite is like a soft, sweet cloud that perfectly absorbs pools of warm maple syrup and melting butter. The smell of vanilla and malted flour on a weekend morning is an instant mood lifter. On a breakfast board, these fluffy rounds look beautiful when overlapped, surrounded by fresh berries and glistening bacon, turning an ordinary morning into a celebratory event.
Ingredients
- 1.5 cups all-purpose flour
- 3.5 tsp baking powder
- 1 tbsp white sugar
- 1.25 cups milk
- 1 egg
- 3 tbsp melted butter
- 1 tsp vanilla extract
How to make it
- In a large bowl, whisk together the flour, baking powder, sugar, and a pinch of salt. Make a well in the center of the dry ingredients.
- In a separate jug, whisk the milk, egg, melted butter, and vanilla. Pour the wet ingredients into the well of the dry ingredients.
- Whisk gently until just combined. It is vital to leave small lumps in the batter; over-mixing will lead to tough, flat pancakes rather than fluffy ones.
- Heat a lightly oiled griddle or frying pan over medium heat. Use a 1/4 cup measure to scoop the batter onto the griddle.
- Wait for bubbles to form on the surface and the edges to look set and dry (about 2-3 minutes) before flipping.
- Cook the other side for another 1-2 minutes until golden brown. Keep the pancakes in a warm oven until you are ready to assemble your board.
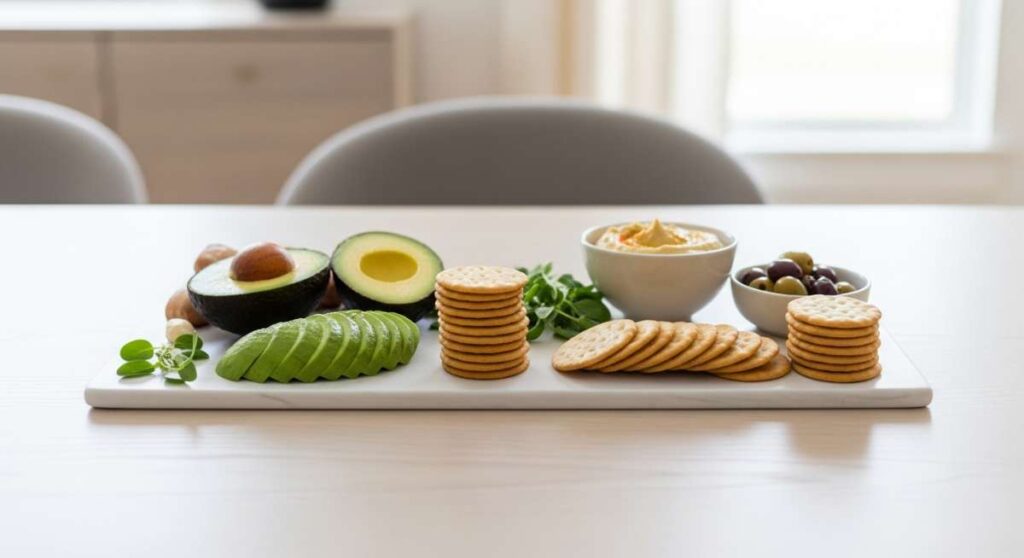
How to prep dinner bowls?
[IMAGE_10]
Why we love this
Dinner bowls are the ultimate expression of balanced, vibrant eating, where every ingredient is chosen for its color, texture, and nutritional value. From the crunch of raw radishes to the creaminess of avocado and the heartiness of a base grain, these bowls are a feast for the eyes before they ever hit the palate. When served as a DIY board, they allow everyone to customize their own meal, making it an interactive and joyful way to eat fresh, whole foods in a way that feels curated and special.
Ingredients
- Base: Cooked quinoa or brown rice
- Protein: Shredded chicken, chickpeas, or tofu
- Veggies: Shredded carrots, cucumber slices, edamame
- Healthy Fats: Avocado slices or toasted seeds
- Dressing: Tahini-lemon or soy-ginger vinaigrette
How to make it
- Start by prepping your grains. Rinse quinoa or rice thoroughly to remove bitterness, then simmer in stock rather than water for added flavor.
- While the grains cook, chop your vegetables into uniform, bite-sized pieces. This makes the bowl easier to eat and more visually appealing.
- Prepare your protein. If using chickpeas, roast them with spices for crunch; if using chicken, poach or grill it and shred it finely.
- Whisk your dressing together in a small jar. Aim for a balance of fat (oil/tahini), acid (lemon/vinegar), and salt (soy sauce/sea salt).
- On your board, create separate mounds of each ingredient. This allows guests to see all the beautiful components clearly.
- Provide small individual bowls and encourage everyone to layer their grains first, followed by the proteins and veggies, drizzling the dressing over the top at the end.
The Art of the Minimalist Board
The beauty of this trend isn’t just in the food itself, but in the atmosphere it creates. By focusing on one or two high-quality elements, you remove the clutter from your table and your mind. It’s about celebrating the textures and flavors of simple ingredients prepared with love. So next time you’re hosting, skip the twenty-ingredient grocery list and focus on making one thing perfectly. Your guests—and your stress levels—will thank you.