
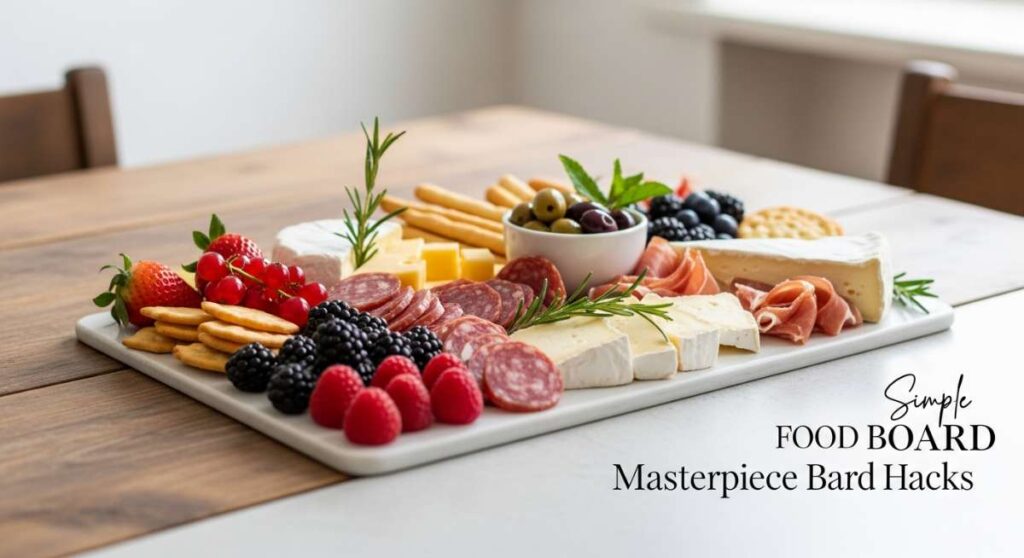
Simple Food Board Hacks: How to Make a Masterpiece in Minutes
There is something inherently magical about a gathering where the food isn’t just served, but presented as a landscape of possibilities. I remember the first time I set out a massive wooden board for my friends; the room’s energy shifted from polite small talk to genuine excitement. It wasn’t about being a five-star chef; it was about the colors, the textures, and the shared experience of picking and choosing the perfect bite. That is the heart of the viral food board trend—it’s accessible luxury that anyone can master.
In today’s fast-paced world, we often forget that eating is a sensory experience meant to be savored. These ‘masterpiece boards’ are my secret weapon for stress-free entertaining. Whether you are hosting a cozy movie night or a festive dinner party, these simple food board hacks will turn basic ingredients into a stunning focal point. We are going to dive into ten diverse components that will make your next board absolutely unforgettable, focusing on techniques that maximize flavor with minimal fuss.
The beauty of a food board lies in its versatility. You can mix and match sweet and savory, hot and cold, and crunchy and soft. In this guide, I’ll show you how to prepare everything from succulent seared scallops to the perfect sugar cookie, ensuring every corner of your board is a conversation starter. Let’s get into the kitchen and start building your masterpiece!
How to make spicy mocktails?

Why we love this
There is nothing quite like the refreshing kick of a well-crafted spicy mocktail to awaken the palate before a big meal. Imagine the bright, zingy scent of freshly squeezed lime mingling with the earthy heat of muddled jalapeños, all carried by the effervescent bubbles of a premium club soda. This drink offers a sophisticated complex flavor profile that feels celebratory without the alcohol, providing a crisp, cooling sensation followed by a lingering warmth that makes every sip an adventurous experience. It’s the perfect vibrant companion for any food board, cutting through rich flavors with ease.
Ingredients
- 2 fresh jalapeños, sliced into rounds
- 1 cup fresh lime juice
- 1/2 cup agave nectar or simple syrup
- 1 bunch fresh cilantro or mint
- Club soda or sparkling mineral water
- Tajin or sea salt for the rim
- Ice cubes
How to make it
- Begin by prepping your glassware; rub a lime wedge around the rim of each glass and dip into a plate of Tajin or sea salt to create a flavorful, aesthetic border.
- In a cocktail shaker, combine 3-4 jalapeño rounds (remove seeds for less heat) and a handful of fresh cilantro or mint leaves. Use a muddler to firmly press the ingredients, releasing the capsaicin from the peppers and the essential oils from the herbs.
- Pour in the fresh lime juice and agave nectar. Fill the shaker halfway with ice and shake vigorously for about 15 seconds until the exterior of the shaker feels frosty.
- Strain the mixture into your prepared glasses filled with fresh ice, ensuring no herb bits or large pepper pieces fall through.
- Top off each glass with chilled club soda, stirring gently with a long spoon to incorporate the flavors without deflating the carbonation. Garnish with an extra jalapeño slice and a lime wheel for that professional blogger look.
How to roast tender chicken?
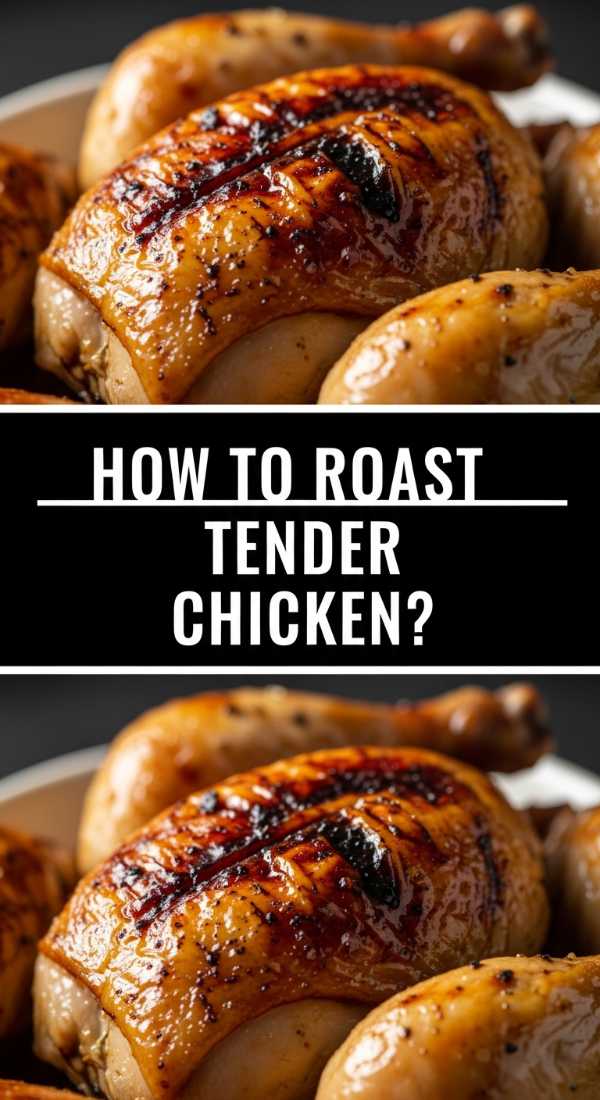
Why we love this
The aroma of a roasting chicken is the ultimate olfactory embrace, signaling comfort and home-cooked goodness. When done right, the skin transforms into a crackling, golden-brown parchment that yields to incredibly succulent, juice-laden meat underneath. Every bite is a symphony of savory depth, enhanced by aromatic herbs like rosemary and thyme that infuse the protein with a woodland fragrance. It is the centerpiece of a warm food board, offering a hearty, rustic element that pairs beautifully with crunchy salts and zesty mustards.
Ingredients
- 1 whole organic chicken (about 4 lbs)
- 4 tablespoons unsalted butter, softened
- 2 tablespoons olive oil
- 1 head of garlic, halved crosswise
- Fresh rosemary, thyme, and sage
- Kosher salt and freshly cracked black pepper
- 1 lemon, halved
How to make it
- Start by removing the chicken from the refrigerator at least 30 minutes before cooking to bring it to room temperature; this ensures even cooking throughout the bird.
- Preheat your oven to 425°F (218°C). High heat is essential for that initial sear that locks in juices and starts the skin-crisping process.
- Thoroughly pat the chicken dry with paper towels inside and out. Moisture is the enemy of crispy skin, so ensure it is bone-dry before applying any fat.
- Stuff the cavity with the lemon halves, garlic head, and half of the fresh herbs. Liberally rub the softened butter and olive oil all over the skin, then season aggressively with kosher salt and pepper, ensuring you get into every crevice.
- Place the chicken on a roasting rack in a heavy pan. Roast for about 50-60 minutes, or until the internal temperature reaches 165°F (74°C) in the thickest part of the thigh. Let the chicken rest for at least 15 minutes before carving to allow the juices to redistribute back into the muscle fibers.
How to sear buttery scallops?

Why we love this
Searing scallops is an art form that rewards you with a texture that is simultaneously firm and melt-in-your-mouth tender. A perfectly seared scallop features a deep, caramelized crust that tastes of toasted butter and the sea, while the interior remains translucent and sweet. The contrast between the hot, salty exterior and the cool, delicate center is a culinary delight that elevates any food board to gourmet status. It’s a luxurious, high-protein addition that feels incredibly special and sophisticated, yet takes only minutes to achieve.
Ingredients
- 1 lb dry-packed jumbo sea scallops
- 2 tablespoons high-smoke point oil (like grapeseed or avocado oil)
- 3 tablespoons unsalted butter
- 2 cloves garlic, smashed
- Fresh thyme sprigs
- Flaky sea salt and lemon wedges
How to make it
- Always opt for “dry” scallops, which haven’t been treated with phosphates. Remove the small side muscle (the tough little tag on the side) and pat the scallops excessively dry with paper towels.
- Heat a cast-iron or heavy stainless steel skillet over medium-high heat until it is wisps of smoke start to appear. Add the oil and swirl to coat the bottom evenly.
- Season only one side of the scallops with salt right before placing them in the pan. Place them seasoned-side down, leaving ample space between each; do not crowd the pan or they will steam instead of sear.
- Press down lightly with a spatula to ensure even contact. Sear undisturbed for 2 minutes until a thick, golden-brown crust forms. Flip them over gently.
- Immediately add the butter, smashed garlic, and thyme to the pan. As the butter foams, tilt the pan and use a spoon to continuously baste the scallops with the flavored butter for another 60-90 seconds. Remove immediately to a warm plate to prevent overcooking.
How to make fresh wraps?

Why we love this
Fresh wraps bring a much-needed crunch and lightness to a board, acting as the perfect vessel for vibrant vegetables and zesty sauces. There is a satisfying ‘snap’ when you bite through a crisp lettuce leaf or a soft flour tortilla into a medley of textures—creamy avocado, crunchy julienned carrots, and tender proteins. The flavors are bright and clean, offering a palate cleanser between richer meats and cheeses. They are visually stunning when sliced on a diagonal, revealing a rainbow of ingredients that look like edible confetti on your serving board.
Ingredients
- Large flour tortillas or butter lettuce leaves
- 1 cup shredded red cabbage
- 2 carrots, julienned
- 1 avocado, sliced
- 1/2 cup hummus or Greek yogurt dip
- Fresh sprouts or microgreens
- Thinly sliced cucumber
How to make it
- If using tortillas, warm them slightly in a dry pan for 10 seconds per side to make them pliable and prevent tearing during the rolling process.
- Spread a thin, even layer of hummus or Greek yogurt dip across the center of the wrap, leaving a one-inch border around the edges to act as a “glue.”
- Layer your ingredients horizontally in the lower third of the wrap. Start with the flat items like cucumber and avocado, then pile the shredded cabbage, carrots, and sprouts on top.
- Fold the sides of the tortilla inward over the filling, then tuck the bottom edge over the ingredients and roll tightly away from you, keeping tension to ensure a compact wrap.
- Using a very sharp serrated knife, slice the wrap on a sharp diagonal. This not only looks beautiful on the board but makes them easier for guests to grab and eat in two bites.
How to glaze smoky ribs?

Why we love this
Glazed ribs are the ultimate finger food, offering a sticky, sweet, and smoky experience that is deeply satisfying to the soul. The glaze should be thick and tacky, clinging to the tender meat and glistening under the light like mahogany jewels. As you pull the meat from the bone, you get that perfect balance of rendered fat, charred edges, and a rich sauce that dances between tangy vinegar and deep molasses notes. They add a rustic, “get-your-hands-dirty” charm to a food board that encourages guests to relax and truly enjoy their meal.
Ingredients
- 1 rack of baby back ribs
- 1 cup high-quality BBQ sauce
- 1/4 cup apple cider vinegar
- 2 tablespoons honey or maple syrup
- Dry rub (brown sugar, smoked paprika, garlic powder, onion powder, salt, pepper)
- Liquid smoke (optional, for indoor cooking)
How to make it
- Remove the silver skin membrane from the back of the ribs by loosening a corner with a butter knife and pulling it off with a paper towel; this ensures the meat is tender and the rub can penetrate.
- Coat the ribs generously in the dry rub and wrap tightly in foil. Bake at a low 275°F (135°C) for 2.5 to 3 hours until the meat is tender but not quite falling off the bone.
- In a small bowl, whisk together the BBQ sauce, apple cider vinegar, and honey. This creates a glaze that has enough acidity to balance the sugar and enough viscosity to stick.
- Remove the ribs from the foil and crank the oven to a high broil (or move to a hot grill). Brush a thick layer of the glaze over the meat side of the ribs.
- Broil for 3-5 minutes, watching closely. The sugars will begin to bubble and caramelize, creating dark, flavorful charred spots. Repeat the glazing and broiling process twice more to build up a thick, lacquered “bark” before slicing between the bones.
How to char juicy steaks?

Why we love this
There is an elemental joy in a perfectly charred steak, where the Maillard reaction creates a savory crust that smells of fire and rich protein. The contrast between the blackened, salty exterior and the tender, rose-pink medium-rare interior is what steakhouse dreams are made of. When sliced thinly for a board, the steak releases its savory essences, coating the board in a light jus that begs to be mopped up with crusty bread. It provides a grounding, masculine energy to the presentation, offering a deep umami punch that satisfies the most carnivorous appetites.
Ingredients
- 2 thick-cut Ribeye or New York Strip steaks (at least 1.5 inches thick)
- 3 tablespoons neutral oil
- 4 tablespoons butter
- 4 cloves garlic, crushed
- Fresh rosemary and thyme
- Coarse Kosher salt and cracked black pepper
How to make it
- Salt your steaks heavily on all sides at least 45 minutes before cooking, or ideally, 24 hours in advance in the fridge. This “dry brining” allows the salt to penetrate the fibers and helps create a superior crust.
- Ensure the steak is completely dry. Heat a heavy cast-iron skillet until it is screaming hot—you should see blue smoke rising from the dry pan.
- Add the oil, then carefully lay the steak away from you. Sear for 3-4 minutes per side without moving it to allow a deep crust to develop. Use tongs to sear the fat cap on the side until the fat renders and turns golden.
- Turn the heat down to medium and add the butter, garlic, and herbs. Once the butter is foaming, spoon it over the steak repeatedly (basting) for about 2 minutes to cook the interior to your desired doneness (130°F for medium-rare).
- Crucially, let the steak rest on a cutting board for 10 full minutes. This allows the muscle fibers to relax and retain their juices. Slice against the grain into 1/2 inch strips for the board.
How to toss green salad?
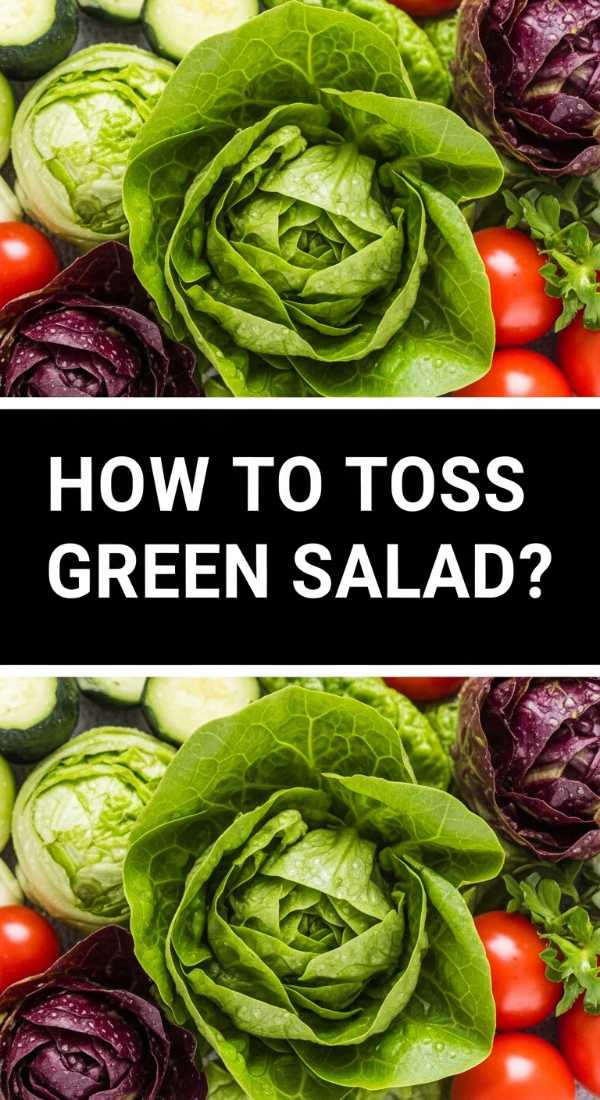
Why we love this
A perfectly tossed green salad is the unsung hero of the food board, providing the essential acid and freshness needed to balance out rich meats and cheeses. Imagine a bowl of vibrant, leafy greens coated in a dressing so light it glistens like dew, tasting of bright lemon and spicy olive oil. The crunch of fresh radishes or the snap of a cucumber adds a rhythmic texture that keeps the palate engaged. It’s a breath of fresh air in a sea of decadent bites, offering a crisp, clean finish that makes you want to go back for more.
Ingredients
- 5 cups mixed greens (arugula, bibb lettuce, radicchio)
- 1/4 cup extra virgin olive oil
- 2 tablespoons fresh lemon juice
- 1 teaspoon Dijon mustard
- 1 small shallot, finely minced
- Salt and pepper to taste
- Optional: Shaved parmesan or toasted pine nuts
How to make it
- Start with very dry greens. If they are wet, the dressing will slide off and pool at the bottom of the bowl, resulting in a soggy salad. Use a salad spinner or pat them gently with a kitchen towel.
- In a large wooden bowl (which can actually help season the salad), whisk together the minced shallot, lemon juice, and Dijon mustard. Let it sit for 5 minutes to mellow the shallots.
- Slowly drizzle in the olive oil while whisking constantly. You want to create an emulsion where the oil and acid are fully combined into a creamy, slightly thickened dressing.
- Add the greens to the bowl but do not toss them until right before serving. This prevents the acid in the dressing from wilting the delicate leaves prematurely.
- Use your hands or large salad tongs to gently lift and turn the greens, ensuring every single leaf is micro-coated with dressing. Season with a final pinch of flaky salt and pepper, and top with shaved cheese if desired.
How to stew beef roast?
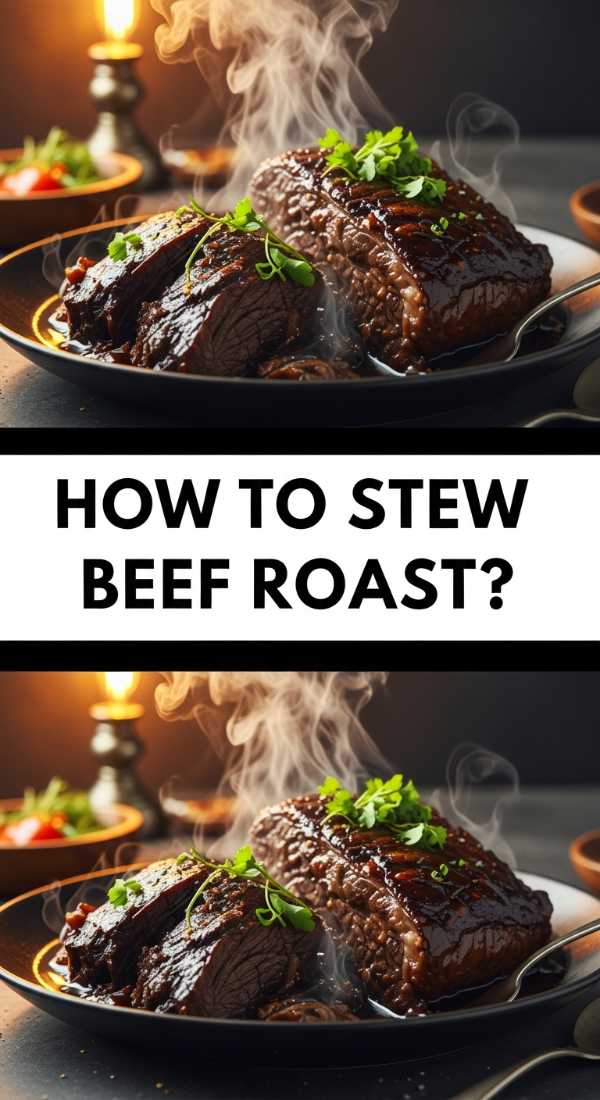
Why we love this
Stewed beef roast is the epitome of patience rewarded, offering a depth of flavor that only comes from hours of slow simmering. The meat becomes so incredibly tender that it falls apart at the mere suggestion of a fork, bathed in a rich, velvety gravy that tastes of red wine, mirepoix, and time. It brings a soul-warming, savory aroma to your kitchen that creates an immediate sense of coziness. Served in a small crock or bowl on your board, it provides a succulent, hearty dip or topping for toasted baguette slices.
Ingredients
- 3 lbs beef chuck roast, cut into 2-inch cubes
- 2 cups dry red wine (Cabernet or Merlot)
- 3 cups beef bone broth
- 2 tablespoons tomato paste
- 3 carrots and 2 celery stalks, chopped
- 1 large onion, diced
- 4 cloves garlic, minced
- Fresh thyme and bay leaves
How to make it
- Season the beef cubes generously with salt and pepper. In a large Dutch oven, sear the meat in batches over high heat until all sides are deeply browned. Remove the meat and set aside; this “fond” on the bottom of the pot is where the flavor lives.
- Lower the heat to medium and add the onions, carrots, and celery. Sauté until the onions are translucent and slightly caramelized, scraping the bottom of the pot with a wooden spoon.
- Add the tomato paste and garlic, cooking for 2 minutes until the paste turns a dark rust color. Pour in the red wine to deglaze the pan, scraping up all those flavorful brown bits.
- Return the beef and its juices to the pot. Add the beef broth, thyme, and bay leaves until the meat is mostly submerged.
- Cover and simmer on very low heat for 3 to 4 hours, or place in a 300°F oven. The beef is done when it is “fork-tender.” Remove the lid for the last 30 minutes if you want to thicken the cooking liquid into a lush sauce.
How to bake sugar cookies?

Why we love this
No food board is complete without a sweet finale, and a classic sugar cookie is the ultimate nostalgic treat. These cookies are a study in simple perfection: a soft, buttery center with slightly crisp, golden edges that snap delicately when broken. The scent of vanilla and toasted sugar is intoxicating, reminding everyone of childhood baking sessions. They act as a neutral yet delicious base for fruit preserves or can be enjoyed on their own as a sweet palate cleanser. Their pale, golden hue adds a touch of lightness to the aesthetic of your board.
Ingredients
- 2 3/4 cups all-purpose flour
- 1 teaspoon baking soda
- 1/2 teaspoon baking powder
- 1 cup unsalted butter, softened
- 1 1/2 cups white sugar
- 1 egg
- 1 teaspoon pure vanilla extract
How to make it
- Preheat your oven to 375°F (190°C). In a small bowl, whisk together the flour, baking soda, and baking powder to ensure the leavening agents are evenly distributed.
- In a large bowl, cream together the softened butter and sugar until the mixture is light, fluffy, and pale yellow. This aeration is key to a soft cookie texture.
- Beat in the egg and vanilla extract until fully incorporated. Gradually blend in the dry ingredients. If the dough feels too soft, chill it in the fridge for 20 minutes to prevent the cookies from spreading too thin.
- Roll rounded tablespoons of dough into balls and place them on an ungreased cookie sheet. For a classic look, lightly press them down with the bottom of a glass dipped in sugar.
- Bake for 8 to 10 minutes. The trick is to remove them when the edges are just barely golden but the centers still look slightly underdone. They will finish cooking on the hot baking sheet, resulting in that coveted soft-baked texture.
How to prepare shrimp skewers?
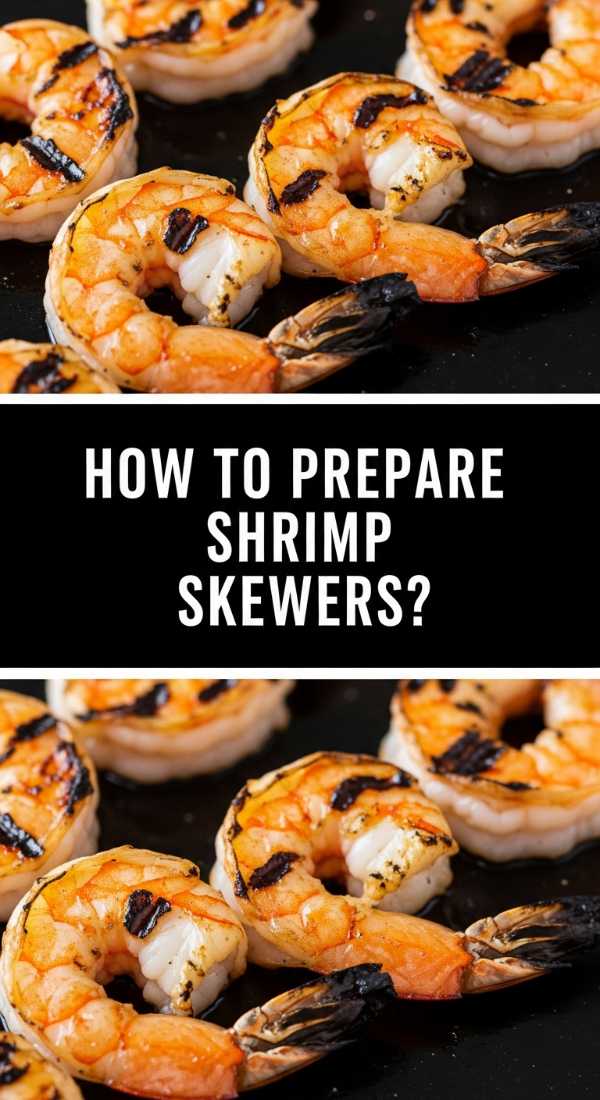
Why we love this
Shrimp skewers are the perfect “grab-and-go” element for a food board, offering a lean, snappy protein that is as beautiful as it is delicious. The shrimp take on a lovely pink curl when cooked, accented by charred grill marks that add a hint of smokiness. They carry flavors exceptionally well, whether it’s a zesty lemon-garlic marinade or a spicy chili glaze. The presentation on a skewer makes them easy to nestle into small spaces on your board, adding height and an interactive element that guests always appreciate.
Ingredients
- 1 lb large shrimp, peeled and deveined
- 3 tablespoons olive oil
- 3 cloves garlic, minced
- 1 teaspoon smoked paprika
- Zest of 1 lemon
- Wooden or metal skewers
- Fresh parsley for garnish
How to make it
- If using wooden skewers, soak them in water for at least 30 minutes before using to prevent them from burning on the grill or in the pan.
- In a medium bowl, whisk together the olive oil, minced garlic, smoked paprika, lemon zest, and a pinch of salt. Add the shrimp and toss to coat thoroughly. Let them marinate for no more than 15-20 minutes—any longer and the acid from the lemon will start to “cook” the delicate seafood.
- Thread 3-4 shrimp onto each skewer, piercing them through the thickest part and the tail to ensure they stay secure and cook evenly.
- Heat a grill pan or outdoor grill to medium-high heat. Lightly oil the grates to prevent sticking.
- Lay the skewers down and cook for about 2-3 minutes per side. The shrimp are done the moment they turn opaque and form a tight “C” shape. Overcooking will make them rubbery, so watch for that bright pink color change and remove them immediately.
Mastering the Board Layout
Now that you have your ten incredible components, the final step is assembly. Start by placing your largest items—like the roast beef bowl or the whole roasted chicken—on the board first. These act as your anchors. Next, fill in the spaces with your skewers, wraps, and steaks. Finally, use the cookies, salad, and mocktails to fill the gaps and provide pops of color. Remember, the key to a viral-worthy board is abundance; don’t be afraid to let things overlap and touch. Your masterpiece is ready to be shared, photographed, and most importantly, enjoyed!
Frequently Asked Questions
Everything you need to know about creating the perfect food board display.