
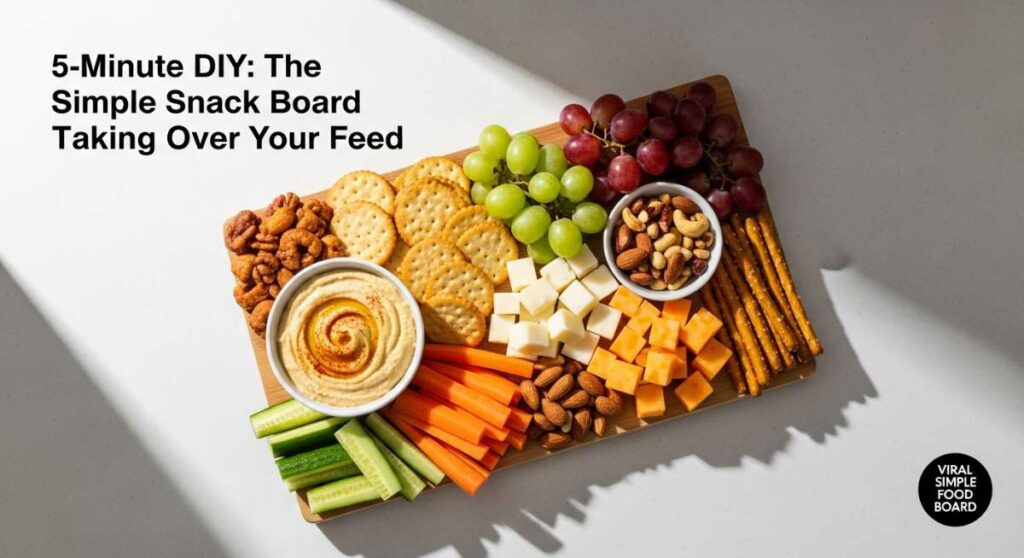
5-Minute DIY: The Simple Snack Board Taking Over Your Feed
There is something inherently magical about a meal that looks like a work of art but takes almost no effort to assemble. We’ve all seen those gorgeous, sprawling boards on our social feeds—the ones overflowing with vibrant colors, textures, and steam rising from perfectly cooked bites. They represent more than just food; they represent a lifestyle of effortless hosting and mindful eating that feels both luxurious and attainable. Whether you’re winding down after a long Tuesday or hosting your best friends for a weekend catch-up, the ‘mega-board’ is the ultimate way to bring people together.
The secret to a viral snack board isn’t just in the arrangement; it’s in the quality of the components. Instead of just crackers and cheese, we’re elevating the game by adding warm, savory elements that turn a snack into a feast. Imagine the scent of roasted garlic, the sound of a crispy potato skin snapping, and the sight of a perfectly seared steak sliced thin and ready to be shared. It’s about creating a sensory experience that lingers long after the last bite is gone. Let’s dive into the essential components that will make your board the talk of the town.
How to make creamy pasta?

Why we love this
There is nothing quite as comforting as the silky, velvet-like embrace of a perfectly executed creamy pasta. When the sauce clings to every curve of the noodle, it creates a rich, buttery mouthfeel that feels like a warm hug for your soul. The aroma of sautéed shallots and aged parmesan wafting through the kitchen is enough to make anyone’s mouth water, while the subtle hint of fresh nutmeg adds a complex depth that elevates the dish from simple to gourmet. It provides the perfect hearty anchor for a shared board, inviting everyone to twirl a fork and indulge in pure, carby bliss.
Ingredients
- 1 lb Fettuccine or Pappardelle
- 2 cups heavy cream
- 1/2 cup unsalted butter
- 1.5 cups freshly grated Parmesan cheese
- 2 cloves garlic, minced
- Fresh parsley, salt, and cracked black pepper
How to make it
- Bring a large pot of heavily salted water to a rolling boil; the water should taste like the sea to properly season the pasta from within.
- Cook your pasta until it is just shy of al dente, usually 1-2 minutes less than the package instructions, as it will finish cooking in the sauce.
- In a wide skillet over medium heat, melt the butter until it begins to foam, then add the minced garlic and sauté for 30 seconds until fragrant but not browned.
- Pour in the heavy cream and bring to a gentle simmer; do not let it reach a violent boil or the fat may separate. Let it reduce by about a third until it slightly thickens.
- Reduce heat to low and whisk in the Parmesan cheese in small handfuls, stirring constantly to ensure a smooth, emulsified texture without any clumps.
- Toss the pasta directly into the sauce, adding a splash of reserved pasta water to help the sauce bind to the noodles, and cook for one more minute until the sauce is glossy and thick.
How to cook juicy chicken?

Why we love this
Perfectly cooked chicken is a revelation of texture—a golden, crackling skin that gives way to meat so tender it practically melts. When you slice into a breast or thigh and see the juices run clear, you know you’ve achieved the ultimate culinary satisfaction. The herbaceous scent of rosemary and thyme infused into the meat creates an earthy, rustic profile that pairs beautifully with any side dish. It’s the versatile star of the board, offering a protein-packed bite that feels light yet deeply satisfying, especially when finished with a sprinkle of flaky sea salt that catches the light.
Ingredients
- 4 boneless, skin-on chicken breasts or thighs
- 2 tbsp olive oil
- 3 cloves garlic, smashed
- Fresh sprigs of rosemary and thyme
- Salt and lemon zest
How to make it
- Pat the chicken completely dry with paper towels; any moisture on the surface will create steam and prevent that desired golden-brown crust.
- Season generously with salt and pepper on both sides, letting it sit at room temperature for 15 minutes to ensure even cooking.
- Heat olive oil in a heavy-bottomed stainless steel or cast-iron skillet over medium-high heat until the oil shimmers and just begins to smoke.
- Place chicken skin-side down and press firmly with a spatula to ensure maximum contact; cook undisturbed for 5-7 minutes until the skin is deep golden and releases easily from the pan.
- Flip the chicken, add the garlic and herbs to the pan, and lower the heat to medium; baste the chicken with the infused oil for another 5-8 minutes.
- Use a meat thermometer to ensure the internal temperature reaches exactly 165°F (74°C), then let it rest for at least 10 minutes before slicing to allow the juices to redistribute.
How to bake crispy potatoes?

Why we love this
Crispy potatoes are the ultimate crowd-pleaser, offering a symphonic crunch followed by a fluffy, cloud-like center that dissolves on the tongue. The visual of those craggy, deep-amber edges promised a concentrated potato flavor that is intensified by the roasting process. There’s something primal and satisfying about the aroma of toasted starch and olive oil filling the home, signaling that comfort is on the way. On a snack board, these act as the perfect vehicle for dips, providing a structural integrity and a salty punch that keeps everyone reaching for just one more.
Ingredients
- 2 lbs Yukon Gold potatoes, cubed
- 1/4 cup extra virgin olive oil
- 1 tsp garlic powder
- 1 tsp smoked paprika
- Fresh rosemary and sea salt
How to make it
- Preheat your oven to 425°F (220°C) and place a large rimmed baking sheet inside to get screaming hot; this prevents sticking and starts the browning immediately.
- Parboil the potato cubes in salted water for 5-7 minutes until the exteriors are soft but the centers are still firm; drain and shake them vigorously in the pot to roughen up the edges.
- Toss the roughened potatoes with olive oil, garlic powder, and paprika until every crevice is coated in a thick, starchy paste.
- Carefully spread the potatoes onto the hot baking sheet in a single layer, ensuring they aren’t crowded, which would cause them to steam rather than crisp.
- Roast for 25-30 minutes, flipping halfway through with a metal spatula to ensure every side achieves a glass-like crunch and a rich mahogany color.
- Immediately toss with fresh rosemary and extra sea salt while the oil is still bubbling on the surface of the potatoes.
How to sear perfect steak?

Why we love this
A perfectly seared steak is the crown jewel of any savory board, boasting a dark, caramelized Maillard crust that hides a tender, ruby-red interior. The scent of rendering beef fat mixed with browning butter and scorched garlic is intoxicating, creating an atmosphere of high-end dining in your own living room. Each slice offers a complex balance of smoky, salty, and rich umami flavors that feel incredibly indulgent. It’s the kind of dish that commands attention, offering a luxurious bite that contrasts beautifully with lighter elements like salads or fresh fruit.
Ingredients
- 1.5 lb Ribeye or New York Strip (1.5 inches thick)
- 2 tbsp high-smoke point oil (like grapeseed)
- 3 tbsp unsalted butter
- 2 cloves garlic and 1 sprig of thyme
- Coarse kosher salt
How to make it
- Remove the steak from the fridge 45 minutes before cooking to bring it to room temperature, ensuring the center cooks at the same rate as the exterior.
- Season very aggressively with kosher salt; the salt needs to penetrate the thick cut to enhance the natural beef flavor.
- Heat a cast-iron skillet over high heat until it is white-hot; add the oil and wait until it is shimmering and just starting to smoke.
- Lay the steak away from you to avoid splatter and sear for 3-4 minutes without moving it, allowing a thick, dark crust to form.
- Flip the steak, then immediately add the butter, garlic, and thyme to the pan; as the butter melts, tilt the pan and spoon the foaming fat over the steak repeatedly.
- Cook until an internal thermometer reads 130°F for medium-rare, then transfer to a board and rest for 10 minutes to lock in the juices before carving against the grain.
How to make street tacos?
Why we love this
Street tacos bring a vibrant, festive energy to the table, featuring a kaleidoscope of colors from bright green cilantro to deep red salsas. The tactile experience of folding a warm, charred corn tortilla around succulent meat and zesty toppings is pure joy. You get the snap of raw onion, the creaminess of avocado, and the sharp hit of lime juice all in one concentrated, handheld bite. They are the perfect social food, allowing guests to customize their own experience while enjoying a flavor profile that is simultaneously smoky, spicy, and incredibly fresh.
Ingredients
- 1 lb flank steak or chicken thighs, diced small
- Small corn tortillas
- White onion, finely diced
- Fresh cilantro, chopped
- Lime wedges and radishes
How to make it
- Marinate your protein in a mix of lime juice, cumin, and chili powder for at least 30 minutes to tenderize the fibers and infuse deep flavor.
- Sauté the meat in a very hot skillet with a small amount of oil, working in batches to ensure the meat sears and browns rather than boiling in its own moisture.
- Warm the corn tortillas directly over a gas flame for 10-15 seconds per side using tongs until they are pliable and show charred black spots for an authentic smoky taste.
- Immediately place the warm tortillas in a clean kitchen towel or a tortilla warmer to keep them soft and steamy.
- Assemble the tacos by placing a generous spoonful of meat in the center, followed by a sprinkle of raw onions and a handful of cilantro.
- Serve with plenty of lime wedges on the side, as the acidity is crucial for cutting through the richness of the meat and brightening the entire dish.
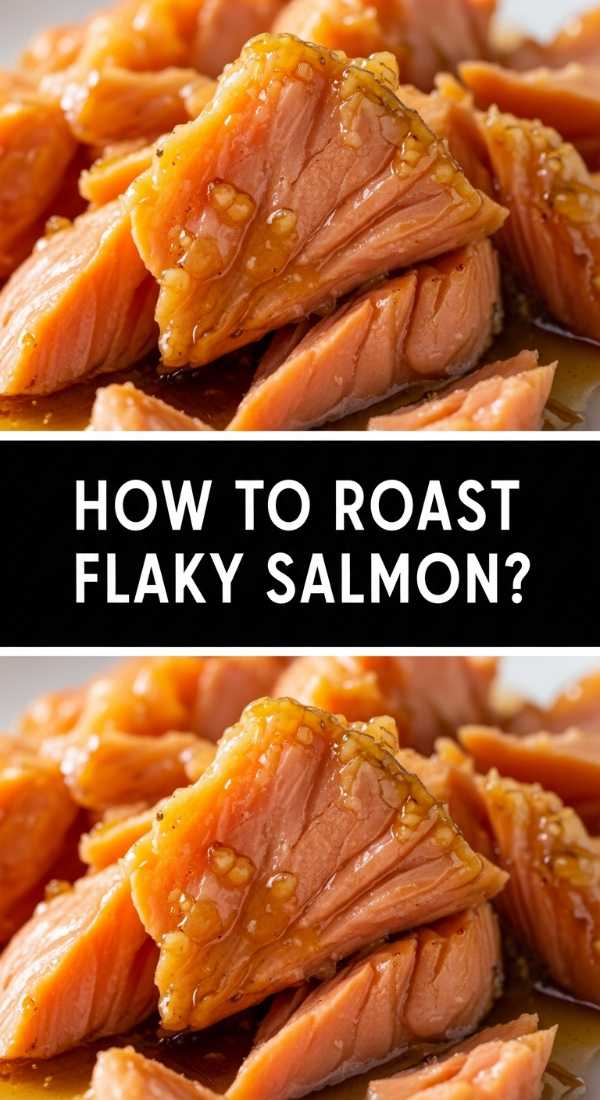
How to roast flaky salmon?

Why we love this
Roasted salmon is the epitome of elegant simplicity, offering a delicate, buttery texture that flakes away with the slightest pressure of a fork. The vibrant coral hue of the fish looks stunning against the rustic wood of a snack board, especially when garnished with bright green herbs and translucent lemon slices. As it roasts, the natural oils rise to the surface, creating a luscious sheen and a rich, savory aroma that is light yet deeply nourishing. It provides a sophisticated, healthful option that feels special and refined, making your board feel like a true gourmet spread.
Ingredients
- 1 large salmon fillet (center cut)
- 2 tbsp melted butter or olive oil
- 1 lemon, thinly sliced
- 2 tsp honey
- Fresh dill and black pepper
How to make it
- Preheat your oven to 400°F (200°C) and line a baking sheet with parchment paper for easy cleanup and to prevent the delicate skin from sticking.
- Whisk together the melted butter, honey, and a squeeze of lemon; brush this mixture generously over the top of the salmon to create a light glaze.
- Season the fillet with salt and pepper, then layer the thin lemon slices across the top to protect the meat from drying out and to infuse citrus notes.
- Roast for 12-15 minutes, depending on the thickness; the salmon is done when it is opaque on the outside and flakes easily with a fork in the center.
- For a professional finish, turn on the broiler for the last 60 seconds to slightly caramelize the honey glaze and brown the edges of the lemon slices.
- Remove from the oven and let rest for 5 minutes, then garnish with a forest of fresh dill before serving.
How to simmer hearty soup?

Why we love this
There is a profound sense of peace that comes from a simmering pot of soup, its steam carrying the concentrated essence of slow-cooked vegetables and savory broth. The deep, complex flavors develop over time, resulting in a liquid gold that warms you from the inside out with every spoonful. The texture is a medley of soft, tender components that have surrendered their individual flavors to create a harmonious whole. Serving a small bowl of hearty soup on a board adds an element of coziness and soul, making the meal feel grounded and complete.
Ingredients
- 1 quart high-quality bone broth or vegetable stock
- 2 carrots and 2 celery stalks, diced
- 1 onion, finely chopped
- 1 cup kale or spinach
- 1 can cannellini beans or cooked pasta
How to make it
- Sauté the onions, carrots, and celery (the mirepoix) in a heavy pot with olive oil over medium heat until the onions are translucent and the vegetables begin to soften.
- Add minced garlic and any dried herbs like thyme or bay leaves, stirring for one minute to release the fat-soluble aromas.
- Pour in the stock and bring the mixture to a boil, then immediately reduce the heat to low to maintain a very gentle simmer.
- Allow the soup to cook for at least 20-30 minutes; the low heat ensures the vegetables soften without falling apart and the flavors have time to marry.
- Stir in your greens and beans in the last 5 minutes of cooking so they retain their color and structural integrity.
- Season at the very end with salt, pepper, and a splash of apple cider vinegar or lemon juice to provide a bright finish that lifts the heavy flavors.
How to bake soft cookies?

Why we love this
A tray of soft-baked cookies is the ultimate nostalgic treat, filling the air with the intoxicating scent of caramelized sugar and warm vanilla. The sight of a slightly underbaked center and a golden, chewy edge is enough to make anyone feel like a kid again. When you pull them apart, the gooey chocolate pockets stretch and shimmer, promising a decadent experience that is both comforting and indulgent. Including these on your board adds a sweet finale that encourages guests to linger longer, turning a simple meal into a memorable celebration of flavor.
Ingredients
- 1 cup softened unsalted butter
- 3/4 cup sugar and 3/4 cup brown sugar
- 2 eggs and 1 tsp vanilla extract
- 2.25 cups all-purpose flour
- 1 tsp baking soda and 12 oz chocolate chips
How to make it
- Cream the butter and both sugars together for at least 3-5 minutes until the mixture is pale, light, and fluffy; this incorporates air for a softer lift.
- Beat in the eggs one at a time, followed by the vanilla, ensuring each is fully incorporated before adding the next.
- Sift the dry ingredients together and fold them into the wet mixture by hand using a spatula; stop the moment the white streaks of flour disappear to avoid overworking the gluten.
- Fold in the chocolate chips and chill the dough in the refrigerator for at least 2 hours; this prevents the cookies from spreading too thin and deepens the flavor.
- Scoop rounded tablespoons onto a parchment-lined sheet and bake at 350°F (175°C) for only 9-11 minutes, even if they look slightly raw in the middle.
- Let them cool on the hot baking sheet for 5 minutes to finish setting before moving to a wire rack; this creates that perfect soft-in-the-middle texture.
How to grill smash burgers?

Why we love this
Smash burgers are the pinnacle of burger perfection, featuring ultra-thin patties with craggy, lacy edges that are intensely browned and crispy. The contrast between the crunchy exterior and the juicy, tender interior is a masterclass in texture, especially when topped with a blanket of melted, gooey cheese. The smoky aroma of searing beef on a hot griddle is quintessential backyard bliss, promising a savory, salty punch that is incredibly satisfying. They bring a fun, casual, and high-energy vibe to your board, making it feel like a trendy gastropub experience right in your kitchen.
Ingredients
- 1 lb ground beef (80/20 fat ratio is essential)
- 4 brioche buns, buttered
- American cheese slices
- Dill pickles and thin-sliced onions
- Salt and pepper
How to make it
- Form the cold ground beef into loose 4-ounce balls; do not overwork the meat or pack it tightly, as you want the fat to stay intact.
- Heat a flat cast-iron griddle or heavy skillet over high heat until it is smoking; do not add oil, as the beef fat will provide all the lubrication needed.
- Place a meat ball on the hot surface and use a heavy-duty spatula (and a second tool to press down) to smash it completely flat until it is less than half an inch thick.
- Season the patty immediately with salt and pepper while it’s searing; cook for 2 minutes until the edges are dark brown and crispy.
- Scrape under the patty with a sharp metal spatula to keep the crust intact and flip it; immediately place a slice of cheese on top.
- Cover with a lid for 30 seconds to melt the cheese, then serve immediately on a toasted bun to maintain the contrast of the hot meat and cool toppings.
How to prep fresh salad?
[IMAGE_10]
Why we love this
A truly fresh salad is a masterclass in vibrancy, offering a crisp, cooling counterpoint to the richer, warmer elements of a snack board. The crunch of cold greens combined with the snap of garden-fresh vegetables creates a refreshing palate cleanser that keeps your taste buds excited for the next bite. The scent of bruised herbs and zesty vinaigrette is invigorating, bringing a bright, garden-fresh energy to the table. It’s the visual pop of green and red that ties the whole board together, making the meal feel balanced, thoughtful, and brimming with life.
Ingredients
- 5 oz mixed baby greens or arugula
- 1 cucumber, thinly sliced
- 1/2 cup cherry tomatoes, halved
- 1/4 cup feta cheese or shaved parmesan
- Lemon-tahini or balsamic vinaigrette
How to make it
- Wash your greens in ice-cold water and use a salad spinner to dry them completely; dressing will slide off wet leaves, resulting in a soggy, bland salad.
- Chill your salad bowl in the fridge for 10 minutes before assembling to keep the ingredients crisp for longer.
- Layer the greens at the bottom, then arrange the heavier vegetables like tomatoes and cucumbers on top so they don’t crush the delicate leaves.
- Dress the salad only seconds before serving, using just enough vinaigrette to lightly coat the leaves; the goal is a shimmering glow, not a puddle at the bottom.
- Use your hands or large tongs to gently toss the salad, ensuring the dressing is evenly distributed across every leaf and vegetable.
- Finish with a final sprinkle of cheese and a crack of fresh black pepper to add a savory note that complements the bright acidity of the dressing.
The Art of the Finished Board
Once you’ve mastered these individual components, the real magic happens in the assembly. A viral-worthy board is all about flow and abundance. Start by placing your larger bowls—like the creamy pasta or the hearty soup—in opposite corners to create balance. Fan out your sliced steak and juicy chicken in the center, and fill the remaining gaps with piles of crispy potatoes and fresh salad. The goal is to leave no wood showing, creating a tapestry of food that invites everyone to dig in. Remember, the best boards aren’t just about the food; they’re about the memories made while sharing it. Happy hosting!