

Hello, my loves! There is something so magical about a kitchen filled with the scent of fresh herbs and simmering sauces, isn’t there? It’s where we pour our heart into every stir of the spoon and every pinch of salt, creating more than just meals, but memories that linger long after the plates are cleared. I’ve spent so many afternoons scrolling through ideas, looking for that perfect spark of inspiration to share with you all, and I think I’ve finally found the ultimate collection of viral-worthy dishes that are as beautiful to look at as they are to eat.
Today, I am opening up my personal ‘Viral Food Ideas Board’ just for you, filled with recipes that have captured the hearts of foodies everywhere. Whether you’re hosting a sun-drenched garden party or just want to treat your family to a cozy, elevated weeknight dinner, these dishes are designed to bring a little extra sparkle to your table. So, grab your favorite apron and a glass of something chilled, and let’s dive into these delicious treasures together.
Secrets to the Most Flavorful Grilled Chicken Marinade

Why we love this
There is nothing quite like the sizzle of a well-marinated chicken breast hitting a hot grill, sending those mouth-watering aromas drifting through the garden air to greet your guests. This marinade is my little secret for transforming a simple protein into a tender, juicy masterpiece that practically melts in your mouth with every bite. It’s the kind of recipe that makes you want to dance in your kitchen while the flavors meld together perfectly over time. You’ll find that the balance of citrus and herbs creates a profile that is both nostalgic and excitingly fresh for your palate.
Ingredients
- 1/2 cup extra virgin olive oil
- 1/4 cup fresh lemon juice
- 3 cloves garlic, minced
- 1 tbsp honey
- 1 tsp smoked paprika
- 1 tsp dried oregano
- Salt and black pepper to taste
How to make it
- In a medium-sized glass bowl, whisk together the olive oil, lemon juice, minced garlic, and honey until the mixture is fully emulsified and smooth.
- Add the smoked paprika, dried oregano, salt, and pepper, stirring well to ensure all the spices are evenly distributed throughout the liquid base.
- Place your chicken pieces in a large resealable bag or a shallow dish and pour the marinade over them, ensuring every inch of the meat is well-coated.
- Seal the bag or cover the dish and refrigerate for at least 4 hours, though overnight is best for the deepest flavor penetration.
- Preheat your grill to medium-high heat, remove the chicken from the marinade, and grill for 6-8 minutes per side until the internal temperature reaches 165°F.
The Most Refreshing Pasta Salad For Your Next Potluck

Why we love this
When the sun is high and the air is warm, a heavy meal is the last thing on anyone’s mind, which is why this pasta salad is such a gem. It is a vibrant tapestry of colors and textures that brings a sense of joyful brightness to any picnic table or backyard gathering you host. I love how the dressing clings to every curve of the pasta, ensuring that each mouthful is a balanced burst of vinegar-zipped goodness and herb-flecked delight. It is the ultimate crowd-pleaser that looks just as beautiful in a ceramic bowl as it tastes when shared with the ones you love.
Ingredients
- 1 lb rotini or fusilli pasta
- 1 cup cherry tomatoes, halved
- 1 cucumber, diced
- 1/2 red onion, finely chopped
- 1/2 cup kalamata olives, sliced
- 1/2 cup feta cheese crumbles
- 1/2 cup Italian vinaigrette dressing
How to make it
- Bring a large pot of salted water to a boil and cook the pasta according to the package directions until it reaches a perfect al dente texture.
- Drain the pasta and rinse it immediately under cold water to stop the cooking process and cool the noodles down for the salad base.
- In a large mixing bowl, combine the cooled pasta with the cherry tomatoes, diced cucumbers, red onions, and sliced kalamata olives.
- Drizzle the Italian vinaigrette over the top and toss gently with large spoons until every ingredient is shimmering with the dressing.
- Sprinkle the feta cheese over the top and refrigerate for at least one hour before serving to let the flavors marry and the salad become perfectly chilled.
How To Make The Most Flavorful Shrimp Tacos At Home

Why we love this
Taco night is a sacred tradition in my home, but these shrimp tacos take the experience to an entirely new level of coastal culinary bliss. There is a specific kind of magic that happens when succulent shrimp meet a smoky spice rub and are topped with a cool, crunchy slaw. Every bite feels like a tiny vacation to a sun-drenched beach, wrapped in a warm corn tortilla and drizzled with a bit of extra lime. It is a quick, healthy, and incredibly flavorful way to show your family just how much you care through a truly delicious, hand-held meal.
Ingredients
- 1 lb large shrimp, peeled and deveined
- 2 tsp chili powder
- 1 tsp cumin
- 1/2 tsp garlic powder
- 8 small corn tortillas
- 2 cups shredded cabbage mix
- 1/4 cup fresh cilantro, chopped
- Lime wedges for serving
How to make it
- In a small bowl, mix the chili powder, cumin, and garlic powder together, then toss the shrimp in the spice mixture until they are evenly coated.
- Heat a large skillet over medium-high heat with a drizzle of oil and sauté the shrimp for 2-3 minutes per side until they turn pink and opaque.
- While the shrimp are cooking, lightly char the corn tortillas over an open gas flame or in a dry pan until they are warm and pliable.
- Assemble the tacos by placing 3-4 shrimp in each tortilla, followed by a generous handful of the shredded cabbage mix.
- Garnish with fresh cilantro and a squeeze of lime juice right before serving to bring out the bright, zesty notes of the dish.
Healthy Mediterranean Bowls That Taste Better Than Takeout

Why we love this
If you are looking for a meal that feels like a warm hug for your body, look no further than these vibrant, nutrition-packed Mediterranean bowls. They are my go-to when I need a reset, offering a symphony of fresh cucumbers, salty feta, and perfectly seasoned grains that satisfy every single craving. Unlike takeout, you can control every sprinkle of spice, making sure it’s exactly how you like it, while knowing you’re nourishing yourself with wholesome ingredients. It’s a beautiful, colorful bowl of sunshine that makes healthy eating feel like the most luxurious treat you could ever give yourself.
Ingredients
- 1 cup quinoa or brown rice, cooked
- 1 cup chickpeas, rinsed and drained
- 1 cup diced cucumber
- 1/2 cup cherry tomatoes, halved
- 1/4 cup red onion, thinly sliced
- 2 tbsp hummus
- 1 tbsp tahini sauce
How to make it
- Prepare your base of quinoa or brown rice according to the package instructions and divide it evenly among four serving bowls.
- Arrange the chickpeas, diced cucumbers, cherry tomatoes, and red onions in separate sections on top of the grains for a beautiful presentation.
- Place a generous dollop of creamy hummus in the center of each bowl to serve as a rich, savory anchor for the other fresh ingredients.
- Drizzle the tahini sauce over the entire bowl in a zigzag pattern to add a nutty, velvety finish to the dish.
- Serve immediately or pack into meal prep containers for a healthy, delicious lunch that will make your coworkers absolutely envious.
The Absolute Best Way To Grill A Perfect Cheeseburger

Why we love this
There is a reason the classic cheeseburger is an American icon, but mastering the grill to get that perfect crust and juicy interior is an art form. This method ensures that every patty is seasoned to perfection, with cheese that drapes over the edges like a molten blanket of pure savory joy. I truly believe that a burger made with love and attention to detail is the ultimate way to celebrate a summer afternoon with your closest friends. When you take that first bite and the juices mingle with the toasted bun, you’ll understand why this is the only way I’ll ever grill them.
Ingredients
- 1.5 lbs ground beef (80/20 blend)
- 4 slices sharp cheddar cheese
- 4 brioche buns, sliced
- 1 tsp salt
- 1 tsp black pepper
- Butter for toasting the buns
- Optional: Lettuce, tomato, and onion
How to make it
- Divide the ground beef into four equal portions and gently shape them into patties that are slightly wider than your buns, making a small thumbprint indent in the center.
- Generously season both sides of each patty with salt and pepper right before they hit the heat to ensure the seasoning stays put.
- Heat your grill to high and place the patties on the grates, cooking for about 4-5 minutes on the first side without pressing down on them.
- Flip the burgers and immediately place a slice of cheddar cheese on each patty, allowing it to melt while the second side cooks for another 3-4 minutes.
- Lightly butter the brioche buns and toast them on the grill for 30 seconds, then assemble the burgers with your favorite fresh toppings.
The Crispiest Baked Zucchini Fries You Will Ever Eat

Why we love this
For those moments when you crave something salty and crispy but want to keep things light and veggie-forward, these zucchini fries are an absolute game-changer. They have a golden, panko-crusted exterior that shatters beautifully between your teeth, giving way to the tender, mild sweetness of the fresh zucchini inside. I love serving these as a side dish or even a midnight snack because they feel indulgent without ever weighing you down or making you feel sluggish. They are a testament to the fact that simple garden vegetables can be transformed into something truly spectacular with just a little bit of kitchen love.
Ingredients
- 2 medium zucchinis, cut into sticks
- 1/2 cup all-purpose flour
- 2 eggs, beaten
- 1 cup Panko breadcrumbs
- 1/2 cup grated Parmesan cheese
- 1 tsp garlic powder
- Salt and pepper to taste
How to make it
- Preheat your oven to 425°F and line a large baking sheet with parchment paper to prevent sticking and ensure even browning.
- Set up a breading station with three shallow bowls: one for flour, one for the beaten eggs, and one for the mixture of Panko, Parmesan, and garlic powder.
- Dredge each zucchini stick in the flour, dip it into the egg wash, and then press it firmly into the Panko mixture until fully coated.
- Arrange the coated zucchini sticks on the prepared baking sheet in a single layer, making sure they do not touch so they can crisp up properly.
- Bake for 15-20 minutes, flipping halfway through, until they are golden brown and irresistibly crunchy, then serve immediately with your favorite dipping sauce.
Easy Homemade Berry Cobbler With A Golden Butter Crust

Why we love this
A warm berry cobbler is the dessert equivalent of a soft cashmere blanket, wrapping you in comfort and sweetness at the end of a long, busy day. The way the berries bubble up through the golden, buttery crust creates a jammy, intense fruit flavor that is perfectly balanced by a scoop of vanilla bean ice cream. It is a rustic, unpretentious dish that celebrates the bounty of the season, reminding us to slow down and savor the sweetness that life has to offer. Sharing a spoonful of this with a friend over a cup of tea is one of my favorite ways to spend an evening.
Ingredients
- 4 cups mixed berries (blueberries, raspberries, blackberries)
- 1/2 cup granulated sugar
- 1 cup all-purpose flour
- 1 cup milk
- 1/2 cup unsalted butter, melted
- 1 tbsp baking powder
- 1/2 tsp salt
How to make it
- Preheat your oven to 375°F and pour the melted butter into the bottom of a 9×9 inch baking dish, spreading it evenly across the surface.
- In a mixing bowl, whisk together the flour, sugar, baking powder, and salt, then stir in the milk until a smooth batter forms.
- Pour the batter directly over the melted butter in the baking dish, but do not stir them together; let the batter rest naturally on the butter.
- Gently scatter the mixed berries over the top of the batter, resisting the urge to push them down or mix them in.
- Bake for 40-45 minutes until the crust has risen around the fruit and turned a beautiful, deep golden brown, then serve warm.
Street Corn Salad That Everyone Will Ask For The Recipe

Why we love this
This street corn salad is a vibrant explosion of flavor that captures the essence of a summer festival in every single spoonful you take. It takes all the smoky, creamy, and tangy elements of traditional elote and tosses them together into a convenient dish that is so easy to share. Everyone who tries it will beg you for the recipe, drawn in by the combination of charred corn, salty cotija, and that signature kick of chili lime. It is a bold, festive addition to any menu that brings people together and sparks conversation about how something so simple can be so incredibly delicious.
Ingredients
- 4 cups corn (fresh, canned, or frozen)
- 1/4 cup mayonnaise
- 1/4 cup sour cream or Greek yogurt
- 1/2 cup Cotija cheese, crumbled
- 1/4 cup fresh cilantro, chopped
- 1 tsp chili powder
- 1 lime, juiced
How to make it
- If using fresh corn, grill the cobs until charred and cut off the kernels; if using canned or frozen, sauté them in a hot skillet until they develop golden-brown spots.
- In a large bowl, whisk together the mayonnaise, sour cream, lime juice, and chili powder until the dressing is smooth and creamy.
- Add the charred corn to the bowl and toss thoroughly so that every kernel is coated in the flavorful dressing mixture.
- Fold in the crumbled Cotija cheese and the chopped cilantro, being careful not to over-mix so the cheese stays in visible chunks.
- Taste and adjust the seasoning with extra lime or chili if desired, and serve either warm or chilled as a side dish.
Pan Seared Salmon With The Most Amazing Lemon Butter Sauce
Why we love this
Salmon is such a delicate and noble fish, and dressing it in a silken lemon butter sauce is the highest compliment you can pay to its flavor. The pan-sear creates a crispy skin that contrasts beautifully with the flaky, melt-in-your-mouth texture of the fish, making every bite feel like a fine dining experience. It is a sophisticated yet surprisingly easy meal to prepare when you want to impress someone special or simply treat yourself to a high-quality dinner. The bright citrus notes dance across your tongue, highlighting the richness of the butter in a way that feels balanced and exquisitely refined.
Ingredients
- 2 salmon fillets (6 oz each)
- 2 tbsp unsalted butter
- 1 tbsp olive oil
- 2 cloves garlic, minced
- 2 tbsp fresh lemon juice
- 1 tsp fresh parsley, chopped
- Salt and pepper to taste
How to make it
- Pat the salmon fillets dry with a paper towel and season both sides generously with salt and pepper to ensure a good sear.
- Heat the olive oil in a non-stick skillet over medium-high heat and place the salmon skin-side down, cooking for 4-5 minutes until the skin is crispy.
- Carefully flip the fillets and cook for an additional 2-3 minutes on the other side until the fish is just cooked through and flaky.
- Remove the salmon from the pan and set aside; in the same pan, melt the butter and sauté the minced garlic until fragrant.
- Stir in the lemon juice and parsley, then drizzle the warm sauce over the salmon fillets before serving them with a slice of fresh lemon.
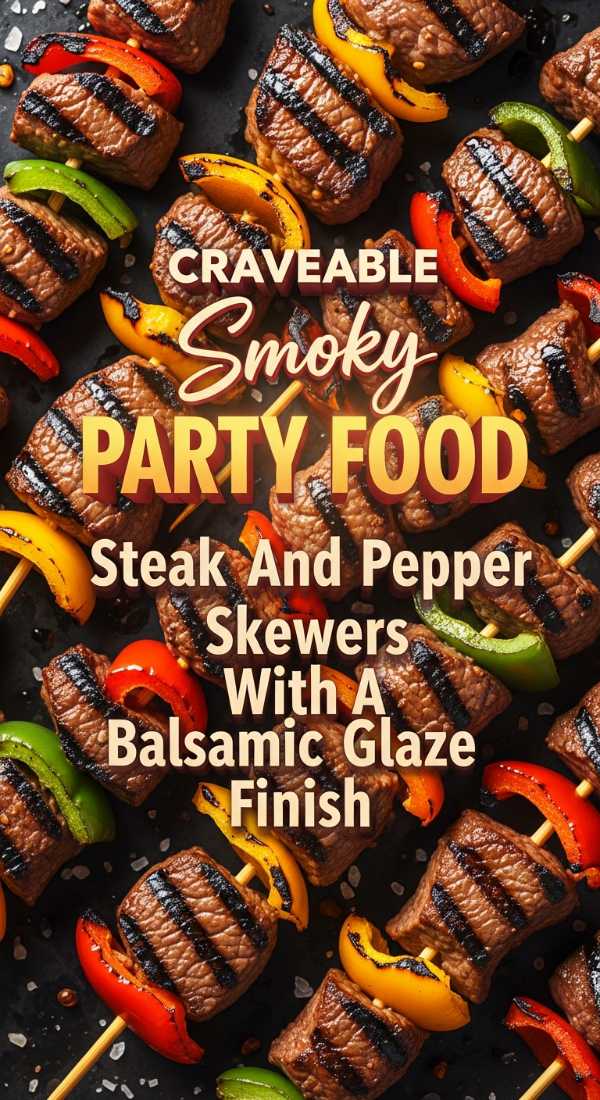
Steak And Pepper Skewers With A Balsamic Glaze Finish
[IMAGE_10]
Why we love this
These steak and pepper skewers are a masterclass in balance, pairing the deep, savory richness of high-quality beef with the bright sweetness of charred bell peppers. The balsamic glaze adds a sophisticated finish, creating a sticky, tangy coating that caramelizes beautifully under the heat of the grill or the broiler’s flame. There is something inherently social about eating food off a stick, making these the perfect choice for a lively dinner party where laughter flows as freely as the wine. Each skewer is a perfectly portioned bite of happiness that looks just as stunning on the platter as it tastes on your plate.
Ingredients
- 1 lb sirloin steak, cut into 1-inch cubes
- 2 bell peppers (any color), cut into chunks
- 1/2 red onion, cut into chunks
- 1/4 cup balsamic glaze
- 2 tbsp olive oil
- Salt and pepper to taste
- Wooden or metal skewers
How to make it
- If using wooden skewers, soak them in water for at least 30 minutes prior to use to prevent them from burning on the grill.
- Thread the steak cubes, bell pepper chunks, and red onion pieces onto the skewers in an alternating pattern for a colorful and balanced presentation.
- Brush the assembled skewers with olive oil and season them generously with salt and pepper on all sides to enhance the natural flavors.
- Grill the skewers over medium-high heat for 8-10 minutes, turning occasionally, until the steak reaches your desired level of doneness and the veggies are charred.
- During the last minute of cooking, brush the balsamic glaze over the skewers and let it bubble and thicken slightly before removing from the heat.
A Little Note From My Heart to Yours
Cooking is such a beautiful journey, and I hope these recipes bring as much joy to your kitchen as they have to mine. Remember, the most important ingredient is always the love you put into the process. I can’t wait to see your versions of these viral favorites, so please share your photos and stories with me! Until next time, keep dreaming, keep cooking, and stay wonderful, my loves.
Frequently Asked Questions
Can I make these recipes ahead of time? Many of these, like the pasta salad and the chicken marinade, are actually better when prepared ahead! For the grilled items, I recommend prepping the ingredients and cooking them fresh for the best texture.
What can I substitute for shrimp if I have an allergy? You can easily substitute the shrimp with firm white fish, chicken strips, or even grilled cauliflower for a vegetarian version of the tacos!
How do I store leftovers? Most of these dishes can be stored in an airtight container in the refrigerator for 3-4 days. For the berry cobbler, it’s best enjoyed within 2 days to maintain the crust’s texture.