
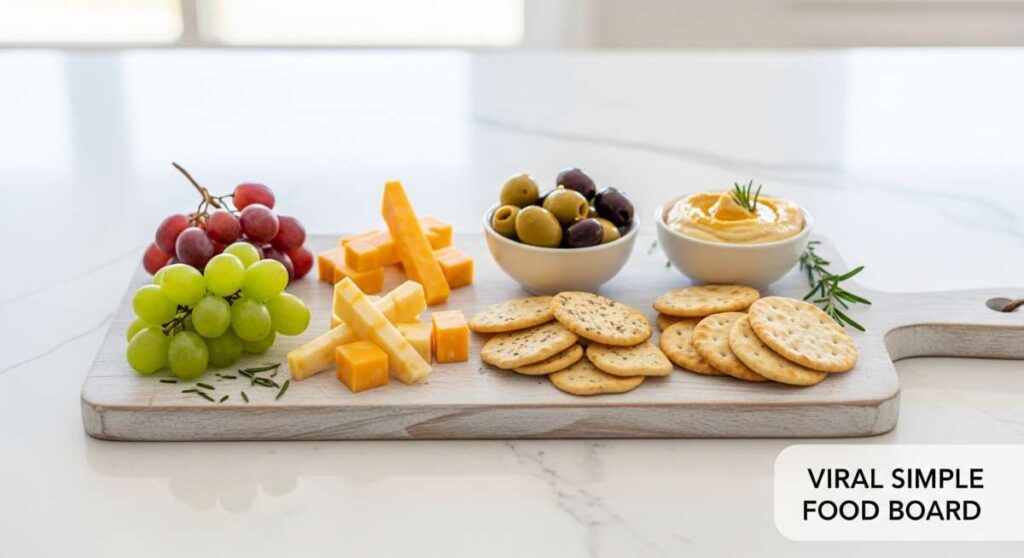
How to Build a Viral Snack Board with Just 5 Ingredients
There is something inherently magical about the way food brings people together. Whether it’s a late-night gossip session with your best friends or a sunny afternoon on the patio, a well-curated snack board acts as the ultimate centerpiece, sparking conversation and satisfied sighs. I remember the first time I put together a ‘viral’ style board; it wasn’t about the cost or the complexity, but the way the colors popped against the wood and the way everyone’s eyes lit up when they saw their favorites arranged so beautifully.
Creating a viral simple food board is an art form that anyone can master. It’s about balance—pairing something salty with something sweet, something crunchy with something creamy. You don’t need a pantry full of exotic ingredients to make an impact. In fact, some of the most shared boards on social media are the ones that celebrate simplicity. Today, I’m walking you through some of my favorite components that turn a basic gathering into a curated culinary experience.
How to make rotel dip?

Why we love this
This dip is the ultimate comfort food, offering a velvety, molten texture that clings perfectly to every single chip. As it warms, the aroma of savory beef and zesty green chilies fills the room, instantly signaling that the party has started. There is a nostalgic joy in the way the spice of the tomatoes cuts through the rich, creamy cheese, creating a symphony of flavors that feels both indulgent and familiar. It’s the kind of dish that disappears in minutes because it hits every single craving for salt, heat, and creaminess all at once.
Ingredients
- 1 lb Ground Beef
- 1 block (16 oz) Velveeta or processed cheese
- 1 can (10 oz) Ro-Tel Diced Tomatoes and Green Chilies
- 1 tsp Taco Seasoning
- Fresh Cilantro for garnish
How to make it
- Begin by browning your ground beef in a large skillet over medium-high heat. Use a wooden spoon to break the meat into very small, uniform crumbles. This ensures a consistent texture throughout the dip. Cook until no pink remains, which usually takes about 7-9 minutes.
- Once the meat is fully cooked, drain the excess fat carefully. Too much grease will prevent the cheese from emulsifying properly. Return the skillet to low-medium heat and sprinkle in the taco seasoning, stirring for 1 minute to bloom the spices.
- Cube your processed cheese into 1-inch pieces. This is a professional tip to ensure even melting and prevent the bottom from scorching. Add the cheese cubes to the skillet.
- Pour in the entire can of Ro-Tel, including the juices. The acidity in the tomato juice is crucial for thinning the dip to a perfect, pourable consistency.
- Stir constantly with a silicone spatula using a folding motion. Keep the heat low; if the cheese boils, it can become grainy. Continue until the mixture is completely smooth and glossy.
- Transfer to a pre-warmed slow cooker on the ‘warm’ setting to keep it dip-ready for hours, and top with freshly chopped cilantro for a pop of color and brightness.
How to prepare spring lunches?

Why we love this
Spring lunches are all about the transition from heavy winter stews to light, vibrating flavors that celebrate the earth waking up. Imagine the satisfying crunch of snap peas and the peppery bite of radishes, all brought together by a dressing that smells of fresh lemon zest and garden mint. It feels restorative to eat food that matches the brightening sky outside, leaving you feeling energized rather than weighed down. The textures are crisp, the colors are vivid greens and soft pinks, and every bite feels like a fresh start.
Ingredients
- Mixed Spring Greens (Arugula, Spinach)
- Shaved Asparagus
- Sliced Radishes
- Soft Boiled Eggs
- Lemon Tahini Dressing
How to make it
- Start by prepping your vegetables to ensure the most delicate texture. Use a vegetable peeler to shave the raw asparagus into thin ribbons. This technique removes the woodiness and highlights the vegetable’s natural sweetness.
- Wash your spring greens in ice-cold water and use a salad spinner to dry them thoroughly. Wet greens will cause the dressing to slide off, resulting in a soggy lunch.
- To achieve the perfect jammy soft-boiled egg, bring a pot of water to a rolling boil. Carefully lower the eggs in and boil for exactly 6 minutes and 30 seconds. Immediately transfer them to an ice bath for 5 minutes. This stops the cooking and ensures a vibrant, custardy yolk.
- Slice your radishes as thinly as possible—ideally with a mandoline—to add a sharp, peppery crunch that isn’t overpowering.
- In a small bowl, whisk together tahini, fresh lemon juice, a splash of maple syrup, and warm water until it reaches the consistency of heavy cream.
- Assemble by tossing the greens and asparagus ribbons lightly in half the dressing. Top with radish slices and the halved eggs, then drizzle with the remaining dressing and a pinch of flaky sea salt.
How to cook dirty spaghetti?

Why we love this
Dirty spaghetti is the soul-food cousin of the classic pasta night, bursting with deep, earthy umami notes and a hint of spice that lingers on the tongue. The aroma of sautéed bell peppers, onions, and celery—the holy trinity—forms a fragrant base that makes the entire kitchen feel warm and inviting. As the noodles soak up the savory drippings from the meat and spices, they transform from plain pasta into threads of pure flavor. It is a hearty, rustic dish that feels like a big hug, perfect for those evenings when you need something substantial and incredibly satisfying.
Ingredients
- 1 lb Spaghetti noodles
- 1 lb Ground Pork or Sausage
- 1 Bell Pepper, finely diced
- 1 Onion, finely diced
- 2 tbsp Cajun seasoning
How to make it
- Bring a large pot of heavily salted water to a boil. Professionals say the water should taste like the sea; this is your only chance to season the pasta itself. Cook the spaghetti until it is two minutes shy of al dente.
- While the pasta cooks, heat a large cast-iron skillet over medium heat. Add the ground pork or sausage and brown it thoroughly. Use a masher to get the meat into fine bits so it clings to the noodles.
- Add the diced bell pepper and onion directly into the meat drippings. Sauté for 5-6 minutes until the vegetables are translucent and have picked up the brown bits (fond) from the bottom of the pan.
- Stir in the Cajun seasoning. Toasting the spices in the fat for 60 seconds before adding liquid unlocks the oils and intensifies the flavor.
- Before draining the pasta, reserve 1 cup of the starchy pasta water. This is the secret to a silky sauce. Drain the noodles and add them to the skillet with the meat and veg.
- Add the reserved pasta water and turn the heat to high. Toss vigorously for 2 minutes. The starch in the water will emulsify with the fats to create a ‘dirty’ sauce that coats every strand perfectly.
How to make baseball snacks?

Why we love this
Baseball snacks evoke memories of warm stadium lights, the crack of a bat, and the simple pleasure of handheld treats that are meant to be shared. There is a delightful contrast between the heavy saltiness of roasted peanuts and the buttery, caramel sweetness of popcorn or Cracker Jacks. These snacks are designed for mindless, happy grazing—the kind of food where you reach into a bowl and find a different texture every time. The smell of toasted nuts and sugar is synonymous with summer fun and communal cheering.
Ingredients
- Pretzel Twists
- Dry Roasted Peanuts
- Caramel Corn
- Red Licorice bites
- Chocolate-covered sunflower seeds
How to make it
- To elevate standard baseball snacks, start by lightly toasting your dry roasted peanuts in a pan for 3-4 minutes over medium heat. This refreshes the oils and makes them smell like a professional concession stand.
- In a large mixing bowl, combine the pretzels and caramel corn. Use a 1:1 ratio for the perfect balance of sweet and salty.
- For a viral look, incorporate ‘team colors’ using chocolate-covered sunflower seeds or M&Ms. This adds a pop of visual interest that makes the snack board look intentional.
- Chop the red licorice into half-inch bites. This makes them easier to grab by the handful and ensures they distribute evenly through the mix.
- To prevent the popcorn from getting soft, wait until just before serving to mix the ingredients together.
- Serve in individual parchment paper cones or a large galvanized bucket to lean into the nostalgic stadium aesthetic.
How to toss summer salads?

Why we love this
A perfectly tossed summer salad is a masterclass in refreshment, offering a cooling reprieve from the afternoon sun. The scent of torn basil and sun-ripened tomatoes is intoxicating, reminding us of garden harvests and slow, breezy days. We love the way a well-balanced vinaigrette makes the natural sugars in summer fruit—like peaches or berries—sing against the saltiness of feta or goat cheese. It’s a dish that looks like a watercolor painting on the plate and feels like a burst of pure sunshine with every forkful.
Ingredients
- Fresh Arugula
- Sliced Strawberries or Peaches
- Crumbled Feta Cheese
- Candied Pecans
- Balsamic Glaze
How to make it
- Select the freshest produce possible; a summer salad is only as good as its ingredients. Chill your fruit in the fridge before slicing to ensure it stays firm and refreshing.
- Place your arugula in a very large bowl—much larger than you think you need. This allows for ‘lofting’ the leaves, which prevents them from being crushed.
- Drizzle a high-quality extra virgin olive oil and a pinch of salt over the greens first. Use your hands to gently massage the oil into the leaves. This creates a barrier so the acid in the vinegar doesn’t wilt the greens immediately.
- Add the sliced fruit and nuts. Avoid over-mixing once the fruit is added to prevent staining the greens with fruit juice.
- Add the cheese last. If you toss the cheese too much, it breaks down and makes the salad look muddy rather than clean and crisp.
- Finish with a decorative drizzle of thick balsamic glaze in a zig-zag pattern across the top for that professional, viral-ready presentation.
How to prep spring meals?

Why we love this
Prepping spring meals is an act of self-care that sets the tone for a productive and vibrant week. There is a tactile joy in snapping the ends off fresh green beans or zesting a bright lime into a container of quinoa. We love the organization of a fridge filled with glass containers showcasing a rainbow of seasonal produce like purple kale, bright orange carrots, and pale green cabbage. It turns the ‘chore’ of cooking into an effortless assembly of flavors that makes you feel light, healthy, and completely in tune with the season.
Ingredients
- Quinoa or Farro
- Roasted Chicken Breast or Tofu
- Blanched Snap Peas
- Pickled Red Onions
- Herb-infused Vinaigrette
How to make it
- Batch-cook your base grain (quinoa or farro) at the start of the week. Rinse the grains thoroughly under cold water before boiling to remove saponins, which can cause a bitter taste. Cook in vegetable broth instead of water for extra depth.
- Prepare your protein using a neutral seasoning like lemon, garlic, and salt. This allows you to change the flavor profile of your meals throughout the week without clashing.
- Master the ‘Blanch and Shock’ technique for your green vegetables. Boil snap peas for 2 minutes until bright green, then immediately plunge them into ice water. This preserves the ‘snap’ and the vivid color for days in the fridge.
- Make a quick pickle of red onions by soaking thin slices in apple cider vinegar and sugar for 30 minutes. These add a bright acidity that cuts through the earthiness of the grains.
- Store components in separate airtight containers. Mixing them too early leads to flavor transfer and sogginess.
- When ready to eat, layer the grains, protein, and veg, then finish with a fresh herb dressing to ‘wake up’ the prepped ingredients.
How to make squishy dumplings?

Why we love this
The texture of a ‘squishy’ dumpling is one of life’s greatest culinary pleasures—a delicate, translucent skin that yields to a succulent, savory interior. As you bite through the tender dough, a burst of warm, aromatic broth and ginger-scented meat greets your palate. There is something incredibly therapeutic about the process of folding the pleats, and the sight of steam rising from a bamboo basket is the epitome of cozy, handmade comfort. It’s a sensory experience that combines soft, pillowy mouthfeel with intense, complex flavors.
Ingredients
- Dumpling Wrappers (Store-bought or handmade)
- Ground Pork or Shrimp
- Minced Cabbage (salted and squeezed dry)
- Grated Ginger and Garlic
- Sesame Oil and Soy Sauce
How to make it
- Prepare the filling by mixing the meat, ginger, garlic, and seasonings. Crucial tip: Mix the filling in one direction (clockwise) for 3-4 minutes until it becomes tacky and paste-like. This ensures the filling stays together in a ‘ball’ rather than crumbling.
- Place a small teaspoon of filling in the center of a wrapper. Moisten the edges with a finger dipped in water.
- Fold the wrapper and create 4-5 pleats on one side only. Press firmly to seal. The pleats aren’t just for looks; they create ‘pockets’ that hold onto dipping sauce.
- To get the ‘squishy’ steamed texture, use a bamboo steamer lined with parchment paper or cabbage leaves to prevent sticking.
- Bring water to a simmer under the steamer. Place the dumplings inside, ensuring they do not touch each other. Steam for 8-10 minutes over medium heat.
- The visual cue for doneness is the wrapper becoming slightly translucent and clinging to the shape of the filling. Serve immediately with a side of chili oil.
How to plan spring dinners?

Why we love this
Planning spring dinners is about embracing the longer days and the desire to spend less time over a hot stove and more time enjoying the sunset. We love the shift toward ‘sheet pan’ meals and light pastas that feature the season’s heavy hitters like artichokes and leeks. The aroma of roasting lamb with rosemary or a delicate lemon-butter salmon wafting through an open window is the essence of spring. It’s a time for meals that feel elegant yet effortless, allowing the natural quality of the ingredients to shine through without heavy sauces.
Ingredients
- Seasonal Proteins (Salmon, Lamb, or Chicken)
- New Potatoes
- Fresh Herbs (Dill, Parsley, Mint)
- Leeks or Scallions
- White Wine for pan sauces
How to make it
- Focus on ‘one-pan’ or ‘one-pot’ recipes to minimize cleanup. When planning, pair ingredients that have similar cooking times, such as thin asparagus spears and salmon fillets.
- Incorporate ‘brighteners’ into every meal plan. This means always having lemons, fresh herbs, and a light vinegar on hand to finish dishes.
- Utilize the ‘Low and Slow’ method for spring meats like lamb to keep them tender, or the ‘High and Fast’ method for spring vegetables to keep them vibrant.
- Prep your aromatics (chopping leeks, mincing garlic) in the morning so the actual cooking process takes less than 20 minutes in the evening.
- Plan for ‘Al Fresco’ compatibility. Choose dishes that still taste great at room temperature, as spring evenings can be unpredictable.
- Balance your plate by ensuring 50% of the meal is comprised of seasonal greens or lightly sautéed spring vegetables.
How to top cherry cakes?

Why we love this
A cherry cake is only as good as its crowning glory, and the right topping can transform a simple sponge into a viral-worthy masterpiece. We love the visual drama of glossy, dark red cherries nestled against a snowy white frosting or a golden-brown crumble. The scent of sweet-tart fruit cooking down into a thick syrup is nostalgic and deeply comforting. Whether it’s a sophisticated glaze or a rustic almond streusel, the topping provides that essential textural contrast that makes every slice of cake a multi-layered delight.
Ingredients
- Fresh or Frozen Cherries (pitted)
- Cornstarch and Sugar
- Lemon Juice
- Heavy Cream or Cream Cheese for frosting
- Toasted Almond Slices
How to make it
- Create a ‘Cherry Compote’ by simmering pitted cherries with sugar and a splash of lemon juice. Mix a teaspoon of cornstarch with water (a slurry) and stir it in to thicken the juices into a glossy, translucent syrup.
- Let the compote cool completely before topping. If you apply warm cherries to a cake, the heat will melt the structure of the cake or frosting.
- For a professional ‘viral’ look, use a piping bag to create a border of stiff cream cheese frosting around the top edge of the cake. This acts as a ‘dam’ to hold the cherry filling in the center.
- If using fresh cherries as a garnish, leave the stems on for a rustic, high-end bakery aesthetic. Lightly brush them with a simple syrup to give them a camera-ready shine.
- Add a textural element like toasted flaked almonds or a dusting of powdered sugar. The white sugar against the dark red cherries creates a beautiful high-contrast look.
- For a ‘naked’ cake style, allow some of the cherry syrup to drip naturally down the sides for an effortless, artisanal feel.
How to bake cherry treats?

Why we love this
Baking with cherries is a celebration of summer’s bounty, filling the house with a sweet, jammy aroma that is practically irresistible. There is a specific joy in pulling a tray of cherry turnovers or a cobbler out of the oven, watching the purple-red juices bubble up through a golden, flaky crust. We love the way the heat intensifies the cherry’s natural flavor, turning them into soft, molten pockets of sweetness. It’s the kind of baking that feels rewarding and heart-centered, perfect for sharing with neighbors or serving at a family Sunday brunch.
Ingredients
- Puff Pastry or Pie Crust
- Cherry Filling (homemade or high-quality store-bought)
- Egg Wash (1 egg + 1 tbsp water)
- Coarse Sparkling Sugar
- Vanilla Extract
How to make it
- Always start with cold dough. Whether it’s puff pastry or shortcrust, the fat (butter) must remain solid until it hits the oven to create those sought-after flaky layers.
- If making turnovers, place a tablespoon of filling on one half of your dough square. Do not overfill, or the steam will cause the pastry to burst during baking.
- Crimp the edges with a fork dipped in flour. This creates a decorative border and a tight seal.
- Brush the tops with an egg wash. This is the secret to that deep, professional golden-brown color. Without it, the pastry will look pale and floury.
- Sprinkle generously with coarse sparkling sugar. This adds a delightful crunch that contrasts with the soft fruit inside.
- Bake at a high temperature (around 400°F / 200°C). The initial blast of heat is what ‘lifts’ the pastry. Bake until you see the cherry juices just starting to bubble out of the steam vents—that is your visual cue that the filling is hot and set.
Conclusion
Building a viral snack board or crafting the perfect spring meal doesn’t require a culinary degree—it just requires a bit of heart and an eye for detail. By focusing on fresh ingredients and simple techniques, you can create food that not only tastes incredible but also creates lasting memories. So grab a board, pick your favorite five ingredients, and start creating something beautiful today!