

Simple Food Boards: The Viral Trend You Need to Try Right Now
There is something inherently magical about a shared meal that isn’t confined to individual plates. I remember the first time I set out a massive, wooden board covered in fresh textures and colors; the room immediately felt warmer, the conversation flowed more freely, and the rigid formality of dinner simply melted away. It is an invitation to linger, to graze, and to savor every bite in good company.
As we transition from the heavy, comforting layers of winter into the bright, crisp energy of spring and summer, the ‘Simple Food Board’ has become my go-to way to entertain. It is less about perfection and more about the celebration of seasonal ingredients. Whether you are hosting a backyard brunch or a quiet sunset dinner on the patio, these ideas will help you master the art of the board and bring that viral, effortless aesthetic into your own home.
How to decorate beautiful spring cakes
Why we love this
A beautifully decorated spring cake is the ultimate centerpiece for any food board, bringing a sense of whimsy and elegance to the table. We love the contrast between a velvety, cloud-like buttercream and the delicate, crisp texture of edible pansies or pressed chamomile. The aroma is faintly sweet with a hint of botanical freshness, and there is a profound joy in slicing into a moist, airy sponge that looks like it was plucked straight from a wildflower meadow. It turns a simple dessert into a living piece of art that smells of vanilla and sunshine.
Ingredients
- 1 double-layer vanilla sponge cake
- 4 cups vanilla bean buttercream
- Assorted edible flowers (pansies, violas, or lavender)
- Fresh lemon zest
- Organic honey for drizzling
- Offset spatula and piping tips
How to make it
- Begin by placing your first cake layer on a rotating turntable. Using an offset spatula, apply a generous layer of buttercream to the top, spreading it evenly to the edges to create a stable base for the second layer.
- Place the second layer on top and apply a thin ‘crumb coat’ of frosting over the entire cake. This layer should be translucent; its purpose is to trap any loose crumbs. Chill the cake in the refrigerator for 30 minutes until the frosting is firm to the touch.
- Apply the final layer of buttercream. Use the spatula to create soft, horizontal ridges by slowly spinning the turntable while holding the spatula against the side. This creates a rustic, ‘lived-in’ texture that catches the light beautifully.
- Carefully press your edible flowers into the sides and top of the cake. For a professional look, cluster them at the base and have a few ‘climbing’ up the side in a crescent shape. Ensure the flowers are dry before applying so they adhere properly to the fat in the buttercream.
- Finish with a light dusting of lemon zest and a tiny drizzle of honey over the petals to give them a dew-kissed appearance.
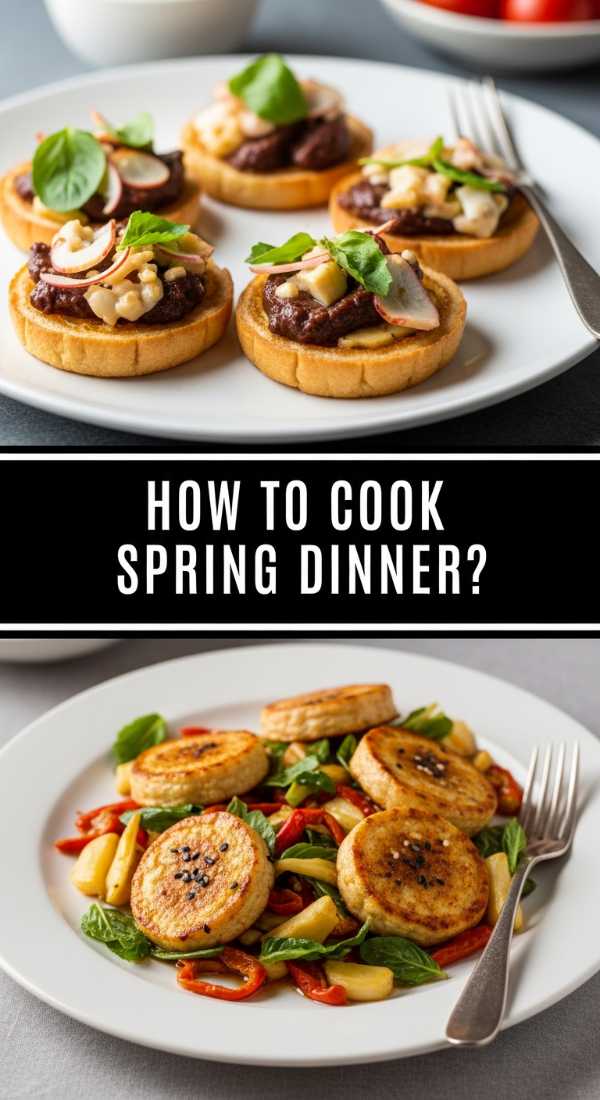
How to cook healthy spring dinner

Why we love this
A healthy spring dinner board is all about the snap of fresh greens and the buttery richness of sustainably sourced proteins. Imagine a platter featuring flaky, pan-seared salmon nestled against vibrant, tender-crisp asparagus spears and charred lemon halves. The aroma is a refreshing blend of citrus zest and earthy herbs, while the texture provides a satisfying crunch followed by a melt-in-your-mouth finish. It feels restorative and light, leaving you energized rather than weighed down after a long day.
Ingredients
- 2 large salmon fillets
- 1 bunch thin asparagus, woody ends trimmed
- 2 cups baby arugula
- Radishes, thinly sliced
- Extra virgin olive oil
- 1 lemon, halved
- Fresh dill and sea salt
How to make it
- Preheat your cast-iron skillet over medium-high heat. Pat the salmon fillets completely dry with a paper towel; this is the secret to achieving a crispy, golden skin that doesn’t stick to the pan.
- Season the salmon generously with sea salt. Add a tablespoon of olive oil to the hot pan, then place the salmon skin-side down. Press gently with a spatula for 30 seconds to ensure even contact. Cook for 4-5 minutes until the skin is shatteringly crisp.
- Flip the salmon and cook for another 2 minutes for a perfect medium-rare. Remove from the pan and let it rest on a cutting board to allow the juices to redistribute.
- In the same pan, toss the asparagus with a splash of water and a pinch of salt. Cover for 60 seconds to steam-sauté them until they turn bright green and tender but still retain a firm bite.
- Arrange a bed of arugula on your board, top with the salmon and asparagus, and scatter the radishes and dill over the top. Squeeze the charred lemon halves over everything just before serving to brighten the fats.
How to make spring crockpot meals

Why we love this
Crockpot meals often get a reputation for being heavy, but spring versions are delightfully herbaceous and light. We love the way the slow-cooking process infuses chicken or chickpeas with the bright, zingy notes of artichokes and lemon. The meat becomes so tender it practically dissolves at the touch of a fork, while the cooking liquid transforms into a liquid gold broth that is perfect for dipping crusty bread. It fills the house with a comforting, savory aroma that whispers of home and slow Sunday afternoons.
Ingredients
- 1.5 lbs boneless skinless chicken thighs
- 1 jar marinated artichoke hearts, drained
- 1 cup low-sodium chicken bone broth
- 3 cloves garlic, smashed
- 1 tbsp dried oregano
- 1/2 cup heavy cream or coconut milk
- Fresh parsley for garnish
How to make it
- Place the chicken thighs in the bottom of the slow cooker in a single layer. Season them well with salt, pepper, and the dried oregano, rubbing the spices into the meat to ensure deep flavor penetration.
- Scatter the smashed garlic cloves and the artichoke hearts over the chicken. Pour the bone broth around the edges of the chicken so you don’t wash off the seasoning you just applied.
- Set the crockpot to ‘Low’ and cook for 5 to 6 hours. You want the internal temperature of the chicken to reach 165°F, at which point the connective tissue has broken down into a succulent texture.
- About 20 minutes before serving, stir in the heavy cream or coconut milk. This adds a velvety mouthfeel and balances the acidity of the artichokes.
- Transfer the chicken and artichokes to a shallow wooden bowl on your board, ladle over the creamy broth, and finish with a handful of chopped fresh parsley for a burst of chlorophyll and color.
How to prepare fresh spring soup

Why we love this
There is nothing quite like a vibrant green pea and mint soup to signal the arrival of spring. The color is an electric, life-affirming emerald that looks stunning on a food board when served in small, ceramic ramekins. The texture is silky and smooth, offering a cooling sensation that is perfectly balanced by the warmth of the broth. Each spoonful delivers a sweet pop of peas followed by the refreshing, tingly finish of fresh mint, making it the perfect palate cleanser or appetizer for a larger spread.
Ingredients
- 4 cups fresh or frozen sweet peas
- 1 large leek, white and light green parts only, cleaned and sliced
- 4 cups vegetable stock
- 1/2 cup fresh mint leaves
- 2 tbsp butter or olive oil
- Creme fraiche for swirling
How to make it
- In a large pot, melt the butter over medium heat. Add the sliced leeks and a pinch of salt. Cook them slowly for about 8-10 minutes, stirring occasionally, until they are soft and translucent but not browned; this provides a delicate base flavor.
- Pour in the vegetable stock and bring to a rolling boil. Once boiling, add the peas. Cook for only 3-4 minutes if using fresh (or 2 minutes for frozen). You want to cook them just enough to soften, but not so long that they lose their bright green color and turn olive-drab.
- Immediately remove the pot from the heat and stir in the fresh mint leaves. The residual heat will wilt the mint and release its aromatic oils without overcooking it.
- Use an immersion blender to puree the soup until it is completely smooth. For an extra-fine, restaurant-quality texture, pour the soup through a fine-mesh sieve into a clean bowl.
- Serve in small bowls on your board, adding a swirl of creme fraiche and a few tiny mint leaves on top to create a beautiful visual contrast against the green soup.
How to toss vibrant summer salads

Why we love this
Summer salads should be a riot of color and a masterclass in texture. We love the combination of juicy, sun-ripened peaches, creamy burrata cheese, and the crunch of toasted pine nuts. It’s a sensory experience that hits every note: sweet, salty, creamy, and acidic. The aroma of basil mingled with balsamic glaze is intoxicating, and the feeling of a cold, crisp salad on a hot afternoon is the height of culinary luxury. It’s a dish that demands to be shared directly from a large, rustic board.
Ingredients
- 3 ripe peaches, sliced into wedges
- 2 balls of fresh burrata cheese
- 4 cups baby spinach or arugula
- 1/4 cup toasted pine nuts
- Fresh basil leaves, torn
- Balsamic glaze and high-quality olive oil
How to make it
- Start by lightly grilling the peach wedges. Heat a grill pan over high heat and brush the peaches with a tiny bit of oil. Sear for 1-2 minutes per side until char marks appear; this caramelizes the sugars and adds a smoky depth to the fruit.
- Lay a lush bed of greens across your food board. Arrange the grilled peaches on top in an aesthetic, scattered pattern.
- Place the burrata balls in the center of the greens. Use a sharp knife to gently score the top of the cheese so the creamy interior (stracciatella) begins to spill out slightly onto the salad.
- Sprinkle the toasted pine nuts and torn basil leaves over the entire board. The basil should be torn by hand rather than chopped to prevent bruising and to keep the aroma sharp.
- Drizzle the balsamic glaze in a zig-zag pattern and finish with a generous pour of extra virgin olive oil and a sprinkle of flaky sea salt to enhance the creaminess of the cheese.
How to bake soft spring cookies
Why we love this
These soft spring cookies, flavored with lemon and lavender, are like a gentle hug in baked form. They have a tender, buttery crumb that practically dissolves on the tongue, leaving behind a subtle floral note and a bright citrus zing. We love the aesthetic of a pile of these pale, golden-edged cookies stacked high on a board, dusted with a light snowfall of powdered sugar. They are the perfect accompaniment to a cup of herbal tea, smelling of a spring garden in full bloom and feeling wonderfully decadent yet light.
Ingredients
- 1 cup unsalted butter, softened
- 3/4 cup granulated sugar
- 1 egg + 1 egg yolk
- 2.5 cups all-purpose flour
- 1 tbsp dried culinary lavender, lightly crushed
- Zest of 2 lemons
- 1/2 tsp baking powder
How to make it
- In a large bowl, cream together the softened butter and sugar until the mixture is pale and fluffy—about 3-4 minutes of high-speed beating. This incorporates air, which is essential for that ‘soft’ texture.
- Add the egg, extra yolk, lemon zest, and crushed lavender. The extra yolk provides richness and a chewy center. Mix until just combined.
- Whisk together the flour and baking powder, then gradually add to the wet ingredients. Mix on low speed until the dough just comes together; do not overmix, as this will develop gluten and make the cookies tough.
- Chill the dough in the refrigerator for at least 1 hour. This prevents the cookies from spreading too much and allows the lavender flavor to infuse deeply into the fats.
- Scoop rounded tablespoons onto a parchment-lined sheet and bake at 350°F for 10-12 minutes. The edges should be just barely set and the tops still look slightly soft. Let them cool on the pan for 5 minutes before moving them to the board.
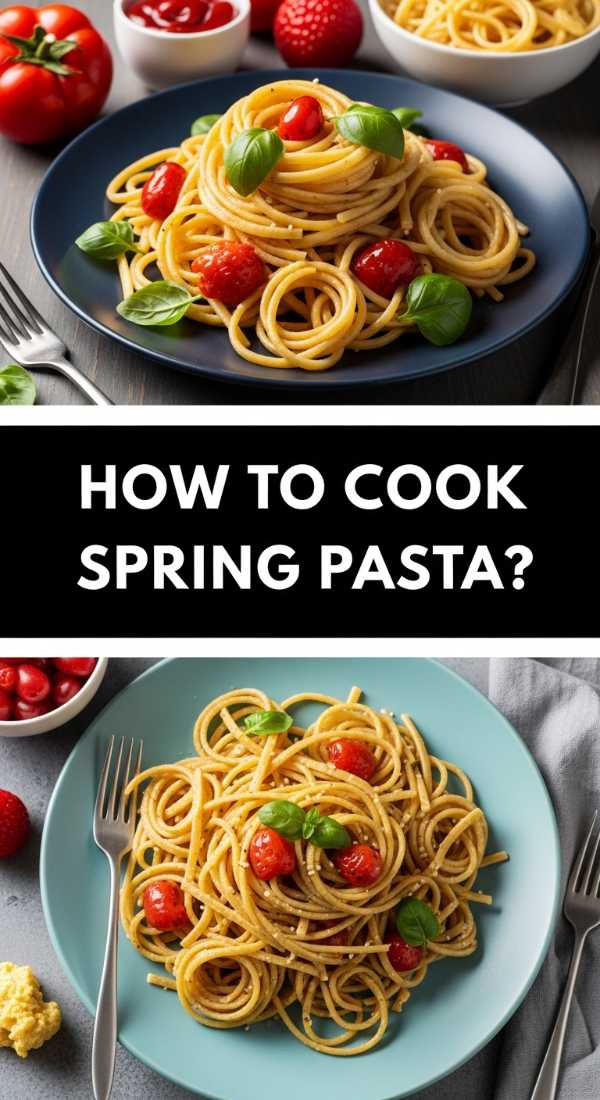
How to cook creamy spring pasta

Why we love this
Creamy spring pasta is the bridge between winter comfort and summer freshness. We love using orecchiette or ‘little ears’ to catch the silky lemon-cream sauce and the tiny, tender peas. The dish is fragrant with garlic and parmesan, and the texture is a perfect harmony of ‘al dente’ pasta and velvety sauce. It’s the kind of meal that feels sophisticated yet takes very little time, making it ideal for a weeknight board where the pasta is served alongside crusty bread and a heap of fresh herbs.
Ingredients
- 12 oz orecchiette or fusilli pasta
- 1/2 cup heavy cream
- 1/2 cup freshly grated Parmesan cheese
- 1 cup frozen peas or asparagus tips
- 2 cloves garlic, minced
- Zest and juice of 1 lemon
- Fresh cracked black pepper
How to make it
- Bring a large pot of heavily salted water to a boil. Cook the pasta according to the package directions, but aim for ‘al dente’ (firm to the bite). Crucially, reserve 1 cup of the starchy pasta water before draining.
- While the pasta cooks, sauté the minced garlic in a large pan with a bit of olive oil over medium-low heat. You want the garlic to become fragrant and golden, not brown or bitter.
- Pour the heavy cream into the pan with the garlic and bring to a gentle simmer. Whisk in the Parmesan cheese slowly until the sauce is smooth and slightly thickened.
- Add the cooked pasta and the peas (or asparagus) directly into the cream sauce. Pour in half of the reserved pasta water. The starch in the water helps the sauce emulsify and cling to the pasta perfectly.
- Toss everything together over medium heat for 2 minutes. Stir in the lemon juice and zest at the very end to keep the citrus flavor bright. Serve immediately on a warm board or platter.
How to create summer desserts

Why we love this
Summer desserts should emphasize the natural beauty of seasonal fruit. A berry pavlova board is our favorite way to do this, offering a dramatic contrast between the crisp, snowy-white meringue and the deep reds and purples of macerated berries. The texture is a delight—shattering at first, then yielding to a marshmallowy center. The aroma is purely of caramelized sugar and fresh fruit, and the communal nature of scooping toppings onto individual meringue nests makes for a fun, interactive ending to any meal.
Ingredients
- 6 individual meringue nests (store-bought or homemade)
- 2 cups heavy whipping cream
- 2 tbsp powdered sugar
- 3 cups mixed berries (strawberries, blueberries, raspberries)
- 1 tbsp sugar + 1 tsp vanilla extract
- Fresh mint for garnish
How to make it
- Place the mixed berries in a bowl and toss them with 1 tablespoon of sugar and the vanilla extract. Let them sit at room temperature for at least 30 minutes. This ‘macerating’ process draws out the juices, creating a natural, glossy syrup.
- In a chilled bowl, whip the heavy cream and powdered sugar until soft peaks form. Avoid over-whipping; the cream should be billowy and soft, not stiff or buttery.
- Arrange the meringue nests across a large wooden board. This provides the ‘base’ for your dessert board.
- Spoon a generous dollop of the whipped cream into the center of each meringue nest, allowing it to spill over the sides slightly for a rustic look.
- Top each nest with the macerated berries and a spoonful of the resulting syrup. Scatter extra berries and fresh mint leaves across the board to fill in any gaps, making it look like a lush berry patch.
How to master healthy grilling

Why we love this
Healthy grilling is about celebrating the Maillard reaction—that beautiful char that adds smoky complexity to simple vegetables and lean proteins. We love a grilled halloumi and vegetable board because of the squeaky, salty texture of the cheese paired with the sweetness of charred peppers and zucchini. The aroma of woodsmoke and caramelized onions is the quintessential scent of summer. It’s a meal that feels celebratory and indulgent without being heavy, perfect for an outdoor gathering where the board acts as the communal heart of the party.
Ingredients
- 1 block halloumi cheese, sliced into 1/2 inch thick pieces
- 2 zucchini, sliced into ribbons or rounds
- 2 bell peppers, cut into large chunks
- 1 red onion, wedged
- Cherry tomatoes on the vine
- Olive oil, dried oregano, and lemon wedges
How to make it
- Toss all the vegetables (except the tomatoes) in a large bowl with olive oil, sea salt, and dried oregano. Ensure everything is lightly coated to prevent sticking and to facilitate even charring.
- Preheat your grill to medium-high. Place the vegetables on the grates, working in batches if necessary. Grill for 3-4 minutes per side until they have clear grill marks and have softened slightly.
- Place the cherry tomatoes (still on the vine) on the grill for just 2 minutes. They should blister and soften but stay attached to the stem for a beautiful presentation.
- Pat the halloumi slices dry. Place them directly on the grill grates. Halloumi has a high melting point, so it will char rather than melt. Grill for about 1-2 minutes per side until dark golden grids appear.
- Arrange everything on a large board, grouping the vegetables by color for maximum visual impact. Place the warm halloumi in the center and serve with lemon wedges for squeezing over the hot cheese.
How to use sourdough discard
[IMAGE_10]
Why we love this
Sourdough discard crackers are the ultimate addition to a food board, providing a tangy, fermented depth that store-bought crackers simply can’t match. We love their incredible snap and the way they are flecked with coarse sea salt and dried herbs like rosemary. They have an artisanal, handcrafted feel and an aroma of toasted grain and sourdough tang that is absolutely addictive. Making them is a therapeutic process that turns ‘waste’ into the star of your charcuterie spread, adding a sophisticated, crunchy element that pairs perfectly with soft cheeses.
Ingredients
- 1 cup sourdough discard (unfed)
- 1/4 cup melted butter or olive oil
- 1 cup all-purpose flour (plus extra for rolling)
- 1/2 tsp fine sea salt
- 1 tbsp dried rosemary or ‘everything bagel’ seasoning
- Flaky sea salt for topping
How to make it
- In a medium bowl, mix the sourdough discard, melted butter, flour, fine salt, and dried herbs. Knead it gently with your hands for about 1 minute until it forms a smooth, slightly tacky dough ball.
- Divide the dough into two pieces. Wrap them in plastic and let them rest in the fridge for at least 30 minutes. This relaxes the gluten, making it much easier to roll the dough out thin without it snapping back.
- Preheat your oven to 325°F. Place one piece of dough on a sheet of parchment paper and roll it out as thin as possible—ideally about 1/16th of an inch. The thinner the dough, the crispier the cracker.
- Lightly brush the surface with a tiny bit of water and sprinkle with flaky sea salt. Use a fork to ‘dock’ the dough (poke holes all over) to prevent it from puffing up like a pita bread.
- Bake for 20-25 minutes, or until the crackers are golden brown and firm to the touch. Let them cool completely on a wire rack to achieve maximum crispness before breaking them into rustic shards and piling them onto your board.
The Joy of the Shared Board
As we’ve explored, the ‘Simple Food Board’ is more than just a trend—it is a philosophy of eating that prioritizes connection and seasonality. From the floral notes of a spring cake to the smoky char of a healthy grill, these boards allow the ingredients to speak for themselves. I hope these ideas inspire you to clear your table, lay out a board, and invite the people you love to share a beautiful, effortless meal together.