
Minimalist Mastery: Redefining Sophistication with Subtle Manicures
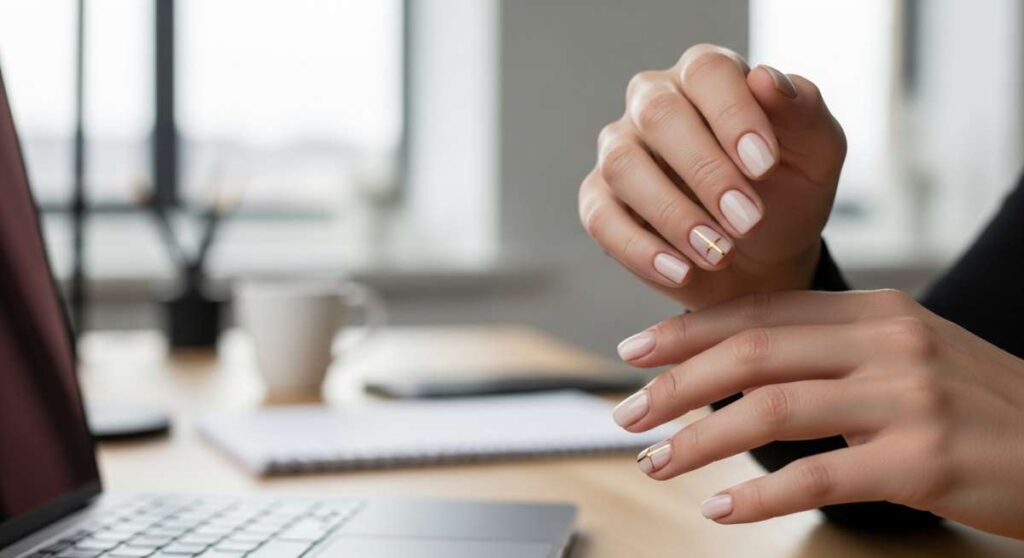
Hello, my loves! There is something so incredibly grounding about looking down at your hands and seeing a reflection of the peace you are trying to cultivate in your life. In a world that often feels loud and cluttered, I’ve found myself gravitating toward the soft, the intentional, and the beautifully understated. Our nails are like tiny canvases for our mood, and right now, I’m in a season of ‘quiet luxury’ and cloud-soft aesthetics.
Redefining sophistication doesn’t mean you have to be boring—it means finding the magic in the details. Today, I want to share some of my favorite modern chic nail art inspirations that feel like a gentle hug for your fingertips. Whether you’re sipping a matcha latte or typing away at your dream project, these looks are designed to make you feel polished, poised, and perfectly you.
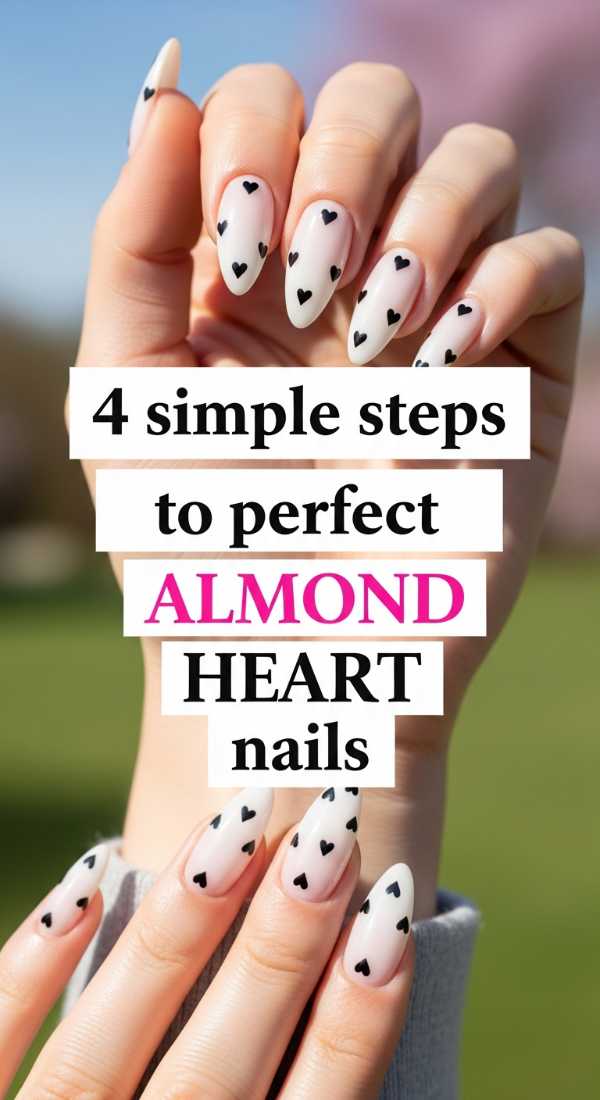
The Sweetest Romance: 4 Simple Steps to Perfect Almond Heart Nails
Why to love these Nails:
These nails are the epitome of soft-girl aesthetic. The almond shape elongates the fingers, while the tiny heart detail adds a whisper of whimsy without being overwhelming. It’s like carrying a little secret love letter on your hands all day long.
Essential Items:
- Almond-shaped nail tips or a good glass file
- Sheer nude or pale pink base polish
- A fine-point dotting tool or a toothpick
- Deep red or creamy white polish for the heart
- High-shine top coat
How to Prepare:
- Shape your nails into a soft almond point and apply a nourishing base coat.
- Apply two thin layers of your favorite sheer nude polish and let dry completely.
- Using your dotting tool, place two small dots side-by-side near the tip of the nail, then drag them down to meet in a ‘V’ shape to form the heart.
- Seal the design with a glossy top coat to protect your masterpiece.
Budget Range
- Essie Skinny Dip Polish – $10
- Nail Art Dotting Tool Set – $6
- Seche Vite Dry Fast Top Coat – $9
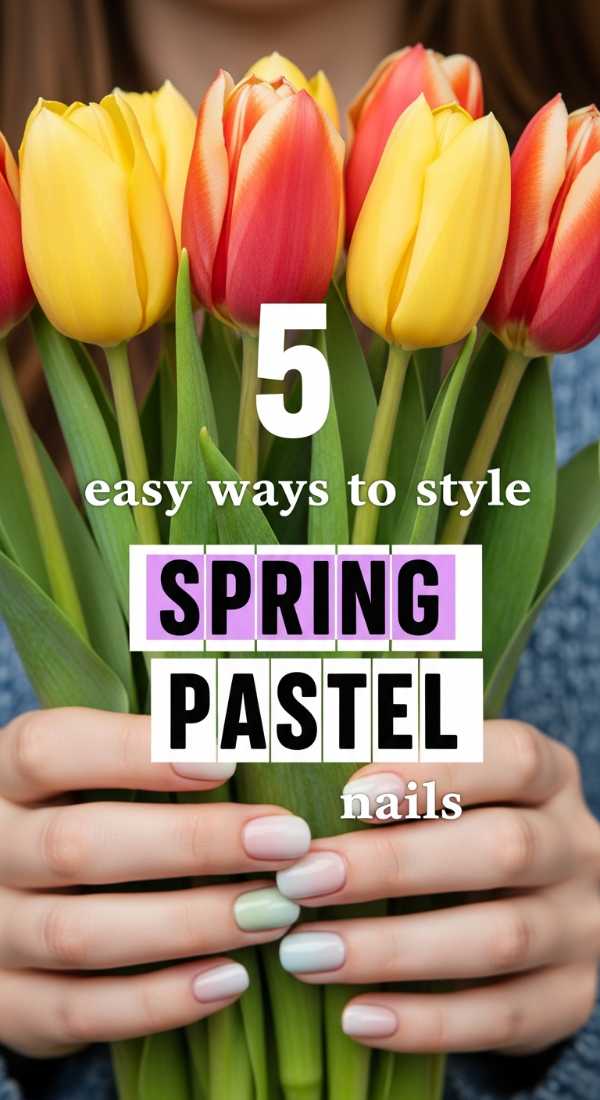
Petal Softness: 5 Easy Ways to Style Spring Pastel Nails
Why to love these Nails:
Spring is all about renewal, and nothing says ‘fresh start’ like a palette of pastels. These styles are versatile enough for the office but dreamy enough for a weekend picnic in the park. They bring a pop of color that still feels airy and light.
Essential Items:
- A collection of pastel polishes (mint, lavender, lemon, baby blue)
- Matte top coat
- Makeup sponge for gradients
- Fine detail brush
How to Prepare:
- Try ‘Skittle Nails’ by painting each finger a different muted pastel shade.
- Create a ‘Negative Space’ look by painting only the bottom half of the nail.
- Go for a ‘Gradient Ombre’ using a sponge to blend two pastels together.
- Apply a matte top coat for a modern, velvet-like finish.
- Add a tiny gold stud at the base of one accent nail for a touch of luxury.
Budget Range
- Olive & June Pastel Set – $40
- Sally Hansen Miracle Gel Matte Top Coat – $8
- Basic Nail Sponges – $4
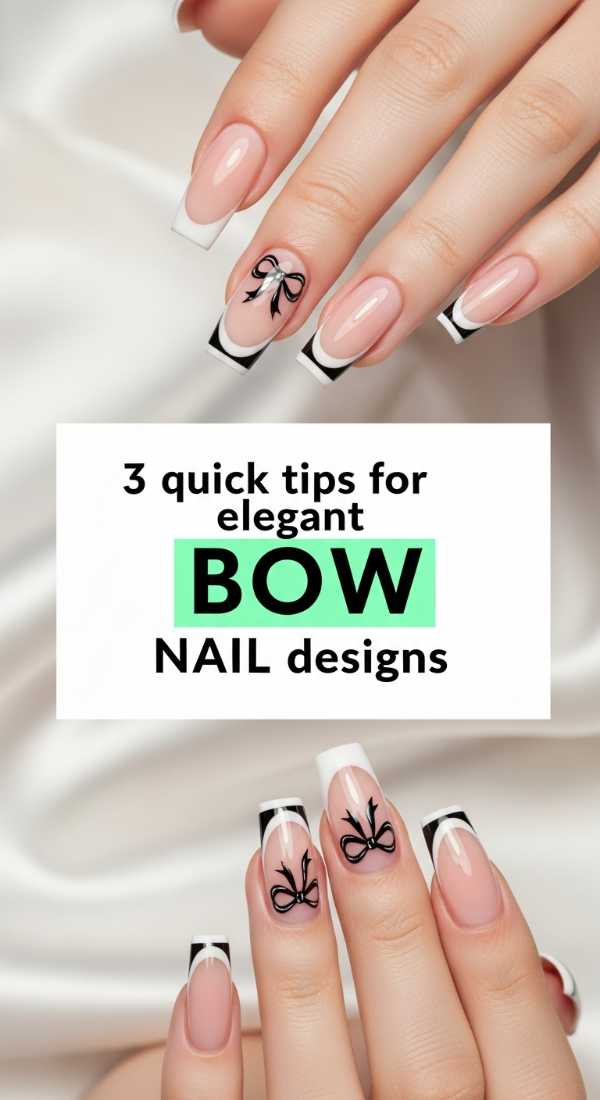
The Coquette Touch: 3 Quick Tips for Elegant Bow Nail Designs
Why to love these Nails:
The coquette trend is here to stay, and adding a delicate bow to your manicure is the ultimate way to embrace your feminine energy. It’s dainty, sophisticated, and looks like it belongs in a Parisian cafe.
Essential Items:
- Ultra-thin liner brush
- Opaque white or black polish
- Pearl accents or tiny rhinestones
- Steady hand and a bit of patience
How to Prepare:
- Placement is key: Position your bow slightly off-center or right at the tip of a French manicure for the most elegant look.
- Think ‘loops and tails’: Draw two small triangles meeting at a point, then add two flowing lines underneath for the ribbon tails.
- Add a tiny pearl: Place a microscopic pearl or rhinestone in the center of the bow to give it a 3D, high-end feel.
Budget Range
- Zoya Professional Lacquer in Snow White – $12
- Winstonia Fine Nail Art Brushes – $10
- Nail Art Pearl Studs – $5
Structured Serenity: 6 Simple Steps for a Trendy Grid Nail Look
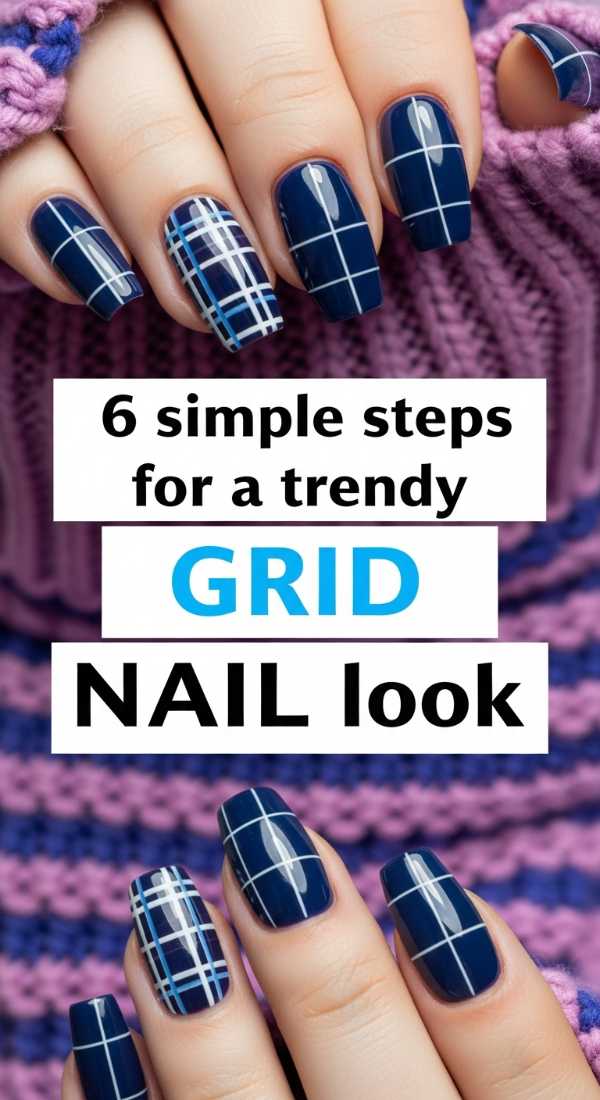
Why to love these Nails:
For my loves who adore a bit of geometric order, the grid look is perfection. It’s modern, architectural, and surprisingly calming to look at. It’s minimalist art at its finest.
Essential Items:
- Neutral base color (beige or grey)
- Striper tape or a very long-haired detail brush
- Contrasting line color (black or white)
- Tweezers
How to Prepare:
- Apply your base color and ensure it is 100% dry.
- Lay down vertical strips of striper tape evenly across the nail.
- Lay down horizontal strips to create the grid pattern.
- Paint over the entire nail with your contrasting color (or use a brush to trace the lines).
- Carefully peel away the tape while the polish is still slightly tacky.
- Finish with a leveling top coat to smooth out any ridges.
Budget Range
- OPI Put it in Neutral – $11
- Nail Art Striper Tape – $5
- Tweezerman Precision Tweezers – $15
Botanical Bliss: 5 Fast Methods to Paint Spring Floral Designs
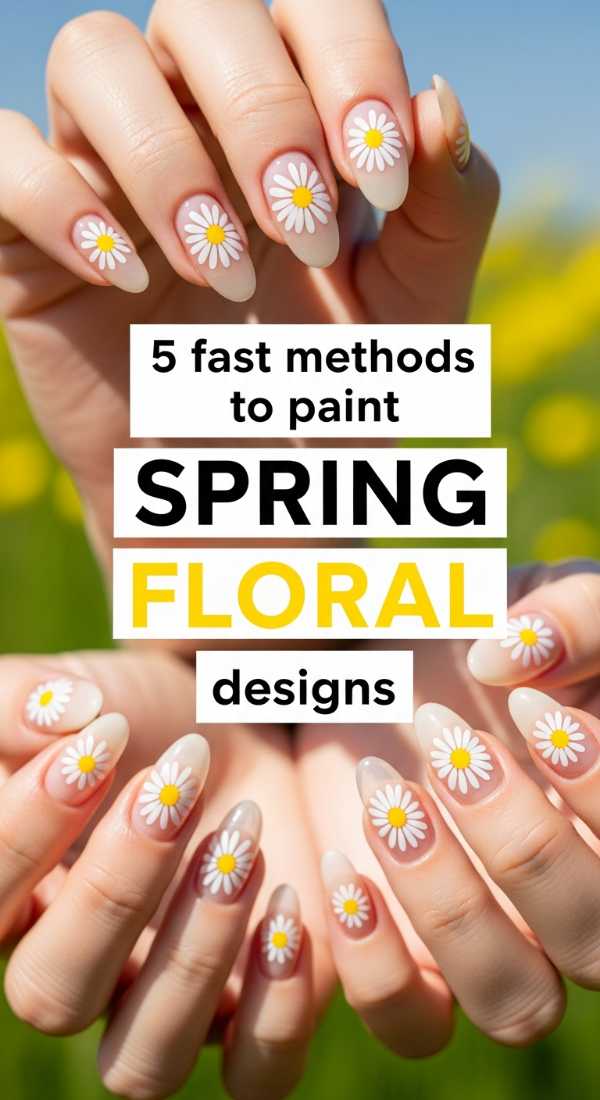
Why to love these Nails:
There is nothing more classic than florals for spring, but we’re keeping it subtle. These methods allow you to add a touch of nature to your look without it feeling like a garden took over your hands.
Essential Items:
- Dried pressed flowers for nails
- Floral nail stickers or decals
- Dotting tool for ‘daisy’ shapes
- Sheer green polish for leaves
How to Prepare:
- The ‘Dotted Daisy’: Use a dotting tool to make five yellow dots in a circle with a white center.
- The ‘Pressed Beauty’: Apply a tiny real dried flower onto tacky polish and seal with a thick top coat.
- The ‘Sticker Chic’: Use high-quality minimalist floral decals for an instant professional look.
- The ‘Leafy Vine’: Draw a single thin green line with tiny teardrop shapes for a sophisticated vine.
- The ‘Abstract Bloom’: Use a dry brush technique to create soft, blurry floral ‘blobs’ that look like watercolor art.
Budget Range
- Pressed Dried Flowers for Nails – $7
- Tattly Floral Nail Decals – $8
- Holler and Glow Nail Stickers – $5
Modern Simplicity: 4 Easy Techniques for Minimalist Dot Nail Art
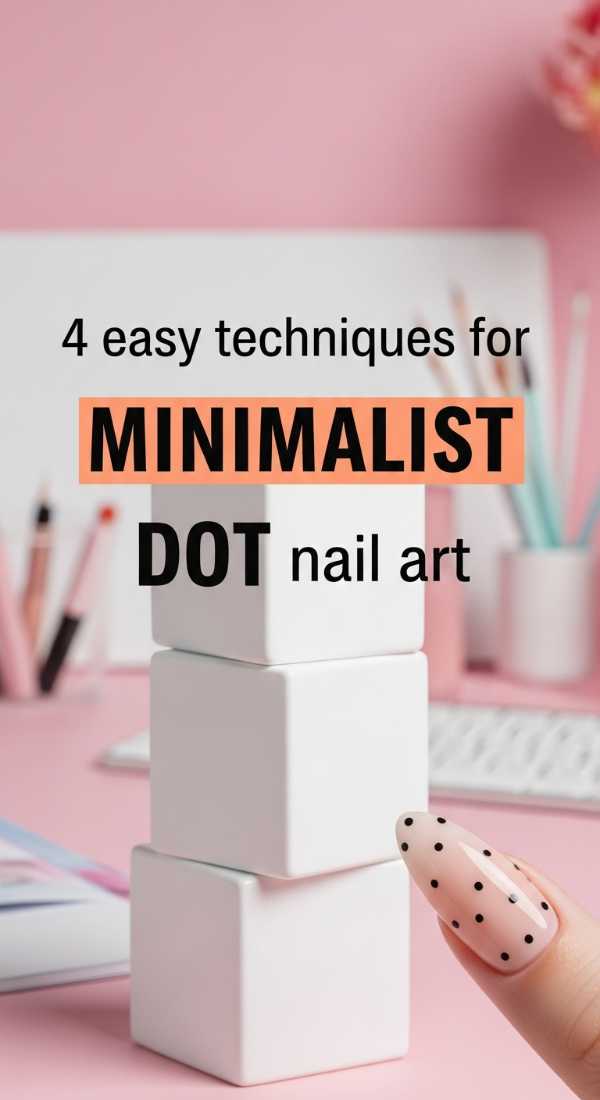
Why to love these Nails:
If you’re a beginner or just love a clean aesthetic, dots are your best friend. They are the ‘no-makeup makeup’ of the nail world—effortless, intentional, and so chic.
Essential Items:
- Single dotting tool (or the end of a bobby pin)
- Contrast polish (Black, Gold, or White)
- Nude base
How to Prepare:
- The ‘Single Central Dot’: Place one tiny dot at the very base of each nail, just above the cuticle.
- The ‘Vertical Line’: Place three descending dots in a straight line down the center of the nail.
- The ‘Side Cluster’: Place a cluster of three dots of varying sizes on the bottom corner of the nail.
- The ‘French Dot’: Replace the white line of a French mani with a row of tiny, perfectly spaced dots.
Budget Range
- Orly Bonder Base Coat – $10
- Revlon ColorStay Gel Envy – $9
- Bobby Pins (for DIY dotting) – $2
Espresso Elegance: 5 Simple Ways to Achieve Coffee Aesthetic Nails
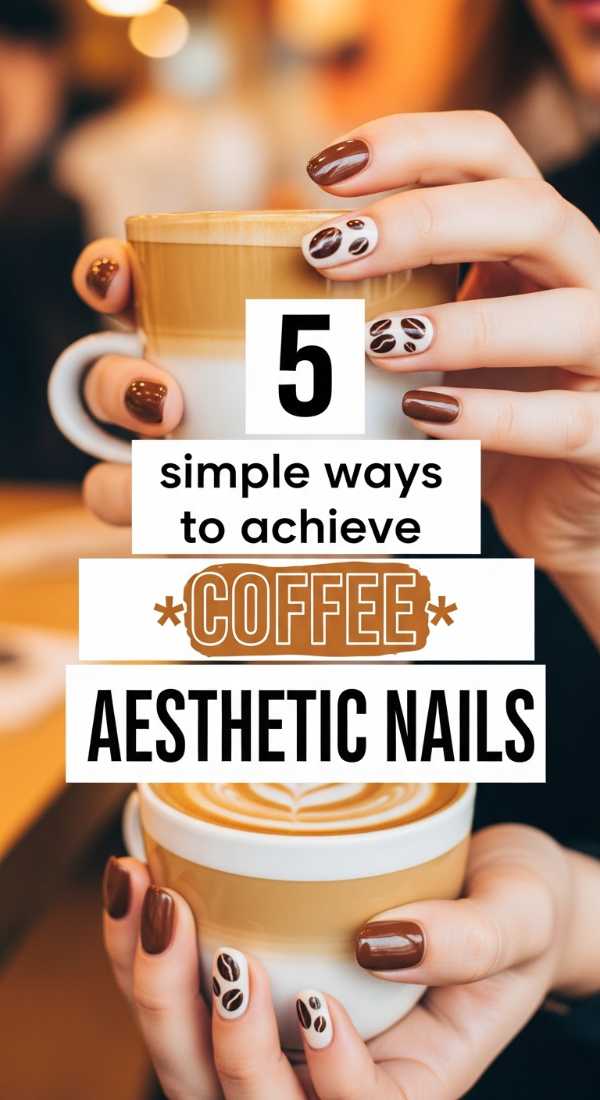
Why to love these Nails:
Warm, cozy, and rich—coffee aesthetic nails are like a warm mug on a rainy morning. They use earthy tones to create a look that is sophisticated and incredibly flattering on all skin tones.
Essential Items:
- Brown polish shades (Mocha, Latte, Espresso)
- Cream polish for mixing
- Detail brush for swirls
How to Prepare:
- The ‘Coffee Cream Swirl’: Drop a bit of white into brown polish and swirl it on the nail before it dries.
- The ‘Mismatched Browns’: Paint each nail a different shade of brown, from dark chocolate to light tan.
- The ‘Espresso French’: Use a deep espresso brown for the tips instead of the traditional white.
- The ‘Mocha Matte’: Apply a matte top coat to a medium brown for a soft, suede look.
- The ‘Tortoiseshell Accent’: Use amber and black polishes to create a glass-like coffee effect.
Budget Range
- Cirque Colors Coffee Collection – $12 per bottle
- Lights Lacquer ‘Coffee’ Tones – $13
- Glisten & Glow Top Coat – $8
The Glazed Glow: 3 Steps to Create the Viral Glazed Almond Look
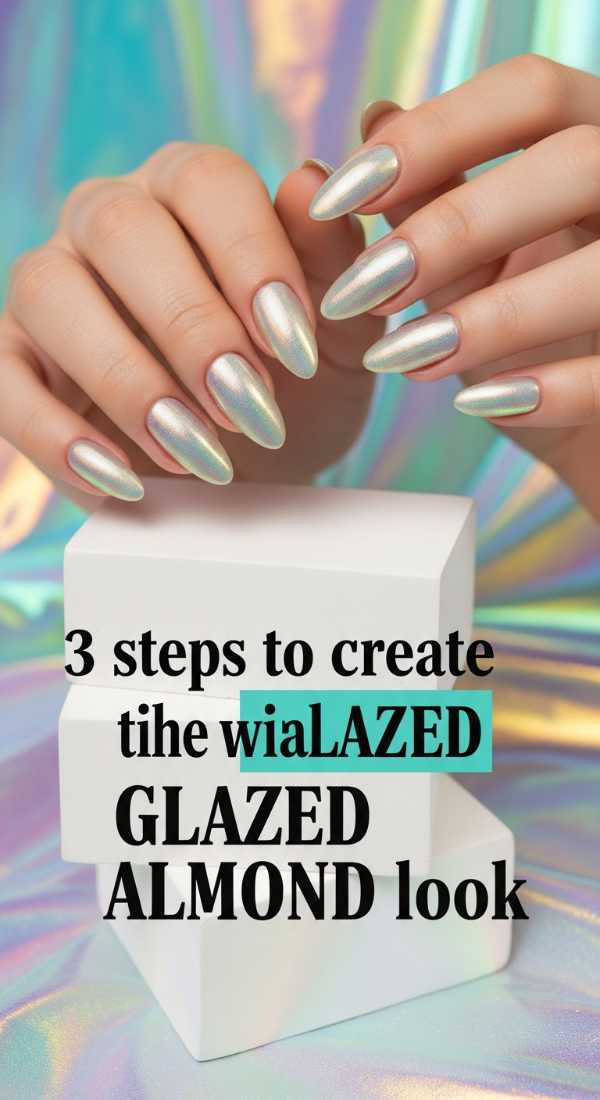
Why to love these Nails:
We can’t talk about minimalist sophistication without mentioning the glazed look. It’s pearlescent, ethereal, and makes your hands look like they’re glowing from within.
Essential Items:
- Sheer white or ‘milky’ polish
- Chrome powder (pearl or iridescent)
- Sponge applicator
- Non-wipe top coat
How to Prepare:
- Apply one coat of a milky white polish and cure (or let dry).
- Rub a small amount of pearl chrome powder over the nail using a sponge applicator until it shines like a mirror.
- Gently brush off excess powder and seal with a non-wipe top coat for that signature ‘glazed donut’ finish.
Budget Range
- OPI Funny Bunny – $11
- Born Pretty Pearl Chrome Powder – $7
- Kiara Sky Non-Wipe Top Coat – $15
Whimsical Waves: 6 Easy Ways to Master Spring Swirl Nail Art
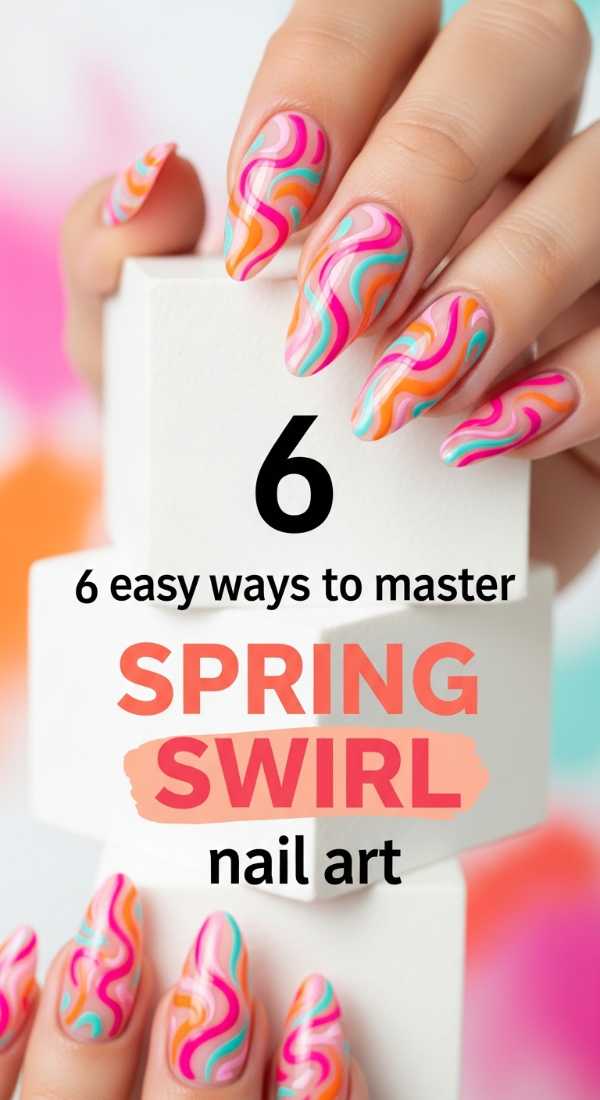
Why to love these Nails:
Swirls add movement and a touch of the 70s to your manicure while staying firmly in the modern era. They are incredibly forgiving because they don’t have to be perfect to look intentional.
Essential Items:
- Long-haired striper brush
- At least two contrasting colors
- Clear base
How to Prepare:
- Load your brush with polish but wipe off the excess so it doesn’t drip.
- Start from the side of the nail and pull the brush in a long, ‘S’ shaped curve.
- Add a second swirl in a different color that hugs the line of the first one.
- Try ‘Negative Space Swirls’ by leaving half the nail bare.
- Vary the thickness: Start thin, apply pressure for a thicker middle, and lift for a thin tail.
- Keep the colors in the same family (e.g., three shades of blue) for a more cohesive look.
Budget Range
- Modelones Liner Gel Set – $15
- Beetles Gel Polish Spring Set – $20
- Glass Nail File – $10
The Timeless Twist: 4 Simple Secrets for Flawless Almond French Tips
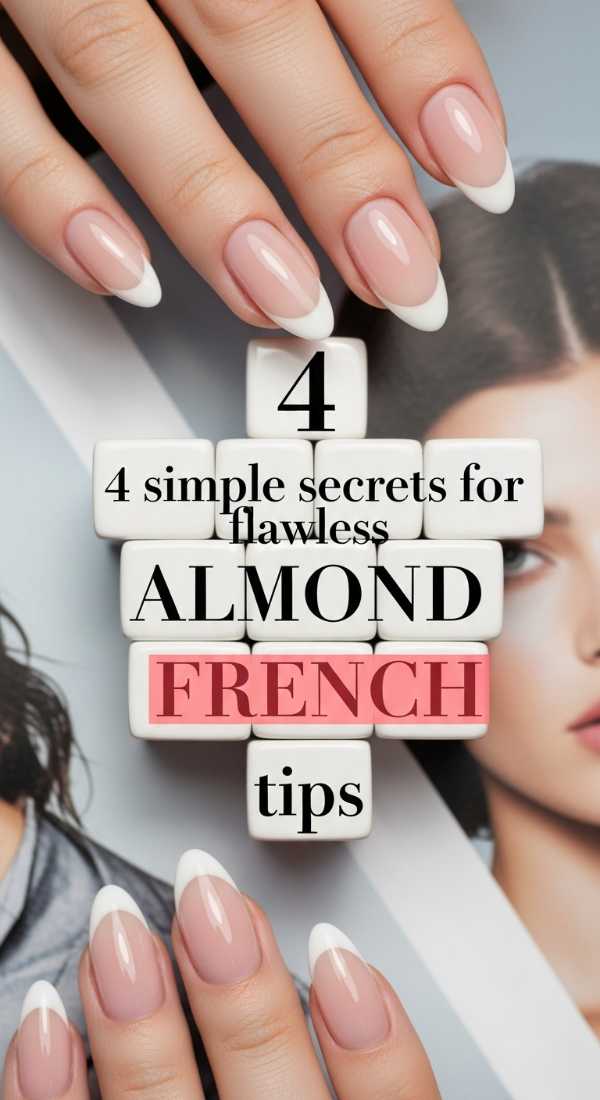
Why to love these Nails:
The almond French tip is the gold standard of sophistication. It’s clean, it’s classic, and it makes your hands look miles long. It’s the ultimate ‘I have my life together’ manicure.
Essential Items:
- French tip guides or a silicone nail stamper
- Crisp white polish (or a soft pastel for a twist)
- Nude base color
How to Prepare:
- The ‘Stamper Hack’: Put a bit of white polish on a silicone stamper and gently push your nail tip into it at an angle.
- The ‘Thin Line’ Secret: Keep the white tip very thin to maintain the minimalist feel.
- Follow the Curve: Ensure the ‘smile line’ of the French tip mirrors the curve of your cuticle for perfect balance.
- Clean up with a brush: Dip a small flat brush in acetone to sharpen the line if you make a mistake.
Budget Range
- Silicone Nail Stamper – $6
- Essie Marshmallow – $10
- Pure Acetone and Clean-up Brush – $8
Finding Your Quiet Beauty
My sweet friends, I hope these inspirations remind you that beauty doesn’t have to be loud to be seen. Taking twenty minutes out of your busy week to care for your hands is a beautiful act of self-love. It’s about the ritual, the softness, and the way you feel when you catch a glimpse of your hands throughout the day. Which of these looks are you excited to try first? Remember, there are no mistakes in art—only ‘happy little accidents’ that make your style uniquely yours. Stay soft, stay inspired, and keep shining in your own subtle way.