
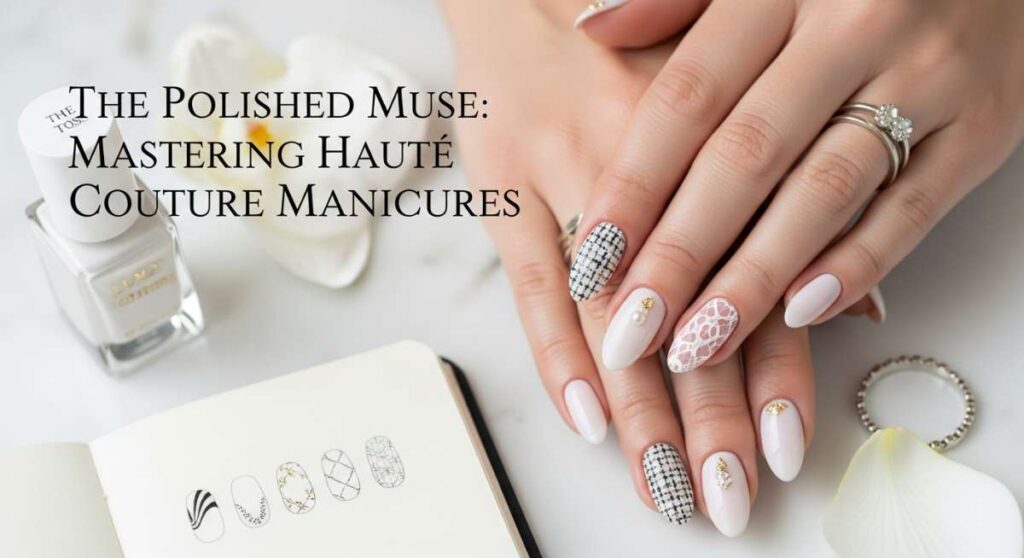
The Polished Muse: Mastering Haute Couture Manicures
Hello, my loves. Welcome back to our little corner of the world, where the tea is always warm and the inspiration flows like silk. There is something so incredibly intimate about the ritual of painting our nails, isn’t there? It is that quiet window of time we carve out just for ourselves, a gentle pause in the rush of the world where we can focus on the delicate details that make us feel truly beautiful.
Lately, I have been dreaming of soft textures and the way a perfectly manicured hand feels against a cashmere sweater. Our hands do so much for us—they hold the hands of those we love, they create, they comfort. Giving them a touch of ‘haute couture’ isn’t just about vanity; it’s about honoring that grace. Today, I want to walk you through some of my favorite chic and elegant designs that feel like a soft cloud-soft embrace for your fingertips.
Whether you’re a seasoned artist or just starting to play with color, these tutorials are designed to be a gentle guide. So, grab your favorite mug, put on some soft jazz, and let’s transform your nails into a masterpiece of your own making.
5 Easy Steps to Paint Spring Floral Nails
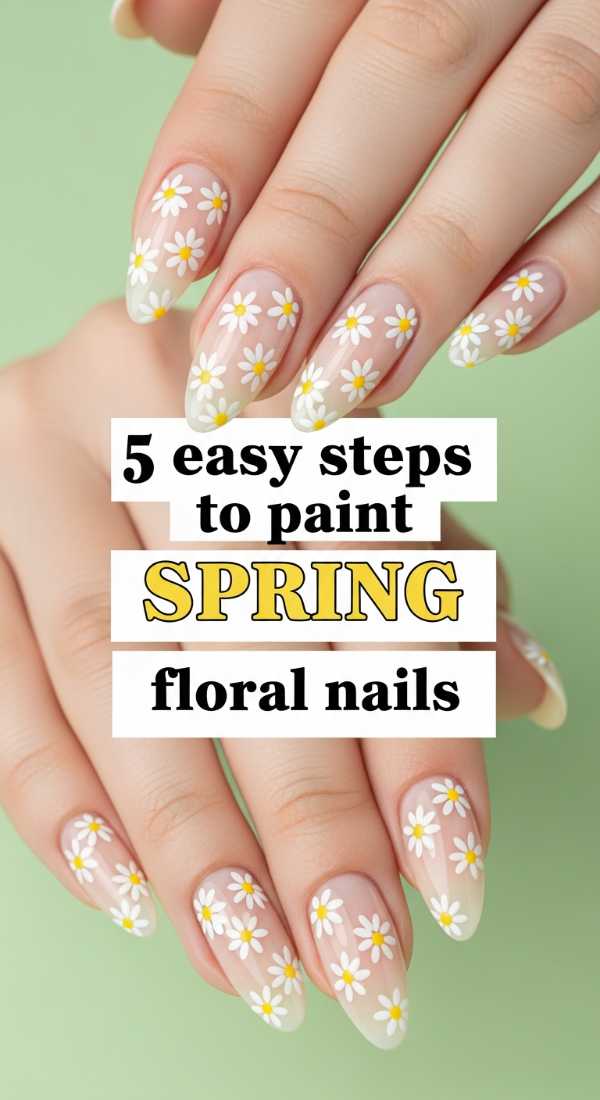
Why to love these Nails:
These nails are like carrying a secret garden right at your fingertips. They evoke the first breath of spring, where tiny buds begin to peek through the frost, offering a sense of renewal and delicate femininity that brightens even the greyest afternoon.
Essential Items:
- Soft blush base polish
- White and pastel yellow acrylic paints or polishes
- Fine-tipped detailing brush
- Dotting tool
- High-gloss top coat
How to Prepare:
- Apply two thin layers of your soft blush base and let them dry completely.
- Use your dotting tool to place five tiny white dots in a circle to form your petals.
- Add a single yellow dot in the very center of the white circle.
- Take your detailing brush to add tiny green leaves if you’re feeling extra whimsical.
- Seal the garden with a thick, protective top coat for a glass-like finish.
Budget Range
- Essie ‘Ballet Slippers’ – $10
- Beetles Nail Art Liners – $8
- Seche Vite Dry Fast Top Coat – $9
3 Simple Ways to Create Minimalist Heart Designs
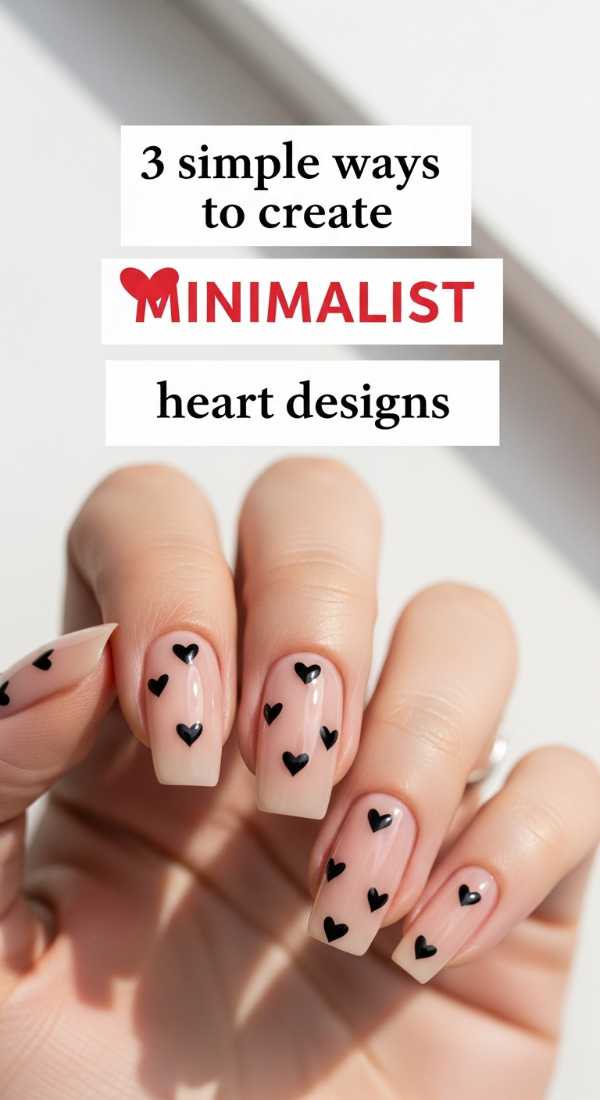
Why to love these Nails:
Minimalist hearts are a whisper of romance—subtle, sweet, and never overdone. They serve as a tiny, quiet reminder to be kind to yourself throughout the busy day, tucked away where only you might notice their charm.
Essential Items:
- Sheer nude polish
- Deep crimson or classic black polish
- A toothpick or professional dotting tool
How to Prepare:
- The Dot Method: Place two small dots side-by-side and drag them down to a point with a toothpick to form a heart.
- The Brush Swipe: Use a very thin liner brush to paint two intersecting diagonal lines.
- The Sticker Hack: Use a tiny heart stencil or sticker for a perfectly crisp edge every single time.
Budget Range
- OPI ‘Bubble Bath’ – $11
- Sally Hansen ‘Insta-Dri’ Red – $6
- Dual-ended Dotting Tool Set – $5
4 Steps to Master Almond French Tips with Bows
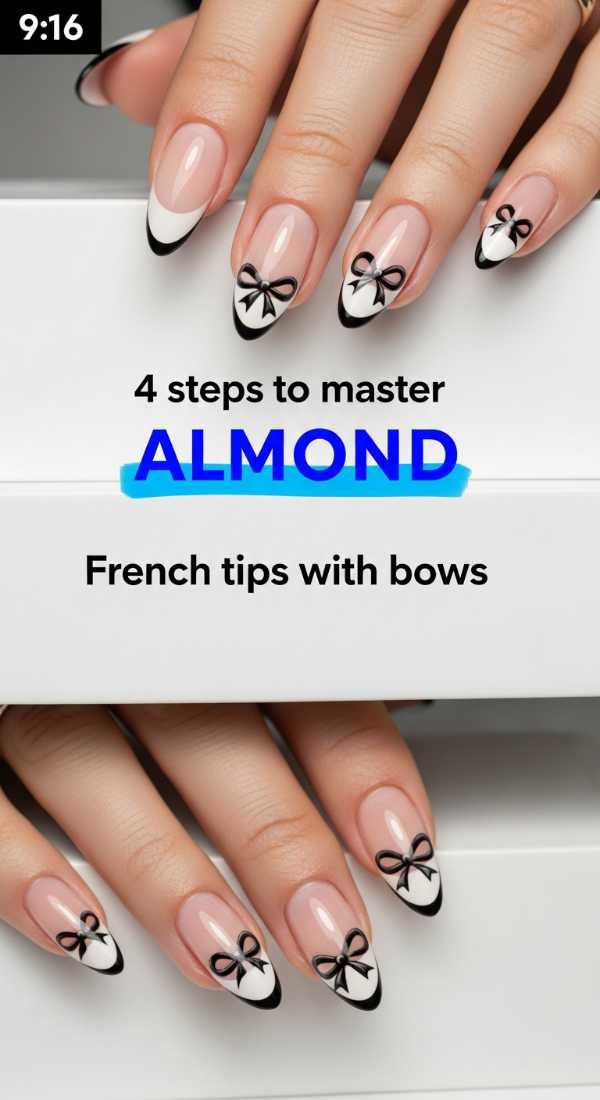
Why to love these Nails:
This look is the epitome of the ‘coquette’ aesthetic, blending classic sophistication with a playful, girlish charm. The almond shape elongates the fingers beautifully, while the tiny bows add a touch of haute couture tailoring.
Essential Items:
- Almond-shaped nail tips or natural growth
- Crisp white polish
- Ultra-fine black liner brush
- Pale pink base
How to Prepare:
- Paint your base with a sheer pink to give the nail a healthy, natural glow.
- Carefully swipe a white curve across the tip, following the natural almond arc.
- Using the fine liner, draw two small loops and two tiny tails at the base of the French tip to create the bow.
- Cure or dry thoroughly before applying a smudge-proof top coat.
Budget Range
- Zoya ‘Naked Manicure’ Kit – $25
- Hollo Nail Art Brushes – $12
- NailTek Strengthening Top Coat – $10
6 Quick Methods for Coffee Bean Nail Art
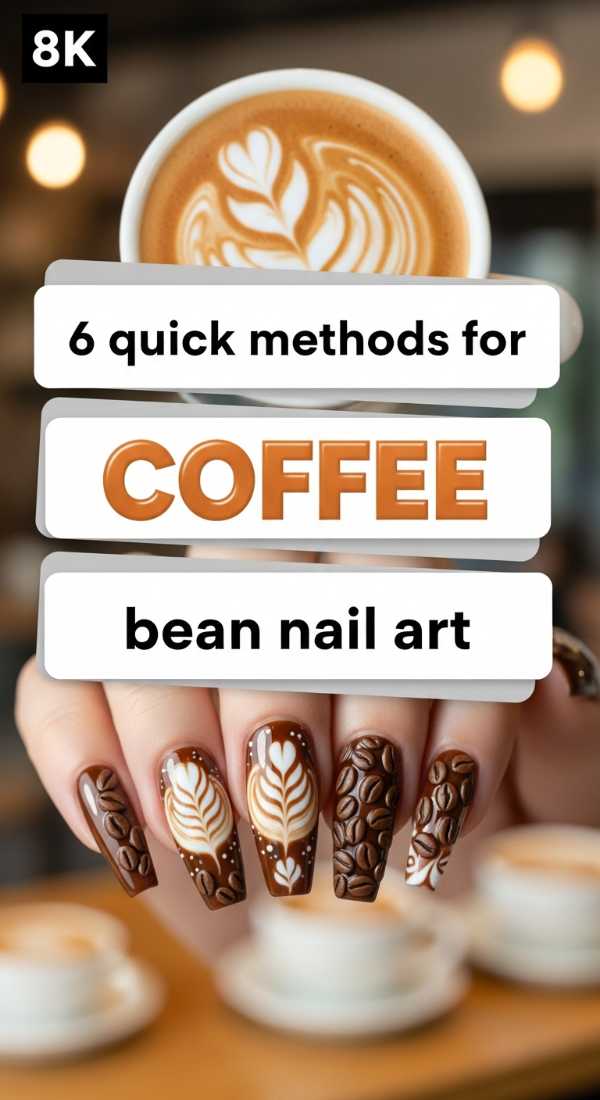
Why to love these Nails:
For my fellow caffeine lovers, these nails are a cozy morning in a bottle. They feel earthy, grounded, and sophisticated, mirroring the rich textures of an espresso crema or a warm latte on a rainy morning.
Essential Items:
- Mocha brown polish
- Cream or tan polish
- Matte top coat
- Precision tool
How to Prepare:
- Apply a warm mocha base to all nails.
- Use a lighter tan shade to create small oval shapes.
- With a dark brown liner, draw a tiny ‘S’ curve down the middle of the oval to mimic the bean crease.
- Vary the placement of the beans so they look scattered and organic.
- Experiment with a matte finish for an earthy, realistic bean texture.
- Add a ‘latte swirl’ accent nail using a toothpick to marble cream and brown together.
Budget Range
- Lights Lacquer ‘Espresso’ – $13
- Revlon ‘Core’ Brown – $7
- Matte About You Top Coat – $10
7 Easy Tips for Simple Plaid Nail Patterns
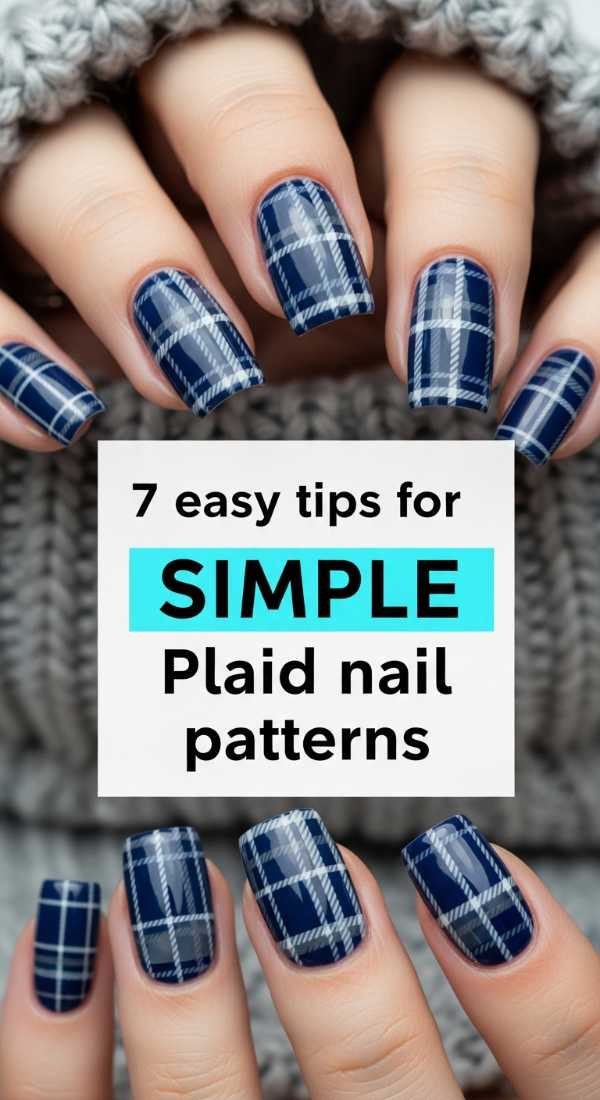
Why to love these Nails:
Plaid is a timeless classic that feels structured yet incredibly stylish. It’s like wearing a perfectly tailored blazer on your nails—polished, intentional, and endlessly chic for any professional or casual setting.
Essential Items:
- Neutral base color
- Two contrasting striping polishes
- Steady hand or striping tape
How to Prepare:
- Start with a clean, dry base of beige or grey.
- Draw two vertical lines slightly off-center using your first contrasting color.
- Draw two horizontal lines to intersect them, creating a grid.
- Add a third, much thinner line in a metallic or bright shade for ‘pop’.
- Keep your layers very thin to avoid a bulky look.
- Use a cleanup brush dipped in acetone to keep your lines razor-sharp.
- Finish with a high-shine top coat to pull the pattern together.
Budget Range
- Orly ‘Glowstick’ or Neutrals – $12
- Art Deco Striping Polish – $5 each
- Pure Acetone Cleanup Jar – $6
5 Steps to Achieve the Perfect Spring Ombre
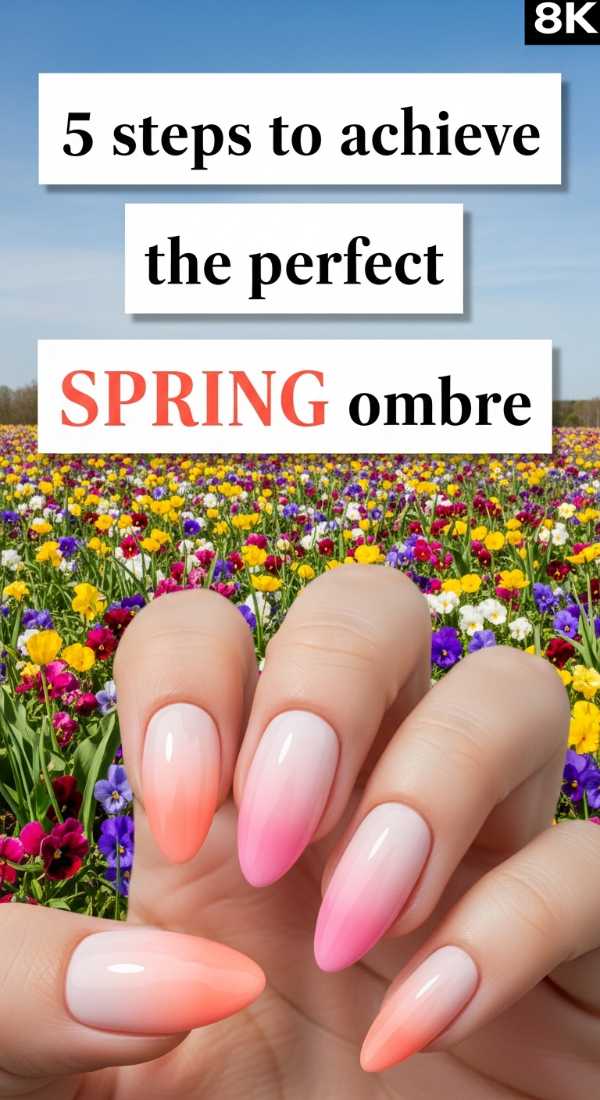
Why to love these Nails:
Spring ombre is like watching a sunrise on your fingertips. The soft transition from one pastel hue to another feels ethereal and dreamy, capturing the very essence of a light spring breeze.
Essential Items:
- Two coordinating pastel polishes (e.g., lavender and peach)
- Latex-free makeup sponge
- Liquid latex or tape (for skin protection)
How to Prepare:
- Paint your nails with the lighter of the two shades and let dry.
- Apply the two colors in parallel lines directly onto the makeup sponge.
- Gently dab the sponge onto your nail, moving it slightly up and down to blur the line.
- Repeat the dabbing process once dry to build the color intensity.
- Remove the skin protection and seal the gradient with a top coat to smooth the texture.
Budget Range
- China Glaze Pastels – $8 each
- Wedge Makeup Sponges – $4
- Pueen Latex Tape – $9
4 Ways to Design Simple Geometric Almond Nails
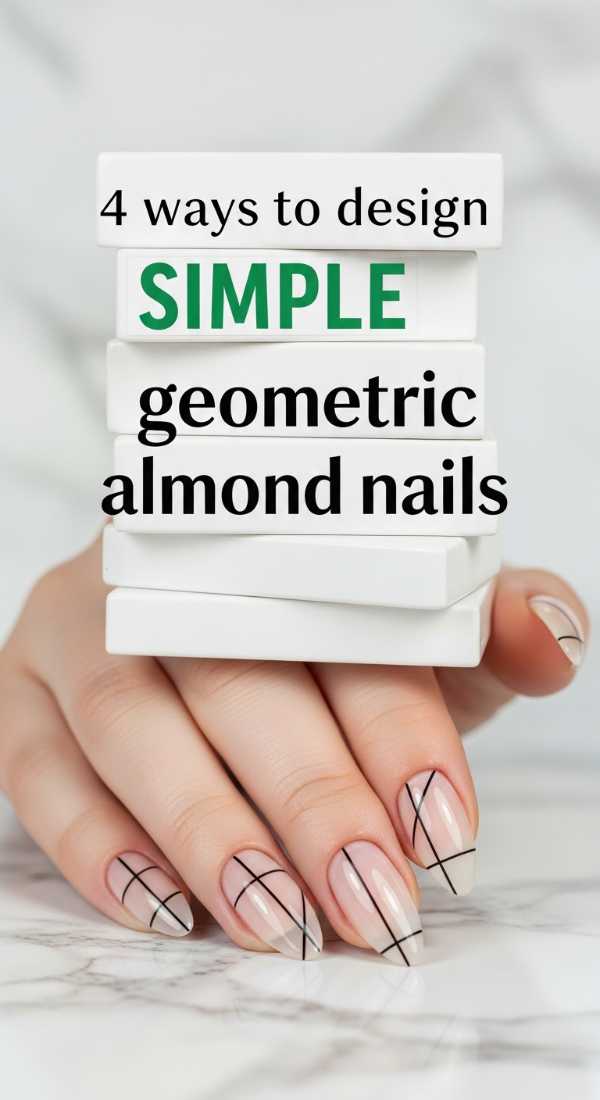
Why to love these Nails:
Geometric designs on almond nails offer a modern, architectural feel. It’s for the muse who loves clean lines and minimalist art—designs that feel deliberate and sharp while remaining soft enough for everyday wear.
Essential Items:
- Nude base polish
- Black or gold metallic liner
- Washi tape or nail tape
How to Prepare:
- The Negative Space Half-Moon: Leave the base of the nail bare and paint only the top half in a sharp angle.
- The Single Vertical Stripe: Draw one perfectly straight line from cuticle to tip for instant elongation.
- The Triangle Tip: Instead of a curve, paint the tip of the almond in a sharp V-shape.
- The Side Frame: Trace only one side of the nail edge for a subtle, modern frame effect.
Budget Range
- ILNP ‘Birthday Suit’ – $10
- Maybelline Gold Liner – $8
- Line-work Washi Tape – $4
8 Steps to Create Elegant Spring Sage Designs
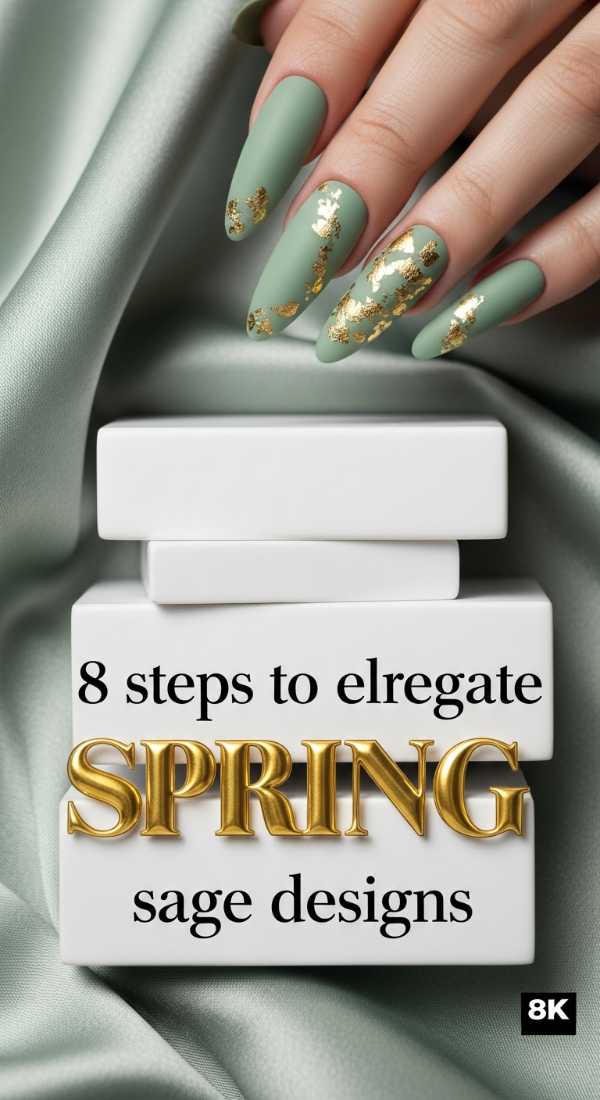
Why to love these Nails:
Sage green is the color of tranquility. These designs feel grounded and organic, reminiscent of eucalyptus leaves and quiet forest walks. It is a sophisticated way to wear color without it feeling overwhelming.
Essential Items:
- Sage green polish
- Gold leaf flakes
- Clear base and top coat
How to Prepare:
- Shape your nails into a soft oval or almond.
- Apply a strengthening base coat.
- Apply two coats of sage green polish.
- While the second coat is slightly tacky, use tweezers to place a few gold leaf flakes.
- Press the flakes down gently with a dry finger.
- Add a tiny white dot near the flakes for a ‘dewdrop’ effect.
- Ensure all edges are smooth.
- Apply a generous layer of top coat to encapsulate the gold.
Budget Range
- Olive & June ‘Sagey’ – $9
- Generic Gold Leaf Flakes – $6
- Cuccio Cuticle Oil – $7
3 Easy Steps for Almond Nails with Chrome
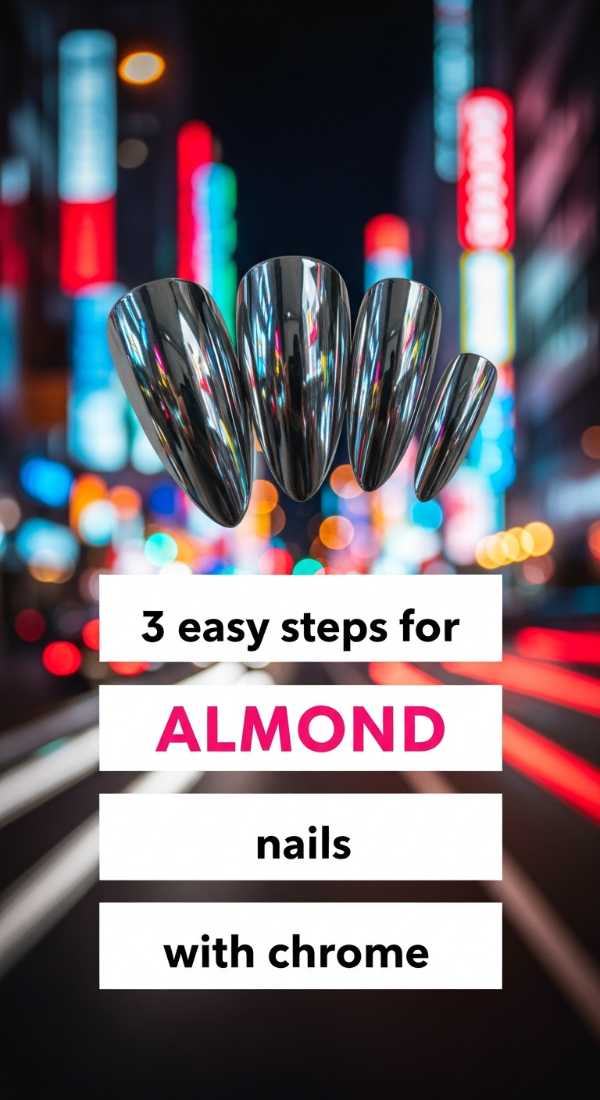
Why to love these Nails:
Chrome is pure magic—it transforms a simple manicure into a liquid-metal masterpiece. It’s bold, futuristic, and catches the light in a way that feels absolutely high-fashion and expensive.
Essential Items:
- No-wipe gel top coat
- Chrome powder (pearl or silver)
- Eyeshadow applicator
How to Prepare:
- Apply your base color and a no-wipe gel top coat, then cure.
- Dip the applicator into the chrome powder and rub it firmly onto the nail surface until it mirrors.
- Finish with one final layer of gel top coat to lock in that metallic shine.
Budget Range
- Artdone Chrome Powder Kit – $12
- SUNUV LED Nail Lamp – $25
- Gelish No-Wipe Top Coat – $15
5 Tips for Simple Butter Yellow Spring Nails
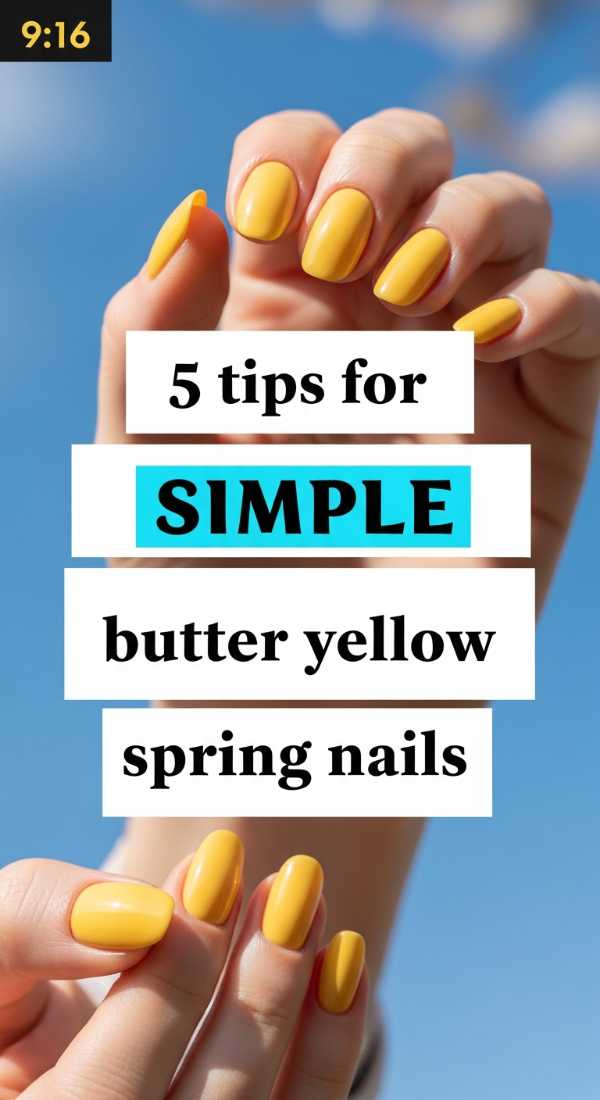
Why to love these Nails:
Butter yellow is the ‘it’ color of the season. It is cheerful without being loud, soft like a lemon curd, and looks stunning against almost every skin tone, bringing a sense of warmth and happiness to your look.
Essential Items:
- Creamy pastel yellow polish
- White base coat (to make the yellow pop)
- Nourishing cuticle oil
How to Prepare:
- Always start with a white base coat; yellows can be sheer, and this gives them a solid foundation.
- Apply the yellow in three very thin strokes (middle, side, side).
- Allow ample drying time between coats to avoid streaking.
- Keep the nail shape short and rounded for a clean, modern ‘clean girl’ aesthetic.
- Finish with a high-gloss coat to give it that ‘creamy’ butter finish.
Budget Range
- Londontown ‘Lemonade’ – $16
- Wet n Wild White – $3
- CND SolarOil – $9
Embracing Your Inner Muse
My sweet friends, I hope these tutorials inspire you to take a little moment for yourself this week. Remember, your nails are just another way to express the beautiful, multifaceted person you are. There is no right or wrong way to create art—there is only the joy of the process. Whether you choose a simple butter yellow or a complex plaid, wear it with confidence and a soft heart. Until next time, stay polished and stay true to your beautiful self.