
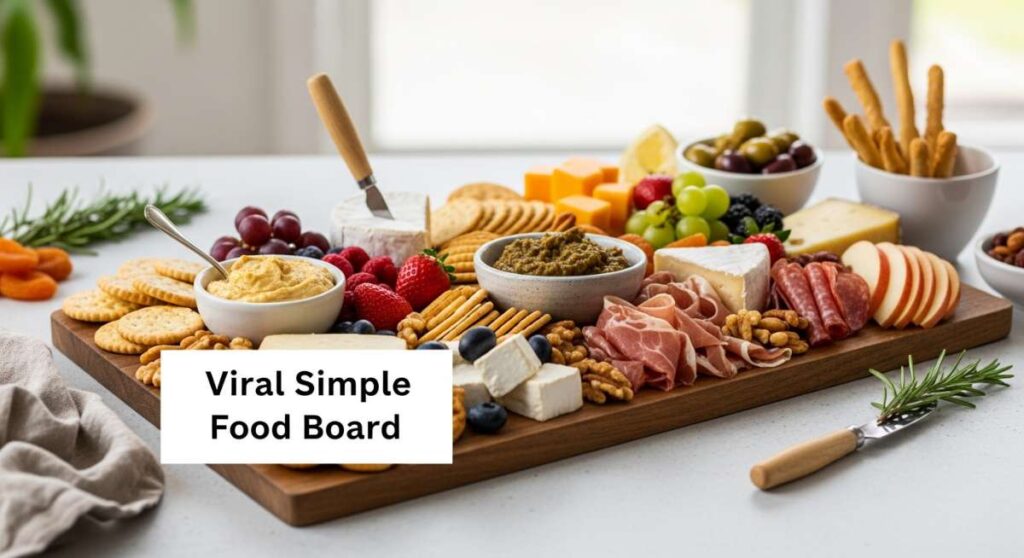
Easy Appetizer Magic: How to Build the Viral Simple Food Board
There is something truly soul-healing about a gathering where the food feels as effortless as the conversation. We’ve all been there—stuck in the kitchen while our favorite people laugh in the other room. The Viral Simple Food Board was born out of my desire to change that, moving away from formal plates and toward a gorgeous, grazing-style experience that celebrates fresh ingredients and vibrant colors. It’s about creating a centerpiece that invites everyone to lean in, reach across the table, and share a moment over something delicious.
The magic of this board lies in its versatility. It’s a tapestry of flavors: the smokiness of the grill, the brightness of citrus, and the comforting crunch of roasted vegetables. When you lay these dishes out together, they transform from simple recipes into an edible work of art. Whether you’re hosting a backyard sunset dinner or a cozy indoor brunch, these components are designed to be prep-friendly and high-impact. Let’s dive into the ten essential elements that will make your board the talk of the town.
How to grill fresh shrimp?

Why we love this
There is nothing quite like the sensory experience of perfectly grilled shrimp; it’s the ultimate summer bite. As they hit the hot grates, the shells turn a vibrant, sunset pink and the aroma of garlic and char begins to waft through the air, instantly making everyone’s mouth water. When you bite into one, you get that satisfying, firm snap followed by a burst of juicy, sweet seafood flavor that is perfectly accented by a hit of smoky caramelization. It feels elegant yet rustic, making it the perfect protein anchor for our viral food board.
Ingredients
- 1 lb jumbo shrimp, peeled and deveined (tail on)
- 3 tablespoons extra virgin olive oil
- 3 cloves garlic, minced
- 1 teaspoon smoked paprika
- 1/2 teaspoon red pepper flakes
- Zest and juice of one lemon
- Fresh parsley for garnish
- Kosher salt and black pepper to taste
How to make it
- Begin by patting your shrimp completely dry with paper towels; removing excess moisture is the secret to getting a deep, golden char rather than steaming the meat.
- In a large glass bowl, whisk together the olive oil, minced garlic, smoked paprika, red pepper flakes, lemon zest, and a generous pinch of salt and pepper to create a fragrant marinade.
- Toss the shrimp in the marinade until every crevice is coated, then let them sit at room temperature for no more than 15 minutes—any longer and the lemon juice will begin to “cook” the delicate protein.
- Preheat your grill to medium-high heat (about 400°F) and lightly oil the grates using a folded paper towel dipped in oil and held with tongs.
- Thread the shrimp onto skewers to prevent them from falling through the grates, or place them directly onto the grill if using a grill basket.
- Grill for exactly 2-3 minutes per side; you are looking for the flesh to turn opaque and the edges to show slight char marks. Overcooking will lead to a rubbery texture, so stay vigilant.
- Remove immediately from the heat, squeeze the fresh lemon juice over the hot shrimp, and sprinkle with chopped parsley before arranging them on your board.
How to make peach salad?

Why we love this
This peach salad is a celebration of contrasting textures and temperatures that dance on the tongue. The fuzziness of a perfectly ripe peach gives way to a succulent, honey-sweet interior that pairs beautifully with the creamy, rich velvet of burrata or the sharp tang of feta. Every forkful offers a crunch from toasted nuts and a peppery bite from fresh arugula, all tied together by a silky balsamic glaze. It smells like a sun-drenched orchard and looks like a masterpiece, adding a sophisticated sweetness to your appetizer spread.
Ingredients
- 4 ripe peaches, sliced into wedges
- 4 cups fresh baby arugula
- 8 oz fresh burrata cheese or crumbled feta
- 1/4 cup toasted pecans or walnuts
- 1/4 cup fresh mint leaves, torn
- 2 tablespoons thick balsamic glaze
- 1 tablespoon honey
- Flaky sea salt
How to make it
- Start by selecting peaches that are slightly firm but give just a little when pressed; if they are too soft, the salad will become mushy.
- To elevate the flavor, you can lightly sear the peach wedges in a dry pan over high heat for 60 seconds per side to caramelize the natural sugars, though fresh slices work beautifully too.
- Layer a bed of vibrant, washed arugula onto a shallow platter, ensuring the greens are fluffed to create volume.
- Nestle the peach wedges into the greens, spacing them evenly to ensure every guest gets a bit of fruit in every bite.
- Tear the burrata cheese by hand and place the creamy pieces in the center, or sprinkle your feta generously across the top.
- Scatter the toasted nuts and torn mint leaves over the salad to provide a much-needed textural contrast and a burst of herbal freshness.
- Just before serving, whisk the honey with a teaspoon of warm water to loosen it, drizzle it over the peaches, and then follow with a decorative zig-zag of balsamic glaze and a sprinkle of flaky sea salt.
How to roast summer squash?

Why we love this
Roasted summer squash is often underrated, but when done right, it becomes a buttery, tender delight that melts in your mouth. The high heat of the oven transforms the mild, watery vegetable into a concentrated explosion of earthy sweetness, especially where the edges turn a deep, golden brown. The smell of roasting squash mingled with parmesan cheese creates a comforting, kitchen-filling aroma that signals a home-cooked meal. It provides a soft, warm element to the food board that balances out the crisper, raw components perfectly.
Ingredients
- 2 medium yellow summer squashes
- 2 medium zucchinis
- 2 tablespoons avocado oil
- 1/2 cup grated Parmesan cheese
- 1 teaspoon dried oregano
- 1/2 teaspoon garlic powder
- Salt and cracked black pepper
How to make it
- Preheat your oven to 425°F (220°C); a high temperature is critical here to evaporate the squash’s natural water content quickly so it browns instead of steams.
- Slice the squash and zucchini into 1/2-inch thick rounds; try to keep them uniform so they cook at the same rate.
- In a large mixing bowl, toss the rounds with avocado oil (which has a high smoke point), garlic powder, oregano, salt, and pepper until each piece is well-lubricated.
- Arrange the slices in a single layer on a parchment-lined baking sheet, making sure they aren’t overlapping; crowding the pan will cause the vegetables to get soggy.
- Roast for 15 minutes, then remove the tray and sprinkle the Parmesan cheese evenly over the top of the slices.
- Return to the oven for another 5-7 minutes, or until the cheese has formed a golden, lacy crust and the squash is tender when pierced with a fork.
- Let them cool for two minutes on the pan to allow the cheese crust to firm up before transferring them to your board.
How to grill honey chicken?
Why we love this
This honey-grilled chicken is the definition of a crowd-pleaser, offering a sticky, caramelized exterior that yields to an incredibly juicy and tender center. The heat of the grill works magic on the honey, creating those sought-after charred bits that taste like savory candy. As it grills, the sweet and salty marinade thickens into a glossy lacquer that looks stunning under the light. It’s the kind of dish that has guests asking for the recipe before they’ve even finished their first piece, providing a hearty, protein-rich anchor for your board.
Ingredients
- 1.5 lbs chicken breast or thighs, cut into bite-sized strips
- 1/3 cup honey
- 1/4 cup soy sauce
- 1 tablespoon toasted sesame oil
- 1 tablespoon fresh ginger, grated
- 2 cloves garlic, minced
- Green onions and sesame seeds for garnish
How to make it
- Whisk together the honey, soy sauce, sesame oil, ginger, and garlic in a small saucepan over low heat for 3 minutes just to meld the flavors; set aside a small portion to use as a finishing glaze.
- Place your chicken pieces in a resealable bag and pour the remaining marinade over them, massaging the bag to ensure even coverage; marinate in the fridge for at least 30 minutes, or up to 4 hours.
- Preheat your grill to medium heat (approx 375°F); honey burns easily due to its sugar content, so avoid using high heat.
- Thread the chicken onto wooden skewers (pre-soaked in water for 20 minutes) to make them easy for guests to grab from the board.
- Place the skewers on the grill and cook for 5-6 minutes per side. Brush with the reserved glaze during the last 2 minutes of cooking to create that beautiful, sticky finish.
- Check for an internal temperature of 165°F (74°C) using a meat thermometer to ensure they are safe yet still succulent.
- Garnish with thinly sliced green onions and a sprinkle of toasted sesame seeds for a professional, restaurant-quality look.
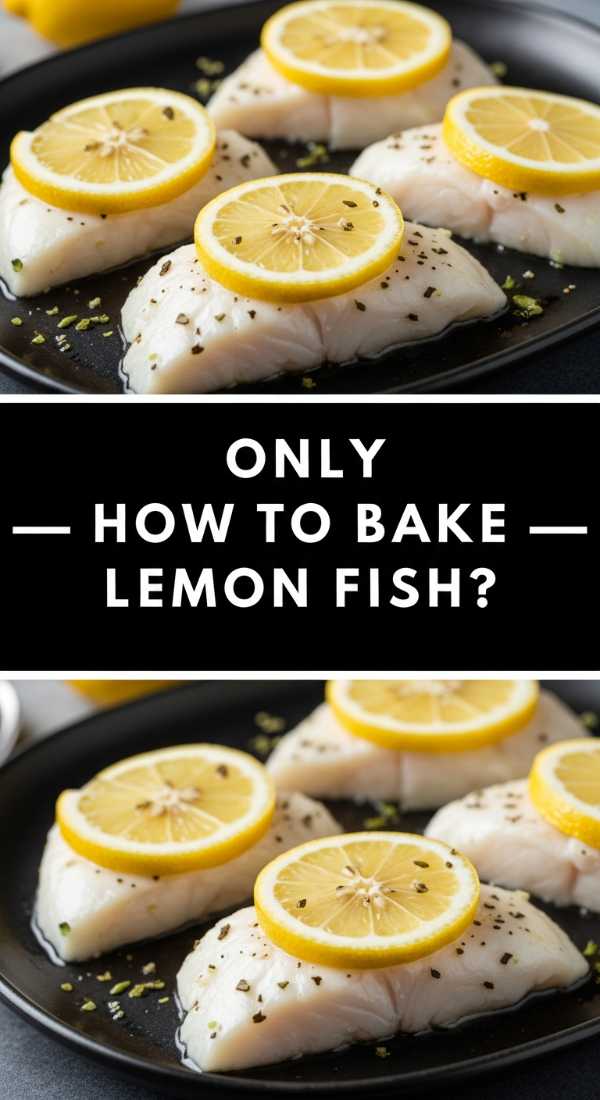
How to bake lemon fish?

Why we love this
Baking fish with lemon is a masterclass in clean, bright flavors that feel incredibly light on the palate. The steam trapped under the lemon slices keeps the fish extraordinarily moist, resulting in a flake-apart texture that feels like butter. The scent of citrus and fresh herbs filling the air is therapeutic and sophisticated, signaling a dish that is as healthy as it is delicious. It adds a touch of elegance to the board, offering a refined option for guests who prefer something less heavy than meat but just as satisfying.
Ingredients
- 1 lb white fish fillets (cod, tilapia, or halibut)
- 2 lemons (one thinly sliced, one juiced)
- 3 tablespoons melted butter or olive oil
- 2 cloves garlic, minced
- 1 teaspoon dried dill or fresh parsley
- Salt and white pepper
How to make it
- Preheat your oven to 375°F (190°C) and lightly grease a shallow baking dish with olive oil.
- Pat the fish fillets dry with a paper towel; moisture on the surface can prevent the seasonings from sticking and lead to a poached rather than baked texture.
- In a small bowl, combine the melted butter, lemon juice, minced garlic, and herbs.
- Place the fish fillets in the prepared dish and pour the lemon-butter mixture over them, ensuring they are fully submerged in the flavor.
- Season with salt and white pepper, then lay the thin lemon slices across the top of the fillets like scales; this protects the delicate flesh from the direct heat of the oven.
- Bake for 12-15 minutes, depending on the thickness of the fish. You’ll know it’s done when the fish is opaque throughout and flakes easily with a fork at the thickest part.
- Carefully transfer the fillets to your board, pouring the pan juices over them to keep them glistening and flavorful.
How to sear steak bites?
Why we love this
Steak bites are the ultimate finger-food luxury, providing all the rich, savory satisfaction of a full steak dinner in a single, perfectly seasoned cube. The Maillard reaction creates a dark, salty crust on the outside while the inside remains a tender, pink medium-rare. When tossed in garlic butter, the aroma is absolutely intoxicating—it’s the kind of smell that pulls people from across the house into the kitchen. These bites are bold, decadent, and provide a wonderful contrast to the lighter vegetable elements on your food board.
Ingredients
- 1 lb sirloin or ribeye steak, cut into 1-inch cubes
- 2 tablespoons high-smoke point oil (like grapeseed)
- 3 tablespoons unsalted butter
- 4 cloves garlic, smashed
- 2 sprigs fresh rosemary or thyme
- Coarse sea salt and cracked black pepper
How to make it
- Take your steak cubes out of the fridge 20 minutes before cooking to bring them to room temperature; this ensures an even sear and a tender interior.
- Pat the cubes extremely dry and season them generously with salt and pepper just seconds before they hit the pan to prevent the salt from drawing out moisture.
- Heat a heavy cast-iron skillet over high heat until it is wispy with smoke. Add the oil and swirl to coat.
- Place the steak bites in the pan in a single layer, making sure they aren’t touching. Do not move them for at least 60-90 seconds to allow that deep brown crust to form.
- Flip the bites and cook for another minute. Reduce the heat to medium and add the butter, smashed garlic, and herb sprigs.
- As the butter foams, use a spoon to baste the steak bites with the garlic-infused butter for about 30 seconds.
- Remove the steak from the pan immediately to prevent overcooking and let them rest for 3 minutes before serving so the juices redistribute.
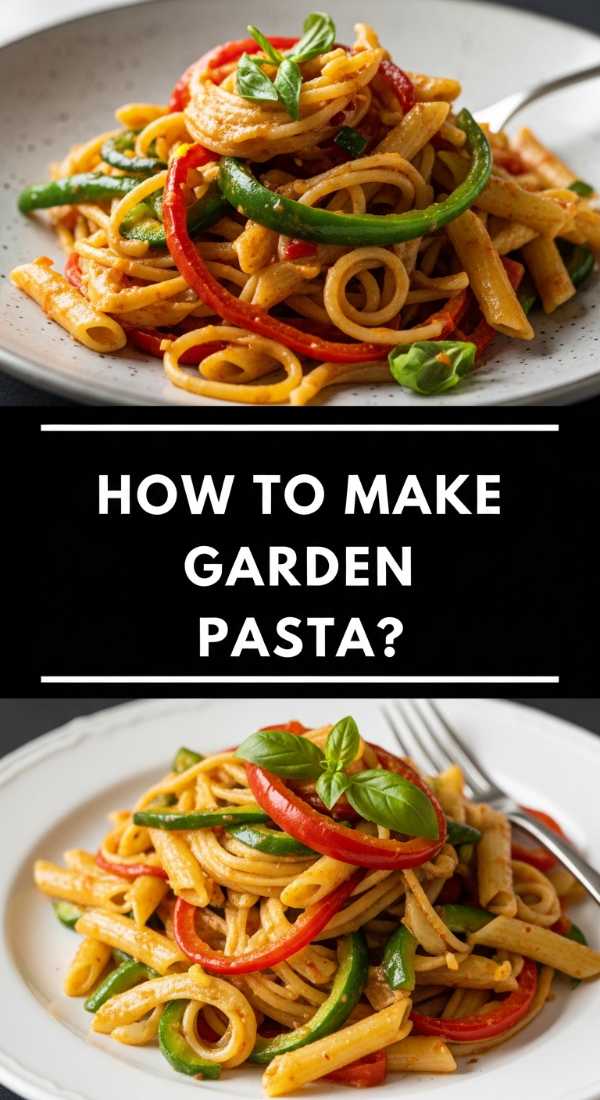
How to make garden pasta?
Why we love this
Garden pasta is like a bowl of sunshine, bringing together the vibrant colors of the harvest with the comforting, al dente bite of pasta. It’s light, herbaceous, and incredibly refreshing, making it an ideal side dish that doesn’t feel too heavy for a grazing board. The way the olive oil coats the noodles and carries the flavor of fresh basil and vine-ripened tomatoes is simple perfection. It provides a beautiful visual break on the board with its pops of red and green, inviting guests to scoop up a small portion alongside their proteins.
Ingredients
- 8 oz short pasta (penne, fusilli, or farfalle)
- 1 cup cherry tomatoes, halved
- 1/2 cup fresh basil, julienned
- 1/4 cup extra virgin olive oil
- 2 cloves garlic, very thinly sliced
- 1/2 teaspoon red pepper flakes
- Freshly shaved Parmesan cheese
How to make it
- Boil a large pot of heavily salted water—it should taste like the sea—and cook your pasta according to package directions until it is just al dente.
- While the pasta cooks, heat the olive oil in a large skillet over low-medium heat. Add the sliced garlic and red pepper flakes, cooking slowly until the garlic is golden and the oil is infused with flavor.
- Add the halved cherry tomatoes to the oil and cook for 3-4 minutes until they just begin to burst and release their juices, creating a light, natural sauce.
- Reserve 1/2 cup of the starchy pasta water, then drain the pasta and add it directly into the skillet with the tomatoes and garlic.
- Toss everything together, adding a splash of the reserved pasta water to help the oil and juices emulsify into a silky coating for the noodles.
- Turn off the heat and fold in the fresh basil; the residual heat will wilt it just enough to release its oils without turning it brown.
- Transfer to a small bowl for the board and finish with a generous amount of shaved Parmesan.
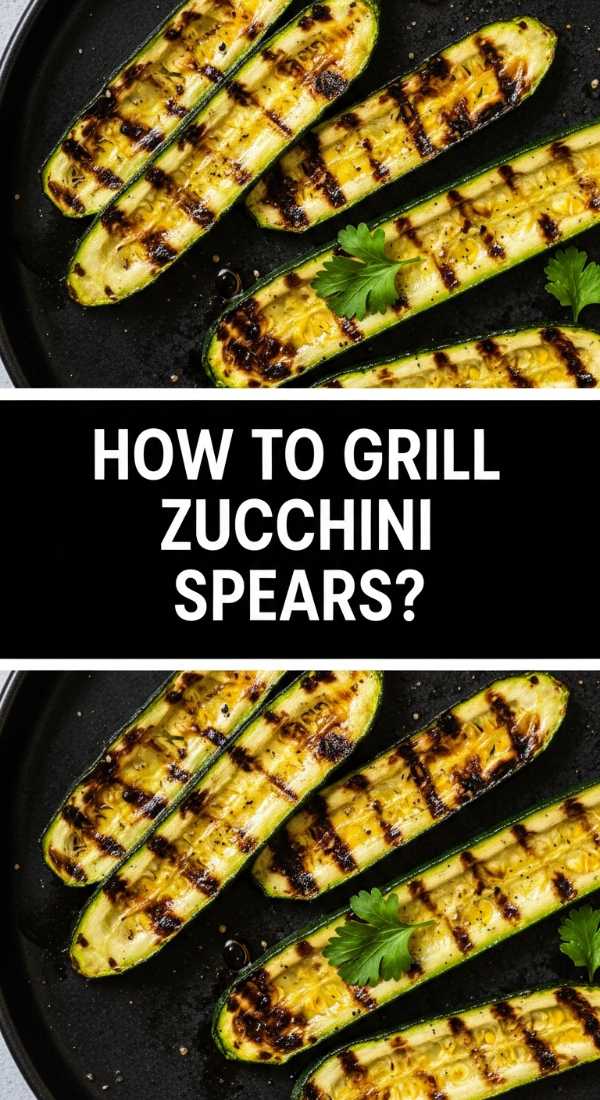
How to grill zucchini spears?

Why we love this
Grilling zucchini spears transforms them from a humble vegetable into a smoky, charred treat with a surprisingly meaty texture. The long, elegant shape of the spears adds a lovely architectural element to your board, drawing the eye across the arrangement. There’s a delightful contrast between the slightly crisp exterior and the tender, succulent middle that holds onto the flavors of the grill. Topped with a sprinkle of herbs or a squeeze of lime, they offer a healthy, earthy flavor profile that cleanses the palate between richer bites.
Ingredients
- 3 medium zucchinis
- 2 tablespoons olive oil
- 1 teaspoon lemon pepper seasoning
- 1/2 teaspoon onion powder
- 1/4 cup crumbled feta cheese (optional)
- Fresh chives, chopped
How to make it
- Slice each zucchini lengthwise into quarters to create long, uniform spears. This shape is better for grilling than rounds as they are easier to flip and won’t fall through the grates.
- Place the spears on a tray and drizzle with olive oil, then sprinkle evenly with lemon pepper and onion powder. Use your hands to ensure every side is coated.
- Preheat your grill to medium-high heat. Ensure the grates are clean and well-oiled to prevent sticking.
- Place the zucchini spears skin-side down first. Grill for 3-4 minutes per side. You are looking for distinct, dark grill marks and a slight softening of the flesh.
- Flip the spears carefully using tongs and cook for another 3 minutes. The goal is to have a bit of “bite” left in the center; nobody likes a mushy zucchini!
- Remove from the grill and immediately sprinkle with chopped chives and crumbled feta while still warm so the cheese slightly softens.
- Arrange them in a fan shape on your board for a beautiful, organized aesthetic.
How to make berry dessert?

Why we love this
Every great board needs a sweet finish, and this berry dessert is a light, sparkling conclusion to a savory feast. The sight of deep red strawberries and plump blueberries glistening with a light glaze is irresistible. It smells like a summer garden and tastes like pure sunshine, with the berries providing a natural tartness that cuts through the richness of the earlier courses. Whether served with a dollop of whipped cream or just on their own, they provide a refreshing, healthy way to satisfy a sweet tooth while keeping the board’s “fresh and simple” theme intact.
Ingredients
- 1 pint strawberries, hulled and halved
- 1 cup blueberries
- 1 cup raspberries
- 1 tablespoon honey or maple syrup
- 1 teaspoon vanilla extract
- Fresh mint leaves for garnish
- Optional: Whipped cream or Greek yogurt for dipping
How to make it
- Wash all the berries in cold water and spread them out on a clean kitchen towel to air dry completely; any excess water will dilute the flavor.
- In a small bowl, whisk together the honey (or maple syrup) and the vanilla extract until smooth.
- Place all the berries in a large mixing bowl and drizzle the honey-vanilla mixture over the top.
- Gently fold the berries with a silicone spatula, being very careful not to bruise the delicate raspberries or blueberries.
- Let the mixture macerate at room temperature for about 10-15 minutes; this allows the berries to release their natural juices and create a light, flavorful syrup.
- Transfer the berries into a decorative bowl or nestle them into a hollowed-out fruit half (like a melon) to place on the board.
- Garnish with fresh mint leaves to provide a pop of green and a refreshing herbal scent that complements the fruit perfectly.
How to prepare shrimp tacos?
[IMAGE_10]
Why we love this
Shrimp tacos are the ultimate interactive component of a food board, offering a DIY element that guests absolutely love. The combination of warm, slightly charred corn tortillas, spicy seasoned shrimp, and a cool, crunchy slaw creates a symphony of textures in every bite. There’s something so festive about a taco—it’s colorful, easy to hold, and packs a massive punch of flavor from lime, cilantro, and spice. It brings a fun, casual energy to the spread, making the viral food board feel like a true celebration of variety and taste.
Ingredients
- 1 lb small shrimp, peeled and deveined
- 1 tablespoon taco seasoning (chili powder, cumin, garlic)
- 8 small corn tortillas
- 2 cups shredded cabbage (slaw mix)
- 1/4 cup sour cream or Mexican crema
- 1 lime, cut into wedges
- Fresh cilantro and sliced jalapeños
How to make it
- Toss the shrimp in a bowl with the taco seasoning and a drizzle of oil until they are fully coated in the spices.
- Heat a skillet over medium-high heat and sauté the shrimp for about 2 minutes per side until they are pink and curled; set aside and keep warm.
- To prep the tortillas, hold them with tongs directly over a low gas flame for 10 seconds per side until they show slight char marks and become pliable. Alternatively, warm them in a dry pan.
- In a small bowl, mix the shredded cabbage with a squeeze of lime juice and a pinch of salt to create a quick, zesty slaw.
- To assemble for the board, you can either pre-make the tacos or lay out the components separately. To pre-make, place a small heap of slaw in a tortilla, top with 3 shrimp, and add a dollop of crema.
- Garnish the tacos with fresh cilantro and a slice of jalapeño for those who enjoy a bit of heat.
- Place the tacos snugly against each other on the board to keep them upright, and surround them with extra lime wedges for guests to use as they please.
Wrapping Up the Magic
Building a viral simple food board isn’t just about the recipes; it’s about the intention behind the meal. By combining these ten diverse, flavor-packed elements, you create an experience that caters to every palate and encourages a slower, more connected way of eating. Remember to fill the gaps on your board with nuts, crackers, or extra herbs to create that lush, “overflowing” look that makes social media go wild. Now, pour yourself a glass of something cold, invite your favorite people over, and enjoy the magic of simple, beautiful food.