
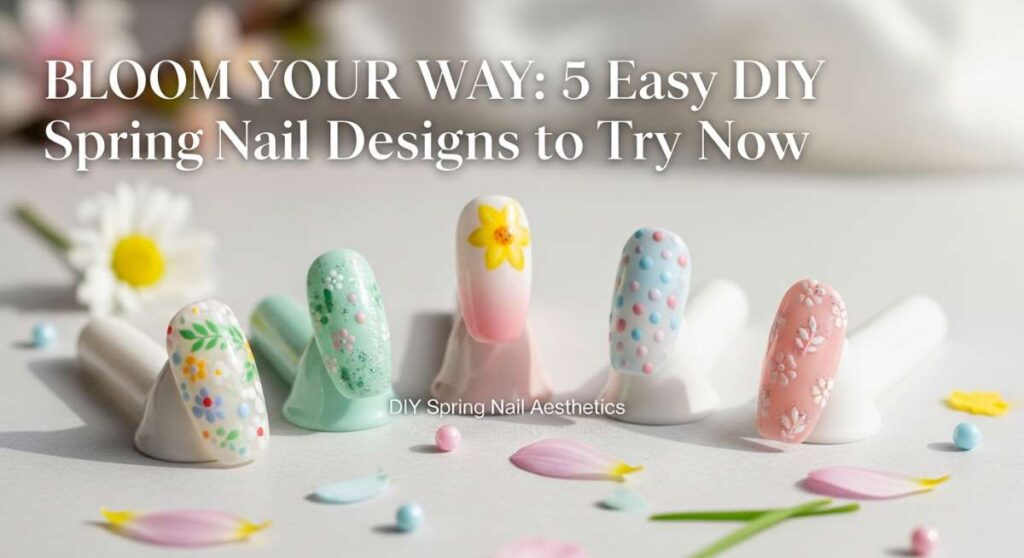
Bloom Your Way: 5 Easy DIY Spring Nail Designs to Try Now
Hello, my loves! Can you feel it? That soft, golden light is finally dancing through the window, and the world is waking up from its long winter slumber. There is something so magical about the first few weeks of spring—the way the air smells of fresh rain and budding blossoms. It’s a time for renewal, for shedding those heavy layers, and for letting our inner light shine through in everything we do.
Today, I wanted to invite you to take a little moment for yourself, a quiet pause in your busy day to celebrate this transition. Our hands do so much for us—they hold tea mugs, type out dreams, and hug the ones we love. Giving them a touch of spring color is like giving yourself a tiny bouquet that never wilts. So, grab your favorite cozy drink, put on some soft lo-fi beats, and let’s dive into some DIY nail magic that feels like a warm, cloud-soft embrace.
4 Simple Ways to Blend Pastel Nails

Why to love this Design:
Imagine the softest sunset you’ve ever seen, melting from lavender into a dreamy mint green. Blending pastels is the ultimate way to capture the ethereal essence of spring without needing the steady hand of a professional artist. It’s forgiving, romantic, and looks like a watercolor masterpiece on your fingertips.
Essential Elements:
- Soft lavender polish
- Pale mint green polish
- A makeup wedge sponge
- Liquid latex or tape (for easy cleanup)
How to Prepare:
- Apply a base coat and one layer of your lightest pastel color.
- Paint stripes of your chosen pastels directly onto the edge of a makeup sponge.
- Gently dab the sponge onto your nail, moving it slightly up and down to blur the lines.
- Repeat until you reach your desired opacity and finish with a glossy top coat.
Budget Range
- Essie Pastel Collection: $9.00 – $11.00
- Wedge Sponges (Multi-pack): $3.50
- Clean-up brush: $5.00
3 Quick Techniques for Floral Nails
Why to love this Design:
Floral nails are the quintessential hallmark of the season, but they don’t have to be complicated! These dainty little blooms add a touch of whimsy to your look and serve as a constant reminder that beauty is blooming all around us, even in the smallest details. It’s pure, wearable joy.
Essential Elements:
- A bright yellow polish for the centers
- Crisp white or soft pink for petals
- A bobby pin or a professional dotting tool
How to Prepare:
- Place a small dot of yellow polish in the center of your nail using your dotting tool.
- Clean the tool and place 5 tiny white dots around the center yellow dot to create petals.
- Drag the petal dots slightly toward the center with a toothpick for a more organic shape.
Budget Range
- OPI Alpine Snow: $11.50
- Bobby Pins (from your bathroom drawer!): $0.00
- Zoya Honey Yellow: $12.00
6 Creative Ideas for Easter Nails

Why to love this Design:
There is something so nostalgic and sweet about Easter-inspired aesthetics. Think speckled robin’s eggs and the softest shades of candy-coated joy. These designs are playful and lighthearted, perfect for brunch dates or simply brightening up your Monday morning coffee run.
Essential Elements:
- Matte top coat
- Speckled ‘egg’ polish or black acrylic paint
- A fan brush or an old toothbrush
How to Prepare:
- Apply two coats of a soft blue or pink base.
- Dip an old toothbrush into a tiny bit of black polish or paint.
- Flick the bristles over your nails to create tiny ‘egg speckles’.
- Seal with a matte top coat for that authentic eggshell texture.
- Add a tiny gold leaf accent if you’re feeling fancy!
- Finish with cuticle oil to keep the skin soft.
Budget Range
- Sally Hansen Matte Top Coat: $7.00
- Deco Miami Speckled Polish: $12.00
- Gold Leaf Flakes: $4.00
5 Trendy Looks for Short Spring Nails

Why to love this Design:
For my loves who prefer to keep things practical and short—this one is for you! You don’t need long talons to make a statement. Short nails look incredibly chic, clean, and modern when paired with minimalist spring accents. It’s all about celebrating your natural shape with a pop of seasonal freshness.
Essential Elements:
- Sheer ‘your nails but better’ base
- A vibrant spring accent color (like coral or cornflower)
- Fine liner brush
How to Prepare:
- Keep your nails filed in a soft ‘squoval’ or round shape.
- Apply a sheer nude base.
- Paint a single thin vertical line down the center of each nail in a bright spring shade.
- Or, try a ‘micro-French’ by painting only the very tips with a pastel hue.
- Apply a high-shine top coat.
Budget Range
- Olive & June Sheer Pink: $9.00
- Nail Liner Brushes (Set): $6.00
- Holo Taco Glossy Taco: $11.00
3 Steps to Achieve Cute Spring Nails

Why to love this Design:
Sometimes, the simplest things are the most beautiful. This design focuses on ‘cloud nails’—a look that is as soft and airy as a spring morning. It’s incredibly cute, beginner-friendly, and makes you feel like you’re carrying a little piece of the sky wherever you go.
Essential Elements:
- Sky blue cream polish
- Opaque white polish
- Large dotting tool or the end of a makeup brush
How to Prepare:
- Paint your nails with two coats of sky blue and let them dry completely.
- Using your white polish, create three overlapping dots at the base or tip of the nail.
- Slightly swirl the edges of the dots to soften them into fluffy cloud shapes.
Budget Range
- Orly Breathable Morning Glow: $10.00
- Wet n Wild White Polish: $2.00
- Seche Vite Dry Fast Top Coat: $9.50
Wrapping Your Nails in Spring Sunshine
I hope these designs inspire you to take a little ‘me time’ this week. Remember, it doesn’t have to be perfect—the beauty lies in the process and the way it makes you feel. Spring is a season of growth, and that includes growing in our self-love and creativity. I can’t wait to see which look you choose, my loves! Tag me in your photos so I can see your beautiful blossoms.