

5-Minute Viral Food Boards You Need to Try Tonight
We’ve all been there—scrolling through our feeds at 9 PM, mesmerized by those perfectly curated boards and aesthetic treats that look almost too good to eat. There is something so incredibly soul-soothing about a beautifully arranged spread, whether it is a collection of colorful fruits or a meticulously decorated cake. It’s more than just food; it’s a lifestyle choice that celebrates the beauty in the everyday, turning a simple Tuesday night into a curated experience of flavor and texture.
Creating these ‘viral’ moments in your own kitchen doesn’t have to be a daunting task. In fact, most of these ideas are about the assembly and the visual story you tell with your ingredients. By focusing on high-quality components and a bit of artistic flair, you can transform ordinary pantry staples into a feast for the eyes and the palate. Let’s dive into these ten viral-inspired ideas that will elevate your hosting game and satisfy your cravings in the most stylish way possible.
Professional Graduation Cake Decorating Tips

Why we love this
There is an undeniable magic in a perfectly finished cake that marks such a monumental milestone as graduation. We love the professional touch because it elevates a simple sponge into a work of art that captures the essence of achievement and the excitement of a new chapter. The smooth, satiny finish of the Swiss meringue buttercream paired with the sharp, clean lines of a fondant mortarboard creates a visual centerpiece that demands attention. It’s not just about the sugar; it’s about the celebration of hard work, the aroma of vanilla bean wafting through the kitchen, and the pride in seeing a graduate’s face light up at a custom creation made just for them.
Ingredients
- Pre-baked layered cake (chilled)
- Swiss meringue buttercream
- Black fondant
- Gold luster dust
- Edible glue or clear vanilla extract
- Cardboard cake board
How to make it
- Begin by placing your chilled cake layers on a rotating cake stand to ensure even access. Apply a thin ‘crumb coat’ of buttercream to trap any loose cake particles, then refrigerate for 20 minutes until firm to the touch.
- Apply a second, thicker layer of buttercream using an offset spatula, starting from the top and working down the sides. Use a bench scraper held at a 45-degree angle against the side of the cake, rotating the stand slowly to achieve a perfectly smooth, professional finish.
- Roll out your black fondant to a 1/8 inch thickness. Cut a square for the top of the mortarboard and a long strip to wrap around a small circular cake dummy or a rolled fondant base to create the cap’s height.
- Assemble the cap by attaching the square top to the base using a small amount of edible glue. Let it set for at least an hour to ensure it doesn’t sag when placed on the cake.
- Mix gold luster dust with a drop of clear vanilla extract to create a ‘paint.’ Use a fine-tip brush to paint the year or the graduate’s name on the side of the cake, ensuring your hand is steady by resting your elbow on the table.
Easy Homemade Rhubarb Jam Recipe

Why we love this
Rhubarb jam is the ultimate seasonal treasure, bringing a vibrant, tart punch that cuts through the sweetness of a morning pastry or a buttery piece of toast. We love how the stalks transform from fibrous greens and reds into a translucent, ruby-hued nectar that smells like a summer garden after a rainstorm. The texture is thick and luscious, with just enough fruit structure to remind you of its rustic origins. Spreading a dollop of this onto a warm scone is like capturing sunshine in a jar, providing a sensory experience that is both nostalgic and refreshing.
Ingredients
- 4 cups fresh rhubarb, chopped
- 1.5 cups granulated sugar
- 1 tablespoon lemon juice
- 1 teaspoon vanilla bean paste
- 1 pinch of sea salt
How to make it
- In a large, heavy-bottomed saucepan or a Dutch oven, combine the chopped rhubarb and sugar. Stir well and let the mixture sit at room temperature for about 2 hours to allow the sugar to draw out the natural juices of the rhubarb.
- Place the pot over medium heat and stir in the lemon juice and salt. Bring the mixture to a gentle boil, stirring frequently with a wooden spoon to prevent the sugar from scorching on the bottom.
- Once boiling, reduce the heat slightly to maintain a steady simmer. Cook for 15-20 minutes, skimming off any foam that rises to the top. The rhubarb will begin to break down and the liquid will thicken significantly.
- To test for doneness, place a small spoonful of jam on a chilled plate and let it sit for a minute. If it wrinkles when you push it with your finger, it has reached the setting point (approximately 220°F).
- Stir in the vanilla bean paste at the very end to preserve its delicate aroma, then carefully ladle the hot jam into sterilized glass jars, leaving a 1/4 inch headspace before sealing.
Creative Graduation Cupcake Ideas
Why we love this
Cupcakes are the perfect vessel for creativity because they offer individual canvases for storytelling. For graduation, we love these because they are easy to serve to large crowds while still feeling incredibly personalized and high-end. Imagine a tray filled with dark chocolate cupcakes topped with miniature ‘diplomas’ made of rolled fondant tied with red licorice strings. The contrast between the rich, moist cake and the whimsical, edible decorations creates a joyful atmosphere that encourages guests to pick their favorite design and celebrate the sweet success of the day.
Ingredients
- 12 baked chocolate cupcakes
- Vanilla buttercream frosting
- White fondant (for diplomas)
- Thin red licorice strings
- Mini chocolate peanut butter cups (for mortarboards)
- Square chocolate pieces
How to make it
- Frost each cupcake with a high swirl of vanilla buttercream using a large star tip. Ensure the frosting is stiff enough to hold the weight of the decorations by chilling it slightly before piping.
- To make the diplomas, roll out white fondant very thinly and cut into small rectangles. Roll each rectangle tightly and tie a small piece of red licorice around the middle, securing it with a tiny drop of water.
- For the mortarboards, place a mini peanut butter cup upside down on a tray. Use a small dab of melted chocolate to attach a square chocolate piece to the top of the peanut butter cup.
- Create a tassel for the mortarboard by using a tiny bit of frosting to attach a short piece of licorice or a strand of sour belt candy to the center of the square chocolate.
- Carefully place one diploma and one mortarboard on top of each frosted cupcake, pressing gently so they stay secure during transport.
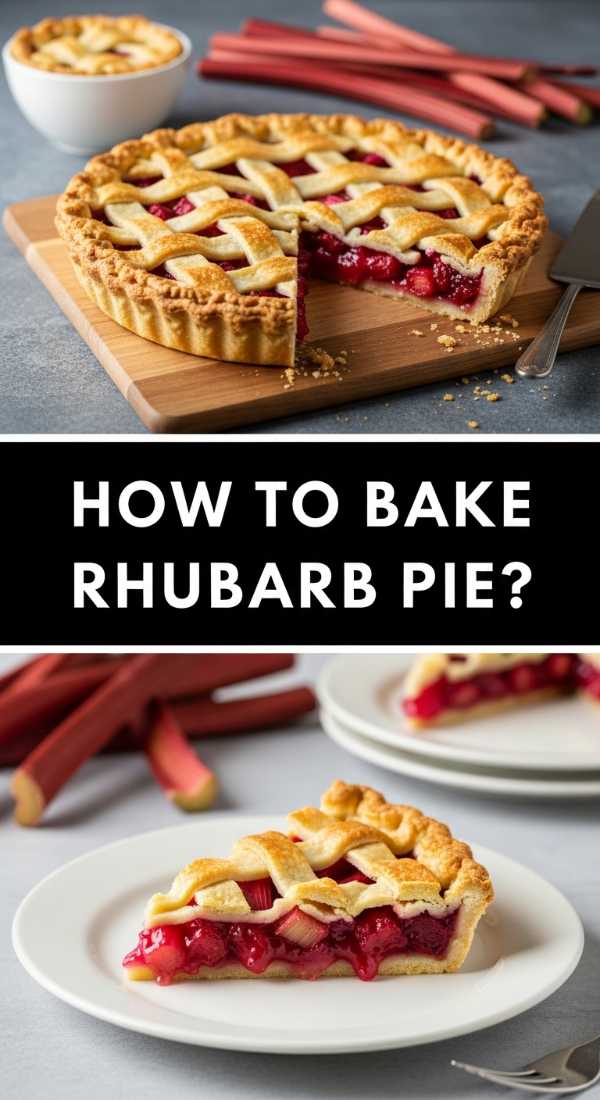
Classic Rhubarb Custard Pie Tutorial
Why we love this
There is a sophisticated elegance to a rhubarb custard pie that few other desserts can match. The way the silky, egg-rich custard envelops the sharp, tangy chunks of rhubarb creates a harmony of flavors that dance on the tongue. We love the visual of the golden, slightly browned custard peek-a-boo through a flaky, buttery crust. The aroma of nutmeg and warm cream filling the kitchen as it bakes is enough to make anyone feel at home. It’s a dessert that feels like a warm hug, perfect for a cozy family dinner or a spring celebration.
Ingredients
- 9-inch unbaked pie crust
- 3 cups rhubarb, sliced into 1/2 inch pieces
- 3 large eggs
- 1 cup granulated sugar
- 1/2 cup heavy cream
- 1/4 teaspoon ground nutmeg
How to make it
- Preheat your oven to 400°F (200°C). Roll out your pie crust and fit it into a 9-inch pie plate, crimping the edges for a decorative look. Prick the bottom with a fork to prevent air bubbles.
- Arrange the sliced rhubarb evenly across the bottom of the pie crust. Make sure the pieces are in a single, relatively flat layer to ensure even cooking within the custard.
- In a medium mixing bowl, whisk together the eggs and sugar until the mixture is pale and slightly frothy. Gradually whisk in the heavy cream and the ground nutmeg until fully incorporated.
- Slowly pour the custard mixture over the rhubarb in the pie crust. Use a spoon to gently move the rhubarb pieces so the custard fills all the gaps and covers the fruit.
- Bake at 400°F for 10 minutes, then reduce the heat to 350°F (175°C) and continue baking for another 35-40 minutes. The pie is done when the custard is set around the edges but still has a slight jiggle in the very center.
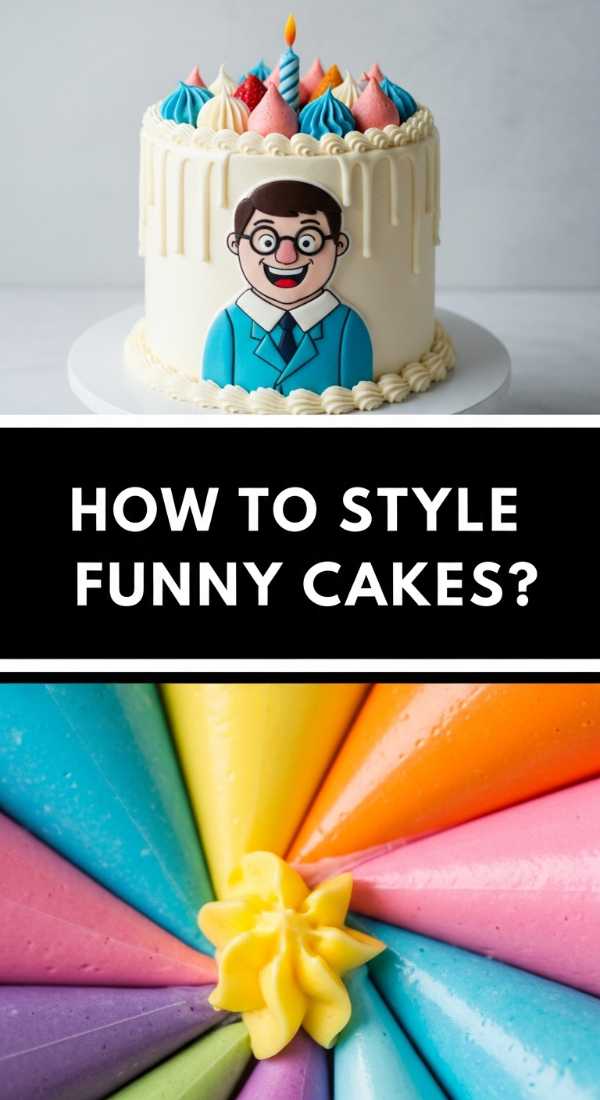
Funny Graduation Cake Inspiration
Why we love this
Graduation is a serious achievement, but the celebration doesn’t have to be! We love funny graduation cakes because they break the ice and highlight the reality of the post-grad struggle with a wink and a smile. Whether it’s a cake shaped like a giant ‘Entry Level’ job application with ‘5 Years Experience Required’ written in icing, or a simple sheet cake that says ‘I’m 100% done with this,’ these cakes bring much-needed laughter. The combination of delicious cake and relatable humor makes for a memorable moment that will be shared across social media instantly.
Ingredients
- Sheet cake or round cake
- Colored frosting (bright and bold)
- Lettering stencils or a steady hand
- Edible markers
- Small plastic ‘crying’ face emojis or funny toppers
How to make it
- Frost your cake with a clean, flat surface of buttercream. A smooth finish is essential here so that your ‘funny’ message is the clear star of the show.
- Plan your message on paper first to ensure the spacing is correct. Popular phrases include ‘The Tassel was Worth the Hassle’ (classic) or ‘I’ve already forgotten everything’ (funny).
- Using a fine-tip piping bag filled with contrasting colored frosting, carefully write your message. If you aren’t confident in your handwriting, use edible markers to lightly trace the letters first.
- Add ‘stress’ elements like messy splatters of frosting or ‘tear marks’ made of clear piping gel to enhance the humor of the ‘exhausted graduate’ theme.
- Place a few humorous toppers around the base of the cake, such as tiny plastic coffee cups or a ‘moving out’ box made of fondant, to complete the narrative.
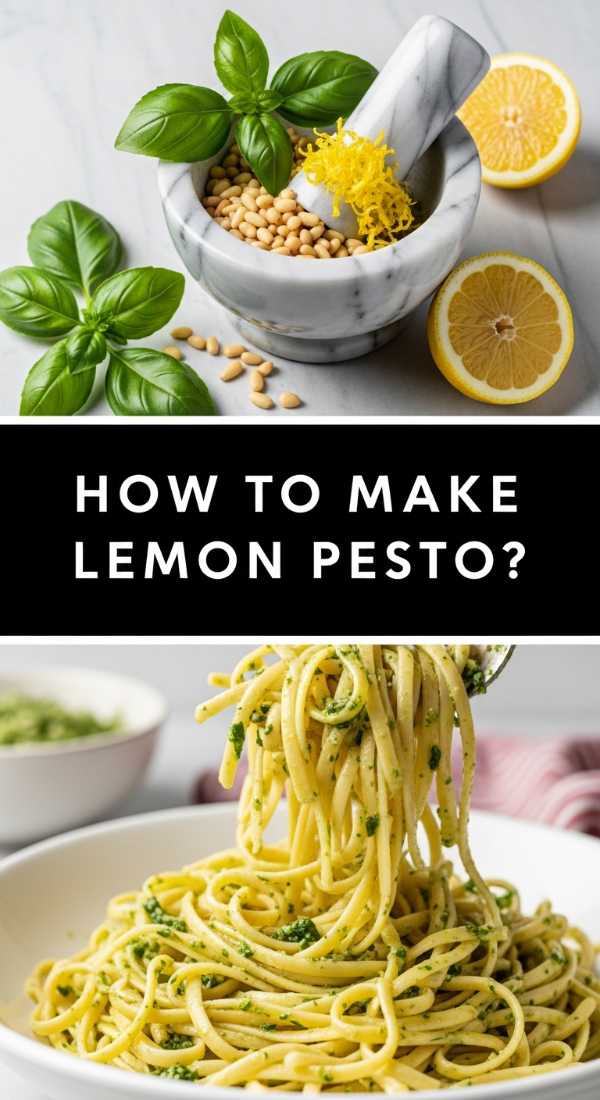
Zesty Lemon Pesto Recipe
Why we love this
This isn’t your average pesto; the addition of bright lemon zest transforms the earthy basil and rich pine nuts into something truly ethereal. We love how the citrus notes wake up the palate, making this the perfect companion for a summer pasta board or as a dip for crusty sourdough. The scent of fresh basil being crushed with garlic and lemon is intoxicating, filling the room with a fragrance that feels like a trip to the Italian coastline. It’s vibrant, green, and incredibly fresh—a literal burst of sunshine in every spoonful.
Ingredients
- 2 cups fresh basil leaves, packed
- 1/2 cup grated Parmesan cheese
- 1/3 cup toasted pine nuts
- 2 cloves garlic
- Zest and juice of 1 large lemon
- 1/2 cup extra virgin olive oil
- Salt and pepper to taste
How to make it
- In a food processor, combine the fresh basil, toasted pine nuts, and garlic cloves. Pulse several times until the ingredients are coarsely chopped, being careful not to over-process into a paste yet.
- Add the grated Parmesan cheese and the lemon zest. Pulse a few more times to integrate these dry ingredients with the basil mixture.
- With the food processor running on low speed, slowly drizzle in the extra virgin olive oil in a steady stream. This emulsion process is key to achieving a smooth, creamy consistency rather than an oily one.
- Stop the processor and stir in the lemon juice by hand. This prevents the acid from reacting too quickly with the basil, which can sometimes dull the bright green color.
- Season with salt and freshly cracked black pepper to taste. Transfer to a bowl and top with a thin layer of olive oil to prevent oxidation before serving on your food board.
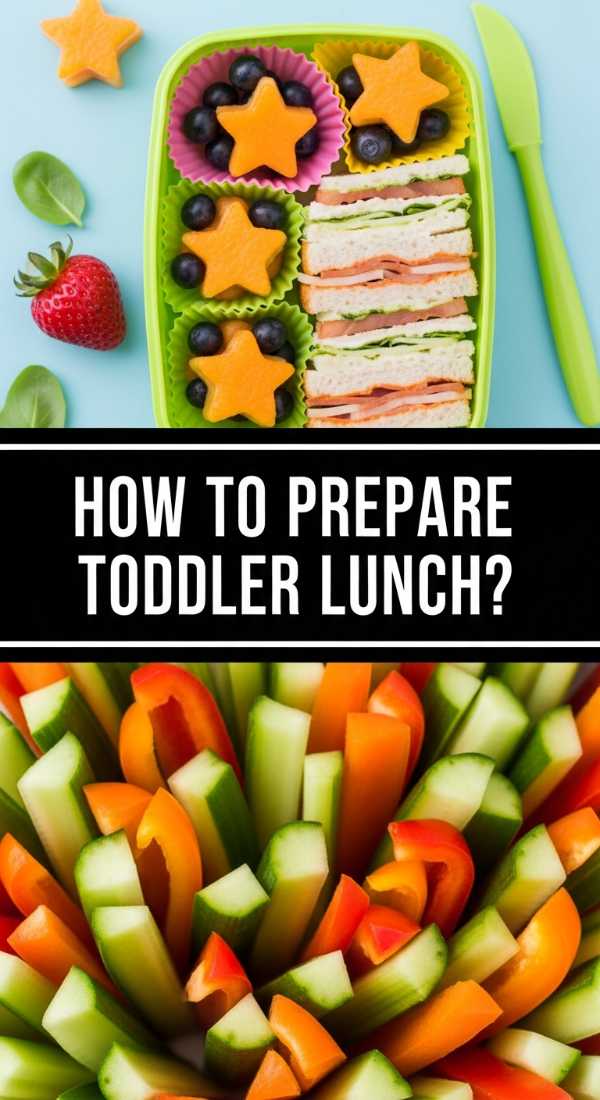
Healthy Toddler Lunch Ideas

Why we love this
Feeding a toddler can feel like a high-stakes art project, but a well-organized ‘lunch board’ makes it fun for both the parent and the child. We love this approach because it encourages exploration through a variety of textures and bright colors, from crunchy snap peas to soft, cubed cheese. By presenting healthy options in a ‘deconstructed’ way, it removes the pressure of a full meal and allows the little ones to graze at their own pace. The visual appeal of star-shaped cucumbers and rainbow fruit skewers makes healthy eating feel like a game rather than a chore.
Ingredients
- Cucumber slices (cut into shapes)
- Turkey or ham roll-ups
- Mild cheddar cheese cubes
- Blueberries and strawberries
- Whole grain crackers
- Hummus for dipping
How to make it
- Use small vegetable cutters to turn cucumber slices and bell peppers into fun shapes like stars, hearts, or dinosaurs. This simple step significantly increases the ‘pick-up’ rate for toddlers.
- Lay out a small wooden board or a compartmentalized plate. Place the protein in one corner—roll up thin slices of deli meat and secure them with a small piece of cheese or just press them tightly.
- Create a ‘fruit rainbow’ in another section. Group red berries, orange tangerine segments, and purple grapes together to make the board visually stimulating.
- Place a small ramekin of hummus or Greek yogurt dip in the center. Surround it with the whole grain crackers and the shaped veggies to encourage dipping.
- Ensure all pieces are cut into safe, bite-sized portions (about the size of a chickpea for younger toddlers) to prevent choking and make the food easy for tiny hands to manage.
Barista Style Coffee at Home
Why we love this
There is something deeply ritualistic about crafting the perfect cup of coffee, and bringing that barista-level quality into your own kitchen is the ultimate lifestyle upgrade. We love the contrast of the dark, intense espresso against the silky, micro-foam milk that feels like velvet on the tongue. The aroma of freshly ground beans alone is enough to boost your mood, and the satisfaction of pouring a perfect heart or rosetta in your latte art is a small but powerful creative win to start your day. It’s about taking a moment for yourself in a busy world.
Ingredients
- Freshly roasted coffee beans
- Filtered water
- Whole milk or oat milk
- Optional: Vanilla or caramel syrup
- Cocoa powder for dusting
How to make it
- Grind your coffee beans to a fine consistency, similar to table salt. Use a kitchen scale to measure exactly 18 grams of coffee for a double shot of espresso to ensure consistency.
- Tamp the coffee grounds into your portafilter with firm, even pressure. This ensures that the water flows through the coffee evenly, extracting all the rich oils and flavors without bitterness.
- Extract the espresso for 25-30 seconds. You are looking for a beautiful ‘crema’ on top—a golden-brown foam that indicates a well-pulled shot.
- Purge your steam wand, then submerge it just below the surface of your cold milk. Turn it on and ‘stretch’ the milk for 3-5 seconds to create micro-foam, then submerge deeper to heat the milk to 150°F (65°C).
- Tap the milk pitcher on the counter to pop any large bubbles and swirl it until it looks like wet paint. Pour the milk slowly into the espresso, starting high and then bringing the pitcher close to the surface to create your desired art.
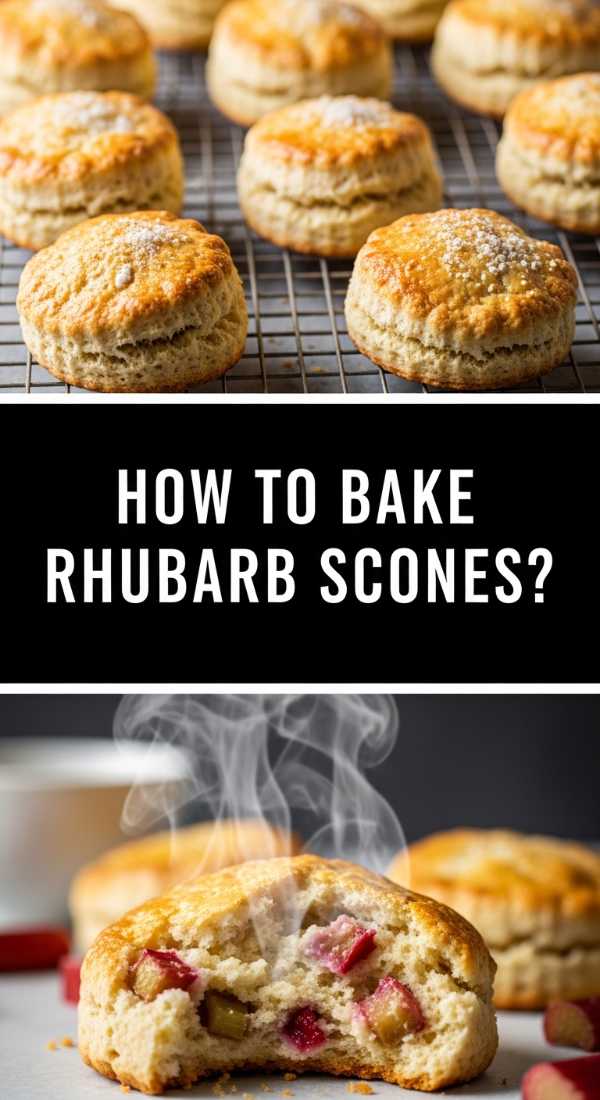
Golden Rhubarb Crumble Scones
Why we love this
Scones are the quintessential tea-time treat, but adding a rhubarb crumble topping takes them to a whole new level of indulgence. We love the ‘shaggy’ texture of the dough that bakes into a flaky, buttery pastry, hiding pockets of tart, softened rhubarb inside. The ‘crumble’ on top adds a necessary crunch, mimicking the best parts of a fruit crisp. When these come out of the oven, the smell of butter and baking fruit is absolutely heavenly, making them the perfect centerpiece for a brunch board or a quiet morning with a cup of tea.
Ingredients
- 2 cups all-purpose flour
- 1/3 cup sugar
- 1 tablespoon baking powder
- 1/2 cup cold butter, grated
- 1 cup chopped rhubarb
- 1/2 cup heavy cream
- Crumble topping: Flour, brown sugar, butter
How to make it
- In a large bowl, whisk together the flour, sugar, and baking powder. Using a box grater, grate the cold butter into the dry ingredients and toss gently with a fork until it resembles coarse crumbs.
- Gently fold in the chopped rhubarb pieces, ensuring they are coated in the flour mixture to prevent them from sinking or clumping.
- Make a well in the center and pour in the heavy cream. Stir with a fork just until the dough starts to come together—do not overwork it, as this will lead to tough scones.
- Turn the dough onto a floured surface and pat it into a 1-inch thick circle. Cut into 8 wedges and place them on a parchment-lined baking sheet.
- Mix your crumble ingredients together and press a generous amount onto the top of each scone. Bake at 400°F (200°C) for 18-22 minutes until the tops are golden brown and the scones feel firm to the touch.
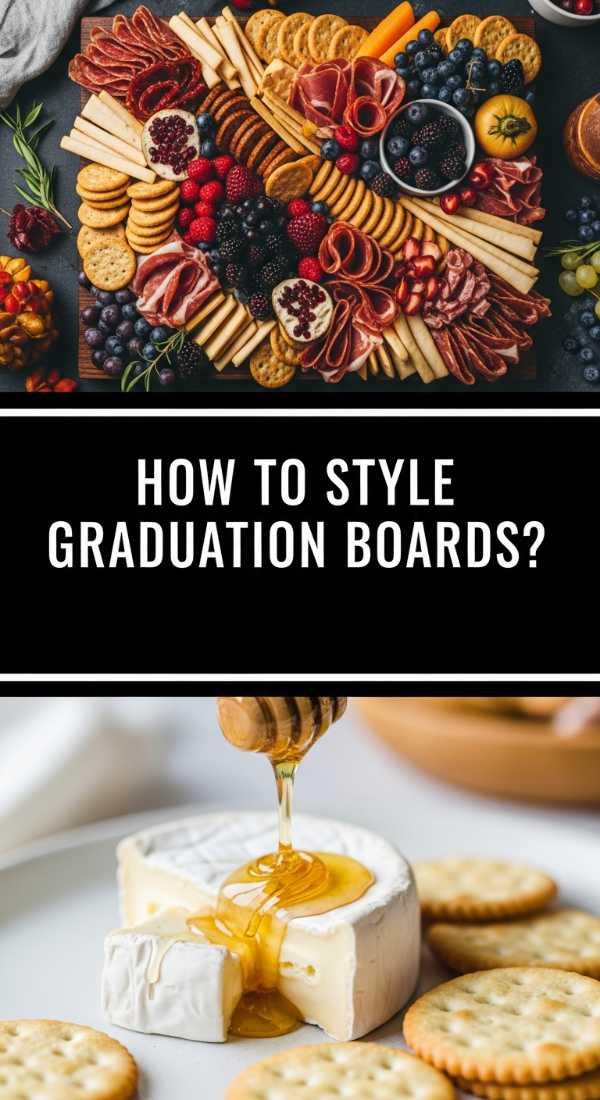
Gourmet Graduation Charcuterie Layout
[IMAGE_10]
Why we love this
A charcuterie board is the ultimate expression of hospitality, and a graduation-themed one allows you to go all out with variety and luxury. We love the communal nature of a board; it invites guests to gather, talk, and try new combinations of salty meats, creamy cheeses, and sweet fruits. The visual impact of a overflowing board—packed with folded prosciuttos, wheels of brie topped with honeycomb, and bunches of dark grapes—is stunning. It feels celebratory and sophisticated, providing something for everyone while acting as a gorgeous edible centerpiece for the party.
Ingredients
- 3 types of cheese (Brie, Sharp Cheddar, Gorgonzola)
- 3 types of meat (Prosciutto, Salami, Mortadella)
- Dried apricots and fresh figs
- Marcona almonds and walnuts
- Honey and fig jam
- Assorted crackers and baguette slices
How to make it
- Start by placing your ‘anchors’ on a large wooden board—these are your cheeses and small bowls of honey or jam. Spread them out to create balance across the layout.
- Create ‘meat rivers’ by folding slices of salami into quarters and lining them up in a curved path across the board. Drape the prosciutto in loose, ribbon-like piles to add height and texture.
- Fill the larger gaps with your crackers and bread slices. Fan them out around the cheese wheels to guide the guests on what to pair together.
- Add the fruits and nuts into the smaller remaining spaces. Use the bright colors of the figs and apricots to break up the neutral tones of the meats and cheeses.
- For the ‘graduation’ touch, add a few sprigs of fresh rosemary or edible flowers that match the school colors, and perhaps a small dish of chocolate-covered almonds to provide a sweet finish to the savory spread.
Conclusion
Bringing these viral food ideas into your home is all about embracing the joy of preparation and the beauty of presentation. Whether you are celebrating a major milestone like a graduation or simply looking to make a Wednesday night dinner feel a little more special, these recipes and boards offer the perfect blend of style and substance. Remember, the best part of any ‘viral’ food trend is the memory you create while sharing it with the people you love. So, grab your board, pick your favorite recipe, and start creating something beautiful tonight!
FAQ
Q: Can I make the rhubarb jam ahead of time?
A: Absolutely! Homemade jam stays fresh in the refrigerator for up to three weeks, or you can use proper water-bath canning techniques to make it shelf-stable for up to a year.
Q: What is the best way to keep a charcuterie board fresh during a party?
A: Keep the board in the fridge until 20 minutes before guests arrive. This allows the cheese to reach room temperature (the best for flavor) while keeping the meats safe and chilled.
Q: How do I prevent my scone dough from getting too sticky?
A: The key is cold ingredients. Use frozen butter and chilled cream, and handle the dough as little as possible to prevent the heat from your hands from melting the fats.