

The Viral Food Board Everyone is Making (And It’s So Easy!)
There is something truly magical about gathering around a table where the food isn’t just a meal, but an invitation to linger and connect. I remember the first time I set out a massive, colorful board for my friends; the room instantly filled with laughter and the sound of forks clicking against plates, and I realized that the best memories are often built around these simple, shared moments. It’s about that effortless beauty that makes everyone feel at home the moment they walk through the door.
Lately, the internet has been obsessed with this specific ‘Seasonal Harvest Board’ style, and for good reason. It’s a stunning tapestry of flavors that celebrates the best of what’s in bloom and what’s in season, combining sweet, savory, and everything in between. Today, I’m pulling back the curtain to show you exactly how to recreate this viral masterpiece in your own kitchen with ten incredible components that will have your guests reaching for seconds (and thirds!).
How to bake strawberry shortcake?

Why we love this
There is nothing quite like the scent of buttery, golden biscuits mingling with the perfume of sun-ripened strawberries. Each bite is a masterclass in textures: the slightly crunchy, sugar-crusted exterior of the shortcake gives way to a soft, pillowy center that soaks up the sweet, ruby-red juices of the macerated berries. Topped with a cloud of freshly whipped cream, it feels like a warm hug from a summer afternoon, offering a bright and nostalgic finish to any gathering that lingers on the palate long after the last crumb is gone.
Ingredients
- 2 cups all-purpose flour
- 1/4 cup granulated sugar (plus extra for topping)
- 1 tablespoon baking powder
- 1/2 teaspoon salt
- 1/2 cup cold unsalted butter, cubed
- 2/3 cup whole milk or heavy cream
- 2 pints fresh strawberries, sliced
- 2 tablespoons sugar for berries
- 1 cup heavy whipping cream
How to make it
- Begin by preparing your fruit: toss the sliced strawberries with 2 tablespoons of sugar in a medium bowl and let them sit at room temperature for at least 30 minutes to release their natural juices.
- Preheat your oven to 425°F (220°C). In a large bowl, whisk together the flour, 1/4 cup sugar, baking powder, and salt until well combined.
- Using a pastry cutter or your fingertips, work the cold, cubed butter into the dry ingredients until the mixture resembles coarse crumbs with some pea-sized pieces of butter remaining; this creates the flaky layers.
- Make a well in the center and pour in the milk or cream, stirring gently with a fork just until the dough comes together—be careful not to overmix, as this makes the shortcakes tough.
- Turn the dough onto a lightly floured surface, pat it into a 1-inch thick circle, and cut out rounds using a biscuit cutter or a glass.
- Place the rounds on a parchment-lined baking sheet, brush the tops with a little extra cream, and sprinkle with sugar. Bake for 12-15 minutes until the tops are a deep golden brown and have risen beautifully.
- Once cooled slightly, split the biscuits open, spoon the macerated strawberries and their syrup over the bottom half, add a generous dollop of whipped cream, and top with the other biscuit half.
How to grill summer corn?
Why we love this
Grilled corn is the quintessential flavor of backyard gatherings, bringing a smoky, charred depth that you simply can’t achieve on a stovetop. When the heat hits those golden kernels, they caramelize and pop with a burst of sweetness that is perfectly complemented by a light char and a sprinkle of salty seasoning. The aroma of corn roasting over an open flame is enough to draw anyone to the table, evoking feelings of warm nights and easy conversations under the stars while providing a satisfying, toothsome crunch.
Ingredients
- 6 ears of fresh sweet corn
- 2 tablespoons olive oil or melted butter
- Salt and cracked black pepper
- Optional: Chili powder, lime wedges, and cotija cheese
How to make it
- Start by preheating your grill to medium-high heat (about 400°F). While the grill warms, remove the husks and silk from each ear of corn until they are completely clean.
- Lightly brush each ear of corn with olive oil or melted butter, ensuring even coverage so the kernels don’t dry out or stick excessively to the grates.
- Season the corn generously with salt and pepper. Place the ears directly onto the hot grill grates, spaced slightly apart.
- Grill the corn for about 10-12 minutes, turning every 2-3 minutes with tongs. You are looking for even char marks and kernels that have turned a bright, opaque yellow and are slightly softened.
- If you want a more intense char, leave the corn in one spot for an extra minute, but watch closely to prevent burning.
- Once cooked, remove from the grill and immediately finish with a squeeze of fresh lime and a dusting of chili powder or cheese if desired.
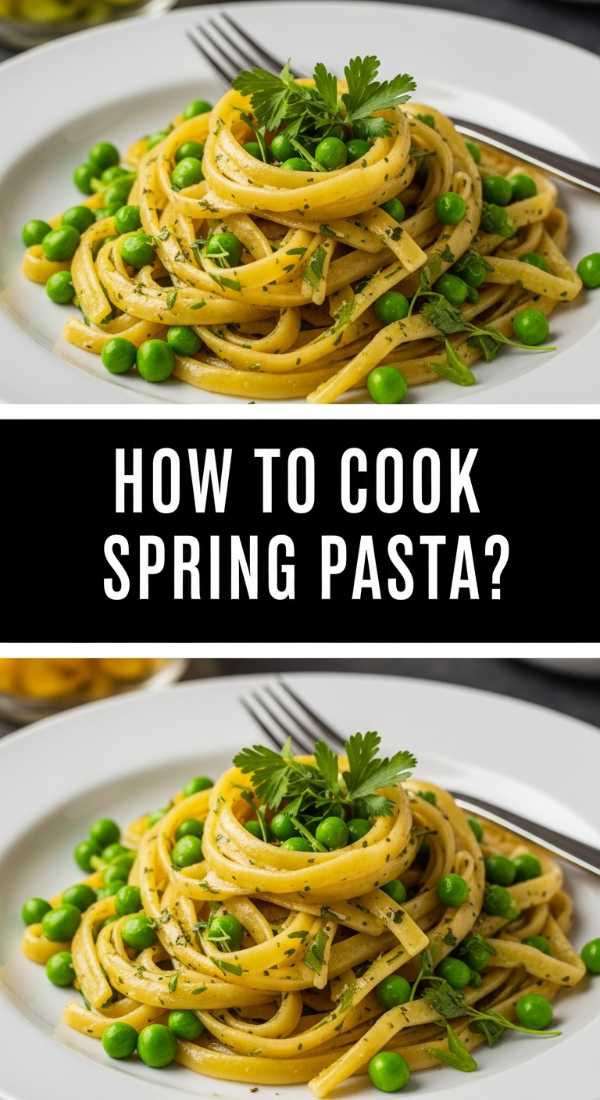
How to cook spring pasta?

Why we love this
Spring pasta is like a garden on a plate, featuring vibrant greens and a silky, citrus-infused sauce that feels incredibly light yet deeply satisfying. The combination of tender asparagus, snappy peas, and zesty lemon zest creates a bright, clean flavor profile that celebrates the rebirth of the season. As you twirl the noodles, the aroma of fresh herbs and garlic wafts up, promising a meal that is both refreshing and comforting, making it the perfect centerpiece for a sophisticated yet simple food board.
Ingredients
- 1 lb linguine or fettuccine
- 1 bunch thin asparagus, trimmed and cut into 2-inch pieces
- 1 cup fresh or frozen peas
- 3 tablespoons extra virgin olive oil
- 3 cloves garlic, thinly sliced
- Zest and juice of one large lemon
- 1/2 cup freshly grated Parmesan cheese
- Handful of fresh mint or basil, torn
How to make it
- Bring a large pot of heavily salted water to a rolling boil—it should taste like the sea to properly season the pasta from the inside out.
- Add the pasta and cook according to the package directions until it is just ‘al dente’ (firm to the bite).
- During the last 2 minutes of the pasta’s cooking time, drop the asparagus pieces and peas directly into the boiling water with the pasta to blanch them until vibrant green.
- Before draining, reserve at least 1 cup of the starchy pasta water; this is the secret to a silky, emulsified sauce. Drain the pasta and vegetables.
- In the same pot (now empty), heat the olive oil over medium-low heat and sauté the sliced garlic for 1-2 minutes until fragrant and translucent but not browned.
- Add the pasta, vegetables, lemon zest, and half of the lemon juice back into the pot. Toss vigorously while slowly adding half a cup of the reserved pasta water and the Parmesan cheese.
- Continue tossing over low heat until a glossy sauce coats every strand. If it looks dry, add more pasta water. Garnish with fresh herbs and more lemon juice before serving.
How to grill healthy salmon?

Why we love this
Grilling salmon results in a perfectly flaky, tender interior protected by a beautifully seared, crisp skin that is packed with savory flavor. The high heat of the grill locks in the natural oils of the fish, creating a rich, melt-in-your-mouth texture that pairs wonderfully with the subtle notes of wood smoke. It’s a protein that feels indulgent and elegant yet remains incredibly light and healthy, providing a gorgeous pink hue to your food board that draws the eye and satisfies the appetite with every nutrient-dense bite.
Ingredients
- 4 salmon fillets (6 oz each), skin-on
- 2 tablespoons avocado oil (high smoke point)
- 1 teaspoon sea salt
- 1/2 teaspoon black pepper
- 1 teaspoon dried oregano or dill
- Fresh lemon slices for grilling
How to make it
- Remove the salmon fillets from the refrigerator about 15-20 minutes before grilling to take the chill off, which ensures even cooking.
- Pat the salmon extremely dry on both sides with paper towels; moisture is the enemy of a crispy sear.
- Brush both sides of the fish with avocado oil and season generously with salt, pepper, and your chosen dried herbs.
- Preheat your grill to medium-high (around 375-400°F) and ensure the grates are very clean and well-oiled to prevent sticking.
- Place the salmon skin-side down on the grill. Close the lid and cook for about 6-8 minutes. Do not try to flip or move the fish too early; it will naturally release from the grates when the skin is crisp.
- Carefully flip the fillets using a wide spatula and cook for an additional 2-4 minutes on the second side, depending on thickness, until the internal temperature reaches 135°F for medium-rare or 145°F for fully cooked.
- Let the salmon rest for 5 minutes before serving to allow the juices to redistribute, ensuring every bite is moist.
How to make refreshing lemonade?
Why we love this
There is nothing quite as revitalizing as a tall glass of ice-cold, homemade lemonade that perfectly balances the sharp tang of citrus with a smooth, lingering sweetness. The bright, zesty aroma of freshly squeezed lemons fills the kitchen, immediately lifting your mood and evoking thoughts of sunshine and poolside relaxation. This isn’t your average store-bought juice; it’s a handcrafted elixir with a vibrant yellow hue and a clean, crisp finish that washes away the heat of the day, making it the ultimate thirst-quencher for your viral board.
Ingredients
- 1 cup granulated sugar
- 1 cup water (for simple syrup)
- 1 cup fresh lemon juice (about 6-8 lemons)
- 3-4 cups cold filtered water
- Ice cubes
- Fresh mint sprigs and lemon slices for garnish
How to make it
- The first step to a smooth lemonade is making a simple syrup: combine 1 cup of sugar and 1 cup of water in a small saucepan over medium heat.
- Stir constantly until the sugar is completely dissolved and the liquid is clear. Bring to a gentle simmer, then remove from heat and let it cool completely. This prevents sugar granules from settling at the bottom of your pitcher.
- While the syrup cools, juice your lemons until you have exactly 1 cup of fresh juice. Strain out any seeds but keep some pulp if you like a rustic texture.
- In a large glass pitcher, combine the cooled simple syrup and the fresh lemon juice. Stir well.
- Add 3 cups of cold filtered water and taste. If the lemonade is too tart or strong, add the fourth cup of water gradually until it reaches your desired balance.
- Chill the pitcher in the refrigerator for at least an hour. Serve in glasses over plenty of ice, garnished with fresh mint leaves and thin lemon rounds for that professional blogger look.
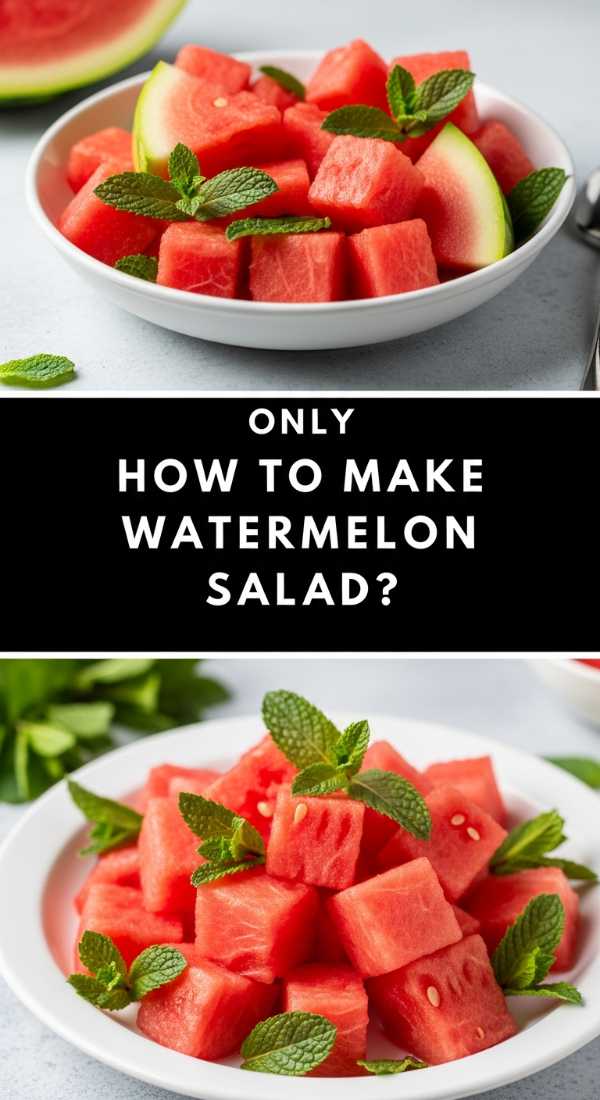
How to make watermelon salad?

Why we love this
This watermelon salad is a stunning juxtaposition of flavors and textures that dance on the tongue, offering a refreshing explosion of summer sweetness paired with salty, creamy feta. The crisp, hydrating crunch of the melon is elevated by the peppery bite of arugula and the cooling finish of fresh mint leaves. Drizzled with a sharp balsamic glaze, it becomes a sophisticated side dish that looks like a jewel-toned masterpiece on your board, providing a cool, palate-cleansing contrast to the grilled components of your spread.
Ingredients
- 6 cups seedless watermelon, cubed
- 1/2 cup crumbled feta cheese
- 1/4 cup red onion, very thinly sliced
- 1/2 cup fresh mint leaves, torn
- 2 cups baby arugula
- 2 tablespoons extra virgin olive oil
- 1 tablespoon balsamic glaze
- Flaky sea salt
How to make it
- Start by cubing your watermelon into uniform 1-inch squares. For the best texture, ensure the watermelon is thoroughly chilled in the refrigerator before cutting.
- Soak the thinly sliced red onions in a bowl of ice water for 10 minutes; this removes the harsh ‘bite’ and keeps them extra crunchy. Drain and pat dry.
- In a large, shallow platter, lay down a bed of baby arugula to act as a base for the melon.
- Arrange the watermelon cubes over the arugula. Scatter the soaked red onions and the crumbled feta cheese evenly across the top.
- Just before serving, drizzle the entire salad with high-quality extra virgin olive oil.
- Tear the fresh mint leaves by hand (this prevents bruising and releases the oils better than chopping) and sprinkle them over the salad.
- Finish with a decorative drizzle of balsamic glaze and a pinch of flaky sea salt to make the sweetness of the watermelon pop.
How to cook authentic tacos?

Why we love this
Authentic tacos are a sensory celebration, from the earthy, toasted smell of warm corn tortillas to the savory, spiced aroma of perfectly seared fillings. Each small but mighty parcel is a balance of heat, acidity, and richness, typically topped with the sharp crunch of raw white onions and the citrusy brightness of fresh cilantro. Holding a warm taco in your hand feels like an invitation to a fiesta, offering a complex layering of traditional flavors that are both rustic and incredibly refined, ensuring they are the first thing to disappear from your board.
Ingredients
- 1 lb flank steak or chicken thighs, thinly sliced
- 2 tablespoons neutral oil
- 1 tablespoon cumin, 1 teaspoon chili powder, 1/2 teaspoon garlic powder
- 12 small corn tortillas
- 1 medium white onion, finely diced
- 1 bunch fresh cilantro, chopped
- Lime wedges
- Salsa verde or pico de gallo
How to make it
- Season your sliced meat with cumin, chili powder, garlic powder, salt, and pepper. Let it marinate for at least 20 minutes to allow the spices to penetrate the fibers.
- Heat a heavy cast-iron skillet over high heat with the neutral oil until it is shimmering and just starting to smoke.
- Add the meat in a single layer (work in batches if necessary) to ensure it sears and browns rather than steams. Cook for 2-3 minutes per side until you have deep, caramelized edges and the meat is cooked through. Remove and let rest.
- While the meat rests, heat your corn tortillas. The best way is to place them directly over a low gas flame for 10-15 seconds per side using tongs until they are soft, slightly charred, and pliable. Alternatively, use a dry skillet.
- Immediately place the warm tortillas in a clean kitchen towel to keep them steamy and soft.
- To assemble, place two tortillas together (for extra strength), add a generous portion of meat, and top with the diced white onion and fresh cilantro.
- Serve with a side of salsa and plenty of lime wedges to be squeezed over the top right before eating.
How to make tomato sandwiches?
Why we love this
The humble tomato sandwich is a masterclass in simplicity, proving that the highest quality ingredients don’t need much to shine. There is a deep, nostalgic comfort in the combination of thick-cut, juicy heirloom tomatoes and a generous layer of rich, tangy mayonnaise on crusty sourdough bread. As the salt draws out the tomato’s essence, the juices mingle with the mayo to create a natural sauce that soaks into the bread, resulting in a succulent, savory experience that tastes like peak summer in every single bite.
Ingredients
- 2 large heirloom tomatoes (different colors look best)
- 4 thick slices of sourdough or brioche bread
- 1/2 cup high-quality mayonnaise
- Flaky sea salt and freshly cracked black pepper
- Fresh basil leaves (optional)
How to make it
- Slice your heirloom tomatoes into thick, substantial rounds (about 1/2 inch thick). This ensures the tomato is the star of the show.
- Place the tomato slices on a paper towel and sprinkle them lightly with salt. Let them sit for 5 minutes; this draws out excess moisture so your sandwich doesn’t get soggy too quickly.
- Lightly toast your bread slices. You want a bit of structural integrity on the outside, but the inside should remain soft and yielding.
- Spread a very generous layer of mayonnaise on both sides of the toasted bread. Don’t be shy here; the mayo acts as a barrier and a flavor enhancer.
- Layer the tomato slices thickly on one piece of bread. Season again with a bit more salt and a heavy hand of cracked black pepper.
- If using basil, layer the leaves over the tomatoes. Close the sandwich and press down gently to help the flavors meld.
- Slice diagonally with a serrated knife and serve immediately while the bread is still slightly warm and the tomatoes are cool.
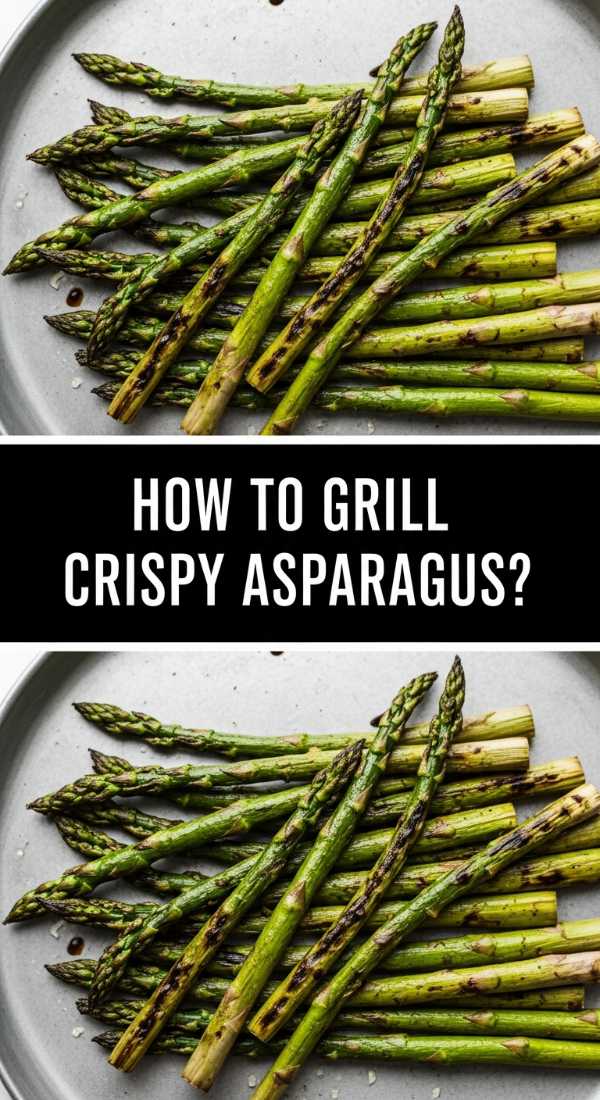
How to grill crispy asparagus?

Why we love this
Grilling asparagus transforms this elegant vegetable into something truly crave-worthy, with charred, crispy tips that taste almost like savory popcorn and tender, succulent stalks. The high heat of the grill intensifies its natural earthy sweetness while adding a sophisticated smokiness that pairs beautifully with a dusting of sharp Parmesan cheese. It is a visually striking addition to any food board, providing a pop of deep green and a satisfying textural snap that makes eating your greens feel like an absolute treat.
Ingredients
- 1 bunch thick-stalked asparagus
- 1 tablespoon extra virgin olive oil
- 1/2 teaspoon garlic salt
- 1/4 teaspoon black pepper
- 1/4 cup freshly grated Parmesan cheese
- Lemon zest for finishing
How to make it
- Prepare the asparagus by trimming off the woody, fibrous ends. A pro tip: hold a stalk at both ends and bend it until it snaps naturally—that’s the point where the tender part begins.
- Place the asparagus on a large baking sheet and drizzle with olive oil. Toss with your hands to ensure every inch of every spear is lightly coated.
- Season with garlic salt and pepper. Avoid using too much oil, as it can cause flare-ups on the grill.
- Preheat your grill to medium-high heat. To prevent the spears from falling through the grates, lay them perpendicular to the bars or use a grill basket.
- Grill for 5-7 minutes, turning occasionally with tongs. You want the tips to become slightly charred and ‘frizzled’ while the stalks remain bright green and tender-crisp.
- Remove from the grill and immediately sprinkle with the Parmesan cheese and lemon zest while the asparagus is still hot so the cheese adheres.
How to bake spring cakes?
[IMAGE_10]
Why we love this
Spring cakes are the ultimate expression of seasonal lightness, featuring a delicate, fine-crumb sponge infused with hints of vanilla and almond. These cakes aren’t heavy or overly sweet; instead, they are airy and ethereal, designed to be paired with fresh fruit and floral decorations. The gentle aroma of a cake baking in the oven creates an atmosphere of warmth and celebration, and when served in small, elegant portions on a board, they provide a refined and beautiful conclusion to a communal dining experience.
Ingredients
- 1 1/2 cups cake flour (sifted)
- 1 cup granulated sugar
- 1 1/2 teaspoons baking powder
- 1/2 teaspoon salt
- 1/2 cup unsalted butter, softened
- 2 large eggs, room temperature
- 1/2 cup whole milk
- 1 teaspoon vanilla extract
- 1/2 teaspoon almond extract
How to make it
- Preheat your oven to 350°F (175°C) and grease a muffin tin or small cake molds thoroughly. Using cake flour is essential here for that signature delicate spring texture.
- In a large bowl, cream together the softened butter and sugar using a hand mixer or stand mixer for 3-5 minutes until the mixture is pale, light, and fluffy.
- Add the eggs one at a time, beating well after each addition to ensure they are fully incorporated. Stir in the vanilla and almond extracts.
- In a separate bowl, whisk together the sifted flour, baking powder, and salt.
- Gradually add the dry ingredients to the wet ingredients, alternating with the milk. Start and end with the flour mixture, mixing only until just combined to avoid overworking the gluten.
- Divide the batter evenly among your molds, filling each about 2/3 full to allow room for the cake to rise.
- Bake for 18-22 minutes, or until a toothpick inserted into the center comes out clean and the tops spring back when lightly touched.
- Let the cakes cool in the pan for 10 minutes before transferring to a wire rack. Once completely cool, dust with powdered sugar or top with a light glaze and edible flowers.
Bringing It All Together: Your Viral Success
Building this food board is more than just a culinary project; it’s an exercise in creativity and a gift to those you love. By combining these ten diverse elements—from the smoky charred corn to the delicate spring cakes—you create a landscape of flavor that caters to every craving. Remember, the ‘viral’ secret isn’t just the food itself, but the abundance and the care you put into the presentation. So, grab your largest platter, arrange these dishes with a bit of whimsy, and get ready to host the most talked-about gathering of the season!