
The May 2026 Manicure Bible: Everything You Need for Flawless Nails
Hello, my loves! Can you feel it? That soft, honeyed warmth of the May 2026 sun is finally peeking through our windows, and honestly, it feels like a long-awaited hug for the soul. May is that magical bridge between the shy blossoms of spring and the wild, electric heat of summer. It’s a time for renewal, for softening our edges, and for letting our inner light reflect right down to our fingertips.
I’ve spent the last few weeks tucked away in my sun-drenched studio, playing with colors that remind me of morning dew and textures that feel like silk. I wanted to create a space for us to celebrate this beautiful transition together. This month isn’t just about ‘doing’ your nails; it’s about the ritual of self-love, the quiet moments of creativity, and carrying a little piece of art with you wherever you go.
So, grab your favorite iced lavender latte, settle into your coziest chair, and let’s dive into the ultimate guide to making your hands look as dreamy as a May sunset. We’re going to explore everything from ethereal chromes to tiny, delicate gardens—all designed to make you feel like the goddess you are. Let’s get glowing!
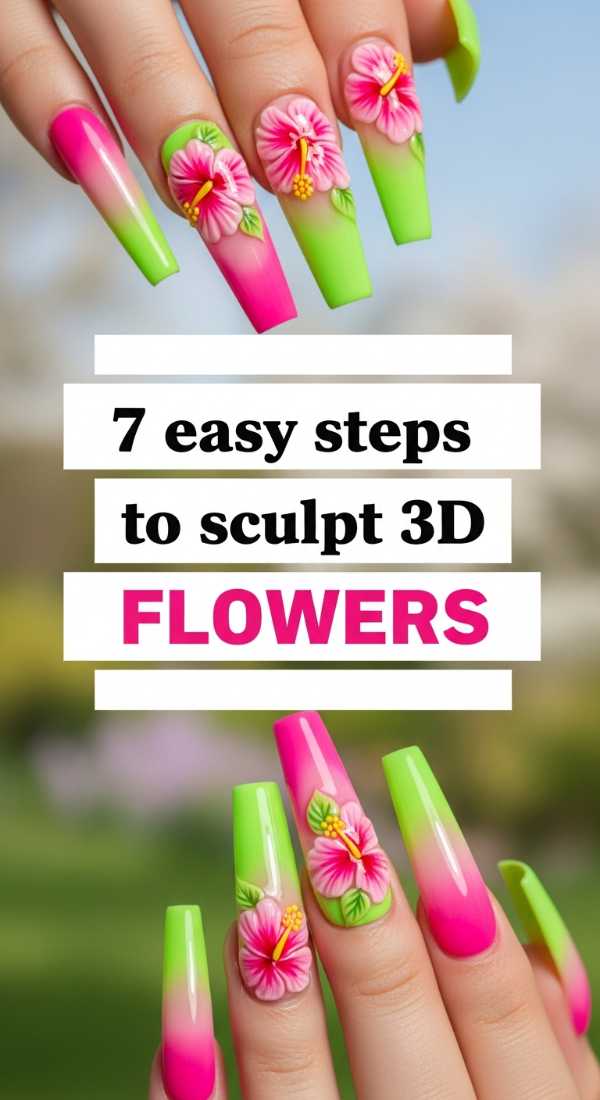
7 Easy Steps to Sculpt 3D Flowers
Why to love this recipe:
There is something so incredibly romantic about wearing a blooming garden on your nails. 3D floral art adds a tactile, whimsical dimension that catches the light and everyone’s attention. It’s like carrying a tiny, everlasting bouquet that never wilts, reminding you to keep blooming even on the busiest days.
Essential Ingredients:
- Thick 3D builder gel or carving gel
- Silicone sculpting tool or a fine dotting tool
- Pastel petal-colored gels (soft pink, lilac, or butter yellow)
- Tiny gold caviar beads for the flower centers
- UV/LED Lamp
How to Prepare:
- Apply your base color and cure completely.
- Take a tiny bead of 3D gel on your tool and place it where you want the first petal.
- Gently press and pull the gel to shape a delicate petal leaf.
- Repeat for five petals to form a complete flower circle.
- Place a tiny gold bead in the center using a dab of top coat.
- Flash cure for 10 seconds to set the shape, then full cure for 60 seconds.
- Seal the surrounding nail with a matte or glossy top coat, leaving the flower textured.
Budget Range
- Zillabeau Carving Gel ($15)
- Beetles Pastel Gel Set ($12)
- Amazon Nail Art Silicone Tool Kit ($8)
Master the May Gradient in 4 Simple Steps

Why to love this recipe:
The May gradient is all about that soft-focus, airbrushed look that mimics the sky at dusk. It’s seamless, soothing, and incredibly sophisticated. By blending colors like peach and sky blue, you create a transition that feels as smooth as a cloud-soft embrace.
Essential Ingredients:
- Two complementary pastel gel polishes
- Cosmetic wedge sponge or a specialized ombre brush
- Liquid latex or nail tape for easy cleanup
- High-shine top coat
How to Prepare:
- Apply a coat of the lighter shade as your base and cure.
- Apply stripes of both colors onto your sponge, slightly overlapping them.
- Gently dab the sponge onto the nail, moving it slightly up and down to blur the line.
- Cure, repeat for more intensity, and finish with a glossy top coat.
Budget Range
- Holo Taco Pastel Bundle ($60)
- Essie Gel Couture ‘Satin Slipper’ ($13)
- Disposable Makeup Sponges ($5)
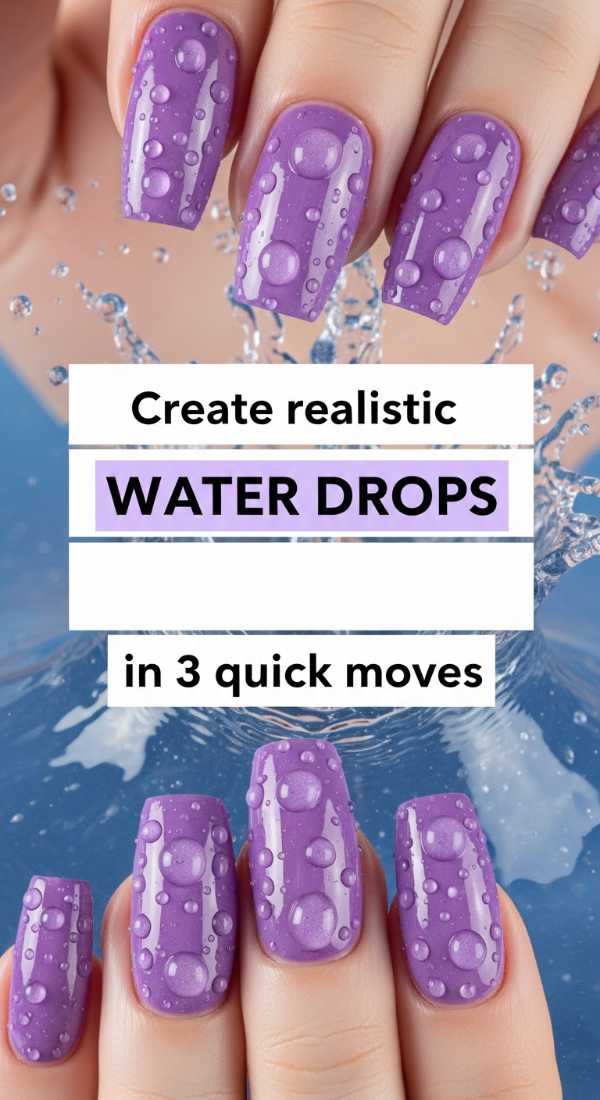
Create Realistic Water Drops in 3 Quick Moves
Why to love this recipe:
This is the ultimate ‘clean girl’ aesthetic with a twist! Realistic water drops look like fresh May morning dew has just landed on your nails. It’s a subtle, high-fashion detail that looks incredibly difficult but is actually one of the most satisfying tricks to master.
Essential Ingredients:
- Non-wipe thick top coat or hard gel
- A large dotting tool
- A matte top coat (as the base layer)
How to Prepare:
- Apply a matte top coat over your color and cure—this makes the ‘drops’ pop!
- Dip your dotting tool into the thick non-wipe top coat and place random ‘beads’ onto the nail.
- Cure immediately for 60 seconds to ensure the drops stay perfectly spherical and clear.
Budget Range
- Aprés Non-Wipe Top Gelcoat ($15)
- Modelones Matte Top Coat ($7)
- Standard Wood Dotting Tools ($4)
Apply 10 Y2K Nail Charms like a Pro

Why to love this recipe:
May 2026 is seeing a massive resurgence of playful, nostalgic energy! Y2K charms—think gummy bears, tiny stars, and butterflies—add a sense of fun and personality. It’s a way to let your inner child play while staying perfectly on-trend.
Essential Ingredients:
- A curated mix of 10 Y2K-themed charms
- Strong nail glue or jewelry gel
- Fine tweezers
- Clear builder gel for sealing edges
How to Prepare:
- Plan your layout on a flat surface before touching your nails.
- Apply a small bead of jewelry gel to the back of the charm.
- Place the charm firmly and cure for 30 seconds.
- Use a tiny brush to fill any gaps between the charm and nail with builder gel.
- Repeat until all 10 charms (across both hands) are secure.
- Cure one final time for a full 90 seconds.
- Wipe away any stickiness.
- Avoid snagging by checking the edges.
- Apply cuticle oil to keep the surrounding skin soft.
- Show off your 3D masterpiece!
Budget Range
- Daily Charme Y2K Mixed Bag ($18)
- Makartt Rhinestone Glue Gel ($10)
- Amazon Bulk Nail Charms ($9)
5 Ways to Perfect Your Colorful French Tips

Why to love this recipe:
The traditional French manicure gets a May makeover with vibrant, joyful hues. Instead of white, we’re using sage greens, periwinkles, and corals. It’s a classic silhouette that feels fresh, modern, and perfectly polished for a spring garden party.
Essential Ingredients:
- Fine liner brush
- Selection of bright gel colors
- Sheer nude base coat
- Nail wipes and alcohol (for mistakes!)
How to Prepare:
- Paint a sheer nude base and cure.
- Load your liner brush and mark the ‘smile line’ at the tip of the nail.
- Fill in the tip with your chosen color, following the curve.
- Use a clean brush dipped in alcohol to crisp up the line if needed.
- Cure and seal with a ‘plumping’ top coat for that salon-quality finish.
Budget Range
- Orly Breathable ‘Flower Power’ ($15)
- Beyond Polish Liner Brush Set ($12)
- OPI ‘Bubble Bath’ Base ($11)
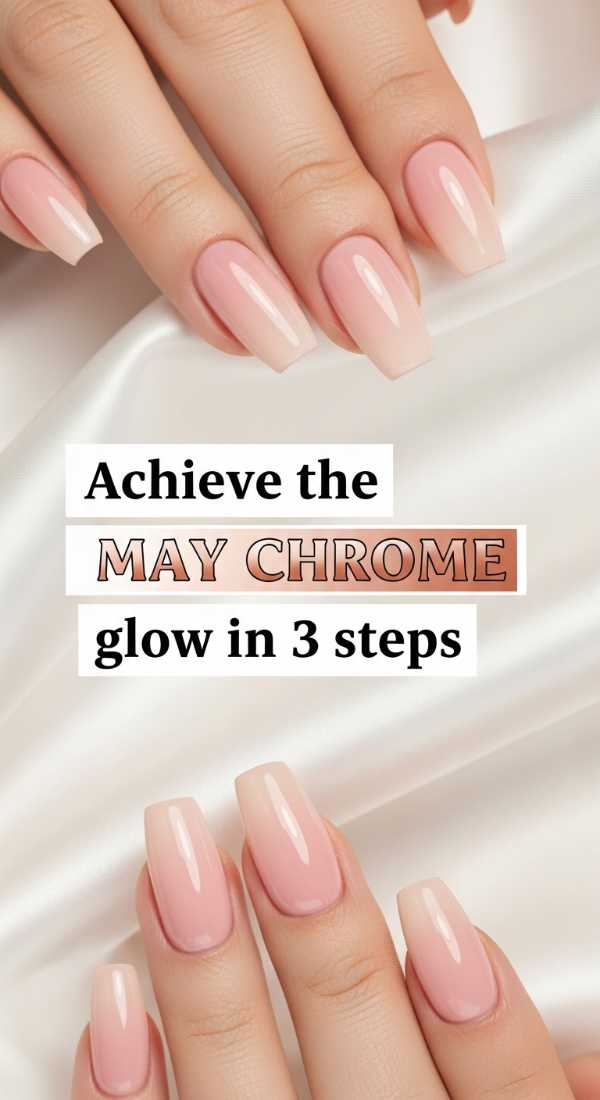
Achieve the May Chrome Glow in 3 Steps
Why to love this recipe:
Chrome isn’t just for winter metallics anymore! The ‘May Glow’ uses iridescent and pearl powders to create a soft, ethereal shimmer that looks like silk. It’s feminine, futuristic, and glows beautifully under the bright spring sun.
Essential Ingredients:
- Pearl or Iridescent chrome powder
- Non-wipe top coat
- Eyeshadow applicator or silicone tool
How to Prepare:
- Apply your base color and a non-wipe top coat, then cure for exactly 30 seconds (it needs to be slightly tacky).
- Rub the chrome powder onto the nail until it turns into a mirror-like shine.
- Seal with another layer of top coat and cure for the full 60 seconds.
Budget Range
- Manicurist Paris Glazed Powder ($20)
- OPI Tin Man Can (Professional only, but dupes available for $10)
- Artdone Chrome Powder Set ($14)
Paint 4 Butterfly Designs for Early Summer

Why to love this recipe:
Butterflies symbolize the transformation that May brings. These designs are airy and light, using delicate strokes to create a sense of movement. They are the perfect way to transition your aesthetic into the warmer months ahead.
Essential Ingredients:
- Ultra-fine detailer brush
- Black and white painting gels
- Transparent iridescent glitter
How to Prepare:
- Paint two small ‘B’ shapes facing each other for the wings.
- Add thin, wispy antennae at the top.
- Dab a tiny bit of iridescent glitter on the wing centers for sparkle.
- Outline the edges with white to give them a 3D, fluttering effect.
Budget Range
- Bio Seaweed Gel ‘Unity’ ($18)
- Winstonia Berry Wine Fine Brush ($8)
- Nail Art Stickers (Alternative to painting, $6)
6 Tips for Drawing Botanical Garden Nail Art

Why to love this recipe:
This is for my loves who find peace in nature. Botanical art—think tiny ferns, eucalyptus leaves, and sprigs of lavender—is incredibly grounding. It turns your nails into a mini conservatory of calm and elegance.
Essential Ingredients:
- Earth-toned gels (olive, moss, terracotta)
- Striper brush
- Matte finish top coat
How to Prepare:
- Start with a neutral base and use a dark green to draw a thin central stem.
- Pressure is key: press the brush down for the leaf body, pull away for the tip.
- Vary the leaf sizes to make it look organic.
- Add tiny dots of lavender or white for small flower buds.
- Let the design ‘breathe’ by leaving plenty of negative space.
- Finish with a matte top coat to give it a realistic, paper-like feel.
Budget Range
- Lights Lacquer ‘Who Loves Short Shorts’ Green ($13)
- Cirque Colors Sage Selection ($14)
- Maniology Nail Art Plates ($10)
Blend the Perfect Aura Nail in 5 Minutes

Why to love this recipe:
Aura nails are all about reflecting your energy! They feature a soft glow emanating from the center of the nail. In May, we use heart-chakra greens and soothing pinks to manifest a month of peace and love.
Essential Ingredients:
- Aura sponge or a small eyeshadow brush
- Highly pigmented gel polish
- A light base color
How to Prepare:
- Apply your base shade and cure.
- Apply a small dot of your ‘aura’ color to the center of a makeup sponge.
- Lightly press the sponge in the center of the nail, diffusing the color outwards.
- Build the intensity in the center with a second layer if desired.
- Seal with a thick glossy top coat to blur any sponge textures.
Budget Range
- Kiara Sky Jelly Gel ($15)
- Gelish Harmony Colors ($14)
- Real Techniques Mini Sponges ($6)
Layer 3 Unique Textures for a May Manicure

Why to love this recipe:
Why choose one finish when you can have three? Combining matte, gloss, and ‘sugar’ (glitter) textures creates a sophisticated, multi-dimensional look. it’s tactile, interesting, and shows off your expert nail skills.
Essential Ingredients:
- Matte top coat
- Glossy top coat
- Fine loose glitter (sugar powder)
How to Prepare:
- Paint your nails and apply a matte top coat to the entire hand.
- Use a glossy top coat to paint specific sections (like a French tip or a heart).
- While the gloss is wet, sprinkle the sugar powder over one accent nail and cure.
Budget Range
- Sally Hansen Miracle Gel Top Coat ($10)
- Kokoist Velvet Matte Top Coat ($15)
- TKB Trading Cosmetic Grade Glitter ($6)
Stay Glowing, Loves!
I hope this guide leaves you feeling inspired to take a little time for yourself this May. Remember, your nails are just a canvas for the beautiful energy you already carry inside. Whether you choose a simple chrome glow or a full 3D garden, wear it with confidence and a smile. I can’t wait to see what you create! Tag me in your photos, and let’s fill the world with a little more color this month. Sending you so much love and light!