

The Rainbow Texture Board: Mastering 3D Nail Art One Layer at a Time
Hello, my loves. Welcome back to our little corner of the world, where we let our creativity bloom like wild jasmine. I was sitting by my window this morning, watching the sunlight dance through a prism, and it hit me—our nails are just like those little rainbows. They are tiny canvases that carry our mood, our light, and our magic wherever we go. Lately, I’ve been obsessed with the idea of ‘texture’—not just color, but the feeling of art you can touch.
Today, I’m so excited to share my heart with you through the Ultimate Colorful 3D Nail Art Tutorial Board. We aren’t just painting; we are building layers of joy. Whether you’re a seasoned pro or just picking up a brush for the first time, I want you to feel my hand in yours as we explore these vibrant techniques. Let’s turn those fingertips into a masterpiece, shall we?
5 Steps to Blend Two Color Nails Perfectly
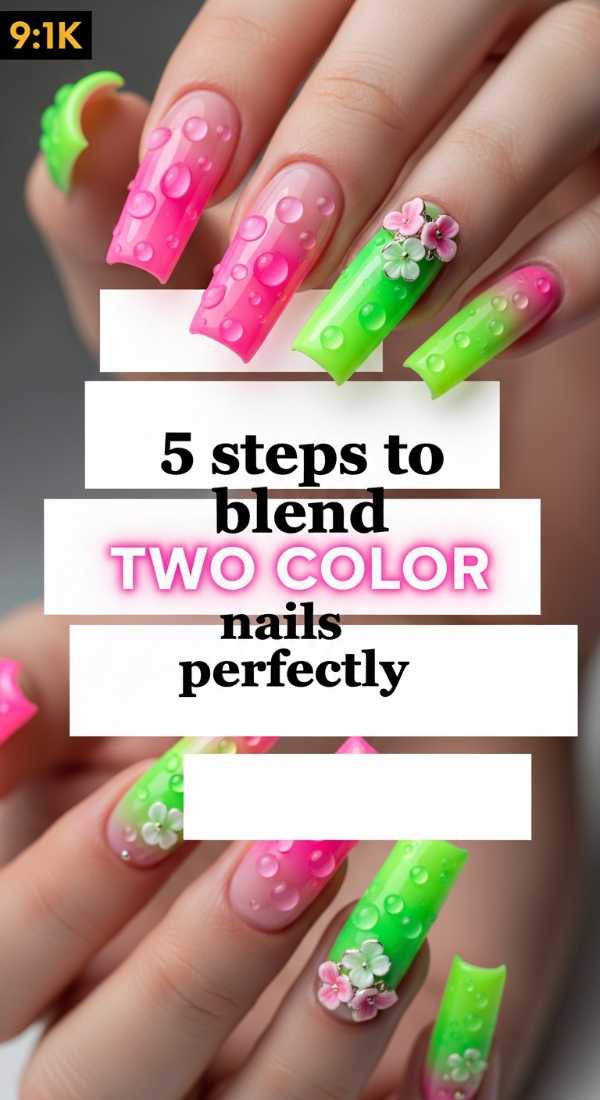
Why to love this recipe:
There is something so soothing about watching two colors melt into one another, like a sunset dipping into the ocean. It’s the perfect way to add sophistication to a simple manicure without needing complex tools.
Essential Ingredients:
- Two contrasting gel polishes
- Latex-free makeup sponge
- Liquid latex (for skin protection)
- Clear top coat
- UV/LED Lamp
How to Prepare:
- Apply a base color and cure.
- Apply liquid latex around your cuticles.
- Paint horizontal stripes of both colors onto the makeup sponge.
- Gently dab the sponge onto your nail in a rocking motion.
- Cure and finish with a high-shine top coat.
Budget Range
- Beetles Gel Polish Set ($15)
- Wedge Makeup Sponges ($5)
- Pueen Latex Tape ($9)
7 Minutes to Apply Color Street Nails Like a Pro
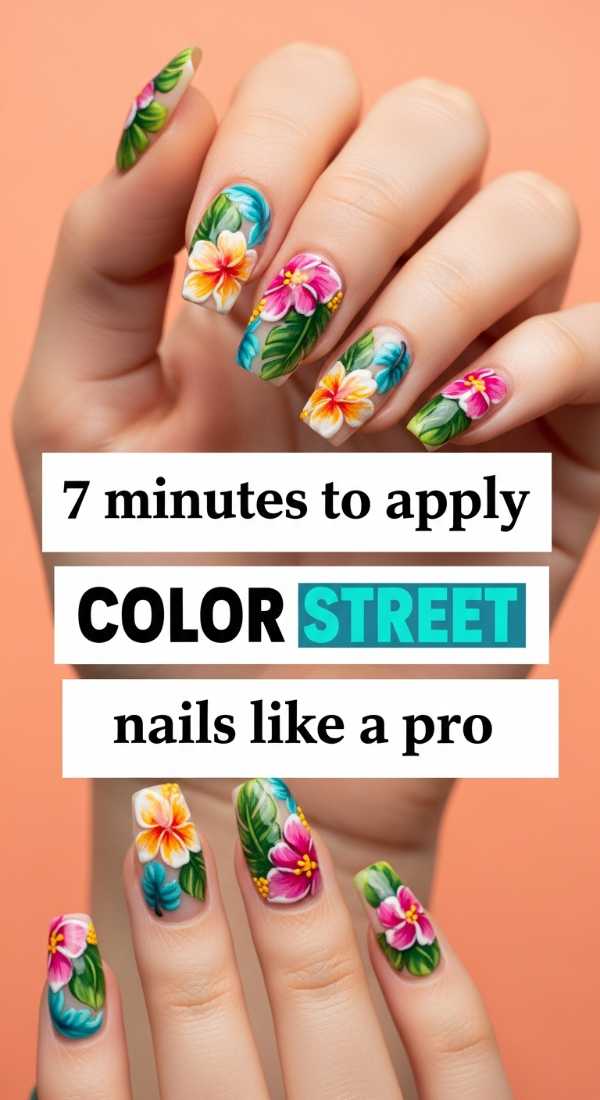
Why to love this recipe:
For those days when your schedule is full but your soul needs a pop of color, these real-nail-polish strips are a literal lifesaver. It’s instant gratification wrapped in a beautiful design.
Essential Ingredients:
- Color Street nail strips
- Alcohol prep pads
- Glass nail file
- Cuticle pusher
How to Prepare:
- Cleanse nails thoroughly with alcohol.
- Push back cuticles gently.
- Select the strip size that fits your nail.
- Peel and apply from the cuticle upward.
- Smooth out air bubbles with your thumb.
- Fold the excess over the tip.
- File downward to remove the surplus.
Budget Range
- Color Street Basic Sets ($11-$14)
- Glass Nail File ($7)
4 Secrets to Keep Your Nails Colorful and Bright

Why to love this recipe:
We work so hard on our art; it deserves to shine for weeks! These secrets are like a protective embrace for your manicure, keeping the pigments as vivid as the day you applied them.
Essential Ingredients:
- UV-filtering top coat
- Vitamin E cuticle oil
- Gloves for cleaning
- Non-acetone remover
How to Prepare:
- Apply a fresh layer of top coat every 3 days.
- Massage cuticle oil daily to prevent chipping from the base.
- Wear gloves when handling household chemicals.
- Avoid using your nails as tools to open cans or boxes.
Budget Range
- Seche Vite Dry Fast Top Coat ($9)
- Cuccio Revitalize Oil ($13)
6 Ways to Layer Multicolor Nails for 3D Depth

Why to love this recipe:
This is where the magic happens! Layering isn’t just about stacking; it’s about creating a holographic world on your nails. It adds a professional, expensive look that catches every bit of light.
Essential Ingredients:
- Translucent ‘jelly’ polishes
- Holographic flakes
- Building gel
- Fine liner brush
- Iridescent powder
How to Prepare:
- Start with a thin layer of building gel.
- Dab flakes onto the sticky layer.
- Apply a layer of jelly polish to ‘tint’ the depth.
- Repeat the flakes in specific spots.
- Encapsulate with another layer of builder gel.
- Buff smooth and add a final top coat.
Budget Range
- Makartt Builder Gel ($12)
- Saviland Jelly Gel Set ($20)
8 Ideas for Your Next Colorful Nail Inspo Set
Why to love this recipe:
Sometimes the hardest part is the blank canvas. These ideas are designed to spark your inner fire, pulling inspiration from nature, fashion, and the softest daydreams.
Essential Ingredients:
- Pinterest Mood Board
- Color wheel
- Gold leaf accents
- Matte top coat
How to Prepare:
- Try ‘Aura Nails’ using a blooming gel.
- Experiment with ‘Mismatched Pastels’ on each hand.
- Create ‘Geode Nails’ with gold leaf edges.
- Go for ‘Velvet Nails’ using magnetic polish.
- Try ‘French Tips’ in neon colors.
- Layer ‘Pressed Flowers’ in clear acrylic.
- Design ‘Checkered Patterns’ in primary colors.
- Apply ‘Chrome Rub’ over dark bases.
Budget Range
- Aora Chrome Pigment ($15)
- Dried Flower Kit ($8)
9 Tools to Shape Colourful Acrylic Nails at Home
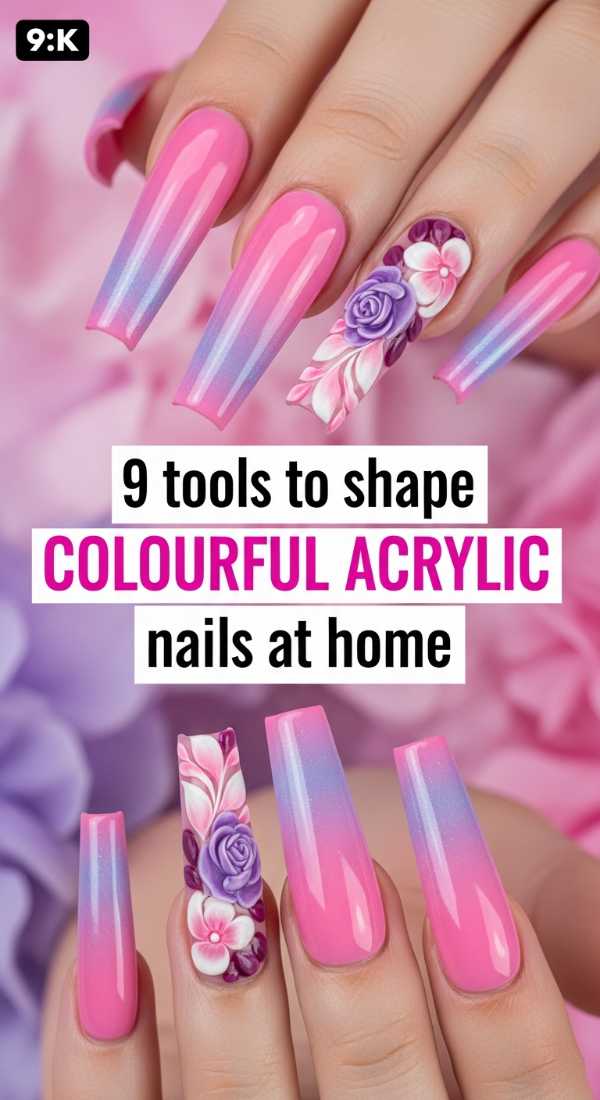
Why to love this recipe:
Control is freedom. Having the right tools means you can sculpt your nails to perfectly match the shape of your hands, making your colorful designs look truly bespoke.
Essential Ingredients:
- Electric nail drill (E-file)
- 100/180 grit hand files
- Kolinsky acrylic brush
- Dappen dish
- Lint-free wipes
- Dust collector
- C-curve pinching tool
- Buffing block
- Nail forms
How to Prepare:
- Sanitize all tools before starting.
- Use the 180 grit file to prep the natural nail.
- Apply nail forms for length.
- Dip brush into monomer, then powder.
- Place the bead and pat into shape.
- Use the pinching tool for a slim profile.
- Refine the shape with the E-file.
- Buff to remove scratches.
- Wipe clean before adding color.
Budget Range
- MelodySusie Portable E-File ($25)
- Pana Kolinsky Brush ($18)
3 Techniques for Filing Colorful Stiletto Nails Safely
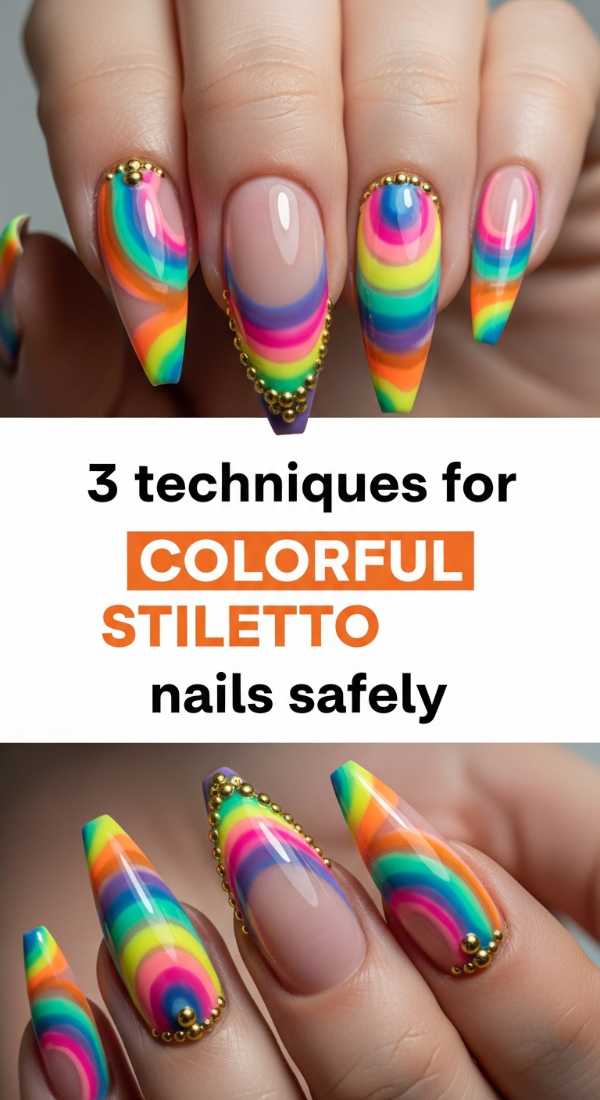
Why to love this recipe:
Stiletto nails are bold and powerful, but they require a gentle touch to stay strong. These techniques ensure you get that fierce point without compromising the integrity of your natural nail.
Essential Ingredients:
- Straight edge file
- Marking pen
- Nail strengthener
How to Prepare:
- Mark the exact center of your nail tip with a tiny dot.
- File from the sidewall toward the center dot in one direction only.
- Check the ‘Apex’ (the highest point) to ensure it’s thick enough to support the long tip.
Budget Range
- OPI Edge File ($5)
- Hard as Hoof Cream ($8)
10 Minutes to Design Gradient Two Color Nails

Why to love this recipe:
This is my favorite ‘busy morning’ hack. You get all the beauty of a complex gradient in the time it takes to brew a pot of herbal tea.
Essential Ingredients:
- Ombre blending brush
- Two highly pigmented gel colors
- Palette or glass tile
How to Prepare:
- Paint the left half of the nail color A and the right half color B.
- Use the ombre brush to ‘wiggle’ the line in the middle.
- Pull the brush downward toward the tip.
- Flash cure for 10 seconds.
- Repeat for a second layer.
- Full cure and top coat.
Budget Range
- Kads Ombre Brush ($6)
- Modelones Color Gel ($8)
5 Hacks for Flawless Multicolor Nails Every Time
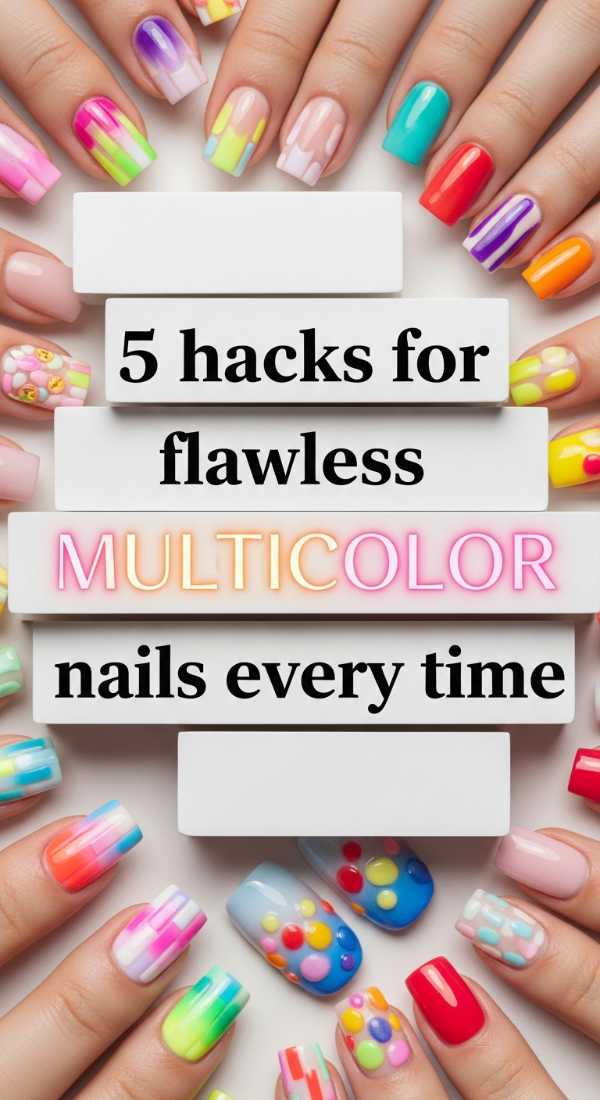
Why to love this recipe:
We all want that ‘just stepped out of a salon’ look. These tiny adjustments to your routine make the difference between a DIY project and a professional-grade set.
Essential Ingredients:
- Cleanup brush
- Acetone
- Base bond primer
- Thin-consistency top coat
How to Prepare:
- Always leave a tiny gap between the polish and the cuticle.
- Dip a cleanup brush in acetone to erase wobbles instantly.
- Use a ‘scrubbing’ motion when applying the base coat.
- Cap the free edge (the very tip) with every layer.
- Turn your hand upside down for 5 seconds before curing to let the gel self-level.
Budget Range
- Cleanup Brush Set ($7)
- Pure Acetone ($6)
6 Steps to Encapsulate Colourful Acrylic Nails with Charms
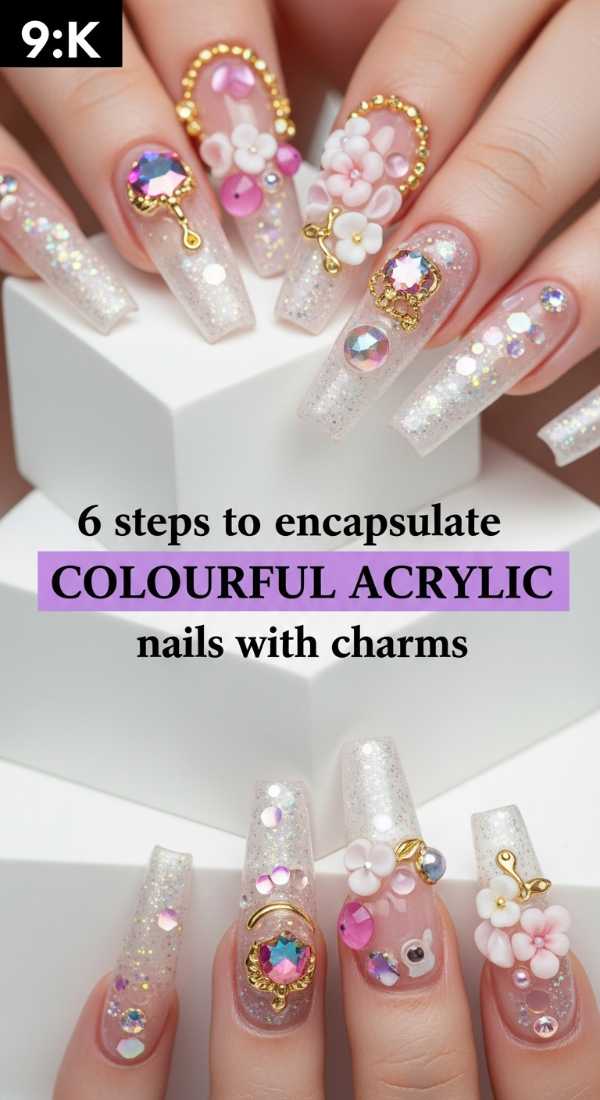
Why to love this recipe:
This is the pinnacle of 3D art! Encapsulating charms like tiny stars or hearts keeps them snag-free and makes them look like they are floating in a crystal-clear dream.
Essential Ingredients:
- Clear acrylic powder
- Mini nail charms (stars, butterflies)
- Tweezers
- Monomer
How to Prepare:
- Apply a thin base of colored acrylic.
- While wet, place charms with tweezers.
- Wait for the base to slightly set.
- Pick up a large bead of clear acrylic.
- Gently flow the clear bead over the charms.
- File and buff until the surface is smooth but the charms are visible.
Budget Range
- Mia Secret Clear Powder ($10)
- Mixed Nail Charm Box ($9)
Your Nails, Your Masterpiece
My sweet friends, I hope this guide feels like a warm hug for your creativity. Remember, there are no mistakes in art—only ‘happy accidents’ that lead to new discoveries. Whether you are rocking a simple gradient or a full 3D encapsulated set, the most beautiful thing you can wear is your confidence. Go forth, paint your world in every color of the rainbow, and let your inner light shine through your fingertips. I can’t wait to see what you create!