

Ahead of the Curve: Master These 2026 Trendsetting Nail Designs Now
Hi loves, welcome back to my cozy corner of the internet! Can you believe we’re already looking ahead to 2026? There is something so incredibly soothing about a fresh manicure; it’s like a tiny, wearable piece of art that reminds you to slow down and appreciate the beauty in your own hands. I’ve spent the last few weeks dreaming up what the future of nails looks like, and I am so excited to share this cloud-soft embrace of a guide with you.
In 2026, it’s all about texture, nostalgia, and colors that make your heart skip a beat. Whether you’re sipping a latte at a sidewalk cafe or prepping for the biggest dance of your life, these designs are meant to make you feel empowered and uniquely you. Let’s dive into these trends together, step-by-step, like we’re just two friends chatting over a warm cup of tea.
Get 3D fruit nails in 5 easy steps
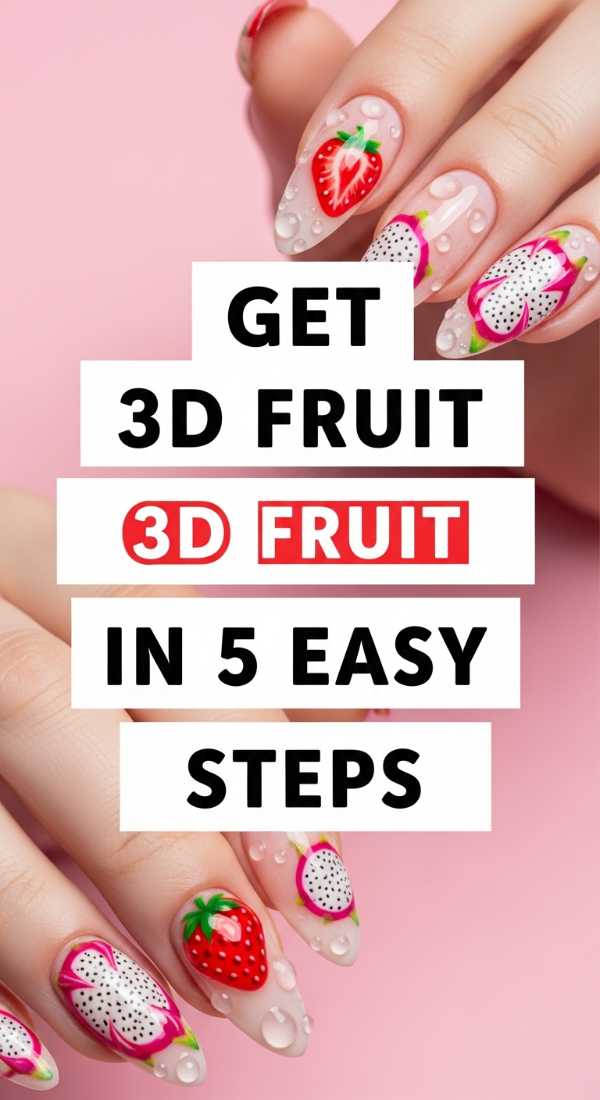
Why to love this Design:
There is something so incredibly playful and tactile about 3D fruit nails. It brings a sense of whimsy to your everyday life, making every reach for your phone or your keys feel like a trip to a sun-drenched orchard.
Essential Elements:
- Clear 3D builder gel
- Neon pink and lime green polish
- Fine-tipped liner brush
- Matte top coat
How to Prepare:
- Apply a neutral base color and cure.
- Paint small fruit shapes (like tiny strawberries or citrus slices).
- Apply a matte top coat to the entire nail.
- Use builder gel to create raised ‘juice drops’ over the fruit shapes.
- Flash cure and finish with a high-shine top coat only on the 3D parts.
Budget Range
- Builder Gel: $12 – $18
- Neon Polish Set: $15
- Liner Brushes: $7
Design your pink prom nails in 4 minutes
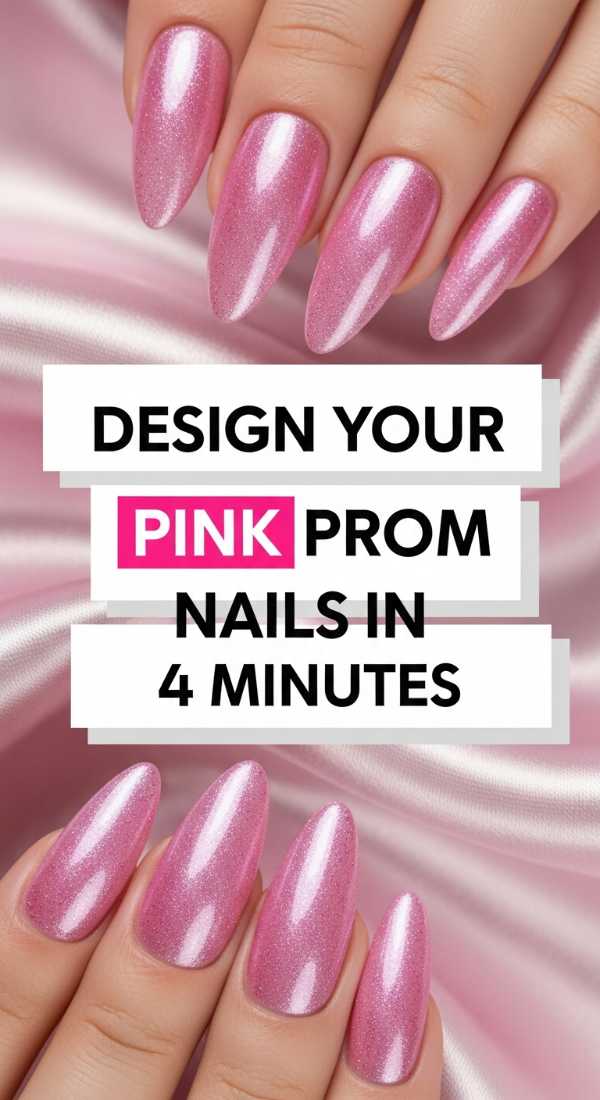
Why to love this Design:
Prom is a night of magic and memories, and these pink nails are designed to be the ultimate romantic accessory. They are soft, dreamy, and take almost no time at all, so you can focus on making memories with your besties.
Essential Elements:
- Sheer ‘Ballet Slipper’ pink polish
- Iridescent flakes
- Fast-drying top coat
How to Prepare:
- Apply one coat of sheer pink for a clean base.
- While wet, press iridescent flakes onto the tips.
- Apply a second thin layer of pink to ‘sandwich’ the flakes.
- Seal with a 60-second top coat.
Budget Range
- Essie Sheer Polish: $9
- Iridescent Nail Flakes: $5
- Seche Vite Top Coat: $10
Master the Tuscan 2000s look with 3 techniques
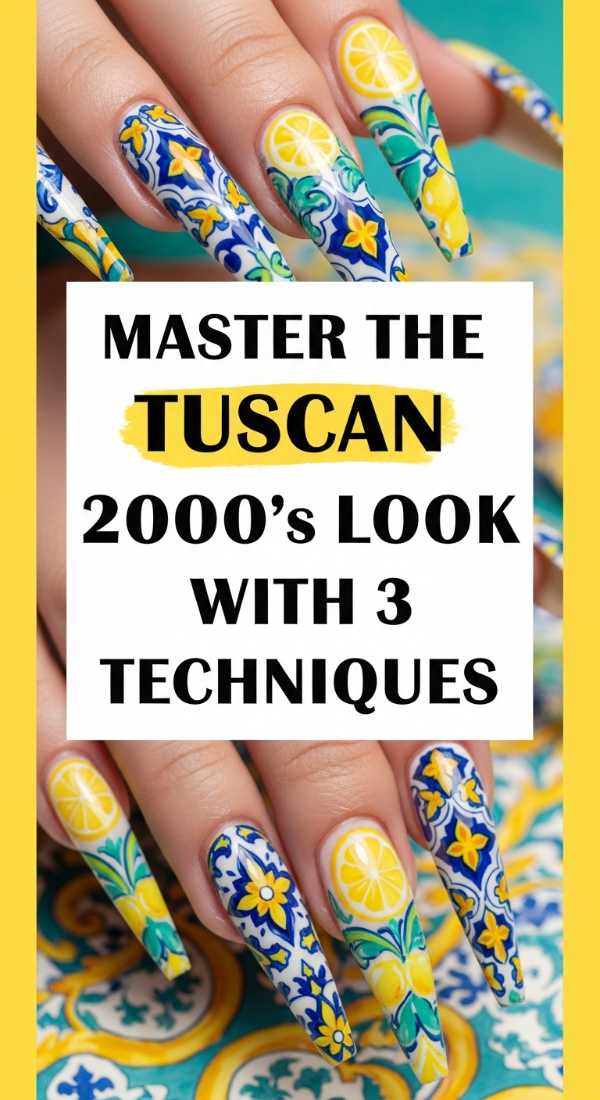
Why to love this Design:
This look is a beautiful marriage between the earthy tones of a Tuscan sunset and the edgy, textured vibes of the early 2000s. It feels sophisticated yet grounded, perfect for the woman who loves a bit of vintage flair.
Essential Elements:
- Terracotta orange polish
- Sponge for gradient
- Gold leaf accents
How to Prepare:
- Sponge a gradient of terracotta and nude from the cuticle up.
- Use a dry brush technique to streak olive green across the middle.
- Apply gold leaf randomly for a weathered, rustic finish.
Budget Range
- Terracotta Polish: $8
- Cosmetic Sponges: $3
- Gold Leaf Sheet: $6
Paint bold red spring nails in 2 layers
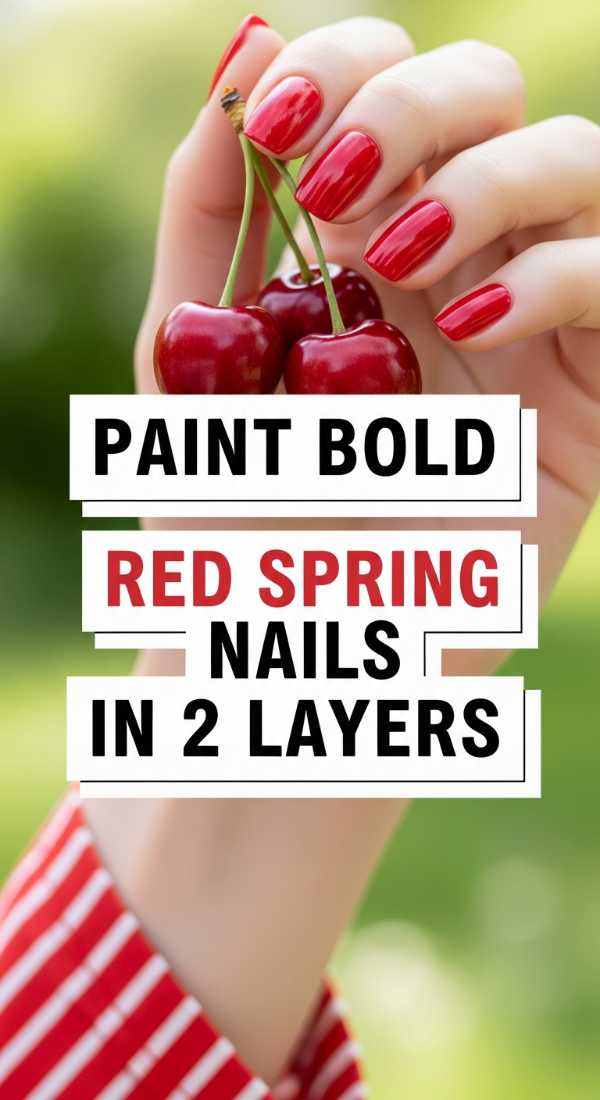
Why to love this Design:
Red is a classic for a reason, but for Spring 2026, we’re going for a ‘Cherry Jelly’ vibe. It’s vibrant, high-energy, and looks stunning against the blooming flowers of the season.
Essential Elements:
- Translucent red jelly polish
- High-gloss top coat
How to Prepare:
- Apply the first layer of jelly red, ensuring even coverage.
- Apply a second, slightly thicker layer to build depth and ‘squishiness’.
Budget Range
- Zoya Jelly Polish: $12
- Glossy Top Coat: $8
Create a blue tropical nail set in 6 stages
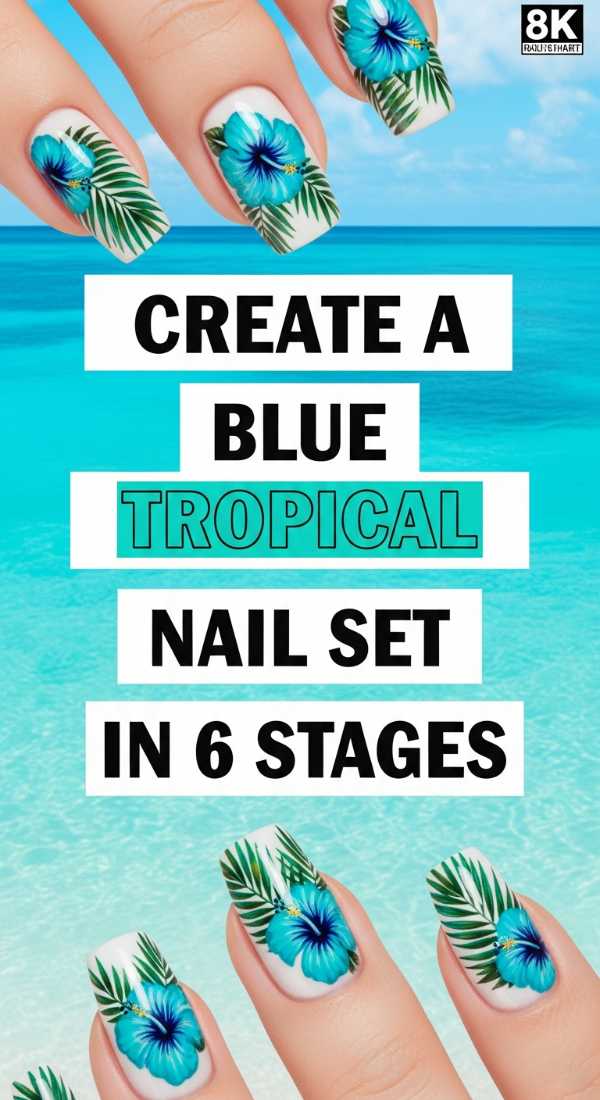
Why to love this Design:
Close your eyes and imagine the turquoise waters of a hidden cove. This design brings the ocean to your fingertips, using layers of blue to create a sense of depth and movement that is absolutely mesmerizing.
Essential Elements:
- Teal, Navy, and White polishes
- Detailing brush
- Small mixing palette
How to Prepare:
- Base coat with a pale sandy beige.
- Dab teal polish on the top half for the shallow water.
- Add navy at the very tips for the deep ocean.
- Blend the edges with a clean brush.
- Add white ‘sea foam’ ripples using a fine liner.
- Finish with a UV gel top coat.
Budget Range
- Blue Polish Trio: $20
- Detailing Brushes: $10
- UV Lamp (entry level): $25
Apply butter yellow chrome in 3 simple swipes
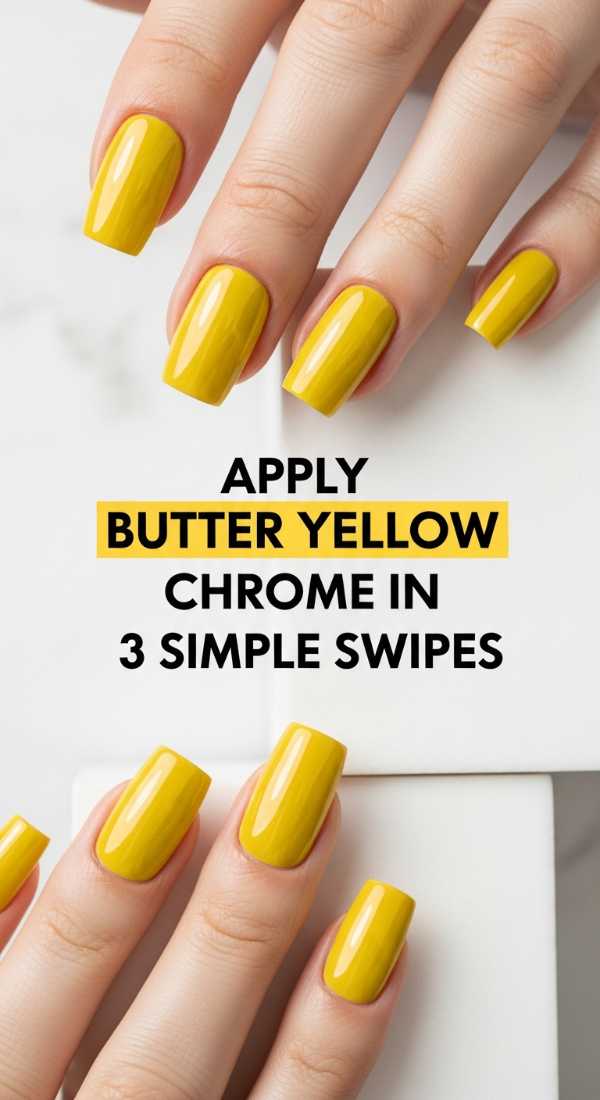
Why to love this Design:
Butter yellow is the breakout color of 2026! It’s soft, sunny, and when paired with a chrome finish, it looks like liquid gold but softer. It’s like wearing a little bit of sunshine even on a cloudy day.
Essential Elements:
- Butter yellow gel polish
- Pale gold chrome powder
- Silicone applicator
How to Prepare:
- Swipe on your yellow base and cure.
- Swipe the chrome powder firmly over the ‘no-wipe’ top coat.
- Seal with a final swipe of top coat to lock in the glow.
Budget Range
- Butter Yellow Gel: $10
- Chrome Powder: $7
- Silicone Tools: $4
Style gothic spring nails with 5 edgy details

Why to love this Design:
Who says spring has to be all pastels? This ‘Gothic Spring’ look is for my loves who embrace the shadows. It’s a beautiful contrast of delicate floral shapes and dark, moody textures.
Essential Elements:
- Matte black polish
- Deep purple shimmer
- Stud accents
- Spider gel
- Stamping plate
How to Prepare:
- Paint nails matte black.
- Stamp a delicate floral pattern in dark purple.
- Add a single silver stud at the base of the ring finger.
- Drag spider gel across the tips for a web effect.
- Cure and leave matte for a velvet-goth feel.
Budget Range
- Matte Black Polish: $9
- Spider Gel: $8
- Nail Studs: $5
Match hands and toes in 10 minutes flat

Why to love this Design:
There is an undeniable sense of ‘put-togetherness’ when your mani and pedi match perfectly. This quick-dry method is a lifesaver for busy mornings when you still want to feel like a queen.
Essential Elements:
- Matching ‘Tonal’ polish set
- Quick-dry drops
How to Prepare:
- Prep all 20 nails at once.
- Apply one coat to all, then immediately the second.
- Add quick-dry drops to every nail to set them instantly.
Budget Range
- Mani-Pedi Set: $15
- Dry Drops: $10
Dazzle with lavender sparkle nails in 4 phases
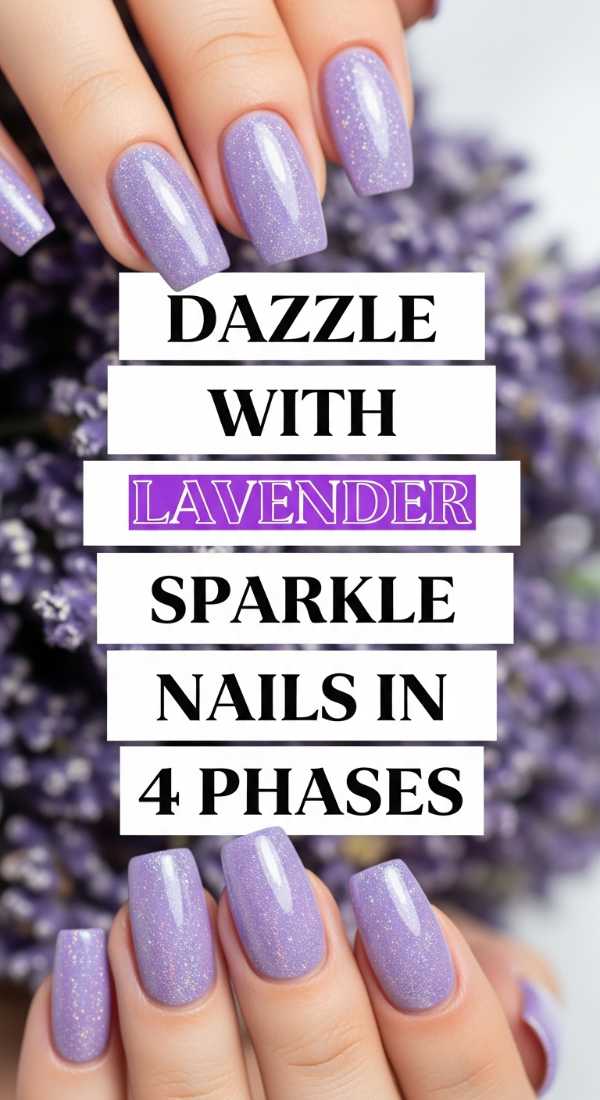
Why to love this Design:
Lavender is the color of serenity. Adding a holographic sparkle makes it feel magical and ethereal. It’s the perfect design for those days when you need a little extra sparkle in your step.
Essential Elements:
- Lavender cream polish
- Holographic glitter topper
- Sponge (for glitter density)
How to Prepare:
- Paint a solid lavender base.
- Sponge glitter onto the tips for an ombre effect.
- Add a sparse layer of glitter over the whole nail.
- Apply a plump top coat to smooth the texture.
Budget Range
- Lavender Polish: $11
- Holo Topper: $13
Sketch funky sunflower nail art in 7 strokes
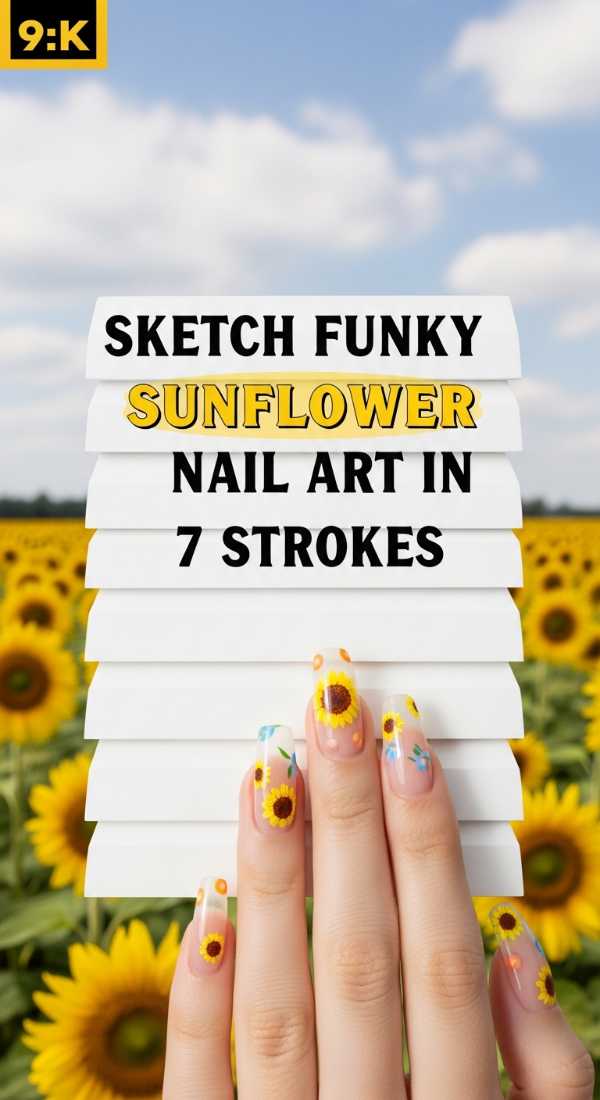
Why to love this Design:
Sunflowers represent loyalty and longevity. This funky, minimalist version is so easy to do but looks like you spent hours at a salon. It’s a happy, bright design that always starts a conversation.
Essential Elements:
- Mustard yellow polish
- Chocolate brown polish
- Dotting tool
How to Prepare:
- Place a brown dot in the center.
- Stroke 1-3: Petals on the top.
- Stroke 4-6: Petals on the bottom.
- Stroke 7: A tiny green leaf flourish at the base.
Budget Range
- Mustard Polish: $8
- Dotting Tool Set: $5
Conclusion
And there you have it, my loves! Whether you’re feeling the moody vibes of a Gothic Spring or the sunny glow of butter yellow chrome, I hope these designs inspire you to take a little ‘me time’ this week. Remember, your nails are just another way to express the beautiful soul you have inside. Don’t be afraid to experiment, make mistakes, and most importantly, have fun with it. Sending you so much love and light until our next chat!