
There is something inherently soul-soothing about an outdoor gathering. When the golden hour light filters through the leaves of an old oak tree and the air carries the faint scent of blooming jasmine, the world feels momentarily perfect. Whether it is a milestone graduation or a simple summer evening with family, hosting under the open sky allows us to reconnect with nature and each other in a way that four walls simply cannot accommodate.
I have always believed that the most memorable celebrations aren’t just about the food or the guest list; they are about the atmosphere you curate. It is in the soft glow of a string of lanterns, the plush texture of an outdoor rug underfoot, and the thoughtful details that tell your guests they are cherished. In this guide, we are diving deep into ten whimsical ways to transform your outdoor spaces into enchanted realms of joy and relaxation.
How to Plan a Magical Outdoor Prom Send Off for Unforgettable Memories

Why we love this
A prom send-off is a rite of passage, a fleeting bridge between childhood and the shimmering horizon of adulthood. We love this because it turns a frantic photo session into a serene, cinematic experience where the rustle of silk gowns meets the gentle whisper of the evening breeze. Imagine a garden filled with the scent of white roses and the soft sparkle of fairy lights reflecting in the eyes of teenagers full of hope; it creates a backdrop that makes every snapshot look like a frame from a classic film.
Essential Elements:
- A defined floral archway or “red carpet” path.
- Coordinated refreshments like sparkling cider and artisanal hors d’oeuvres.
- Soft, diffused landscape lighting.
- A curated playlist of acoustic versions of popular songs.
- Lush greenery and silk ribbons draped from tree branches.
How to make it
- Select a focal point in your yard, preferably against a backdrop of dense foliage or a charming fence, to serve as the main photography zone.
- Construct a floral arch using a sturdy metal frame, securing long-stemmed roses and eucalyptus with green floral wire to ensure they remain vibrant throughout the event.
- Set up a “refreshment station” on a vintage wooden table, layering a lace runner and silver trays to elevate the aesthetic; place chilled glassware in a neat grid to encourage self-service.
- Install warm-white LED string lights zigzagging above the area, ensuring the wires are taut and high enough to stay out of photos but low enough to cast a romantic glow.
- Mark the walkway with low-profile lanterns filled with battery-operated candles, creating a safe yet glowing path for the prom-goers to walk as they make their grand entrance.
How to Create an Inviting Summer Front Porch for Maximum Curb Appeal

Why we love this
The front porch is the handshake of your home, offering the first warm embrace to neighbors and friends alike. We love this transformation because it blends the comfort of an interior living room with the refreshing vitality of the outdoors, turning a transitional space into a destination. Picture yourself sipping ice-cold lemonade in a rocking chair, the aroma of petunias heavy in the humid air, while the rhythmic creak of wood provides a heartbeat to your lazy Sunday afternoon.
Essential Elements:
- Weather-resistant rocking chairs or a porch swing.
- Over-sized ceramic planters with a mix of thriller, filler, and spiller plants.
- A high-quality outdoor rug with a classic pattern.
- Decorative pillows in sun-drenched hues like terracotta and sage.
- A stylish, functional side table for drinks and books.
How to make it
- Deep clean the porch floor and railings using a mild soap solution and a stiff brush, removing all dust and winter grime to create a pristine canvas.
- Measure your porch dimensions and select an outdoor rug that leaves at least six inches of floor visible on all sides, centering it to anchor the seating arrangement.
- Position your largest pieces of furniture—like a bench or rockers—facing slightly inward toward each other to facilitate conversation, rather than just facing the street.
- Plant your containers using the “thriller” (tall center plant), “filler” (mounded middle plants), and “spiller” (trailing vines) method to create a professional, lush look.
- Layer in textiles by adding UV-protected pillows and a lightweight throw blanket, choosing colors that complement your home’s exterior paint for a cohesive, designer finish.
How to Bake Beautifully Decorated Graduation Cookies for Your Favorite Scholars

Why we love this
Nothing says “I’m proud of you” quite like a custom-made treat that tastes as good as it looks. We love these graduation cookies because they offer a tactile and delicious way to celebrate academic achievements, filling the kitchen with the buttery, sweet aroma of vanilla bean and toasted sugar. The satisfying snap of the royal icing and the soft, melt-in-your-mouth texture of the shortbread create a sensory delight that honors the hard work of the graduate in the sweetest way possible.
Essential Elements:
- High-quality butter and pure vanilla bean paste.
- Graduation-themed cookie cutters (caps, gowns, diplomas).
- Royal icing in both “stiff” and “flood” consistencies.
- Edible gold luster dust and fine-tipped brushes.
- Food-grade gel colors in school colors.
How to make it
- Cream chilled butter and granulated sugar together for exactly three minutes until fluffy, then incorporate your dry ingredients slowly to prevent over-working the gluten, which ensures a tender crumb.
- Roll the dough between two sheets of parchment paper to a consistent 1/4 inch thickness and chill for one hour before cutting shapes to prevent spreading during the bake.
- Bake at 350°F (175°C) on a heavy-duty baking sheet for 10-12 minutes, removing them just as the edges turn a pale golden color to maintain a soft center.
- Outline the cooled cookies with stiff-consistency royal icing using a #2 piping tip, then immediately fill the centers with flood-consistency icing, using a scribe tool to pop any air bubbles.
- Once the base layer has dried for 12 hours, mix gold luster dust with a drop of vodka and paint fine details like tassels and year dates for a professional, high-shine finish.
How to Style a Stunning Deck for Relaxed Outdoor Living
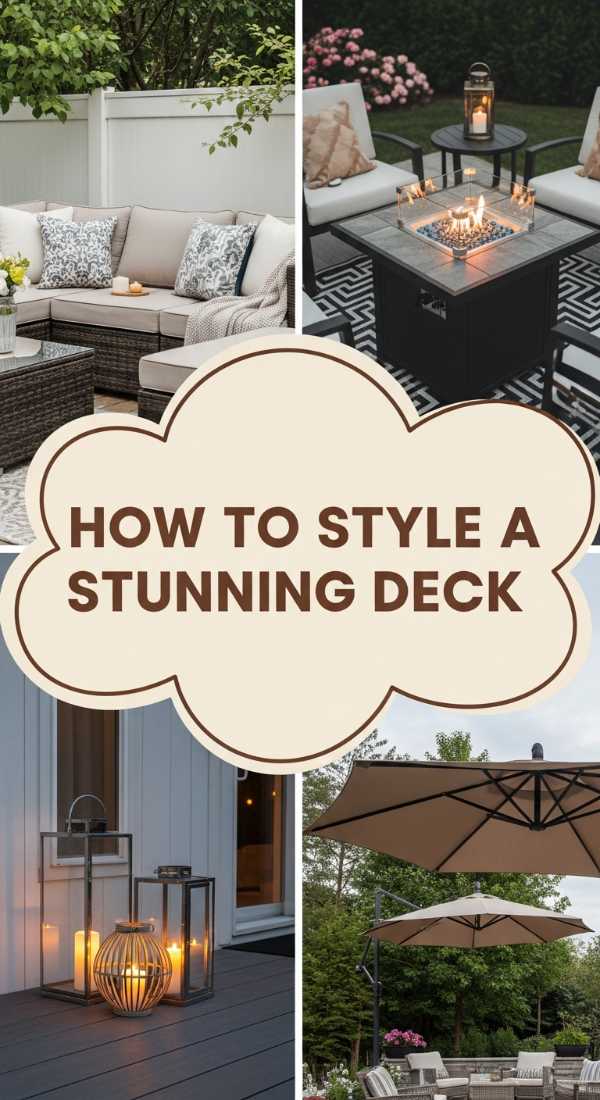
Why we love this
A well-styled deck acts as a private sanctuary where the stresses of the day melt away into the evening mist. We love this approach because it emphasizes comfort without sacrificing elegance, using soft textures and organic materials to bridge the gap between the structured house and the wild garden. It’s the feeling of plush cushions against your back and the sight of candlelight flickering against a dark wood grain that makes an ordinary Tuesday feel like a luxury vacation.
Essential Elements:
- Modular outdoor sectional sofa.
- Natural jute or sisal rugs for an organic feel.
- Solar-powered accent lighting and hurricanes.
- Potted citrus trees or tall grasses for privacy screens.
- A minimalist fire table for warmth and ambiance.
How to make it
- Define specific zones for lounging and dining by placing separate rugs to visually break up the large wooden expanse of the deck.
- Arrange modular seating in an L-shape to maximize corner space, ensuring there is a clear walking path of at least 30 inches around all furniture.
- Integrate vertical elements like tall planters or a privacy trellis covered in climbing ivy to create a sense of enclosure and intimacy in an open space.
- Place oversized lanterns at varying heights—some on the ground, some on tables—to create a layered lighting effect that eliminates harsh shadows.
- Accessorize with functional decor, such as a large wooden tray for carrying snacks and a basket of rolled-up towels or blankets for cooler evenings.
How to Design a Back Deck Oasis for Cozy Family Gatherings
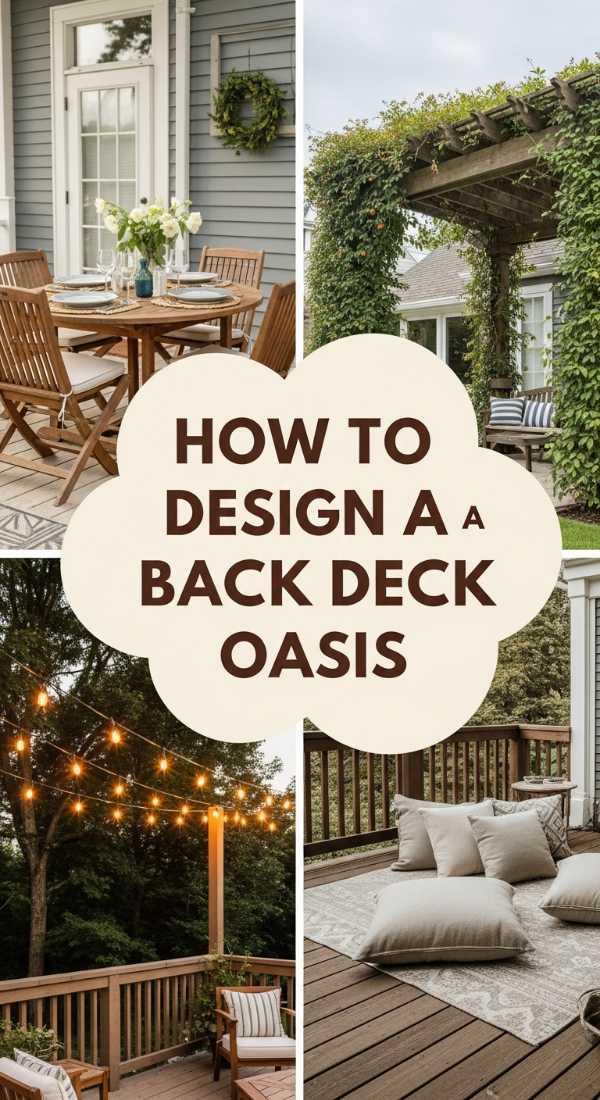
Why we love this
The back deck is the heart of family life during the warmer months, a place where stories are told and laughter rings out long after the sun has set. We love this oasis concept because it focuses on “togetherness,” creating a safe, comfortable nook that encourages everyone to put down their phones and engage. The warmth of a fire pit, the soft touch of a chunky knit throw, and the ambient hum of the outdoors create a cocoon of comfort that strengthens family bonds.
Essential Elements:
- A circular seating arrangement to foster conversation.
- Soft, durable outdoor fabrics that can withstand spills.
- A central fire pit or hearth.
- Ambient string lights hung in a “maypole” pattern.
- Built-in storage for outdoor games and toys.
How to make it
- Position a low-profile fire pit at the center of your deck, ensuring it is placed on a heat-protective mat to safeguard the wood or composite decking below.
- Arrange deep-seated armchairs in a full circle around the fire pit, leaving enough space for legs to stretch out comfortably without being too close to the heat.
- Hang string lights from a central pole or the house eaves, radiating outward like a canopy to create a “ceiling” effect that makes the space feel like a room.
- Incorporate “living decor” by surrounding the perimeter with aromatic herbs like lavender and mint, which smell wonderful and naturally deter pests.
- Add a weather-proof chest to one corner, filling it with plush pillows and fleece blankets so the family can stay outside even as the temperature dips at night.
How to Maximize a Tiny Deck for Big Style and Comfort

Why we love this
Small spaces have a secret superpower: they are inherently cozy. We love maximizing a tiny deck because it forces a curation of only the most beautiful and functional items, resulting in a space that feels intentional and jewel-box-like. It is about the clever use of a corner, the sparkle of a hanging lantern, and the way a single well-placed plant can make a small balcony feel like a lush hidden forest in the middle of the city.
Essential Elements:
- Bistro-style folding furniture.
- Vertical wall planters to save floor space.
- Over-the-rail flower boxes.
- Multi-functional pieces like a stool that doubles as a side table.
- Light-colored textiles to make the space feel larger.
How to make it
- Clear all clutter from the deck floor and use a vertical storage rack for any necessary tools, keeping the limited floor area dedicated strictly to seating.
- Install a rail-mounted bar table that clips onto the deck railing, providing a surface for drinks or a laptop without the footprint of a traditional table.
- Hang a series of wall-mounted pockets or a wooden pallet planter to grow succulents or herbs vertically, drawing the eye upward and creating a lush green backdrop.
- Choose furniture with slim profiles and open frames; bulky pieces will swallow the space, while airy metal or mesh chairs maintain a sense of openness.
- Place a large mirror on a protected wall to reflect light and the view, a classic design trick that visually doubles the size of your small outdoor sanctuary.
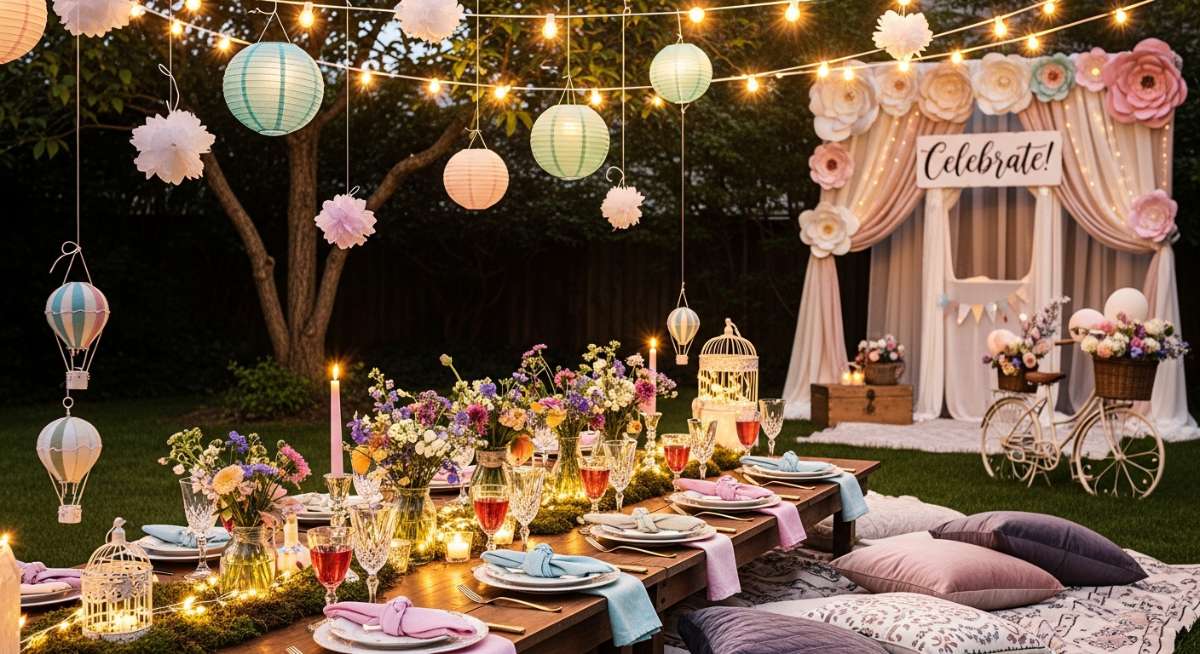
How to Arrange Dreamy Outdoor Prom Decorations for the Best Photo Ops

Why we love this
In the age of social media, the photo backdrop is just as important as the event itself. We love these dreamy decorations because they focus on light and texture to create a professional-grade photography studio right in your backyard. The way sheer chiffon catches the wind and the soft glow of Edison bulbs smooths out skin tones makes everyone feel like a star, capturing the magic of youth in every single frame.
Essential Elements:
- Large-scale floral installations or flower walls.
- Vintage furniture pieces like a velvet settee.
- Professional-grade ring lights hidden within decor.
- Sheer drapery and cascading ribbons.
- Prop baskets with elegant masks or vintage cameras.
How to make it
- Build a simple 7×7 foot frame using PVC pipe or wood, then drape it with heavy-weight white chiffon, bunching the fabric to create deep, luxurious folds.
- Attach a mix of real and high-quality silk flowers to the top corner of the frame, allowing some vines to trail down for a whimsical, “secret garden” aesthetic.
- Position a vintage-style chair or velvet bench three feet in front of the backdrop to create depth and allow for seated or standing poses.
- Place two tall floor lamps with warm-toned bulbs on either side of the photographer’s position to eliminate shadows on the faces of the subjects.
- Scatter gold-painted eucalyptus leaves or rose petals on the ground at the base of the backdrop to ground the scene and add a final touch of luxury to the floor.
How to Refresh Your Sunny Porch Space for the Ultimate Summer Vibe
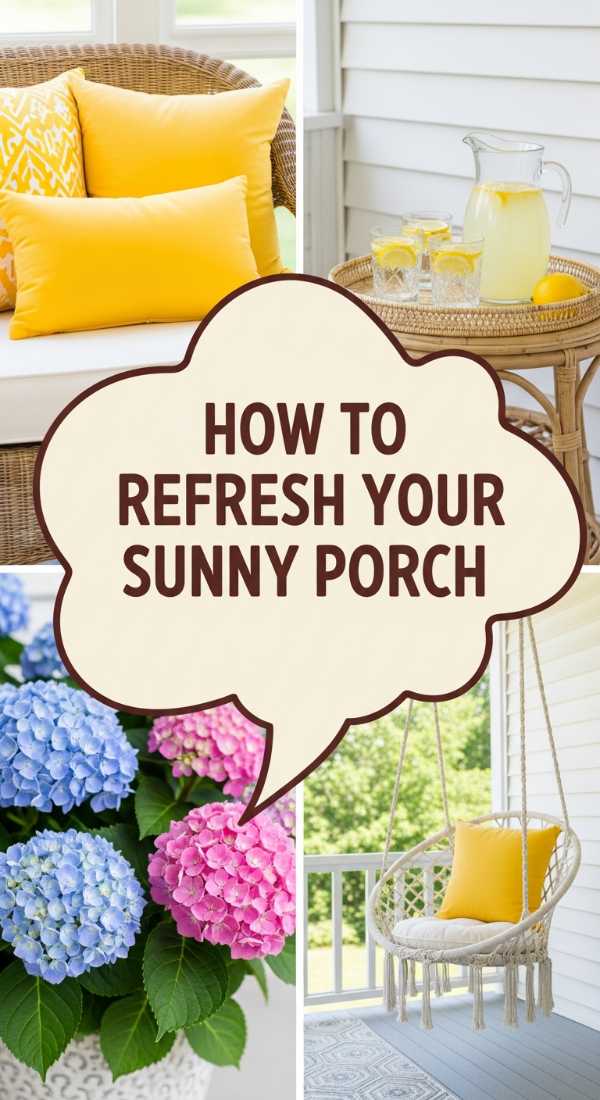
Why we love this
There is a specific kind of joy found in a sun-drenched porch that smells like fresh paint and citrus. We love a summer refresh because it’s an energetic reset, clearing away the stagnation of winter and replacing it with vibrant colors and light fabrics. It’s the visual equivalent of an ice-cold glass of tea—refreshing, bright, and invigorating—making your home feel like the ultimate summer retreat every time you step through the door.
Essential Elements:
- Bright, citrus-inspired color palette (yellow, lime, orange).
- Natural fiber accessories like seagrass baskets.
- New, high-traction outdoor rugs.
- Freshly painted front door in a bold accent color.
- Modern, sleek house numbers and hardware.
- UV-resistant outdoor curtains.
How to make it
- Remove all old decor and give the porch floor a fresh coat of slip-resistant deck paint in a light gray or sand color to brighten the entire entrance.
- Swap out dated light fixtures for modern black or brass lanterns that accommodate high-efficiency LED bulbs with a “daylight” temperature for a crisp look.
- Paint your front door in a vibrant shade like coral or turquoise, using a high-gloss exterior paint to make it pop against your home’s siding.
- Install a tension rod between porch pillars and hang sheer white outdoor curtains; these can be tied back for a breezy look or closed to filter intense afternoon sun.
- Update your planters with bright yellow marigolds and vibrant green ferns, then tuck in a few battery-operated candles for an effortless transition from day to night.
How to Choose Chic Deck Decor for an Elevated Hosting Experience

Why we love this
Hosting is an art form, and the right deck decor provides the perfect canvas. We love chic, elevated styling because it signals to your guests that this evening is special, moving beyond the casual barbecue into something more sophisticated and intentional. Think of marble serving trays, monochromatic color schemes, and architectural plants that create a high-end lounge vibe where cocktails taste better and conversations run deeper.
Essential Elements:
- Monochromatic furniture sets (all black, white, or charcoal).
- Marble or stone accent tables.
- Architectural plants like structural agaves or boxwood spheres.
- High-quality linen napkins and slate coasters.
- Integrated Bluetooth speakers hidden within the landscape.
How to make it
- Select a primary neutral color for your large furniture and use only one accent metal (like matte black or brushed gold) for all hardware and accessories.
- Invest in a heavy stone or concrete coffee table to serve as a permanent, wind-proof centerpiece that adds a sense of permanence and luxury to the deck.
- Style your surfaces with “still life” vignettes: a tray with a glass carafe, a single sculptural bowl, and a stack of coffee table books about architecture or travel.
- Replace standard deck railing with glass panels or thin black cables to minimize visual obstruction and keep the focus on the surrounding landscape.
- Coordinate your tableware with your decor; use heavy-weighted acrylic glassware that mimics crystal to provide a luxury feel without the risk of breakage outdoors.
How to Craft Elegant Graduation Cookies for a Sophisticated Celebration

Why we love this
For the graduate who prefers a touch of class over traditional bright colors, these elegant cookies are a masterpiece. We love this sophisticated approach because it uses a restricted palette—think whites, creams, and metallics—to create a treat that looks more like jewelry than a snack. The intricate piping of delicate lace patterns and the shimmer of edible gold leaf provide a refined finish that celebrates a massive achievement with grace and style.
Essential Elements:
- White and ivory royal icing in various consistencies.
- Genuine 24k edible gold leaf sheets.
- Ultra-fine detail piping tips (#00 or #0).
- Clear vanilla extract or lemon juice for mixing lusters.
- Sanding sugar or edible pearls for texture.
How to make it
- Prepare a classic almond-flavored sugar cookie dough, ensuring it is chilled thoroughly so the edges remain sharp and defined during the baking process.
- Flood the cookies with a high-gloss ivory icing and allow them to dry in a dehydrator or in front of a fan for at least 4 hours to achieve a perfectly smooth, crater-free surface.
- Apply small flakes of edible gold leaf using a dry, soft brush, pressing them gently onto the icing while it is still slightly tacky for a distressed, high-end look.
- Use a #00 tip to pipe intricate “embroidery” patterns or the graduate’s initials in a stiff-peak white icing, creating a 3D effect that catches the light.
- Finish the edges with a thin border of tiny edible pearls, applying them one by one with tweezers for a level of detail that conveys true artisanal craftsmanship.
Creating Memories Under the Stars
As the season of celebration unfolds, remember that the most beautiful element of any outdoor space is the people who fill it. Whether you are decorating a tiny balcony or a sprawling back deck, the goal is always the same: to create a place where memories can take root. Use these tips to build your oasis, but don’t forget to put down the tools and enjoy the magic you’ve created. Here’s to a summer of laughter, light, and perfectly decorated cookies!
Frequently Asked Questions
Your outdoor hosting and decor questions, answered.