

Hello my loves! Welcome back to my cozy little corner of the internet. Grab a warm cup of herbal tea, wrap yourself in your favorite knit blanket, and let’s just breathe for a moment together. My heart has been so full lately as I watch the seasons shift, and it’s inspired me to bring some of that gentle, outdoor magic right into the heart of our sanctuary spaces.
Today, I want to share something that has been fluttering around my soul like a butterfly: the art of making our homes feel like a soft, living dream. We spend so much of our lives within these walls, and I truly believe every corner should feel like a cloud-soft embrace. Whether you have a sprawling meadow or a tiny sun-drenched balcony, these viral trends are all about nurturing your spirit through your surroundings.
5 steps to create DIY Mushroom Garden Decor
Why we love this
There is something inherently mystical about the way mushrooms peek through the moss, like little secrets whispered by the earth itself. Bringing these whimsical shapes into your garden adds a touch of fairytale charm that instantly softens the landscape and invites a sense of wonder into your daily routine. It’s a gentle reminder that magic is everywhere if we only take the time to look down at the soil and smile.
Ingredients
- Medium-sized terracotta pots and saucers
- Outdoor-grade acrylic paint in crimson, cream, and moss green
- Heavy-duty waterproof construction adhesive
- Clear UV-resistant spray sealant
- Assorted river stones for the base
How to make it
- Begin by cleaning your terracotta pieces thoroughly to ensure the paint bonds beautifully to the porous surface.
- Invert your pots to serve as the stems and paint them a soft, creamy white, adding a few brown flecks for a natural, earthy texture.
- Paint the undersides and tops of the saucers with a vibrant red, then once dry, use a sponge to dab on irregular white circles for that iconic toadstool look.
- Apply a generous bead of waterproof adhesive to the bottom rim of the inverted pot and firmly press the painted saucer on top, centering it carefully.
- Allow the glue to cure for 24 hours before applying two thin coats of clear sealant to protect your new fungal friends from the sun and rain.
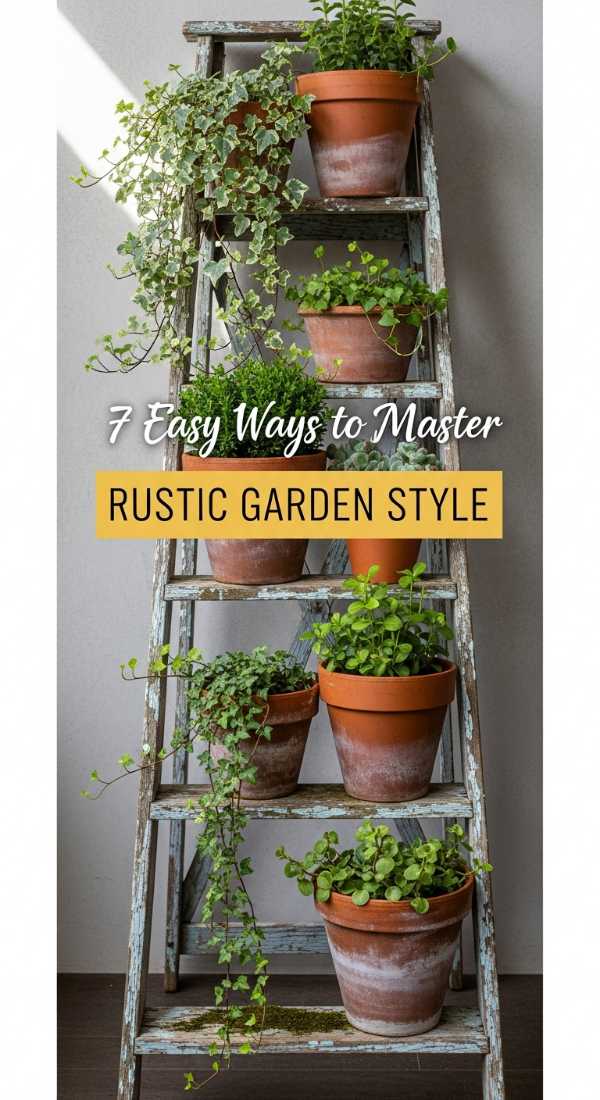
7 easy ways to get the Rustic Garden Decor look

Why we love this
Rustic decor is like a warm hug from the past, celebrating the beauty of imperfection and the stories told by weathered wood and rusted iron. It grounds us in a world that often feels too fast and too digital, providing a tactile connection to the heritage of the land. We love how these elements seem to grow more beautiful with every rainstorm, gaining a patina that only time and love can truly provide.
Ingredients
- Vintage galvanized steel buckets or watering cans
- Reclaimed wooden crates or old ladders
- Burlap ribbon or thick twine
- Wrought iron lanterns with battery-operated candles
- Weathered stones or antique bricks
How to make it
- Scour local thrift shops or antique markets for galvanized metal containers that have developed a soft, matte grey finish over the years.
- Arrange weathered wooden crates at varying heights to create a tiered display for your favorite potted herbs and trailing ivy.
- Use an old wooden ladder as a vertical garden, leaning it against a fence and hanging small terracotta pots from the rungs using sturdy twine.
- Wrap burlap ribbon around the necks of glass jars to create rustic vases for freshly cut wildflowers from your yard.
- Scatter wrought iron lanterns throughout your greenery to provide a soft, amber glow that mimics the warmth of a flickering hearth at sunset.
- Line your garden paths with reclaimed bricks or large river stones to give the impression of a walkway that has been there for generations.
- Incorporate a vintage bicycle or a rusted wheelbarrow as a focal point, filling it with an abundance of overflowing petunias or cascading ferns.
10 easy ways to upgrade your DIY Garden Decor
Why we love this
Upgrading your space doesn’t have to mean starting over; it’s about layering new textures and tiny details that breathe fresh life into what you already cherish. These little elevations act as jewelry for your garden, catching the light and drawing the eye to the special moments you’ve cultivated with your own two hands. It turns a simple outdoor area into a curated gallery of your personal style and creative journey.
Ingredients
- Solar-powered fairy lights on copper wire
- Decorative glass pebbles or sea glass
- Weatherproof outdoor cushions in linen textures
- Hand-painted plant markers made from flat stones
- Copper spray paint for metallic accents
How to make it
- Thread copper wire fairy lights through the branches of your shrubs to create an ethereal, glowing canopy that comes alive as the sun dips low.
- Press colorful sea glass into the soil around your potted plants to catch the morning dew and reflect soft rainbows onto the leaves.
- Refresh tired wooden furniture with a quick sanding and a coat of soft sage or dusty rose exterior paint for an instant cottagecore vibe.
- Create custom plant markers by hand-lettering herb names onto smooth river stones using a permanent gold paint pen for a touch of elegance.
- Give plastic or plain ceramic pots a high-end makeover by applying a light mist of copper spray paint around the rims for a metallic glow.
- Add a layer of visual comfort by tossing weather-resistant linen pillows onto your garden benches, choosing muted tones that blend with nature.
- Install a simple birdbath and surround it with low-growing flowering thyme to encourage wildlife to visit and linger in your sanctuary.
- Hang a collection of vintage mirrors on a shaded fence to bounce light into darker corners and make your garden feel twice as large.
- Use thick manila rope to create decorative borders around your flower beds, securing them with small wooden stakes for a nautical-meets-earthy look.
- Replace standard plastic hanging baskets with macramé plant hangers made from thick cotton cord to add vertical interest and bohemian texture.
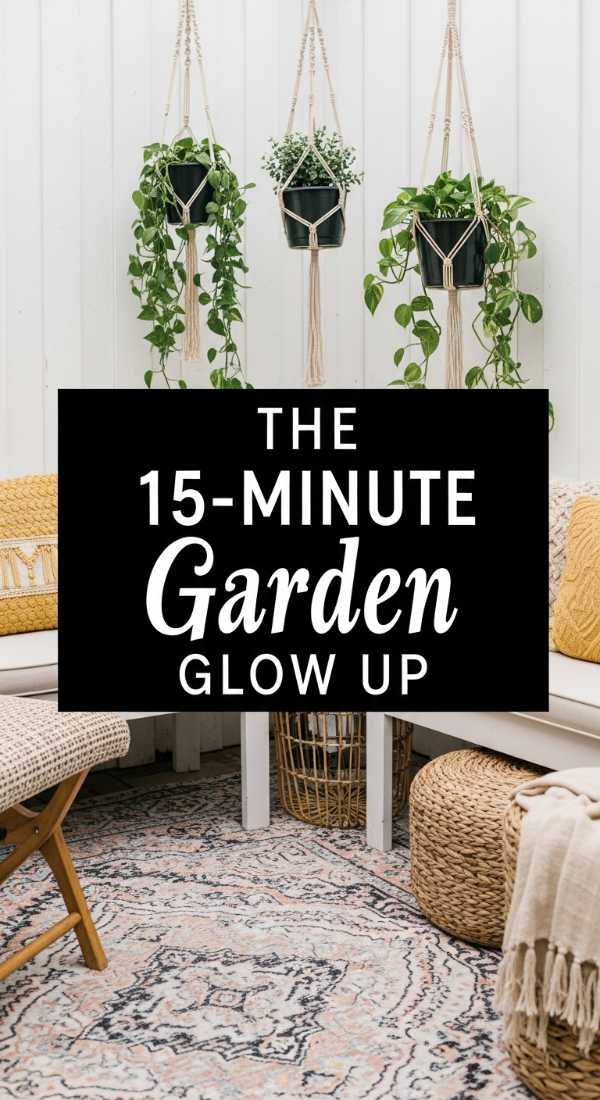
How to get the Boho Garden look in 15 minutes
Why we love this
The boho look is all about freedom, soul, and a lack of rigid rules, making it the perfect style for those who want their garden to feel like an extension of their living room. It’s an effortless blend of global textures and cozy nooks that invites you to kick off your shoes and feel the grass between your toes. This style is pure magic because it feels lived-in, loved, and completely unpretentious from the very first moment.
Ingredients
- A vibrant, weather-resistant Moroccan or Persian-style rug
- Assorted floor poufs and oversized outdoor floor pillows
- A lightweight macramé or cotton fringe hammock
- Strands of large-bulb Edison outdoor lights
- Potted pampas grass or tall structural ferns
How to make it
- Clear a flat area of grass or decking and roll out a large, patterned outdoor rug to immediately define the space as a cozy lounge.
- Toss a mix of floor poufs and textured pillows in the center of the rug to create an inviting seating area that encourages lounging and deep conversation.
- Find two sturdy trees or install heavy-duty hooks to hang a fringed hammock, draping a soft throw blanket over it for ultimate comfort.
- Drape Edison bulb string lights in a zig-zag pattern overhead, low enough to create an intimate “ceiling” of warm, golden light.
- Place large potted pampas grass in the corners of your rug to add height and a soft, feathery texture that dances beautifully in the breeze.
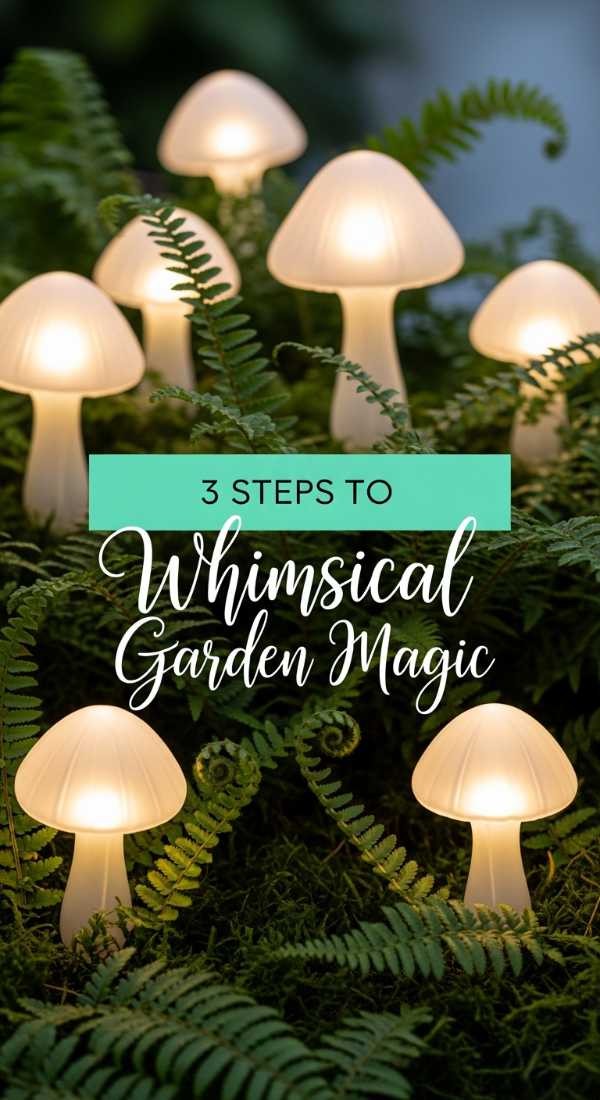
3 steps to create Enchanted DIY Mushroom Garden Decor
Why we love this
This “enchanted” version takes the classic mushroom DIY and adds a layer of iridescent dreaminess that feels like it belongs in a moonlit glade. It’s for the dreamers who love the way light plays on water or the shimmering wings of a dragonfly during a humid summer afternoon. These mushrooms don’t just sit in the garden; they glow with a quiet, internal radiance that captures the imagination of anyone who wanders by.
Ingredients
- Glass bowls and slender glass vases from a thrift store
- Iridescent or holographic spray paint
- Silicone waterproof sealant
- Battery-operated waterproof LED tea lights
How to make it
- Apply a very light, misting coat of iridescent spray paint to the inside of your glass bowls to create a shimmering, pearl-like finish.
- Place a waterproof LED tea light inside the glass vase, then use silicone sealant to attach the bowl (the mushroom cap) to the top of the vase (the stem).
- Position these glass mushrooms in a shaded part of the garden where they can catch the dappled sunlight during the day and glow softly at night.
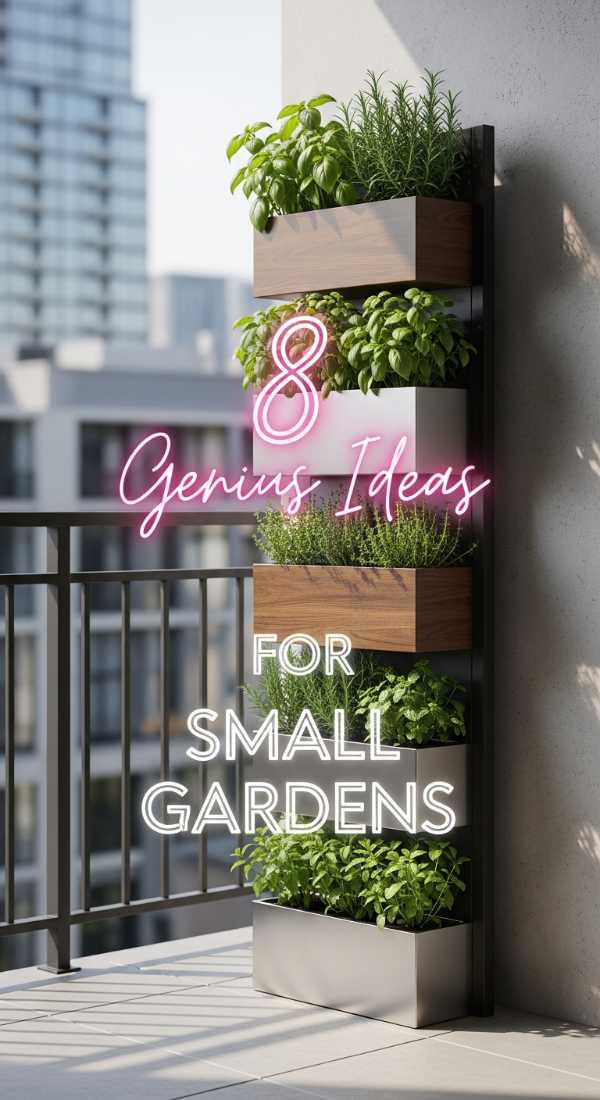
8 easy ways to use Garden Decoration Ideas for small spaces
Why we love this
Small spaces offer the beautiful opportunity to create a truly concentrated burst of personality and joy without feeling overwhelmed by maintenance. It’s about being intentional with every square inch, turning a balcony or a tiny patio into a lush, vertical sanctuary that feels like a secret garden hidden in the city. We love how small-scale gardening teaches us that you don’t need an acre to cultivate a deep connection with the natural world.
Ingredients
- Vertical wall planters or hanging pocket organizers
- Folding bistro sets in pastel colors
- Rail-mounted flower boxes
- Mirrored wall panels
- Multi-tiered plant stands
How to make it
- Utilize your vertical space by mounting wooden crates or felt pocket planters to your walls, filling them with cascading herbs and succulents.
- Choose a petite folding bistro set that can be tucked away when not in use, allowing your small space to remain flexible and open.
- Attach flower boxes directly to your balcony railings to keep the floor clear while still surrounding yourself with vibrant, seasonal blooms.
- Hang a weather-treated mirror on a brick wall to reflect your plants and create the optical illusion of a much deeper, more expansive garden.
- Use a tall, narrow multi-tiered stand to stack plants vertically, allowing you to house a dozen different species in the footprint of a single pot.
- Install a small, wall-mounted water fountain to drown out city noise with the soothing sound of trickling water, creating a peaceful auditory bubble.
- Opt for slender, tall planters rather than wide, round ones to maximize your walking path while still enjoying significant greenery.
- Wrap fairy lights tightly around your railings to illuminate the perimeter of your space without taking up any precious table or floor room.
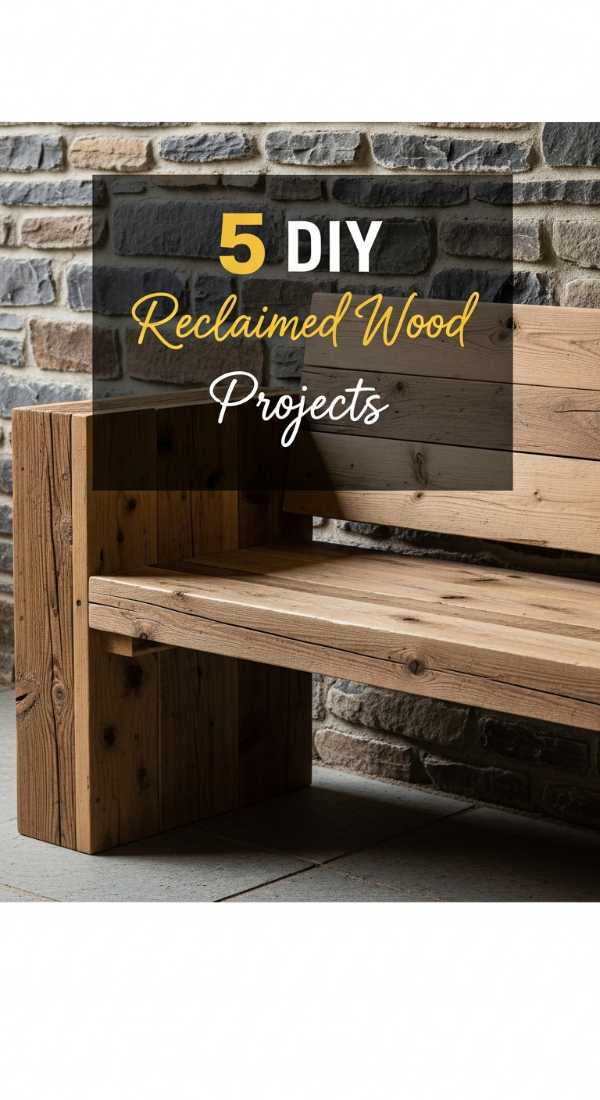
5 steps to create Rustic Garden Decor from reclaimed wood
Why we love this
Reclaimed wood carries the soul of its previous life, whether it was once a sturdy barn door or a simple shipping pallet, adding depth to your garden. There is a profound sense of satisfaction in rescuing materials and giving them a new purpose among the flowers and the buzzing bees. This approach is not only kind to our beautiful earth but also ensures that your garden decor is completely unique and full of character.
Ingredients
- Old wooden pallets or scrap cedar planks
- Rust-resistant wood screws
- Eco-friendly wood stain or wax
- Heavy-duty sandpaper
- Hammer and pry bar
How to make it
- Disassemble your pallets carefully using a pry bar, removing all old nails and sanding the rough edges to prevent splinters while keeping the texture.
- Construct a simple rectangular box frame using the sturdier planks to serve as a rustic raised garden bed or a large porch planter.
- Apply a coat of eco-friendly stain in a dark walnut or weathered grey to unify the different wood tones while letting the natural grain shine through.
- Line the inside of your wooden creation with landscape fabric to protect the wood from direct moisture and hold your potting soil securely.
- Place your reclaimed masterpiece in a sunny spot and fill it with a mix of wildflowers and structural grasses for an effortlessly organic look.
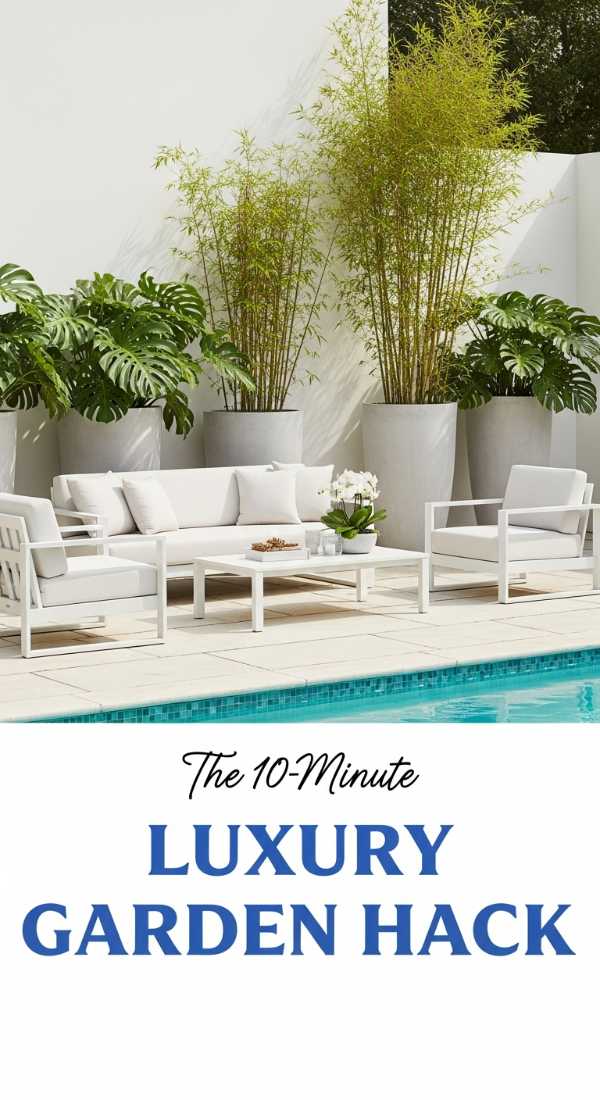
How to get the Luxury Garden Decor look in 10 minutes
Why we love this
Luxury isn’t about the price tag; it’s about the feeling of being completely pampered and cared for in your own private outdoor retreat. By focusing on high-quality textures, symmetrical arrangements, and sophisticated lighting, you can transform a simple yard into a high-end resort experience. We love how these quick shifts can make every Saturday afternoon feel like a five-star vacation in the comfort of your own home.
Ingredients
- Set of matching oversized ceramic planters
- Plush, high-thread-count outdoor throws
- Large architectural plants like Boxwoods or Agaves
- Sleek, black metal solar path lights
- A decorative outdoor tray for refreshments
How to make it
- Flank your entryway or seating area with two identical, oversized ceramic pots to create an immediate sense of grand, intentional symmetry.
- Place a single, large architectural plant in each pot to create a clean, sophisticated look that feels modern and expensive.
- Line your main walkway with sleek, uniform black solar lights, ensuring they are perfectly straight to create a polished, professional landscape feel.
- Drape a heavy, high-quality knit throw over your outdoor sofa to add a layer of tactile luxury that invites you to linger long after dark.
- Arrange a beautiful wooden tray on your outdoor table with a glass pitcher of infused water and linen napkins for a curated hospitality vibe.
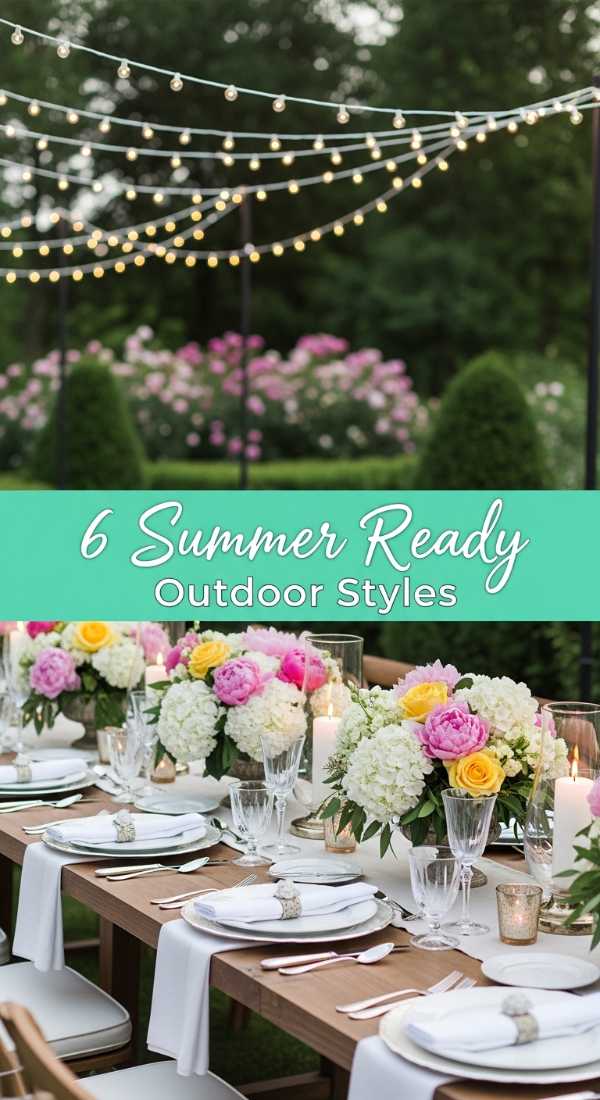
6 easy ways to style Outdoor Garden Decor for summer
Why we love this
Summer is the season of abundance, where the days stretch out long and golden, and our gardens become the true heart of our daily living. Styling for summer is about embracing vibrancy, light, and the joy of being fully present in the warmth of the sun’s soft, golden rays. It’s a time to celebrate color and create spaces that feel as bright and cheerful as a field of sunflowers dancing in the breeze.
Ingredients
- Brightly colored outdoor rugs and cushions
- Citronella candles in decorative ceramic jars
- A portable beverage cart or trolley
- Sheer outdoor curtains or fabric drapes
- Freshly potted tropical blooms
How to make it
- Swap out muted spring tones for vibrant corals, turquoises, and sunny yellows in your textiles to mirror the energy of the summer sun.
- Cluster citronella candles of varying heights on your tables to keep the bugs away while adding a warm, flickering ambiance to your evenings.
- Set up a rolling beverage cart stocked with chilled drinks and fresh mint, making it easy to serve guests without constantly heading inside.
- Hang sheer white curtains around a pergola or porch to filter the harsh afternoon sun into a soft, romantic glow that keeps the area cool.
- Incorporate tropical plants like Hibiscus or Mandevilla for an instant splash of summer color that thrives in the heat and humidity.
- Place a large galvanized tub filled with ice and colorful sodas near your seating area for a nostalgic, summery way to keep refreshed.
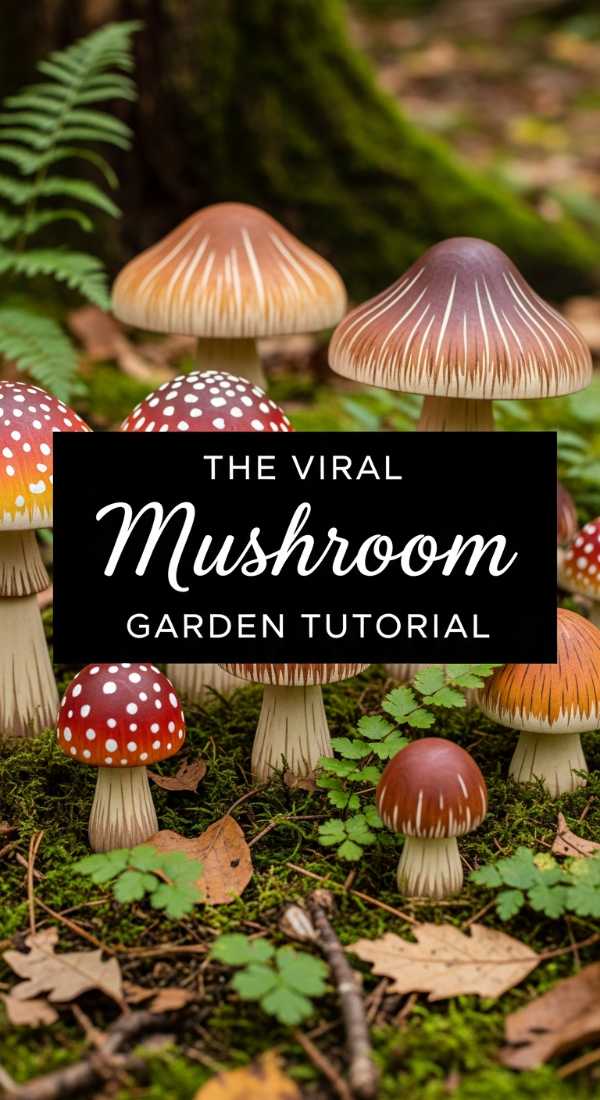
4 steps to create Viral DIY Mushroom Garden Decor
[IMAGE_10]
Why we love this
This specific viral version focuses on the “cottagecore” aesthetic that has taken the internet by storm, emphasizing soft pastels and mossy details. It’s the kind of project that looks stunning in photos but feels even better in person, adding a layer of soft, storybook charm to your planters. We love it because it’s a quick creative win that brings immediate joy to your heart and a pop of color to your social feed.
Ingredients
- Wooden salad bowls and thick dowels
- Soft pastel outdoor paints (mint, lavender, peach)
- Artificial sheet moss
- Hot glue gun with outdoor-rated glue sticks
How to make it
- Paint your wooden salad bowls in soft pastel hues and add tiny cream-colored dots using the end of a paintbrush for a delicate finish.
- Cut your dowels to various heights and paint them a soft, weathered beige to act as the stems for your colorful mushroom caps.
- Use a hot glue gun to attach the dowel to the center of the bowl’s underside, then wrap the base of the “stem” in artificial moss.
- Stake these into your indoor or outdoor planters, nestling them among the real leaves to create a charming, multi-layered miniature world.
A Soft Place to Land
Oh, my loves, I hope these ideas have sparked a little light in your beautiful souls. Remember, your home and garden are reflections of the love you carry within you. There is no right or wrong way to decorate—there is only your way. I can’t wait to see how you transform your spaces into your own personal sanctuaries. Until next time, keep blooming, keep dreaming, and keep making the world a little more beautiful, one corner at a time.